

The <canvas> element, introduced in HTML5, allows developers to dynamically create bit map graphics using JavaScript. In this tutorial you will learn about some of the basic operations supported by the <canvas> element and create a simple animation using JavaScript.
Canvas was first introduced by Apple in 2004 for use in Mac OS X and Safari. Now it has been adopted by every major browser. Current versions of Mozilla Firefox, Chrome, Opera, Safari, and IE 9 and 10 all support the <canvas> element.
Key Takeaways
- The
- The canvas element supports basic operations such as drawing lines, arcs, paths, images, and basic shapes. To create animations, developers can use JavaScript to draw, clear, and redraw shapes on the canvas to give the illusion of movement.
- The tutorial provides an example of creating a bouncing ball application using the setTimeout() function. This function is used to create the illusion of movement by periodically clearing the canvas and updating the position of the ball. The game ends when the ball gets off the screen, at which point the canvas is cleared and the animation stops.
How To Use Canvas
The following code adds a <canvas> element.
<canvas id="canvasDemo" height="400" width="300">

Sorry, your browser does not support canvas.

</canvas>
The id attribute is used so that we can access the <canvas> element from JavaScript. The height and width attributes are used to size the canvas. Whatever you write inside the <canvas> tag will appear if the browser does not support canvases. This acts as a fallback for older browsers. From JavaScript we can access the <canvas> element as shown below.
var canvas=document.getElementById("canvasDemo");

var context=canvas.getContext("2d");
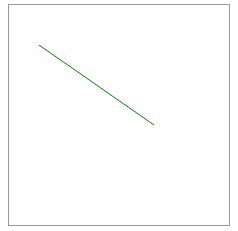
The following example shows how to draw a line on the canvas. The code draws a straight line from coordinate (30, 40) to (145, 120), with the upper left corner of the canvas acting as coordinate (0, 0). It should be noted that <canvas> elements do not maintain any DOM. As a result if you want to alter anything on the canvas, you will probably have to redraw the whole thing.
var canvas=document.getElementById("canvasDemo");

var context=canvas.getContext("2d");

context.strokeStyle="green";

context.moveTo(30,40);

context.lineTo(145,120);

context.stroke();
The modified canvas is shown in the following figure.
Drawing Basic Shapes
Before moving on to animations, you need to understand the basic shapes that can be drawn on canvas. We will need these basic shapes every time we want to create something. Let’s start with the following operations related to rectangles.
fillRect(x,y,width,height);clearRect(x,y,width,height);strokeRect(x,y,width,height);
The first two parameters of each function represent the coordinates of the upper left corner of the rectangle. The next two parameters specify the width and height of the rectangle. Consider the following JavaScript snippet:
var context=document.getElementById("canvasDemo").getContext("2d");

context.strokeStyle="green";

context.fillStyle="red";

context.strokeRect(70,70,80,80);

context.fillRect(80,80,60,60);

context.clearRect(95,95,30,30);
It produces the following output:
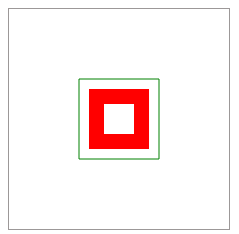
As you can see, the fillRect() method creates a rectangle and fills it with the color specified by the context.fillStyle property. clearRect() clears a rectangular portion from the canvas, and strokeRect() draws a rectangular outline whose color is determined by the context.strokeStyle property.
Drawing Lines
Lines can be drawn using the lineTo() function. The method takes two parameters which represent the coordinates of the end point. To draw a line you need to first call moveTo(), which represents the starting point of line. The first example in this article draws a line in this fashion.
Drawing Arcs
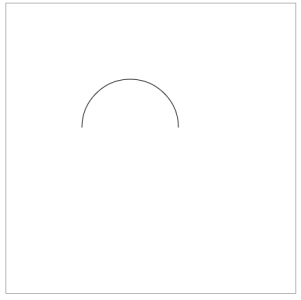
An arc is drawn using the arc() function, shown below.
arc(x,y,radius,startAngle,endAngle,direction);
The first two parameters represent the center’s coordinate. startAngle represents the starting angle for the arc. To create a circle, set this to zero. The endAngle determines the angle at which the arc ends. While drawing a circle you will set this to 360 degrees. For a semi circle it should be 180 degrees. Note that the angles should be specified in radians. Therefore, you should use the Math.PI constant to convert from degrees. Finally, the direction parameter denotes, whether the arc should be drawn clockwise or counterclockwise.
Consider the following snippet:
var ctx = document.getElementById('canvasDemo').getContext('2d');

ctx.arc(180,180,70,0,Math.PI,true);

ctx.stroke();
It produces the following output.
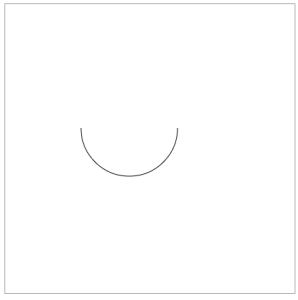
However, if you want to change the direction to clockwise then you need to call arc() with the last argument set to false. This results in the following output.
Drawing Paths
Usually a path consists of several shapes. Each path is internally represented by a list of sub paths like rectangles, lines, or arcs. Paths can be drawn using the following functions.
beginPath()closePath()stroke()fill()
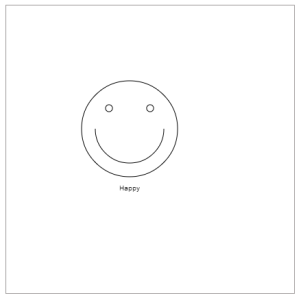
Every path maintains a list of sub paths. When beginPath() is called this list is reset and we can start drawing different shapes for the path. The following example shows the path functions in action.
var ctx = document.getElementById("canvasDemo").getContext("2d");

ctx.beginPath();

ctx.arc(180,180,70,0,Math.PI*2,true);

ctx.moveTo(230,180);

ctx.arc(180,180,50,0,Math.PI,false);

ctx.moveTo(155,150);

ctx.arc(150,150,5,0,Math.PI*2,true);

ctx.moveTo(215,150);

ctx.arc(210,150,5,0,Math.PI*2,true);

ctx.fillText("Happy", 165, 270);

ctx.stroke();
The resulting canvas is shown below.
Drawing Images
Drawing an image on canvas is pretty easy. You can create an Image object and draw it on the canvas as shown below.
var ctx = document.getElementById("canvasDemo").getContext("2d");

var img =new Image();

img.onload=function(){

  ctx.drawImage(img,15,25);

}

img.src="myImg.png";
Another way is to add an image to your document and make it invisible. In JavaScript we can access it by id and draw it as shown below.
var ctx = document.getElementById("canvasDemo").getContext("2d");

var img = document.getElementById("myimage");

ctx.drawImage(img,0,0);
For a complete tutorial about drawing basic shapes you can refer to the Mozilla Developer Network documentation.
Creating a Bouncing Ball Application
This example will create an application containing a bouncing ball. You need to catch the ball with a paddle when it reaches the bottom of the screen. We will use the setTimeout() function to create the animation. We already know that whatever you draw on canvas persists until you clear it. So, to make an object move on canvas you need to call a function periodically that clears the canvas and updates the position of the object.
In our case, a custom draw() function will be called every ten milliseconds. It will clear the entire canvas and update x and y coordinates of the ball. This gives the illusion that the ball is moving continuously.
Place the following JavaScript code in a file named bouncingball.js.
var canvas;

var ctx;

var dx = 1;

var dy = 2;

var bar=new Bar(400,500);

var circle=new Circle(400,30,10);

var dxBar=6;

var timer;

var barImg;

function Bar(x,y){

  this.x=x;

  this.y=y;

}

function Circle(x,y,r){

  this.x=x;

  this.y=y;

  this.r=r;

}

function drawBall(c) {

  ctx.beginPath();

  ctx.arc(c.x, c.y, c.r, 0, Math.PI*2, true);

  ctx.fill();

}

function doKeyDown(e){

  if(e.keyCode==37){

    if(bar.x-dxBar>0)

      bar.x-=dxBar;

  }

  else if(e.keyCode==39){

    if(bar.x+dxBar<canvas.width)

      bar.x+=dxBar;

  }

}

function init() {

  window.addEventListener("keydown",doKeyDown,false);

  barImg=document.getElementById("bar");

  canvas = document.getElementById("canvas");

  ctx = canvas.getContext("2d");

  timer=setInterval(draw, 10);

  return timer;

}

function draw() {

  ctx.clearRect(0, 0, canvas.width, canvas.height);

  ctx.fillStyle = "#FAF7F8";

  ctx.fillRect(0,0,canvas.width,canvas.height);

  ctx.fillStyle = "#003300";

  drawBall(circle);

  if (circle.x +dx > canvas.width || circle.x +dx < 0)

    dx=-dx;

  if(circle.y+dy>bar.y && circle.x>bar.x && circle.x<bar.x+barImg.width)

    dy=-dy;

  if (circle.y +dy > canvas.height || circle.y +dy < 0)

    dy=-dy;

  circle.x += dx;

  circle.y += dy;

  ctx.drawImage(barImg,bar.x,bar.y);

  if(circle.y>bar.y){

    clearTimeout(timer);

    ctx.clearRect(0, 0, canvas.width, canvas.height);

    alert("Game Over");

  }

}
The HTML document which includes the JavaScript code is shown below.
<!doctype html>

<html>

  <head>

    <title>Canvas Demo</title>

    <script type="text/javascript" src="bouncingball.js"/>

  </head>

  <body onload="init();">

    <div>

      <canvas id="canvas" width="800" height="600">

      Sorry, browser does not support canvas.

      </canvas>

    </div>

    <img src="bar.png" id="bar" style="display:none"/>

  </body>

</html>
You can try out the game via the online demo. Note that several optimizations and improvements can be done on this game. First we begin by defining two objects, ball and bar. The bar can reflect the ball when it reaches the bottom of the screen. The variables dx and dy determine how fast the ball moves along the x-axis and y-axis, respectively. dxBar represents how fast the bar moves along the x-axis.
The init() function is called when the body is loaded. Next, we register an event listener which listens for keydown events. If the user presses the left arrow we shift the x value of the bar by dxBar pixels left. If the user presses the right arrow we shift the bar to the right.
Then we initialize the canvas and get a 2D context which initializes the ctx variable. After that, we register the draw() function with setTimeout() so that it will be called every ten milliseconds.
Every time draw() is executed, we clear the canvas and draw the updated ball and bar. Inside the function we check whether the ball collides with the bar. If so, the ball bounces back. If the ball gets off screen, the canvas is cleared and the animation stops, ending the game.
Where To Go From Here
If you’re interested in improving the game, check out the guide to optimizing canvases. You could also use requestAnimationFrame() to perform animation. It instructs the browser to schedule a repaint of the window so that the next animation frame can be rendered. Unfortunately, it’s an experimental technology and its specification has not stabilized yet. You should also learn about various transformations that can be done on the canvas and check out a few animations in MDN.
Frequently Asked Questions (FAQs) about Basic Animation with Canvas and JavaScript
How can I create smoother animations with Canvas and JavaScript?
To create smoother animations, you can use the requestAnimationFrame method instead of setInterval or setTimeout. This method tells the browser that you wish to perform an animation and requests that the browser call a specified function to update an animation before the next repaint. This results in smoother animations as it pauses when the user navigates to another tab, hence saving processing power and battery life.
Can I use Canvas and JavaScript to create interactive animations?
Yes, you can create interactive animations using Canvas and JavaScript. You can use event listeners to respond to user actions like clicks or key presses. For instance, you can change the direction of an animated object when a certain key is pressed.
How can I add gradients or patterns to my Canvas animations?
Canvas API provides methods to add gradients and patterns to your animations. For gradients, you can use the createLinearGradient or createRadialGradient methods. For patterns, you can use the createPattern method, which takes an image and a repetition option as arguments.
How can I animate multiple objects on the Canvas?
To animate multiple objects, you need to create an array of objects, each with its own properties like position and velocity. In your animation loop, iterate over this array and update the properties of each object.
How can I optimize my Canvas animations for better performance?
There are several ways to optimize your Canvas animations. One way is to only redraw areas of the canvas that have changed instead of the entire canvas. Another way is to use layers, where static elements are on one layer and animated elements are on another layer.
Can I use Canvas and JavaScript to create 3D animations?
While it’s possible to create simple 3D animations using Canvas and JavaScript, for complex 3D animations, it’s recommended to use WebGL or a JavaScript library like Three.js that’s built on top of WebGL.
How can I add text to my Canvas animations?
You can add text to your animations using the fillText or strokeText methods of the Canvas API. These methods take the text, x and y coordinates, and optionally a maximum width as arguments.
Can I use CSS to style my Canvas animations?
While you can use CSS to style the canvas element itself, like setting its background color or border, you cannot use CSS to style the content drawn on the canvas. All styling of the content must be done using the Canvas API.
How can I save the state of my Canvas animation?
You can save the state of your animation using the save method of the Canvas API. This method saves the current drawing style and transformations. You can then restore the saved state later using the restore method.
Can I use Canvas and JavaScript to create animations for mobile devices?
Yes, you can create animations for mobile devices using Canvas and JavaScript. However, keep in mind that performance may vary between different devices and browsers, so it’s important to test your animations on multiple platforms.