In the good old days, back when building Websites was as easy as knocking up a few HTML pages, the delivery of a Web page to a browser was a simple matter of having the Web server fetch a file. A site’s visitors would see its small, text-only pages almost immediately, unless they were using particularly slow modems. Once the page was downloaded, the browser would cache it somewhere on the local computer so that, should the page be requested again, after performing a quick check with the server to ensure the page hadn’t been updated, the browser could display the locally cached version. Pages were served as quickly and efficiently as possible, and everyone was happy (except those using 9600 bps modems).
The advent of dynamic Web pages spoiled the party, effectively “breaking” this model of serving pages by introducing two problems:
- When a request for a dynamic Web page is received by the server, some intermediate processing, such as the parsing of scripts by the PHP engine, must be completed. This introduces a delay before the Web server begins to deliver the output to the browser. For simple PHP scripts this may not be significant, but for a more complex application, the PHP engine may have a lot of work to do before the page is finally ready for delivery. This extra work results in a noticeable lag between the users’ requests and the actual display of pages in their browsers.
- A typical Web server, such as Apache, uses the time of file modification to correctly inform a Web browser of a requested page’s cache status. With dynamic Web pages, the actual PHP script may change only occasionally, while the content it displays, which is perhaps fetched from a database, will change frequently. The Web server has no way of knowing about updates to the database, however, so it doesn’t send a last modified date. If the client (browser) has no indication of how long the data is valid, it will take a guess, which usually means it will request the same page again. The Web server will always respond with a fresh version of the page, regardless of whether the data has changed. To avoid this shortcoming, most Web developers use a meta tag or HTTP headers to tell the browser never to use a cached version of the page. However, this negates the Web browser’s natural ability to cache Web pages, and involves some serious disadvantages. For example, the content delivered by a dynamic page may change once a day, so there’s certainly a benefit to be gained by having the browser cache a page – even if only for twenty four hours.
It’s usually possible to live with both problems given a small PHP application, but as the complexity of, and traffic to, your site increases, you may run into difficulties. However, both these issues can be solved, the first with server side caching, the second, by taking control of client side caching from within your application. The exact approach you use to solve the problem will depend on your application, but in this chapter, we’ll see how you can solve both using PHP and a number of class libraries from PEAR.
Note that in this chapter’s discussions of caching, we’ll look at only those solutions implemented in PHP. These should not be confused with some of the script caching solutions that work on the basis of optimizing and caching compiled PHP scripts. Included in this group are the Zend Accelerator, iconCube PHP Accelerator, and Turck MMCache, the latter being the only accelerator that’s ready for use with Windows based PHP installations today.
How do I prevent Web browsers caching a page?
Before we look at the approaches you can take to client and server side caching, the first thing we need to understand is how to prevent Web browsers (and proxy servers) from caching pages in the first place. The most basic approach to doing this utilizes HTML meta tags:
<meta http-equiv="Expires" content="Mon, 26 Jul 1997 05:00:00 GMT"

/>

<meta http-equiv="Pragma" content="no-cache" />
By inserting a past date into the Expires meta tag, we can tell the browser that the cached copy of the page is always out of date. This means the browser should never cache the page. The Pragma: no-cache meta tag is a fairly well-supported convention that most Web browsers follow. Upon encountering this tag, they usually won’t cache the page (although there’s no guarantee; this is just a convention).
It sounds good, but there are two problems associated with the use of meta tags:
- If a tag wasn’t present when the page was first requested by a browser, but appears later (for example, you modified the included pageheader.php file, which contains the top of every Web page), the browser will remain blissfully ignorant and keep its cached copy of the original.
- Proxy servers that cache Web pages, such as those common to ISPs, generally will not examine the HTML documents themselves. Instead, they rely purely on the Web server from which the documents came, and the HTTP protocol. In other words, a Web browser might know that it shouldn’t cache the page, but the proxy server between the browser and your Web server probably doesn’t – it will continue to deliver the same out-of-date page to the client.
A better approach is to use the HTTP protocol itself, with the help of PHP’s header function, to produce the equivalent of the two meta tags above:
<?php

header('Expires: Mon, 26 Jul 1997 05:00:00 GMT');

header('Pragma: no-cache');

?>
We can go one step further, using the Cache-Control header that’s supported by HTTP 1.1 capable browsers:
<?php

header('Expires: Mon, 26 Jul 1997 05:00:00 GMT');

header('Cache-Control: no-store, no-cache, must-revalidate');

header('Cache-Control: post-check=0, pre-check=0', FALSE);

header('Pragma: no-cache');

?>
This essentially guarantees that no Web browser or intervening proxy server will cache the page, so visitors will always receive the latest content. In fact, the first header should accomplish this on its own; this is the best way to ensure a page is not cached. The Cache-Control and Pragma headers are added for “insurance” purposes. Though they don’t work on all browsers or proxies, they will catch some cases in which the Expires header doesn’t work as intended (e.g. if the client computer’s date is set incorrectly).
Of course, to disallow caching entirely introduces the problems we discussed at the start of this chapter. We’ll look at the solution to these issues in just a moment.
Internet Explorer and File Download Caching
Our discussion of PDF rendering in Chapter 3, Alternative Content Types explained that issues can arise when you’re dealing with caching and file downloads. In serving a file download via a PHP script that uses headers such as Content-Disposition: attachment, filename=myFile.pdf or Content-Disposition: inline, filename=myFile.pdf, you’ll have problems with Internet Explorer if you tell the browser not to cache the page.
Internet Explorer handles downloads in a rather unusual manner, making two requests to the Website. The first request downloads the file, and stores it in the cache before making a second request (without storing the response). This request invokes the process of delivering the file to the end user in accordance with the file’s type (e.g. it starts Acrobat Reader if the file is a PDF document). This means that, if you send the cache headers that instruct the browser not to cache the page, Internet Explorer will delete the file between the first and second requests, with the result that the end user gets nothing. If the file you’re serving through the PHP script will not change, one solution is simply to disable the “don’t cache” headers for the download script.
If the file download will change regularly (i.e. you want the browser to download an up-to-date version), you’ll need to use the last-modified header, discussed later in this chapter, and ensure that the time of modification remains the same across the two consecutive requests. You should be able to do this without affecting users of browsers that handle downloads correctly. One final solution is to write the file to your Web server and simply provide a link to it, leaving it to the Web server to report the cache headers for you. Of course, this may not be a viable option if the file is supposed to be secured by the PHP script, which requires a valid session in order to provide users access to the file; with this solution, the written file can be downloaded directly.
How do I capture server side output for caching?
It’s time to look at how we can reduce server side delay by caching output. The general approach begins by rendering the page as normal, performing database queries and so on with PHP. However, before sending it to the browser, we capture and store the finished page somewhere, for instance, in a file. The next time the page is requested, the PHP script first checks to see whether a cached version of the page exists. If it does, the script sends the cached version straight to the browser, avoiding the delay involved in rebuilding the page.
What about Template Caching?
Template engines such as Smarty often talk about template caching. Usually, these engines offer an in-built mechanism for storing a compiled version of a template (i.e. the native PHP generated from the template), which prevents us having to recompile the template every time a page is requested. This should not be confused with output caching, which refers to the caching of the rendered HTML (or other output) that PHP sends to the browser. You can successfully use both types of caching together on the same site.
Here, we’ll look at PHP’s in-built caching mechanism, the output buffer, which can be used with whatever page rendering system you prefer (templates or no templates). Consider a situation in which your script displays results using, for example, echo or print, rather than sending the data directly to the browser. In these cases, you can use PHP’s output control functions to store the data in an in-memory buffer, which your PHP script has both access to and control over.
Here’s a simple example:
Example 5.1. 1.php


<?php

// Start buffering the output

ob_start();


// Echo some text (which is stored in the buffer);

echo '1. Place this in the buffer<br />';


// Get the contents of

$buffer = ob_get_contents();


// Stop buffering and clean out the buffer

ob_end_clean();


// Echo some text normally

echo '2. A normal echo<br />';


// Echo the contents from the buffer

echo $buffer;

?>
The buffer itself stores the output as a string. So, in the above script, we commence buffering with ob_start and use echo to display something. We then use ob_get_contents to fetch the data the echo statement placed in the buffer, and store it in a string. The ob_end_clean function stops the output buffer and trashes the contents; the alternative is ob_end_flush, which displays the contents of the buffer.
The above script displays:
2. A normal echo

1. Place this in the buffer
In other words, we captured the output of the first echo, then sent it to the browser after the second echo. As this simple example suggests, output buffering can be a very powerful tool when it comes to building your site; it provides a solution for caching, as we’ll see in a moment, and is an excellent way to hide errors from your site’s visitors (see Chapter 10, Error Handling). It even provides a possible alternative to browser redirection in situations such as user authentication.
HTTP Headers and Output Buffering
Output buffering can help solve the most common problem associated with the header function, not to mention session_start and set_cookie. Normally, if you call any of these functions after page output has begun, you’ll get a nasty error message. With output buffering turned on, the only output types that can escape the buffer are HTTP headers. Using ob_start at the very beginning of your application’s execution, you can send headers at whichever point you like, without encountering the usual errors. You can then write out the buffered page content all at once, when you’re sure there are no more HTTP headers required.
Using Output Buffering for Server Side Caching
Now you’ve seen a basic example of output buffering, here’s the next step, in which the buffer is stored as a file:
Example 5.2. 2.php


<?php

// If a cached version exists use it...

if (file_exists('./cache/2.cache')) {


  // Read and display the file

  readfile('./cache/2.cache');

  exit();


}


// Start buffering the output

ob_start();


// Display some HTML

?>

<!DOCTYPE html PUBLIC "-//W3C//DTD XHTML 1.0 Strict//EN"

  "https://www.w3.org/TR/xhtml1/DTD/xhtml1-strict.dtd">

<html xmlns="https://www.w3.org/1999/xhtml">

<head>

<title> Cached Page </title>

<meta http-equiv="Content-Type"

  content="text/html; charset=iso-8859-1" />

</head>

<body>

This page was cached with PHP's

<a href="http://www.php.net/outcontrol">Output Control

Functions</a>

</body>

</html>


<?php

// Get the contents of the buffer

$buffer = ob_get_contents();


// Stop buffering and display the buffer

ob_end_flush();


// Write a cache file from the contents

$fp = fopen('./cache/2.cache', 'w');

fwrite($fp, $buffer);

fclose($fp);

?>
First, the above script checks to see if a cached version of the page exists and, if it does, the script reads and displays it. Otherwise, it uses output buffering to create a cached version of the page. It stores this as a file, while using ob_end_flush to display the page to the visitor.
The file 2.cache looks exactly like the HTML that was rendered by the script:
<!DOCTYPE html PUBLIC "-//W3C//DTD XHTML 1.0 Strict//EN"

  "https://www.w3.org/TR/xhtml1/DTD/xhtml1-strict.dtd">

<html xmlns="https://www.w3.org/1999/xhtml">

<head>

<title> Cached Page </title>

<meta http-equiv="Content-Type"

  content="text/html; charset=iso-8859-1" />

</head>

<body>

This page was cached with PHP's

<a href="http://www.php.net/outcontrol">Output Control

Functions</a>

</body>

</html>
Chunked Buffering
A simplistic approach to output buffering is to cache an entire page. However, this approach forfeits the real opportunities presented by PHP’s output control functions to improve your site’s performance in a manner that’s relevant to the varying lifetimes of your content.
No doubt, some parts of the page you send to visitors change very rarely, such as the page’s header, menus and footer. But other parts, such as the table containing a forum discussion, may change quite often. Output buffering can be used to cache sections of a page in separate files, then rebuild the page from these – a solution that eliminates the need to repeat database queries, while loops, and so on. You might consider assigning each block of the page an expiry date after which the cache file is recreated, or alternatively, you may build into your application a mechanism that deletes the cache file every time the content it stores is changed.
Here’s an example that demonstrates the principle:
Example 5.3. 3.php (excerpt)


<?php

/**

 * Writes a cache file

 * @param string contents of the buffer

 * @param string filename to use when creating cache file

 * @return void

 */

function writeCache($content, $filename)

{

  $fp = fopen('./cache/' . $filename, 'w');

  fwrite($fp, $content);

  fclose($fp);

}


/**

 * Checks for cache files

 * @param string filename of cache file to check for

 * @param int maximum age of the file in seconds

 * @return mixed either the contents of the cache or false

 */

function readCache($filename, $expiry)

{

  if (file_exists('./cache/' . $filename)) {

    if ((time() - $expiry) > filemtime('./cache/' . $filename)) {

      return FALSE;

    }

    $cache = file('./cache/' . $filename);

    return implode('', $cache);

  }

  return FALSE;

}
The first two functions we’ve defined, writeCache and readCache, are used to create cache files and check for their existence, respectively. The writeCache function takes rendered output as its first argument, as well as a filename that should be used when creating the cache file. The readCache function takes a filename of a cache file as its first argument, along with the time in seconds after which the cache file should be regarded as having expired. If it finds a valid cache file, the script will return it; otherwise it returns FALSE to instruct the calling file that either no cache file exists, or it’s out of date.
For the purposes of this example, I used a procedural approach. However, I wouldn’t recommend doing this in practice, as it will result in very messy code (see later solutions for better alternatives) and is likely to cause issues with file locking (e.g. what happens when someone accesses the cache at the exact moment it’s being updated?).
Let’s continue this example. After the output buffer is started, processing begins. First, the script calls readCache to see whether the file 3_header.cache exists; this contains the top of the page – the HTML head section and the start of the body. We’ve used PHP’s date function to display the time at which the page was actually rendered, so you’ll be able to see the different cache files at work when the page is displayed.
Example 5.4. 3.php (excerpt)


// Start buffering the output

ob_start();


// Handle the page header

if (!$header = readCache('3_header.cache', 604800)) {

  // Display the header

  ?>


  <!DOCTYPE html PUBLIC "-//W3C//DTD XHTML 1.0 Strict//EN"

    "https://www.w3.org/TR/xhtml1/DTD/xhtml1-strict.dtd">

  <html xmlns="https://www.w3.org/1999/xhtml">

  <head>

  <title> Chunked Cached Page </title>

  <meta http-equiv="Content-Type"

    content="text/html; charset=iso-8859-1" />

  </head>

  <body>

  The header time is now: <?php echo date('H:i:s'); ?><br />


  <?php

  $header = ob_get_contents();

  ob_clean();

  writeCache($header,'3_header.cache');

}
Note what happens when a cache file isn’t found. Some content is output and assigned to a variable with ob_get_contents, after which the ob_clean function empties the buffer. This allows us to capture the output in “chunks” and assign it to individual cache files with writeCache. The header of the page is now stored as a file, which can be reused without our needing to re-render the page. Look back to the start of the if condition for a moment. When we called readCache, we gave it an expiry time of 604800 seconds (one week); readCache uses the file modification time of the cache file to determine whether the cache is still valid.
For the body of the page, we’ll use the same process as before. However, this time, when we call readCache, we’ll use an expiry time of five seconds; the cache file will be updated whenever it’s more than five seconds old:
Example 5.5. 3.php (excerpt)


// Handle body of the page

if (!$body = readCache('3_body.cache', 5)) {

  echo 'The body time is now: ' . date('H:i:s') . '<br />';

  $body = ob_get_contents();

  ob_clean();

  writeCache($body, '3_body.cache');

}
The page footer is effectively the same as the header. After this, the output buffering is stopped and the content of the three variables that hold the page data is displayed:
Example 5.6. 3.php (excerpt)


// Handle the footer of the page

if (!$footer = readCache('3_footer.cache', 604800)) {

  ?>


  The footer time is now: <?php echo date('H:i:s'); ?><br />

  </body>

  </html>


  <?php

  $footer = ob_get_contents();

  ob_clean();

  writeCache($footer, '3_footer.cache');

}

// Stop buffering

ob_end_clean();


// Display the contents of the page

echo $header . $body . $footer;

?>
The end result looks like this:
The header time is now: 17:10:42

The body time is now: 18:07:40

The footer time is now: 17:10:42
The header and footer are updated on a weekly basis, while the body is updated whenever it is more than five seconds old.
The diagram in Figure 5.1 summarizes the chunked buffering methodology.
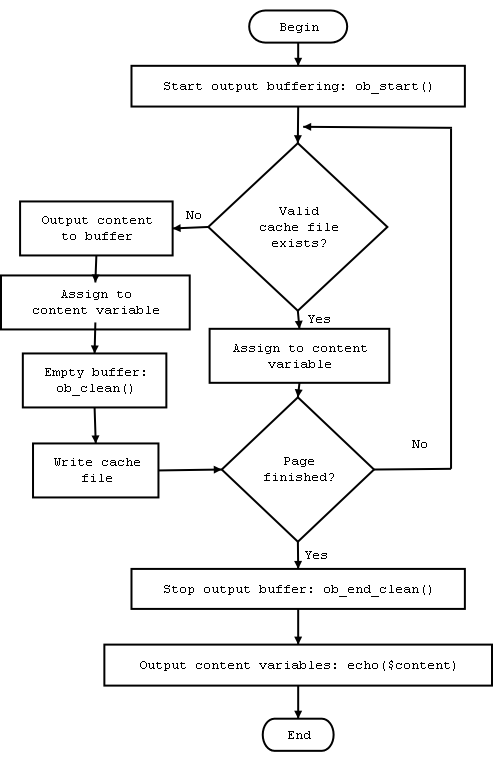
Figure 5.1. Chunked Buffering Flow Diagram
Nesting Buffers
You can nest one buffer within another practically ad infinitum simply by calling ob_start more than once. This can be useful if you have multiple operations that use the output buffer, such as one that catches the PHP error messages, and another that deals with caching. Care needs to be taken to make sure that ob_end_flush or ob_end_clean is called every time ob_start is used.
How do I implement a simple server side caching system?
Now that we have a grasp of the ideas behind output buffering, it’s time to see how we can put this process into action in a manner that will be easy to maintain. To do this, we’ll use a little help from PEAR::Cache_Lite (version 1.1 was used in the examples here).
As I mentioned, in the interests of keeping your code maintainable and having a reliable caching mechanism, it’s a good idea to delegate the responsibility of caching logic to classes you trust. Cache_Lite provides a solid but easy to use library for caching, handling issues such as file locking, creating, checking for, and deleting cache files, controlling the output buffer, and directly caching the results from function and class method calls. More to the point, Cache_Lite should be relatively easy to apply to an existing application, requiring only minor code modifications.
There are three main classes in Cache_Lite. First is the base class, Cache_Lite, which deals purely with creating and fetching cache files, but makes no use of output buffering. This class can be used alone for caching operations in which you have no need for output buffering, such as storing the contents of a template you’ve parsed with PHP. The examples here will not use Cache_Lite directly, but will instead focus on the two subclasses. Cache_Lite_Function can be used to call a function or class method and cache the result; this might prove useful for storing a MySQL query result set, for example. The Cache_Lite_Output class uses PHP’s output control functions to catch the output generated by your script, and store it in cache files; it allows you to perform tasks such as those we completed in the previous solution.
Here’s an example of how you might use Cache_Lite to accomplish the task we completed in the last solution. When instantiating any of Cache_Lite’s classes, we must first provide an array of options that determine the behavior of Cache_Lite. We’ll look at these in detail in a moment. Note that the cacheDir directory specified must be one to which the script has read and write access.
Example 5.7. 4.php (excerpt)


<?php

// Include the PEAR::Cache_Lite Output class

require_once 'Cache/Lite/Output.php';


// Define options for Cache_Lite

$options = array(

  'cacheDir'        => './cache/',

  'writeControl'    => 'true',

  'readControl'     => 'true',

  'readControlType' => 'md5'

);


// Instantiate Cache_Lite_Output

$cache = new Cache_Lite_Output($options);
For each chunk that we want to cache, we need to set a lifetime (in seconds) for which the cache should live before it’s refreshed. Next, we use the start method, available only in the Cache_Lite_Output class, to turn on output buffering. The two arguments passed to the start method are an identifying value for this particular cache file, and a cache group. This is an identifier that allows a collection of cache files to be acted upon; it’s possible to delete all cache files in a given group, for example (more on this in a moment). Once the output for this chunk has finished, we use the end method to stop buffering and store the content as a file.
Example 5.8. 4.php (excerpt)


// Set lifetime for this "chunk"

$cache->setLifeTime(604800);


// Start the cache with an id and group for this chunk

if (!$cache->start('header', 'Static')) {

  ?>

  <!DOCTYPE html PUBLIC "-//W3C//DTD XHTML 1.0 Strict//EN"

    "https://www.w3.org/TR/xhtml1/DTD/xhtml1-strict.dtd">

  <html xmlns="https://www.w3.org/1999/xhtml">

  <head>

  <title> PEAR::Cache_Lite example </title>

  <meta http-equiv="Content-Type"

    content="text/html; charset=iso-8859-1" />

  </head>

  <body>

  <h2>PEAR::Cache_Lite example</h2>

  The header time is now: <?php echo date('H:i:s'); ?><br />

  <?php

  // Stop and write the cache

  $cache->end();

}
Caching the body and footer follows the same procedure as the header. Note that we again specify a five second lifetime when caching the body:
Example 5.9. 4.php (excerpt)


$cache->setLifeTime(5);

if (!$cache->start('body', 'Dynamic')) {

  echo 'The body time is now: ' . date('H:i:s') . '<br />';

  $cache->end();

}


$cache->setLifeTime(604800);

if (!$cache->start('footer', 'Static')) {

  ?>

  The footer time is now: <?php echo date('H:i:s'); ?><br />

  </body>

  </html>

  <?php

  $cache->end();

}

?>
On viewing the page, Cache_Lite creates in the cache directory files with these names:
./cache/cache_Static_header

./cache/cache_Dynamic_body

./cache/cache_Static_footer
When the same page is requested later, the code above will use the cached file if it is valid and has not expired.
Protect your Cache Files
Make sure that the directory in which you place the cache files is not publicly available, or you may be offering your site’s visitors access to more than you realize.
Cache_Lite Options
When instantiating Cache_Lite (or any of its subclasses, such as Cache_Lite_Output), there are a number of ways to control its behavior. These should be placed in an array and passed to the constructor as in the previous example:
Example 5.10. 4.php (excerpt)


// Define options for Cache_Lite

$options = array(

  'cacheDir'        => './cache/',

  'writeControl'    => TRUE,

  'readControl'     => TRUE,

  'readControlType' => 'md5'

);


// Instantiate Cache_Lite_Output

$cache = new Cache_Lite_Output($options);
In the current version (1.1) the available options are:
cacheDir– This is the directory in which the cache files will be placed. This defaults to the current script execution directory.caching– This option switches on or off the caching behavior ofCache_Lite. If you have numerousCache_Litecalls in your code and want to disable the cache for debugging, for example, this will be important. The default value isTRUE(caching enabled).lifetime– This represents the default lifetime (in seconds) of cache files. It can be changed using thesetLifeTimemethod. The default value is3600(one hour).fileNameProtection– With this option activated, Cache_Lite uses an MD5 encryption hash to generate the filename for the cache file. This protects you from error when you try to use IDs or group names containing characters that aren’t valid for filenames; it must be turned on when you useCache_Lite_Function. The default isTRUE(enabled).fileLocking– This is used to switch the file locking mechanisms on or off. The default isTRUE(enabled).writeControl– This checks that a cache file has been written correctly immediately after it has been created, and throws aPEAR::Errorif it finds a problem. Obviously, this would allow your code to attempt to rewrite a cache file that was created incorrectly, but comes at a cost in terms of performance. The default isTRUE(enabled).readControl– This checks cache files that are being read for corruption. Cache_Lite is able to place inside the file a value, such as the string length of the file, which can be used to confirm that the cache file isn’t corrupted. There are three alternative mechanisms for checking that a file is valid, and they’re specified using thereadControlTypeoption. These mechanisms come at the cost of performance, but should help guarantee your visitors aren’t seeing scrambled pages. The default value isTRUE(enabled).readControlType– This specifies the type of read control mechanism to use. The available mechanisms are a cyclic redundancy check (‘crc32‘, the default value) using PHP’scrc32function, an MD5 hash using PHP’smd5function (‘md5‘), or a simple and fast string length check (‘strlen‘). Note that this mechanism is not intended to provide security from people tampering with your cache files; it’s just a way to spot corrupt files.pearErrorMode– This tellsCache_Litehow it should return PEAR errors to the calling script. The default isCACHE_LITE_ERROR_RETURN, which means Cache_Lite will return a /#c#?PEAR::Error object.memoryCaching– With memory caching enabled, every time a file is written to the cache, it is stored in an array in Cache_Lite. ThesaveMemoryCachingStateandgetMemoryCachingStatemethods can be used to store and access the memory cache data between requests. The advantage of this is that the complete set of cache files can be stored in a single file, reducing the number of disk read/writes by reconstructing the cache files straight into an array to which your code has access. We’ll be sticking to the normal Cache_Lite mechanism here, butmemoryCachingmay be worth further investigation if you run a large site. The default value isTRUE(disabled).onlyMemoryCaching– If this is enabled, only the memory caching mechanism will be used. The default value isTRUE(disabled).memoryCachingLimit– This places a limit on the number of cache files that will be stored in the memory caching array. The more cache files you have, the more memory will be used up by memory caching, so it may be a good idea to enforce a limit that prevents your server from having to work too hard. Of course, this places no restriction on the size of each cache file, so just one or two massive files may cause a problem. The default value is1000.
Purging the Cache
Cache_Lite’s in-built lifetime mechanism for cache files provides a good foundation for keeping your cache files up to date, but there will be some circumstances in which you need the files to be updated immediately. For such cases, the methods remove and clean come in handy. The remove method is designed to delete a specific cache file; it takes the cache ID and group name of the file. To delete the page body cache file we created above, we’d use:
$cache->remove('body', 'Dynamic');Using the clean method, we can delete all the files in our cache directory simply by calling the method with no arguments; alternatively, we can specify a group of cache files to delete. If we wanted to delete both the header and footer created above, we could do so like this:
$cache->clean('Static');The remove and clean methods should obviously be called in response to events within an application. For example, if you have a discussion forum application, you probably want to remove the relevant cache files when a visitor posts a new message. Although it may seem like this solution entails a lot of code modifications, with some care it can be applied to your application in a global manner. If you have a central script that’s included in every page a visitor views, you can simply watch for incoming events (e.g. a variable like $_GET['newPost']) and have some code respond by deleting the required cache files. This keeps the cache file removal mechanism central and easier to maintain. You might also consider using the php.ini setting auto_prepend_file to include this code in every PHP script.
Caching Function Calls
In Chapter 2, XML, we looked at accessing remote Web services with SOAP and XML-RPC. Because Web services are accessed over a network, it’s often a very good idea to cache results so that they can be fetched locally, rather than repeating the same slow request multiple times. A simple approach might be to use PHP sessions, as we considered in that chapter, but as this solution operates on a per visitor basis, the opening requests for each visitor will still be slow. This is where Cache_Lite can come in very handy.
PEAR uses Cache_Lite
The PEAR Web installer (see Appendix D, Working with PEAR) takes advantage of Cache_Lite by caching the XML-RPC requests it makes to the PEAR Web server.
In the section called “How do I consume SOAP Web services with PHP?”, we built a client for a SOAP Web service based on its WSDL file; the service provided weather information for airports around the world. Here’s the code that fetched the data from the remote server:
$countries = $stationInfo->listCountries();and
$country = $stationInfo->searchByCountry($_GET['country']);In both cases, these calls correspond to a request for data that’s made over the network. Using Cache_Lite_Function, we could cache the results so the data returned from the service could be reused; this would avoid unnecessary network calls and significantly improve performance. Note that we’re focusing on only the relevant code here. At the top, we include Cache_Lite_Function:
Example 5.11. 5.php (excerpt)


// Include PEAR::Cache_Lite_Function

require_once 'Cache/Lite/Function.php';
Further down, we instantiate the Cache_Lite_Function class with some options:
Example 5.12. 5.php (excerpt)


// Define options for Cache_Lite_Function

// NOTE: fileNameProtection = TRUE!

$options = array(

  'cacheDir'           => './cache/',

  'fileNameProtection' => TRUE,

  'writeControl'       => TRUE,

  'readControl'        => TRUE,

  'readControlType'    => 'strlen',

  'defaultGroup'       => 'SOAP'

);


// Instantiate Cache_Lite_Function

$cache = new Cache_Lite_Function($options);
It’s important that the fileNameProtection option is set to TRUE (this is in fact the default value, but in this case I’ve set it manually to emphasize the point). If it were set to FALSE, the filename will be invalid, so the data will not be cached.
Here’s how we make the calls to our SOAP client class:
Example 5.13. 5.php (excerpt)


  $countries = $cache->call('stationInfo->listCountries');
And:
Example 5.14. 5.php (excerpt)


  $country = $cache->call('stationInfo->searchByCountry',

    $_GET['country']);
If the request is being made for the first time, Cache_Lite_Function stores the results as serialized arrays in cache files (not that you need to worry about this), and this file is used for future requests until it expires. The setLifeTime method can again be used to specify how long the cache files should survive before they’re refreshed; right now, the default value of 3,600 seconds (one hour) is being used.
In general, Cache_Lite provides a solid, easy-to-implement library for solving caching issues. As we move to the “next level” of caching, for sites with particularly high traffic, it’s worth examining PEAR::Cache, Cache_Lite’s big brother. PEAR::Cache is a complete caching framework that offers greater flexibility than Cache_Lite, and ties in with database abstraction libraries such as PEAR::DB. It also offers advanced features such as caching to shared memory, as an alternative to the file system, or, with help from the Msession PHP extension, storing cache data in load balanced sessions, which is particularly useful for load balanced Web servers. Further PEAR::Cache reading material is recommended for at the end of this chapter. Cache_Lite, however, offers more than enough functionality to meet the requirements of the majority of sites.
How do I control client side caching with PHP?
Having seen how to disable client side caching and deal with server side caching, it’s time to look at a mechanism that allows us to take advantage of client side caches in a way that can be controlled from within a PHP script. This approach will only work if you are running PHP with an Apache Web server, because it requires use of the function getallheaders to fetch the HTTP headers sent by a Web browser. This function only works with Apache.
New Function Names
If you’re using PHP version 4.3.0+ on Apache, HTTP headers are available with the functions apache_request_headers and apache_response_headers. The function getallheaders has become an alias for the new apache_request_headers function.
The mechanism for dealing with Web browser caches is again HTTP. A number of headers are involved in instructing Web browsers and proxy servers whether to cache a page; the situation is further complicated by the fact that some are only available with HTTP 1.1.
Examine HTTP Headers in your Browser
A simple but very handy tool for examining request and response headers is LiveHttpHeaders, which is an add-on to the Mozilla browser. It’s worth knowing exactly what headers your script is sending, particularly when you’re dealing with HTTP cache headers.
From the point of view of keeping it simple, we’ll concentrate here on the HTTP 1.0 caching headers only, namely Expires, Last-Modified, and If-Modified-Since, as well as HTTP status code 304 (Not Modified).
Those headers available with HTTP 1.1, such as Cache-Control and ETAG, are intended to provide an advanced mechanism that can be used in conjunction with a Web session’s state; in other words, the version of a given page displayed to a visitor who’s not logged in may differ vastly from that displayed to a logged-in user. The HTTP 1.1 headers were added primarily to allow the caching of such pages.
Page Expiry
The header that’s easiest to use is the Expires header, which sets a date (presumably in the future) on which the page will expire. Until that time, Web browsers are allowed to use a cached version of the page.
An example:
Example 5.15. 6.php


<?php

/**

 * Sends the Expires HTTP 1.0 header.

 * @param int number of seconds from now when page expires

 */

function setExpires($expires)

{

  header('Expires: ' .

    gmdate('D, d M Y H:i:s', time() + $expires) . 'GMT');

}


// Set the Expires header

setExpires(10);


// Display a page

echo 'This page will self destruct in 10 seconds<br />';

echo 'The GMT is now ' . gmdate('H:i:s') . '<br />';

echo '<a href="' . $_SERVER['PHP_SELF'] .

  '">View Again</a><br />';

?>
The setExpires function sets the HTTP Expires header to a future time, defined in seconds. The above example shows the current time in GMT and provides a link that allows you to view the page again. Using your browser’s Refresh button, you might tell the browser to refresh the cache. Using this link, you’ll notice the time updates only once every ten seconds.
Dates and Times in HTTP
HTTP dates are always calculated relative to Greenwich Mean Time (GMT). The PHP function gmdate is exactly the same as the date function, except it automatically offsets the time to GMT, based on your server’s system clock and regional settings.
When a browser encounters an Expires header, it caches the page. All further requests for the page that are made before the specified expiry time use the cached version of the page; no request is sent to the Web server.
The Expires header has the advantage of being easy to implement, but for most cases, unless you’re a highly organized person, you won’t know exactly when a given page on your site will be updated. Because the browser will only contact the server after the page has expired, there’s no way to tell browsers that the page they’ve cached is out of date. You also lose some knowledge of the traffic to your Website, as the browser will not make contact with the server when requesting a page that has been cached.
Page Modification Time
A more useful approach is to make use of the Last-Modified and If-Modified-Since headers, both of which are available in HTTP 1.0. Technically, this is known as performing a conditional GET; whether you return any content is based on the condition of the incoming If-Modified-Since request header.
Using this approach, you need to send a Last-Modified header every time your PHP script is accessed. The next time the browser requests the page, it sends an If-Modified-Since header containing a time; your script can then identify whether the page has been updated since the time provided. If it hasn’t, your script sends an HTTP 304 status code to indicate that the page has not been modified, and exits before sending the body of the page.
Providing a simple example of conditional GETs is tricky, but PEAR::Cache_Lite is a handy tool to show how this works. Don’t get confused though; this is not meant to show server side caching; it simply provides a file that’s updated periodically.
Here’s the code:
Example 5.16. 7.php (excerpt)


<?php

// Include PEAR::Cache_Lite

require_once 'Cache/Lite.php';


// Define options for Cache_Lite

$options = array(

  'cacheDir' => './cache/'

);


// Instantiate Cache_Lite

$cache = new Cache_Lite($options);


// Some dummy data to store

$id = 'MyCache';


// Initialize the cache if first time the page is requested

if (!$cache->get($id)) {

  $cache->save('Dummy', $id);

}


// A randomizer...

$random = array(0, 1, 1);

shuffle($random);


// Randomly update the cache

if ($random[0] == 0) {

  $cache->save('Dummy', $id);

}


// Get the time the cache file was last modified

$lastModified = filemtime($cache->_file);


// Issue an HTTP last modified header

header('Last-Modified: ' .

  gmdate('D, d M Y H:i:s', $lastModified) . ' GMT');


// Get client headers - Apache only

$request = getallheaders();


if (isset($request['If-Modified-Since'])) {

  // Split the If-Modified-Since (Netscape < v6 gets this wrong)

  $modifiedSince = explode(';', $request['If-Modified-Since']);


  // Turn the client request If-Modified-Since into a timestamp

  $modifiedSince = strtotime($modifiedSince[0]);

} else {

  // Set modified since to 0

  $modifiedSince = 0;

}


// Compare time the content was last modified with client cache

if ($lastModified <= $modifiedSince) {

  // Save on some bandwidth!

  header('HTTP/1.1 304 Not Modified');

  exit();

}


echo 'The GMT is now ' . gmdate('H:i:s') . '<br />';

echo '<a href="' . $_SERVER['PHP_SELF'] .

  '">View Again</a><br />';

?>
Remember to use the “View Again” link when you run this example (clicking Refresh usually clears your browser’s cache). If you click on the link repeatedly, eventually the cache will be updated; your browser will throw out its cached version and fetch a new page rendered by PHP.
In the above example we used PEAR::Cache_Lite to create a cache file that is updated randomly. We ascertain the file modification time of the cache file with this line:
$lastModified = filemtime($cache->_file);Technically speaking, this is a hack, as PEAR::Cache_Lite intends its $_file member variable to be private. However, we must use it to get the name of the cache file so that we can fetch its modification time.
Next, we send a Last-Modified header using the modification time of the cache file. We need to send this for every page we render, to cause visiting browsers to send us the If-Modifed-Since header upon every request.
// Issue an HTTP last modified header

header('Last-Modified: ' .

  gmdate('D, d M Y H:i:s', $lastModified) . ' GMT');
Use of the getallheaders function ensures that PHP gives us all the incoming request headers as an array. We then need to check that the If-Modified-Since header actually exists; if it does, we have to deal with a special case caused by older Mozilla browsers (below version 6), which appended an (illegal) extra field to their If-Modified-Since headers. Using PHP’s strtotime function, we generate a timestamp from the date the browser sent us. If there is no such header, we set this timestamp to zero, forcing PHP to give the visitor an up-to-date copy of the page.
// Get client headers - Apache only

$request = getallheaders();


if (isset($request['If-Modified-Since'])) {

    // Split the If-Modified-Since (Netscape < v6 gets this wrong)

    $modifiedSince = explode(';', $request['If-Modified-Since']);


    // Turn the client request If-Modified-Since into a timestamp

    $modifiedSince = strtotime($modifiedSince[0]);

} else {

    // Set modified since to 0

    $modifiedSince = 0;

}
Finally, we check to see whether the cache has been modified since the last time the visitor received this page. If it hasn’t, we simply send a Not Modified response header and exit the script, saving bandwidth and processing time by instructing the browser to display its cached copy of the page.
// Compare the time the content was last modified with cache

if ($lastModified <= $modifiedSince) {

  // Save on some bandwidth!

  header('HTTP/1.1 304 Not Modified');

  exit();

}
If you combine the Last-Modified approach with time values that are already available in your application (e.g. the time of the most recent news article, or expiry times from the server side caching system we saw in the last solution), you should be able to take advantage of Web browser caches and save bandwidth, while being able to gather your site’s traffic information and improve its perceived performance.
Be very careful to test any caching performed in this manner, though; if you get it wrong, you may cause your visitors to have permanently out of date copies of your site.
Further Reading
- Caching Tutorial for Web Authors and Webmasters This article represents the definitive discussion of Web caching.
- Issuing Correct HTTP Headers This tutorial provides a useful discussion of HTTP headers in Perl, which can be readily applied to PHP.
- HTTP 1.1 RFC 2616 on Cache Control Here, you’ll find a precise description of HTTP 1.1 cache control headers.
- Output Buffering, and how it can Change Your Life Zeev Suraski gives a short tour of what can be done with PHP’s output buffering in this great article.
- Output Buffering with PHP This article provides another look at PHP’s output buffering, with notes on using it to capture PHP errors.
- Caching PHP Programs with PEAR Sebastian Bergmann introduces PEAR::Cache.
That’s it for the sample chapters from The PHP Anthology!
To get the full story, including around 100 solutions to the kinds of PHP development problems you face on a daily basis — from image manipulation to N-Tier application desgin — along with a complete code archive, click here to order your copy!
Frequently Asked Questions (FAQs) about PHP Caching
What is the purpose of ob_get_contents() in PHP?
The ob_get_contents() function in PHP is used to return the contents of the topmost output buffer. This function essentially captures everything that is outputted to the browser, and then returns it as a string. This can be particularly useful when you want to manipulate the output before sending it to the browser, or if you want to store the output in a variable for later use.
How does ob_get_contents() work in PHP?
The ob_get_contents() function works by capturing all output that is sent to the browser. When you call ob_start(), output buffering is turned on. From that point onwards, everything that would normally be outputted to the browser is instead stored in an internal buffer. When you call ob_get_contents(), the current contents of this buffer are returned as a string.
What is the difference between ob_get_contents() and ob_end_clean()?
The ob_get_contents() function returns the contents of the output buffer without clearing it, while ob_end_clean() clears the output buffer without returning its contents. If you want to get the contents of the buffer and then clear it, you can use ob_get_clean().
How can I use ob_get_contents() to improve the performance of my PHP application?
One way to use ob_get_contents() to improve performance is by using it to implement caching. By storing the output of expensive or time-consuming operations in a cache, you can avoid having to perform those operations again the next time the same output is needed.
What are some potential issues with using ob_get_contents()?
One potential issue with using ob_get_contents() is that it can increase memory usage, since the output is stored in a buffer in memory. If your script generates a lot of output, this could potentially lead to out-of-memory errors. Another potential issue is that if output buffering is turned on and you forget to call ob_end_flush() or ob_end_clean(), the output will not be sent to the browser.
Can I use ob_get_contents() with other output control functions?
Yes, ob_get_contents() can be used with other output control functions. For example, you can use ob_start() to turn on output buffering, then use ob_get_contents() to get the contents of the buffer, and finally use ob_end_clean() to clear the buffer.
How can I use ob_get_contents() to capture the output of a function?
To capture the output of a function, you can call ob_start() before calling the function, then call ob_get_contents() after calling the function. This will return the output of the function as a string.
Can I nest calls to ob_start() and ob_get_contents()?
Yes, calls to ob_start() and ob_get_contents() can be nested. Each call to ob_start() starts a new output buffer, and ob_get_contents() returns the contents of the topmost buffer.
How can I use ob_get_contents() to implement a simple caching system?
To implement a simple caching system, you can use ob_start() to start output buffering, then generate the output that you want to cache. After generating the output, you can use ob_get_contents() to get the contents of the buffer, and then store these contents in a cache. The next time the same output is needed, you can retrieve it from the cache instead of generating it again.
Can I use ob_get_contents() to capture the output of an include or require statement?
Yes, you can use ob_get_contents() to capture the output of an include or require statement. Just call ob_start() before the include or require statement, and then call ob_get_contents() after the statement.
 Harry Fuecks
Harry Fuecks is the Engineering Project Lead at Tamedia and formerly the Head of Engineering at Squirro. He is a data-driven facilitator, leader, coach and specializes in line management, hiring software engineers, analytics, mobile, and marketing. Harry also enjoys writing and you can read his articles on SitePoint and Medium.