

Key Takeaways
- Adobe XD’s Repeat Grids feature provides a convenient way to import assets, eliminating the need to repeat steps or use overrides.
- The tool allows for quick and efficient mass-importing of image assets and text files, with the ability to apply unique content to each tile in a grid.
- Adobe XD’s updated features enable a highly-energetic workflow where an asset folder of image and text files can be created and directly dragged into the design file, saving significant amounts of time.
Ever since Adobe decided to take on Sketch by finally building a dedicated user interface design tool, many have wondered how long it would take before both apps were fighting in the same weight division. But if you ask me, Adobe XD’s Repeat Grids feature indicates that we’re already there.
Let’s take a look at Adobe XD‘s new drag and drop asset import feature, and then you can decide for yourself. Here’s how we typically import assets today:
Save As→File→ImportorCtrl/Command+C→Ctrl/Command+V
“Drag and drop” has also been a feature in most design applications for as long as I can remember, but there’s no way to automate this action with various reusable components at once, essentially offering unique content to a set of components that are otherwise identical in terms of visuals – until now that is.
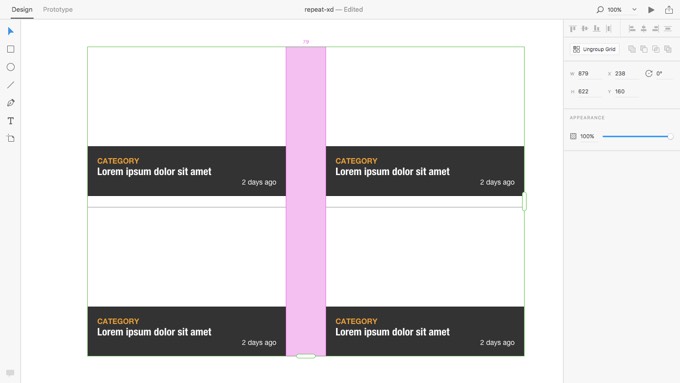
Step 1: Designing a Grid of Article Cards
Start by opening a new “Web” document from the splash screen – it doesn’t matter which size you choose, as long as there’s a lovely white canvas to work on. Press R to create and draw a rectangle, and ensure that the dimensions are 400x300px.
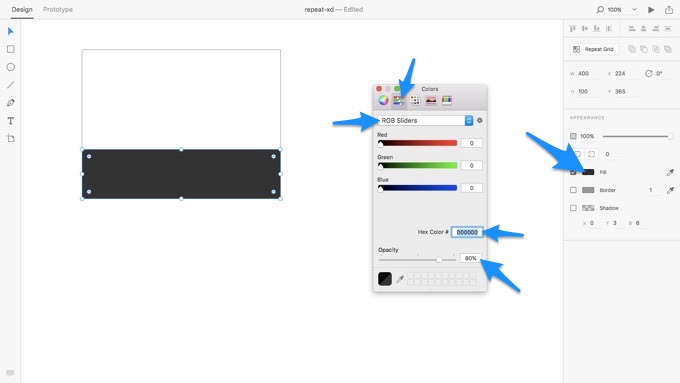
Now create another rectangle (400x100px), remove its border, and then use black (#000000) with 80% opacity for the “Fill” color – make sure to select Color Sliders → RGB Sliders first.
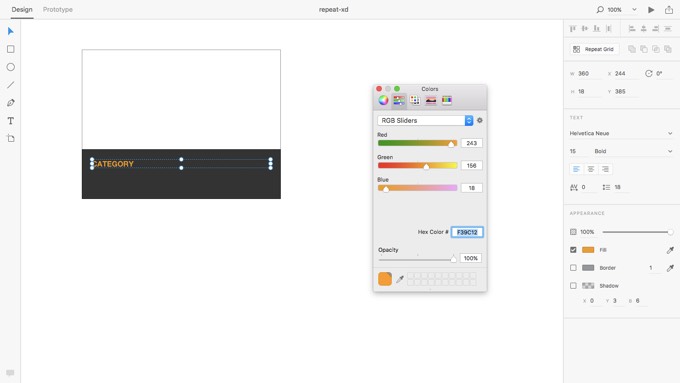
Let’s create a series of text layers to lay over this rectangle; in a moment it’ll be clear that we’re designing article cards consisting of the article’s category, title, and date. Press T to select the “Text” tool and use the following optional styles:
- Fill: #F39C12
- Text: Helvetica Neue, 15, Bold
- Height: 18 (same as Line Spacing)
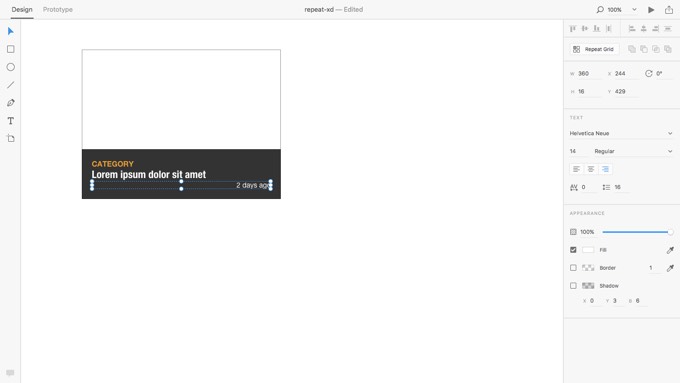
And again:
- Text: Helvetica Neue, 21, Condensed Bold
- Fill: #FFFFFF
- Height: 26
Final time:
- Text: Helvetica Neue, 14, Regular
- Fill: #FFFFFF
- Height: 16
- Align: Right
Duplicating the Component with Adobe XD’s Repeat Grids
Drag the mouse cursor to select all of the layers at once, then select the “Repeat Grid” tool from the sidebar. You’ll notice that the component now has tug-able side handles – you can tug these handles to tile the component as many times as needed. What happens to one tile will happen to all of them (in terms of styling, but not necessarily in content, which is very handy).
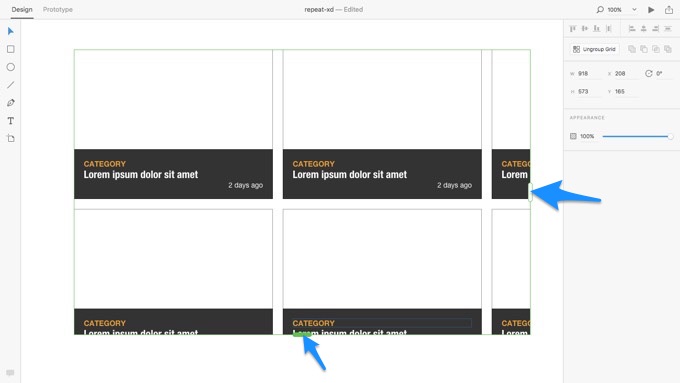
Tip: you can easily adjust the width of the gutter by dragging the spaces in-between each row or column of the grid.
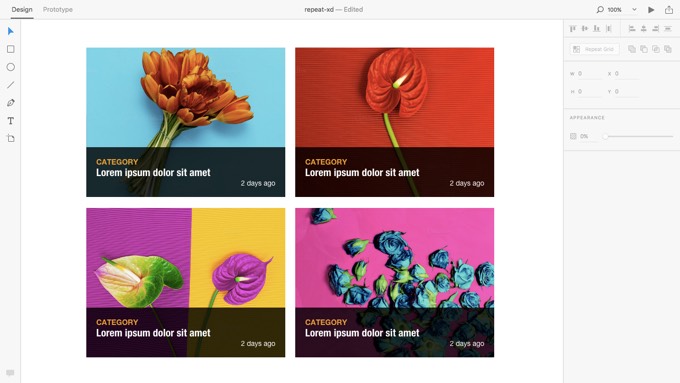
Mass-Importing Image Assets, Pain-Free
Now this is where the magic happens. Before we begin, here are the four images by the wonderful Evgeniya Porechenskaya that I’m using in the screenshots: Red Calla Minimalism, Calla Fashion Minimal, Blue Roses on a Crimson Background and Red Tulip Bouquet.
Save these images to your computer (the samples will do fine). If you then drag one of the images into one of the rectangles, the image will be automatically clipped (and of course applied to each tile). If you select all four images, however, one image will be applied to each tile; this is how we can save bundles of time when importing image assets into Adobe XD. So far, this is the quickest method when compared to Sketch or Photoshop.
Why?
- No need to mask, clip or resize the images to fit
- No need to repeat the steps over and over
- No need to use Overrides (in Sketch)
Importing Text Files Into Repeat Grids
We can do the same thing with text. Lets say that we want to replace each instance of the lorem ipsum title with a unique title, we would open TextEdit (or whatever app you use to create simple .txt files), write each title on a new line, and then drag the file into the layer, like we did with the images.
Adobe XD will automatically extract each new line and distribute them to every instance of that repeated layer.
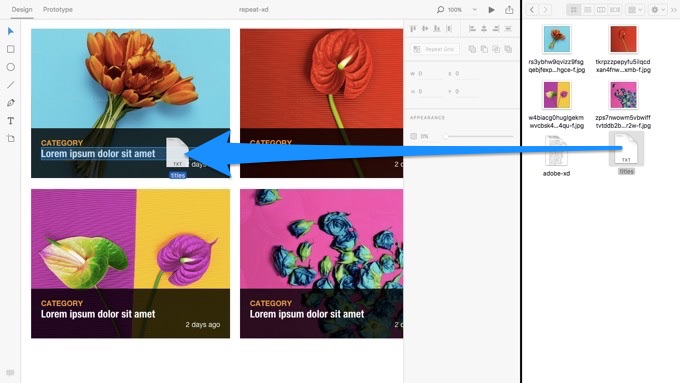
Warning: TextEdit uses Rich Text Format by default, but you can change this under File → Preferences (choose “Plain Text”).
Conclusion
It’s not always the designer that chooses the images or decides upon the text, but thanks to Adobe XD’s update, whoever is in charge of that can create an asset folder of image and text files, and the designer can then simply drag them directly into the design file and use them as-is. This highly-energetic workflow is much easier and can save you huge amounts of time.
What do you think? Will Adobe XD become a real contender against Sketch? What vital features do you think Adobe XD lacks?
Update: it did become a real contender against Sketch! Interested to learn more about the finer aspects of designing, prototyping and collaborating with Adobe XD? SitePoint Premium members can download our brand new book, Jump Start Adobe XD!
Frequently Asked Questions (FAQs) about Adobe XD
How can I import assets from other Adobe applications into Adobe XD?
Adobe XD allows you to import assets from other Adobe applications such as Photoshop and Illustrator. To do this, open the file in the respective application, select the assets you want to import, and copy them. Then, go to Adobe XD, select the artboard you want to place the assets on, and paste them. The assets will maintain their attributes and can be edited within Adobe XD.
Can I use Adobe XD for prototyping?
Yes, Adobe XD is an excellent tool for prototyping. It allows you to create interactive prototypes with ease. You can link artboards, add transitions, and even create micro-interactions. The prototype can be previewed within the application and shared with others for feedback.
How can I share my Adobe XD designs with others?
Adobe XD provides several options for sharing your designs. You can create a link to your prototype or design specs, which can be viewed in a web browser. You can also export your designs as images or PDFs. Additionally, Adobe XD integrates with several collaboration tools, allowing you to share your designs directly within these applications.
What are the system requirements for Adobe XD?
Adobe XD is available for both Windows and macOS. For Windows, you need Windows 10 Fall Creators Update (64-bit) or later. For macOS, you need macOS 10.12 or later. Additionally, you need at least 4 GB of RAM (16 GB recommended) and 2 GB of available hard-disk space for installation.
Can I use Adobe XD for free?
Adobe XD offers a free starter plan, which includes one active shared prototype, one active shared design spec, and 2 GB of cloud storage. If you need more features, you can upgrade to the paid plan.
How can I create a responsive design in Adobe XD?
Adobe XD supports responsive design through the use of responsive resize. This feature automatically adjusts and scales your design when you resize an artboard. You can also manually adjust the constraints for each element to control how they resize.
Can I animate my designs in Adobe XD?
Yes, Adobe XD supports auto-animate, which allows you to create animations between artboards. You can animate changes in size, position, rotation, and more. This feature makes it easy to create micro-interactions and transitions for your prototype.
How can I collaborate with others in Adobe XD?
Adobe XD supports real-time collaboration through coediting. This feature allows multiple people to work on the same document at the same time. You can also use the comment feature to leave feedback on designs.
Can I import Sketch files into Adobe XD?
Yes, Adobe XD supports importing Sketch files. To do this, simply open the Sketch file in Adobe XD. The file will be converted into an XD document, and you can edit the design as needed.
How can I learn Adobe XD?
There are many resources available to learn Adobe XD. Adobe provides a series of tutorials on their website. There are also numerous online courses and YouTube videos available. Additionally, practicing by creating your own designs is a great way to learn.