Add Rich Snippet Support in WordPress and Dominate Your Personal Brand

Google is providing a host of (relatively) new features that allow you to add “rich snippet” metadata to your web content. For those who design, write, and manage WordPress blogs, this is a powerful tool that can help you build your personal brand much more efficiently — the reason being that Google will display your author information in search results if you’ve properly labeled your metadata via the rich snippets markup!
The reward for adding rich snippets of metadata is that as you get more blogs published with your name, your face or logo keeps popping up in search results. This is just one more crucial way to get your personal brand in front of people, and it’s easy to achieve in WordPress.
What Are Rich Snippets?
Normally, HTML markup is used for displaying content in a web browser. “Rich snippets” are a format of HTML that allow you to carefully define pieces of information within a web page so that search engines and other programs know what the heck the data is good for.
Here’s an example of how you might normally introduce yourself:
<p>Hi there! My name is Tara Hornor! Nice to meet you.</p>
Using Rich Snippets, we can tell search engines who I am using code like this:
<p>Hi there! My name is <span itemprop="name">Tara Hornor</span>! Nice to meet you.</p>
You can define scores of items like logos, birthdays, product IDs, and much, much more. But, today I’m really only interested in me…or at least my standing as an author, so that my picture shows up prominently in Google search results.
For much more information on rich snippets, here’s everything you ever wanted to know:
Getting Started
For you non-web developer types out there, don’t worry about getting your hands a little dirty with some coding. I’ll walk you through it in baby steps.
Note: You will need access to the “Appearance” -> “Editor” area of WordPress, which means you’ll need to be an Admin for the site. You can still complete Steps 1-3 on your own and refer your admin to Steps 4-5 if you are not an admin yourself.
Step 1: Your Google+ Page
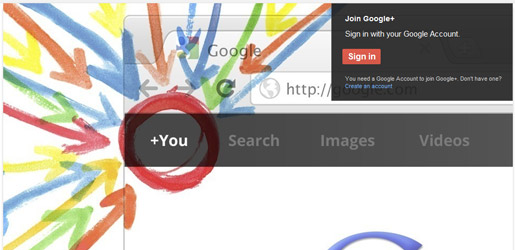
You’re going to need a Google+ page for this to work. If you haven’t got one already, go set up a page really fast (it just takes a few minutes), and come back to this walkthrough.
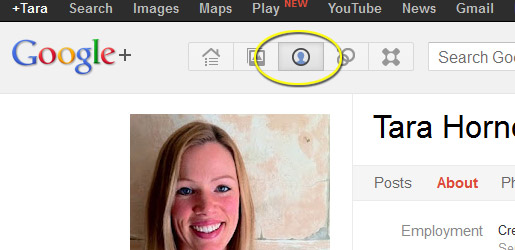
Step 2: Contributor To…
To tell Google that you’re officially a contributor (author) for a site, you have to update the “Contributor to” field on your About page. Log in to your G+ page and click on the “About” tab:
Now click the “Edit Profile” button in the upper-right part of the screen:
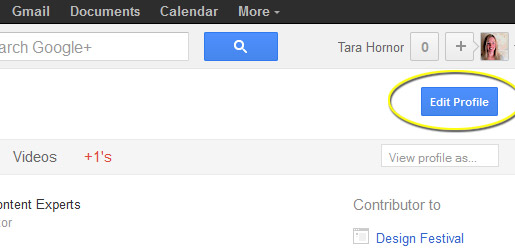
Click on the “Contributor to” section. When you hover your mouse over the field, it will highlight the entire section:
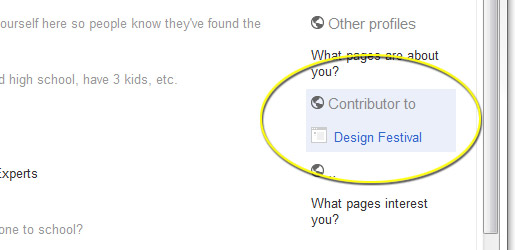
It’s very important to not include the “www” to the URL, as this will break the connection and Google will give you an error.
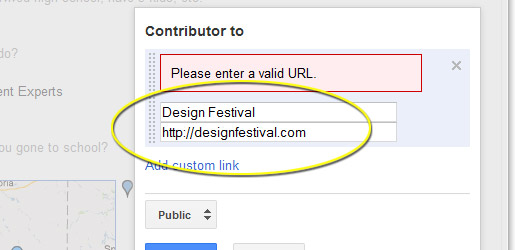
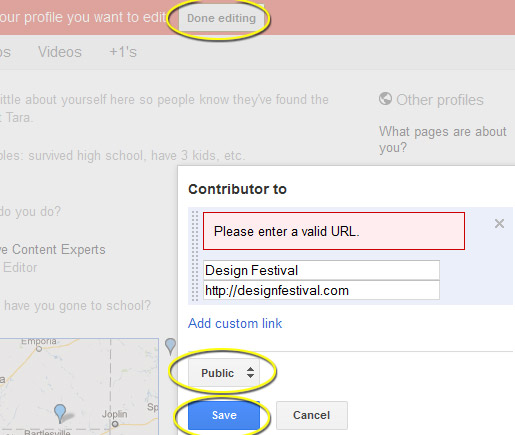
Make sure the link is set to “Public,” and hit save to complete. You’ll need to click the “Done Editing” button as well in the upper-right.
Step 3: WordPress Profile
Log in to your WordPress website, go to the “Users” -> “Profile” section, and paste your G+ URL into the “Website” field:
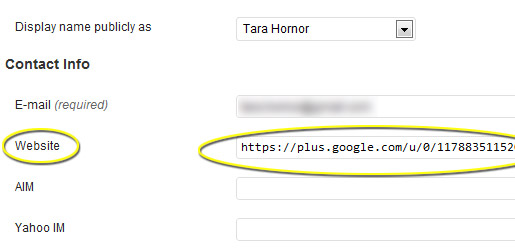
NOTE: Make sure you add “?rel=author” to the end of your G+ URL. This is very important. Now, my URL looks like this:
https://plus.google.com/u/0/117883511520701899763?rel=author
Step 4: WordPress Editor
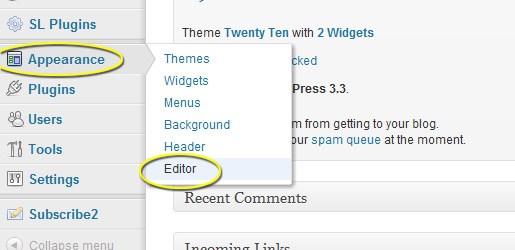
Next, we need to update your WordPress blog so that it automagically connects your G+ profile to your blog. If you don’t have admin access to your blog, then you’ll have to stop here. You will need to be able to access the “Appearance” -> “Editor” options within WordPress to complete this feature.
Sign into your WordPress blog as an admin, and cruise on over to the “Appearance” -> “Editor” option (I’m using WordPress 3.3.1 for this tutorial):
99% of the time, you will need to edit the “single.php” file, but your theme may have the info you need in the “content.php”, “loop.php”, “functions.php”, or other file. In our example, we’re going to “functions.php”.
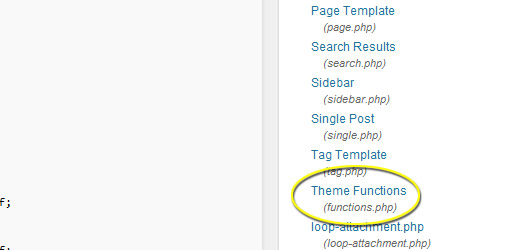
What you’re looking for as you skim through your PHP files is the point where the WordPress theme posts the author content and date of the post. This is usually in the same area as the title of the post. In some themes, you can simply paste the following code and call it good:
<a href="<?php the_author_url(); ?>" rel="author"><?php the_author('display_name'); ?></a>
This calls your author website (updated in Step 3), and makes your name the link to your profile page. Most importantly, the href has the rel=”author” code, that tells Google that you are the author of the page.
For the rest of us, using the default Twenty Ten theme in WordPress, here’s where the content I want to edit is displayed:
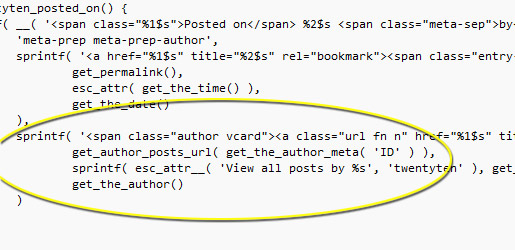
In this example, we only need to make a single small change. In the part of the function that calls the href for the author URL, add the rel=”author” code:
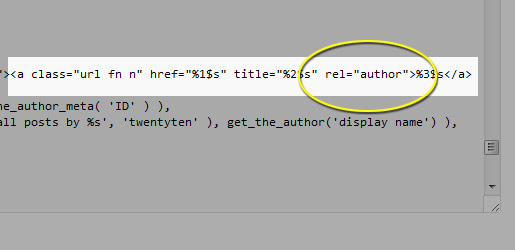
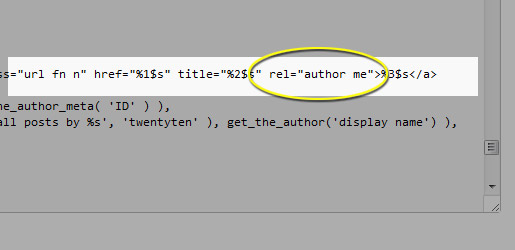
You can cover all of your bases by adding “me” to the rel=”author” so that Google can connect other information, like the author’s name to the profile:
Now, we need to tell WordPress which URL to grab. By default, WordPress will link readers to your archive of posts, which is not what we want anymore. We want WordPress to link to the “website” field from the author profile page. To do this, we need to change this line of code:
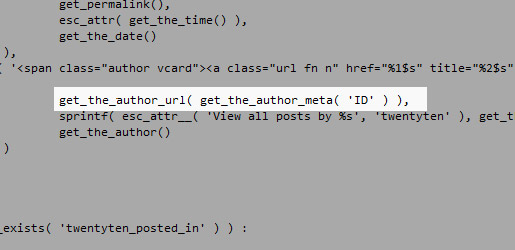
You’re changing the line from:
get_author_post_url( get_the_author_meta( 'ID' ) ),
To the code for grabbing the Author’s website:
get_the_author_url( get_the_author_meta( 'ID' ) ),
Once those updates are completed, save the file and you’re done!
Step 5: Testing The Results
To test the results, you can go to Google’s Rich Snippet Test page: http://www.google.com/webmasters/tools/richsnippets
Paste the URL of a post with the author’s name on it, and hit the “Preview” button:
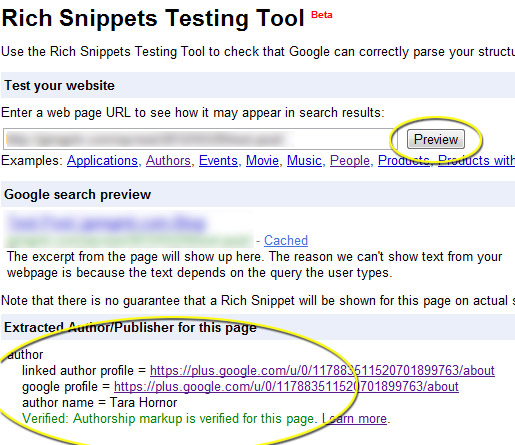
You’ll see the green confirmation at the bottom of the test, showing that the authorship has been verified.
Congrats! You’re now an officially verified author for the blog, and your face, logo, and other metadata will begin showing up in search results. You’re on you way to personal brand domination!
Have you grown your personal or company brand using rich snippets? Will you share any Google search queries to show off your results?
Frequently Asked Questions about Adding Rich Snippet Support in WordPress
What are rich snippets and why are they important for my WordPress site?
Rich snippets are structured data markup that site operators can add to their existing HTML, which in turn allow search engines to better understand what information is contained on each web page. They are important for your WordPress site because they can make your web pages appear more prominently in search results, thus improving click-through rates and driving more traffic.
How can I add rich snippets to my WordPress site?
You can add rich snippets to your WordPress site by using plugins like All in One Schema Rich Snippets or Schema Pro. These plugins allow you to add different types of schema markup to your website without needing to code.
What types of rich snippets can I add to my WordPress site?
There are several types of rich snippets you can add to your WordPress site, including reviews, products, recipes, events, and more. The type of rich snippet you should add depends on the content of your website.
How can I test if my rich snippets are working correctly?
You can test if your rich snippets are working correctly by using Google’s Structured Data Testing Tool. Simply enter the URL of your webpage and the tool will show you if there are any errors in your markup.
Can rich snippets improve my website’s SEO?
Yes, rich snippets can improve your website’s SEO by making your web pages appear more prominently in search results. This can improve click-through rates and drive more traffic to your website.
How long does it take for rich snippets to appear in search results?
It can take anywhere from a few days to a few weeks for rich snippets to appear in search results after you’ve added them to your website. This depends on when Google crawls your website.
Can I add rich snippets to my website without a plugin?
Yes, you can add rich snippets to your website without a plugin by adding the necessary structured data markup to your website’s HTML. However, this requires a good understanding of both HTML and structured data markup.
What is schema markup and how is it related to rich snippets?
Schema markup is a form of microdata that makes it easier for search engines to parse and interpret the information on your webpages more effectively. It is related to rich snippets because rich snippets are the visual representation of what schema markup adds to your website.
Can I use rich snippets for e-commerce products on my WordPress site?
Yes, you can use rich snippets for e-commerce products on your WordPress site. This can help display useful information like price, availability, and review ratings in search results.
Are there any downsides to using rich snippets on my WordPress site?
There are no major downsides to using rich snippets on your WordPress site. However, it’s important to ensure that your markup is correct and that it accurately represents your content, as misleading markup can result in penalties from search engines.
Tara Hornor has a degree in English and has found her niche writing about marketing, advertising, branding, graphic design, and desktop publishing. She is a Senior Editor for Creative Content Experts, a company that specializes in guest blogging and building backlinks. In addition to her writing career, Tara also enjoys spending time with her husband and two children.


Published in
·Canvas & SVG·Design·Design & UX·HTML & CSS·Illustration·Sketch·UI Design·Web·October 10, 2016