How to Add a PayPal Button in WordPress

Key Takeaways
- To add a PayPal button in WordPress, first create the PayPal button in your PayPal account by navigating to the “Create PayPal Button” under the “Tools” heading. There are six button types to choose from: Shopping Cart, Buy Now, Donations, Subscriptions, Automatic Billing, and Installment Plan.
- After creating the button, customize it by setting a name, ID number, price, and currency. You can also customize the button’s appearance and set shipping and tax amounts. Use either your merchant ID or primary email address for the account.
- The button’s code will be generated after clicking on the “Create Button” icon. This code can be added to your WordPress post or page by selecting the “Text” editor option first. Make sure the code is working by previewing the result in the “Visual” tab.
- If you prefer to use a custom button, create one using a CSS3 button generation program. After creating the button, load it into WordPress and make it clickable by adding the PayPal link. Paste the button’s code in the “Text” tab of your WordPress editor, preview it in the “Visual” tab, and publish your post.
Alongside your ecommerce needs, you’ll also want to develop responsive development skills as well. Take a look at the SitePoint Premium course Responsive Tips and Tricks for details!
If you have ever wanted to sell anything online you will have wrestled with the issue of how to do it. There are many tools available, such as shopping carts and payment processors of various kinds. If you’re new to the process of accepting payments online, one of the easiest ways to do it is by making use of a third-party service such as PayPal.
All that’s necessary is to set up a PayPal account, connect it with your bank and you’re good to go. When you set up payments you can choose to use settings which come with PayPal or to add a custom payment button. You will also need a website to place the buttons on, of course. In this tutorial, you will install it in a WordPress site.
Implementing a PayPal Button in WordPress

The first step is to log into PayPal. When you do so, you will see several tabs on the top-left portion of the site. You will use these to navigate to the section where you can create PayPal buttons.
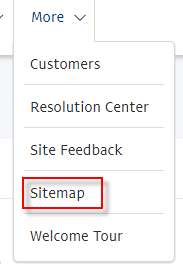
Getting there is a bit convoluted, though. The first step is to click on the More tab and select Sitemap from the drop down.
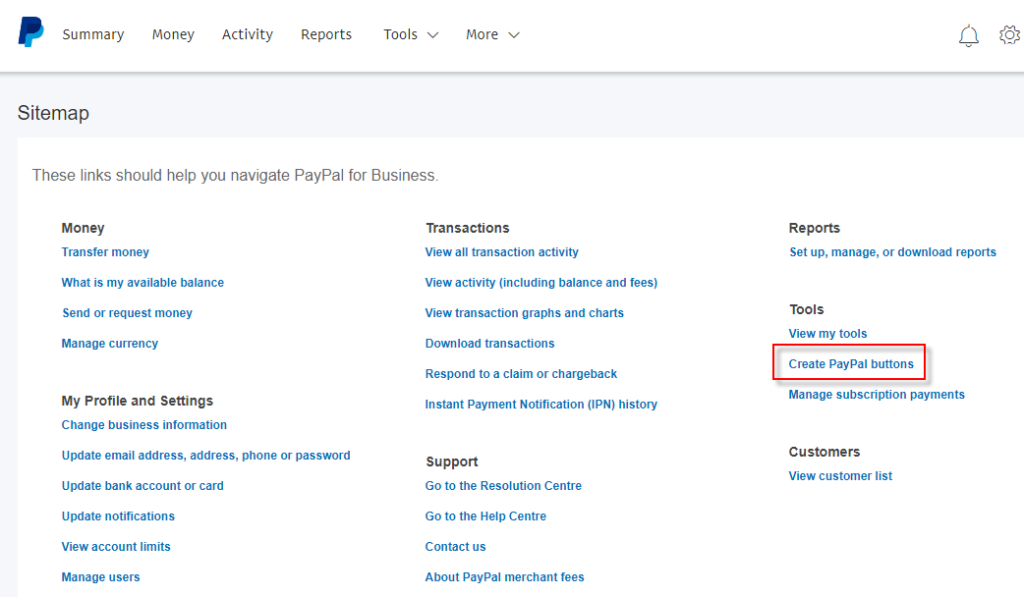
This brings up the Sitemap page. Under the Tools heading, click on “Create PayPal Button”.
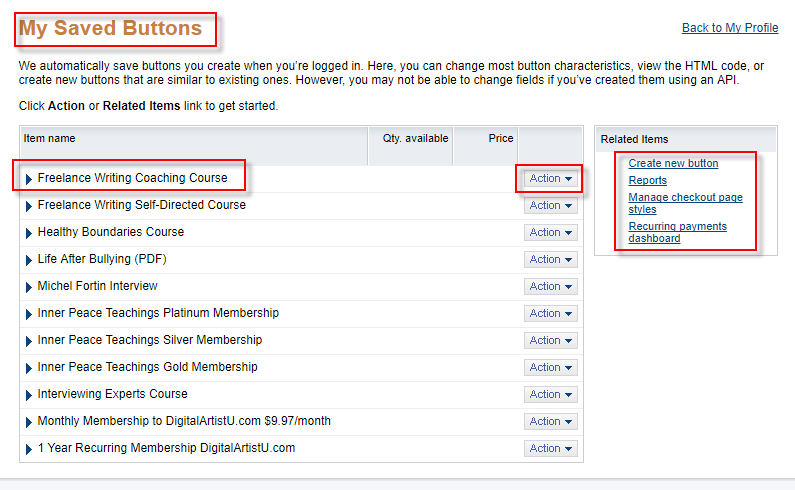
This brings up the My Saved Buttons Page. As you can see, I’ve created many buttons in the past. Here, you can create new buttons, edit old ones, manage checkout page styles, look at recurring payments and more. To keep things simple, you will learn how to create a new button and add it to your WordPress post or page. You will also learn how to create and use a custom button, independent of PayPal’s style choices. Many marketers do that for reasons of styling, branding or testing new buttons that could potentially convert better.
Creating the PayPal Button
To get started, click on the Create a New Button link under the Related Items section.
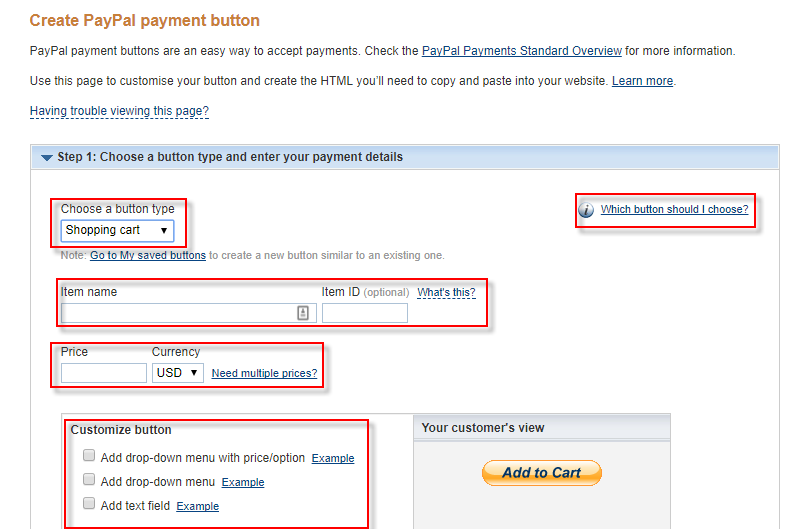
This brings up the Create PayPal payment button page. As you can see, there are many settings here. We will look at each one in turn.
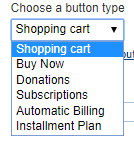
The first one is the button type. As you can see in the drop-down menu, there are six options.
- Shopping cart
- Buy Now
- Donations
- Subscriptions
- Automatic Billing
- Installment Plan.
If you are selling a single product or service, the Shopping Cart or Buy Now buttons will do the trick. If you want donations, the Donations button would be the right one to use. If you sell memberships or subscriptions to your product or service, the Subscriptions or Automatic Billing buttons would be a good bet. The Installment Plan option is something you might want to use if you offer clients the ability to pay a fee over a few months, rather than all at once.
To give you an idea of what these buttons look like, click on the “Which button should I use?” heading at the top-right.
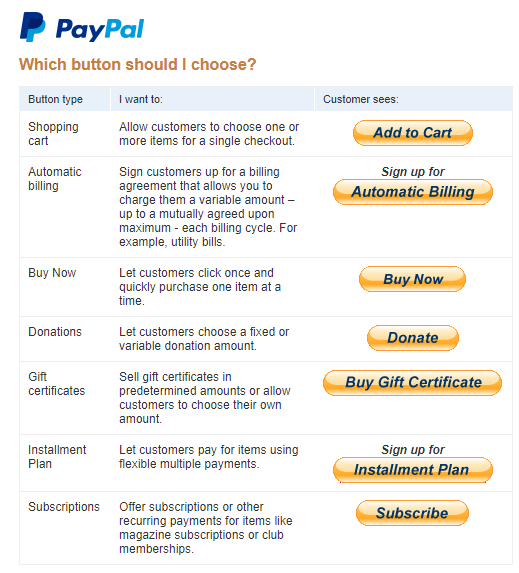
Above are your options.
Directly below the button type options is where you set a name for your item and an ID number or name for tracking. Below that, you set the price and currency. If you need to make use of multiple currencies, you would click on the “Customize” link in the “Customize Button” section.
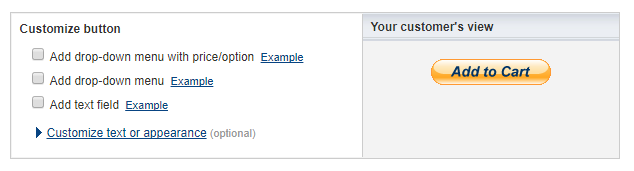
Once you have filled out the above settings, it’s time to look at the “Customize Button” section, as above. We will look at the options in turn and a preview will be displayed on the right, what you would see on your website.
Here are the options when the first check box is enabled and how the button will be displayed as seen in the preview on the right.
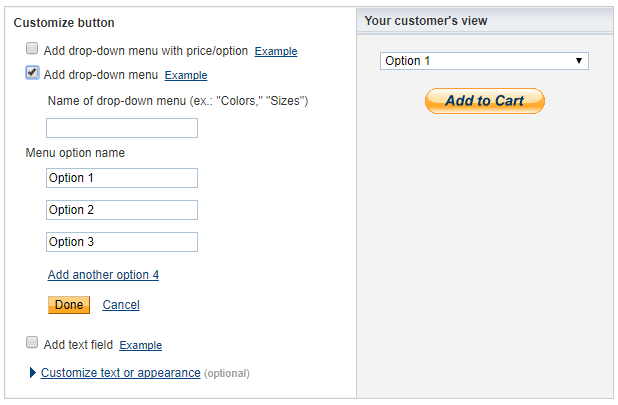
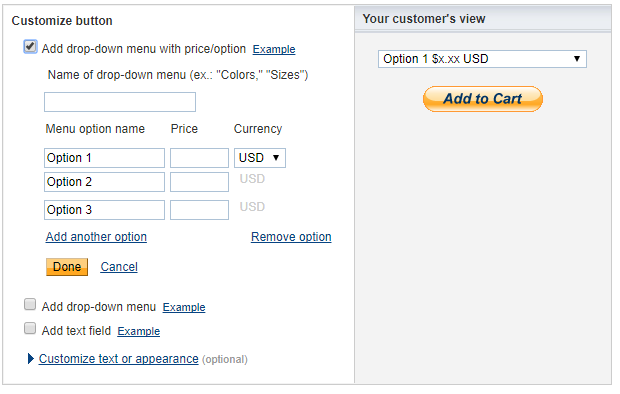
Here are your options when the second drop-down checkbox is enabled and how the button will be displayed as seen in the preview on the right.
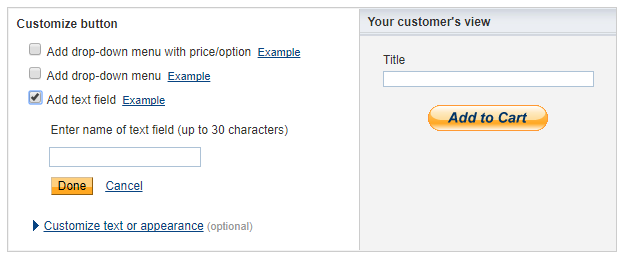
And here are the options available when the third checkbox is enabled and how the button will be displayed as seen in the preview on the right. As you can see, PayPal gives you a lot of control.
When you’re done with the “Customize Button” section, you set the shipping amount (if any), the tax (if any) and then you can choose to use either your merchant ID or your primary email address on the account. If you choose to use a secure merchant account ID, PayPal links your merchant account to your primary email address, making the email invisible to spammers.
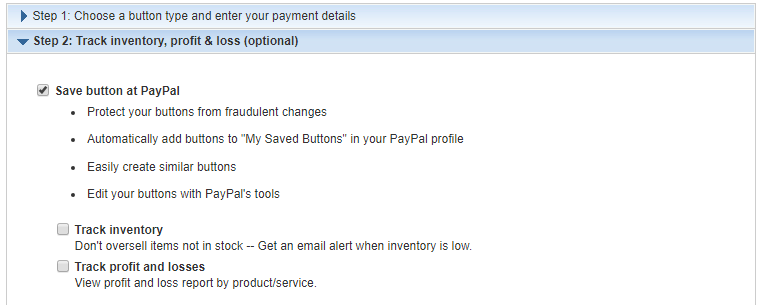
Now, it’s time to move to Step 2, Track Inventory, Profit and loss (optional). If you are in the business of selling a lot of inventory, this step could be very beneficial.
Normally, the checkboxes are not selected here. Briefly, we will select each one and look at the options. The first checkbox enables you to save your button at PayPal and protect from fraudulent charges. You also have two other options in this section, Track Inventory and Track Profits and Losses.
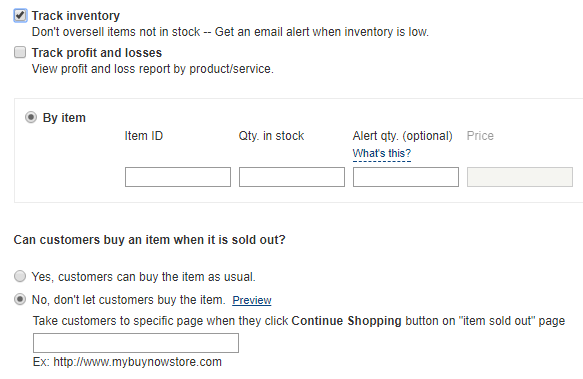
As you can see, you can track inventory by item and if an item is sold out, customers can buy it or not. When shoppers click on the Continue Shopping button on the “item sold out” page, you can direct them to a web page of your choice. If you enable the Track profit and losses checkbox, you can add the price into the By item section (which is currently grayed out).
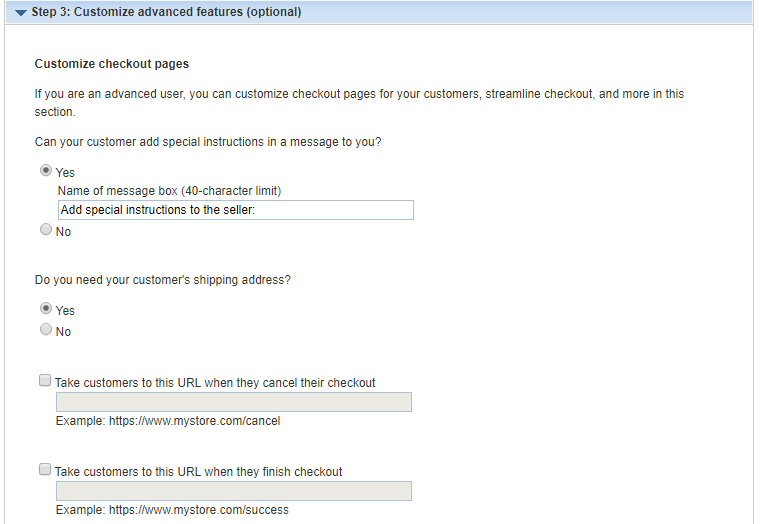
Once you’ve completed this section, it’s time to move to Step 3, Customize Advanced Features (optional). In general, I go with the defaults on this page. The only settings I change are “Take customers to this URL when they cancel their checkout” and “Take customers to this URL when they finish their checkout”. Of these two, the second is most important. In this case, you would probably want to send them to the checkout or download page for your product or service.

Also, in this section, you will need to click on the Create Button icon at the bottom of the page. This will create the code for your button and display it on another page. You will need this for your website.
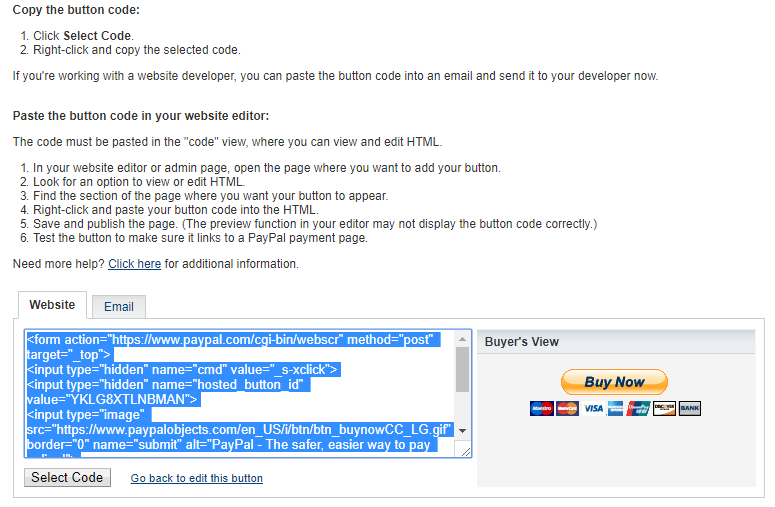
On the page above is the code for your website. Note the two tabs above the highlighted code. If you click on the Website tab, you will see the Buyer’s view preview on the right. This is what you will see on your website.

If you choose the Email option, the view changes dramatically. You can email this link to someone to buy your product or service. You could also use this link with a custom button on your site. Here’s how both options work.
Adding a Paypal Button to WordPress
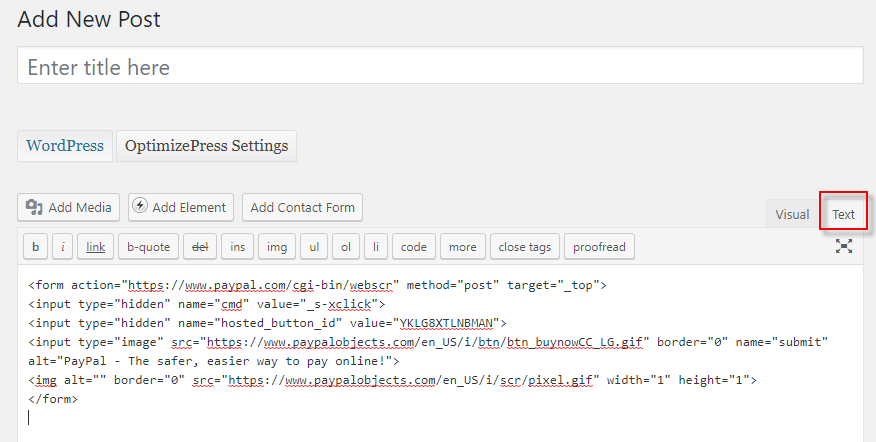
Here, we use the Add New Post option. When you add the code, you must select the “Text” editor option, first. If you put the code into the “Visual” editor section, it will break the code.
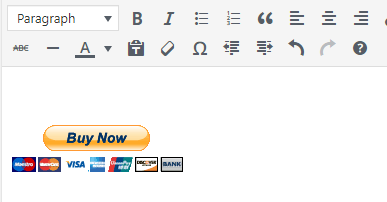
To preview the result, click on the “Visual” tab. Add any text you wish, such as price and terms and publish your post.
Using Custom Buttons
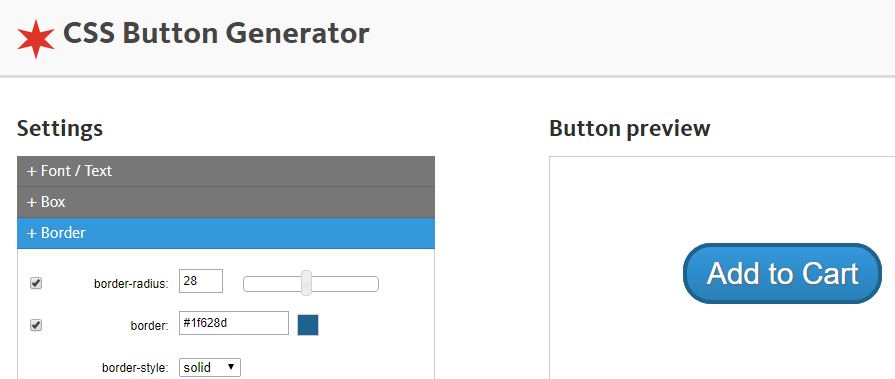
If you’re one of those people who doesn’t like the PayPal-styled buttons, or don’t like the way PayPal buttons in WordPress look, you can create your own using a CSS3 button generation program like the one above. Once you have the button, you want to take the final image, load it into your CMS and use it in combination with your PayPal code. Here’s how it works with the Belcher Button.
First off, you need to load the button into WordPress. In the dashboard, click on the Media tab and click on Add New. In the loading section, drag and drop to add the image or click on the Select Files button to upload the image.
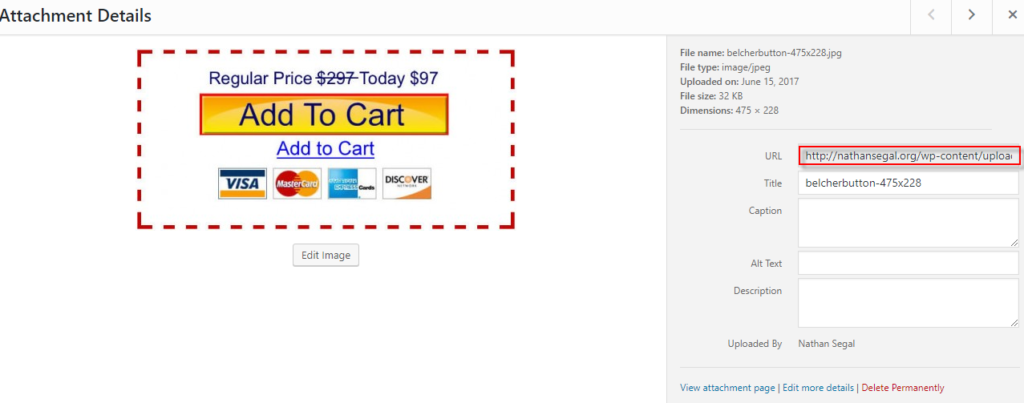
In the attachment details section, you need to grab the URL, which is the location in WordPress where the file has loaded, you will need that for the next step, which is to make the image clickable. The idea is when you click on it the custom PayPal button in WordPress, it will link you directly to the payment page on PayPal.
Here’s what the code looks like to make the button clickable.
<a href="https://www.paypal.com/cgi-bin/webscr?cmd=_s-
xclick&hosted_button_id=YKLG8XTLNBMAN"><img src="http://nathansegal.org/wp-content/uploads/2017/06/belcherbutton-
475x228.jpg" border="0" /></a>
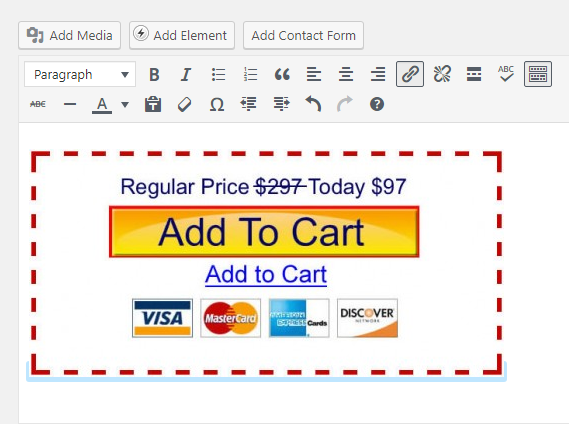
Next, you paste the code (again, under the “Text” tab in your WordPress editor). To make sure it displays correctly, check the Visual tab. As a final step, publish the post, view the result, then click on the add to cart image. This should take you to the PayPal order page!
Have you added PayPal payment options to your WordPress pages? Feel free to tell us your experiences or leave suggestions in the comments below!
Frequently Asked Questions (FAQs) about Adding a PayPal Button in WordPress
How can I customize the appearance of my PayPal button on WordPress?
Customizing the appearance of your PayPal button can help it blend seamlessly with your website’s design. You can do this by using CSS (Cascading Style Sheets). CSS allows you to modify the button’s color, size, shape, and more. You can add custom CSS in your WordPress theme’s style.css file or in the Customizer under ‘Additional CSS’. Remember to use the correct CSS selector for your PayPal button.
Can I add multiple PayPal buttons on my WordPress site?
Yes, you can add multiple PayPal buttons on your WordPress site. You can place them on different pages, posts, or even within the same page or post. Each button can be configured individually, allowing you to set different prices, products, or services for each button.
How can I test my PayPal button before going live?
PayPal provides a sandbox environment for testing purposes. You can create a sandbox account on the PayPal Developer site. Once you’ve set up your sandbox account, you can use it to make test purchases and ensure that your PayPal button is working correctly.
Is it possible to add a PayPal button without using a plugin?
Yes, it’s possible to add a PayPal button without using a plugin. You can do this by generating a PayPal button directly from your PayPal account and then embedding the button’s HTML code into your WordPress site. You can add this code to a post, page, or widget area using the Custom HTML block or widget.
How can I add a PayPal button to my WordPress site’s sidebar?
You can add a PayPal button to your WordPress site’s sidebar by using a widget. Go to Appearance > Widgets in your WordPress dashboard, then drag and drop the Custom HTML widget into your sidebar. Paste your PayPal button’s HTML code into the widget, then click ‘Save’.
Can I use a PayPal button to accept donations on my WordPress site?
Yes, you can use a PayPal button to accept donations. When creating your PayPal button, select the ‘Donations’ button type. This will allow visitors to enter their own donation amount when clicking the button.
How can I add a PayPal button to my WooCommerce store?
You can add a PayPal button to your WooCommerce store by using the WooCommerce PayPal Checkout Gateway plugin. This plugin integrates PayPal into your WooCommerce checkout process, allowing customers to pay directly with PayPal.
Can I add a PayPal button to a WordPress.com site?
Yes, you can add a PayPal button to a WordPress.com site. However, this feature is only available to sites on the Premium, Business, or eCommerce plans.
How can I troubleshoot issues with my PayPal button?
If you’re experiencing issues with your PayPal button, check to ensure that your PayPal email address is correct and that your PayPal account is properly set up to receive payments. If you’re using a plugin, make sure it’s updated to the latest version and compatible with your version of WordPress.
Can I refund payments made through my PayPal button?
Yes, you can refund payments made through your PayPal button. You can do this by logging into your PayPal account, finding the transaction in your activity log, and clicking ‘Issue a refund’.
Nathan Segal has been working as a freelance writer for 18 years. He written over 1,000 articles and has published 9 books, mostly on computer graphics and photography. You can learn more about him at http://NathanSegal.org.