
XML and JavaScript in Mozilla

In my article, “Read and Display Server-Side XML with JavaScript“, I discussed the manipulation of XML files using JavaScript in Microsoft Internet Explorer. In this article, I’ll explain how to read and use XML file data using JavaScript in Mozilla. We will see how to display tag values, tag attribute values, and more.
Henceforth, I won’t explicitly mention Mozilla in this article, because we will be dealing with Mozilla only, which includes Netscape 6.x, 7.x. I’ll let you know specifically when I’m referring to Microsoft Internet Explorer (MSIE, or simply IE), however.
Key Takeaways
- XML files can be read and manipulated using JavaScript in Mozilla, including displaying tag values and attribute values. The same methods can be used for Netscape 6.x, 7.x, and Microsoft Internet Explorer.
- To test if the visitor is using Mozilla, a simple variable can be used. Once the browser is identified, the XML file can be loaded using JavaScript, and the data can be further processed or manipulated.
- Tag attributes can be accessed using the getAttribute() method. For example, to extract the age of the first employee in the XML file, the following code can be used: document.write(employees[0].getAttribute(“age”)).
- It’s not possible to write to an XML file using client-side JavaScript. However, the contents of an external XML file can be manipulated and used for display purposes in a client-side JavaScript application.
The Sample XML File
I’ll use the same XML file that I used in my last article, so it’s easier for those who have already dealt with that file to understand. Consider the following XML file:
<?xml version="1.0" ?>

<company>

  <employee id="001" sex="M" age="20">Premshree Pillai</employee>

  <employee id="002" sex="M" age="24">Kumar Singh</employee>

  <employee id="003" sex="M" age="21">Ranjit Kapoor</employee>

  <turnover>

    <year id="2000">100,000</year>

    <year id="2001">140,000</year>

    <year id="2002">200,000</year>

  </turnover>

</company>
As you can see, the above XML file shows a company’s employees’ details, with the name as the tag <employee>‘s main (or node) value; other details such as an employee’s id, sex and age are given as attributes id, sex and age within the same tag. The file also shows the company’s turnover, with the turnover figure as the tag <turnover>‘s node value, and the year as an attribute year within the same tag.
In the sections that follow, we’ll manipulate the above XML file, so that it makes sense to us.
XML and JavaScript
Before we actually get into reading and further manipulating the XML file, it’s important to know whether the visitor is using Mozilla or some other browser.
Test for Mozilla
Obviously, you will not be coding your XML-based JavaScript application for one particular browser, when you can so easily extend support for other browsers. Yet, the way you code your application will depend on which browser the visitor is using.
To test for Mozilla, we can use a simple variable as follows:
var moz = (typeof document.implementation != 'undefined') && (typeof

 document.implementation.createDocument != 'undefined');
The above variable can be used as a boolean variable:
if(moz) {

  // Mozilla!!

} else {

  // Something else...

}
Load the XML File
Once we’ve identified the browser, it’s time to load the XML file:
var xmlDoc=document.implementation.createDocument("", "doc", null)

xmlDoc.load("someXMLFile.xml");

xmlDoc.onload = someProcessingFunction;
The first line in the above code creates an instance of the xmlDoc object; the second line loads the XML file we want (someXMLFile.xml, in this case); the third line is used to further process, or manipulate, the XML file we’ve just loaded.
Now, it would be better to create a different function to load the XML file:
var xmlDoc;

function importXML(file) {

  xmlDoc=document.implementation.createDocument("", "doc", null)

  xmlDoc.load(file);

  xmlDoc.onload = readXML;

}
Load the XML File for Mozilla and IE
Most of the manipulation techniques used for Mozilla will also work with IE. However, the XML file is loaded differently in each, so let’s look at a function that will load an XML file in Mozilla as well as IE:
var xmlDoc;

function importXML(file) {

  var xmlDoc;

  var moz = (typeof document.implementation != 'undefined') && (typeof

 document.implementation.createDocument != 'undefined');

  var ie = (typeof window.ActiveXObject != 'undefined');


  if (moz) {

    xmlDoc = document.implementation.createDocument("", "", null)

    xmlDoc.onload = readXML;

  } else if (ie) {

    xmlDoc = new ActiveXObject("Microsoft.XMLDOM");

    xmlDoc.async = false;

    while(xmlDoc.readyState != 4) {};

  }

  xmlDoc.load(file);

}
The above function can be used to load an XML file for both Mozilla and IE. Now, to load a XML file, the function must be called as:
importXML("YourXMLFile.xml");Note that the variable ie is used to test for IE. IE uses an ActiveX Object to load an XML file using the Microsoft.XMLDOM object. In the following section, we’ll explore a few methods we can use to access the XML file data.
getElementsByTagName()
The getElementsByTagName method is the most commonly used method available in the XML DOM (Document Object Model) object. As the function’s name suggests, this function returns all the elements (or tags) with the given name within the specified element. Basically, it returns an object collection. For example:
var xmlFile = xmlDoc.getElementsByTagName("company");
In the above code, an object collection containing all the <company> elements in the document is stored in the variable xmlFile. Note that the argument you pass to getElementsByTagName() is case-sensitive, i.e. getElementsByTagName("company") is different from getElementsByTagName("ComPanY").
Find the Number of Elements of a Tag
In the XML file illustrated at the beginning of this article, we see exactly one <company> tag. The object collection returned by getElementsByTagName() has a length method that gives the number of elements in the collection. For example, to find the number of <company> tags, the following code is used:
var noOfCompanyTags = xmlDoc.getElementsByTagName("company").length;Displaying the variable noOfCompanyTags using document.write() will display 1.
Display the Content of a Tag
Again referring to the XML file, suppose we want to display the name of the first employee. Now, the <employee> tag is within the <company> tag; so, first we need to get the collection of all the <company> tags, and through this tag get a collection of all <employee> tags. Let’s take a look at how to display the name step by step:
var companies = xmlDoc.getElementsByTagName("company");The above code returns an object collection for the <company> tag to the companies variable. Note that companies is an array.
var employees = companies[0].getElementsByTagName("employee");The above code returns an object collection for the <employee> tag to the employees variable, again in an array. Note the index used in the company variable; this is used because we need to access only the first element of the array. There may only be one <company> tag, but it’s still an array, so we use the index 0 to get the element.
To display the name of the first employee, we use the following code:
document.write(employees[0].firstChild.nodeValue);The above code will display Premshree Pillai. As is clear, employees is a 3-element array. So, to display the name of the second employee, the code would be:
document.write(employees[1].firstChild.nodeValue);
The above code will display Kumar Singh. All the above steps we used to display the employee name (Premshree Pillai) can be integrated into a single code snippet as follows:
document.write(xmlDoc.getElementsByTagName("company")[0].getElementsByTagName("employee")[0]

.firstChild.nodeValue);
Access Tag Attributes
Storing information in XML files in the form of attributes is very common. Consequently, it is important that we are able to access attributes in XML files. In our example XML file, we have stored various employee details, including id, sex, and age, in the <employee> tag. To extract the age of the first employee, we could use the following code:
document.write(employees[0].getAttribute("age"));The above code will output 20. The code used the getAttribute() method on the employees[0] object. Alternatively, we could use the following code to obtain the same result:
document.write(xmlDoc.getElementsByTagName("company")[0].getElementsByTagName("employee")[0]

.getAttribute("age"));
Now, suppose you want to display the details of all employees (id, sex, age) in a tabular form. To do this, we must loop through all the <employee> tags. Following is the entire code to do this (excluding the code that loads the file):
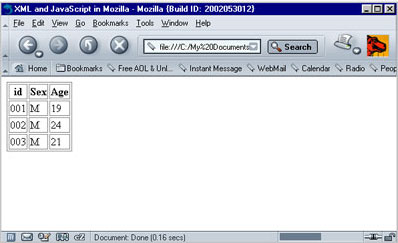
var companies=xmlDoc.getElementsByTagName("company");

var employees=companies[0].getElementsByTagName("employee");

document.write('<table border="1">');

document.write('<tr><th>id</th><th>Sex</th><th>Age</th></tr>');

for(var i=0; i<employees.length; i++) {

  document.write('<tr>');

  document.write('<td>' + employees[i].getAttribute("id") + '</td>');

  document.write('<td>' + employees[i].getAttribute("sex") + '</td>');

  document.write('<td>' + employees[i].getAttribute("age") + '</td>');

  document.write('</tr>');

}

document.write('<table>');
The output of the above code in Mozilla looks like this:
Is it Possible to Write to an XML File?
No, it’s not possible to write to an XML file using client-side JavaScript. You can manipulate all the contents of an external XML file and use it for display purposes in your client-side JavaScript application, but it is not possible, for instance, to take input from the user, and make changes to the XML file using JavaScript.
Conclusion
We now know how to test for Mozilla, load an XML document using JavaScript, and manipulate the contents of an XML file using JavaScript in Mozilla. Using XML and client-side JavaScript, several simple applications can be created:
- you could use XML files to store small databases, then use JavaScript to display the data according to your needs
- you could create something like a news “ticker”, where you store the news items in a XML file and your JavaScript reads the contents of the file and ticks the news items on the screen
These are just a few examples where XML and client-side JavaScript could be used. I hope this article has given you an introductory idea of using XML and client-side JavaScript in Mozilla.
Frequently Asked Questions (FAQs) about XML and JavaScript in Mozilla
What is XML and how does it work with JavaScript in Mozilla?
XML, or Extensible Markup Language, is a markup language that defines a set of rules for encoding documents in a format that is both human-readable and machine-readable. It is primarily used to transport and store data. In Mozilla, JavaScript can be used to parse and manipulate XML data. JavaScript provides methods and properties to navigate through the XML tree structure and extract the information you need.
How can I use JavaScript to parse XML in Mozilla?
Parsing XML with JavaScript in Mozilla involves using the DOMParser object. This object allows you to parse XML or HTML source code from a string into a DOM Document. Once the XML data is parsed into a DOM Document, you can navigate through its tree structure and extract the data you need using various DOM methods and properties.
What is the role of the XMLHttpRequest object in XML parsing?
The XMLHttpRequest object is a built-in browser object that allows you to send HTTP or HTTPS requests to a web server and load the server response data back into your script. It can be used to fetch XML data from a server and then parse that data using JavaScript.
How can I navigate through an XML document using JavaScript?
Once an XML document is parsed into a DOM Document using JavaScript, you can navigate through its tree structure using various DOM methods and properties. These include methods like getElementById(), getElementsByTagName(), and getElementsByClassName(), and properties like parentNode, childNodes, firstChild, lastChild, previousSibling, and nextSibling.
How can I extract data from an XML document using JavaScript?
After navigating to the desired node in an XML document using JavaScript, you can extract its data using the nodeValue property. This property returns the value of the node. If the node is an element node, the nodeValue property will return null.
How can I modify an XML document using JavaScript?
JavaScript provides various DOM methods that allow you to modify an XML document. These include methods like createElement(), createTextNode(), appendChild(), insertBefore(), replaceChild(), and removeChild().
How can I handle XML namespaces in JavaScript?
XML namespaces are used to avoid name conflicts in XML documents. In JavaScript, you can handle XML namespaces using the namespaceURI property and the getElementsByTagNameNS() method.
What is the difference between XML and JSON?
XML and JSON are both used to store and transport data. However, they have different syntaxes and are used in different scenarios. XML is a markup language that uses tags to define elements, while JSON is a lightweight data-interchange format that uses JavaScript syntax.
Can I use JavaScript to convert XML to JSON?
Yes, you can use JavaScript to convert XML data to JSON format. This involves parsing the XML data, traversing the XML tree structure, and then constructing a corresponding JSON object.
What are some common errors when working with XML and JavaScript and how can I debug them?
Common errors when working with XML and JavaScript include syntax errors, DOM errors, and XMLHttpRequest errors. These can be debugged using various tools and techniques, such as the browser’s developer tools, console.log statements, and try-catch blocks.
Premshree studies engineering in Information Technology at Mumbai University, India. He's written articles for a range of popular Indian IT magazines, and his site, QikSearch has featured in 'Digit' Magazine - India's No. 1 technology magazine.

