

Yes, it is real, it is finally here! The long waited follow-up to the introductory article is here, just in time for the new year!
In the first article, we learned about graph databases, their differences and advantages over traditional databases, and about Neo4j. In this article, we are going to install Neo4j, integrate and evaluate the gems listed in the first part of this series.
The scenario that we are going to be working with is the continuation of the simple idea in the first article, a social networking example that is capable of producing traversal queries such as “given the fact that Bob is my friend, give me all friends that are friend’s of friend’s of friend’s of Bob”.
Key Takeaways
- Installing Neo4j on a Mac is streamlined using Homebrew, which simplifies the process to a few terminal commands.
- The Ruby gem Neo4j.rb is essential for integrating Neo4j with Ruby, especially when using JRuby, allowing for object-oriented programming with nodes and relationships instead of rigid tables.
- Neography provides a lighter alternative for integrating Neo4j with Ruby without JRuby, utilizing a thin wrapper around Neo4j’s REST API for those preferring standard Ruby.
- Neoid extends ActiveRecord to interact with the Neo4j graph database, enabling fast graph queries while maintaining a traditional RDBMS schema for other application needs.
- The practical example demonstrates creating a simple social network to explore friends of friends using Neo4j, showcasing the database’s strength in handling complex, deeply interconnected data.
Installing Neo4j
Installing the Neo4j server is pretty straightforward. You can download the standalone server here, or install it using Homebrew. For this article and for the sake of simplicity, we are going to use Homebrew:
$ brew update && brew install neo4j
Once the installation is done, the following commands are available:
Start the server:
$ neo4j start
Stop the server:
$ neo4j stop
Open webadmin, which allows you to manipulate the data using a web interface:
$ open http://localhost:7474/webadmin/
Using Neo4j with Ruby
Now that the server is installed, the next step is going to be the integration with Neo4j. As mentioned in the introductory article, the gems that we are going to be evaluating are: Neo4j.rb, Neoid, and Neography.
Neo4j.rb
What is Neo4j.rb, according to the author:
You can think of Neo4j as a high-performance graph engine with all the features of a mature and robust database. The programmer works with an object-oriented, flexible network structure rather than with strict and static tables — yet enjoys all the benefits of a fully transactional, enterprise-strength database.
This gem is really extensive and I encourage you to explore all of its features. For this article I will be focusing only in one aspect: nodes and relationships.
Prerequisites
This gem requires JRuby. If you are using RVM, you can easily install it with:
$ rvm install jruby
Next, switch to JRuby by executing:
$ rvm use jruby
Installing Neo4j.rb
You can add neo4j to your Gemfile:
$ gem 'neo4j'
And run Bundler:
$ bundle
Or install manually with:
$ gem install neo4j
Integration
Before we can create our nodes and our relationships, we need to have our code be part of a transaction. This is required because Neo4j has ACID transactions.
Since our example is relatively simple, we are going to encapsulate our code to run inside a Neo4j::Transaction block:
require 'rubygems'

require 'bundler/setup'

require 'neo4j'
Neo4j::Transaction.run do

  # our code here

end
The next thing that we are going to do is create a few nodes that will represent our users:
require 'rubygems'

require 'bundler/setup'

require 'neo4j'
Neo4j::Transaction.run do

  me   = Neo4j::Node.new(:name => 'Me',   :age => 31)

  bob  = Neo4j::Node.new(:name => 'Bob',  :age => 29)

  mark = Neo4j::Node.new(:name => 'Mark', :age => 34)

  mary = Neo4j::Node.new(:name => 'Mary', :age => 32)

  john = Neo4j::Node.new(:name => 'John', :age => 33)

  andy = Neo4j::Node.new(:name => 'Andy', :age => 31)

end
Next, we create the friendship relationship between the users:
require 'rubygems'

require 'bundler/setup'

require 'neo4j'
Neo4j::Transaction.run do

  me   = Neo4j::Node.new(:name => 'Me',   :age => 31)

  bob  = Neo4j::Node.new(:name => 'Bob',  :age => 29)

  mark = Neo4j::Node.new(:name => 'Mark', :age => 34)

  mary = Neo4j::Node.new(:name => 'Mary', :age => 32)

  john = Neo4j::Node.new(:name => 'John', :age => 33)

  andy = Neo4j::Node.new(:name => 'Andy', :age => 31)
  me.both(:friends)   << bob

  bob.both(:friends)  << mark

  mark.both(:friends) << mary

  mary.both(:friends) << john

  john.both(:friends) << andy

end
This is how the friendship relationship between the users (nodes) is currently represented:
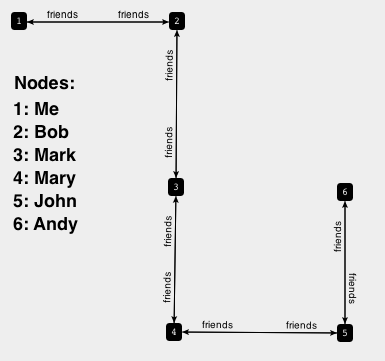
The last step for this example is to traverse the nodes and find all friendship relationship from Me to Andy.
The complete example looks like this:
require 'rubygems'

require 'bundler/setup'

require 'neo4j'
Neo4j::Transaction.run do

  me   = Neo4j::Node.new(:name => 'Me',   :age => 31)

  bob  = Neo4j::Node.new(:name => 'Bob',  :age => 29)

  mark = Neo4j::Node.new(:name => 'Mark', :age => 34)

  mary = Neo4j::Node.new(:name => 'Mary', :age => 32)

  john = Neo4j::Node.new(:name => 'John', :age => 33)

  andy = Neo4j::Node.new(:name => 'Andy', :age => 31)
  me.both(:friends)   << bob

  bob.both(:friends)  << mark

  mark.both(:friends) << mary

  mary.both(:friends) << john

  john.both(:friends) << andy   puts me.outgoing(:friends).depth(5).map{|node| node[:name]}.join(" => ")

end
Running the example
Let’s run our example and see if we get the result that we are expecting.
$ ruby neo4j_example.rb
And as expected, we get the following output:
Me => Bob => Mark => Mary => John => Andy
Neography
What is Neography, according to the author:
Neography is a thin Ruby wrapper to the Neo4j Rest API
This gem is a great alternative if you do not want to use JRuby with your application but still want to take advantage of Neo4j. It has its limitations though, and the author recommends using Neo4j.rb in order to have access to the full power of Neo4j.
Installing Neography
You can add neography to your Gemfile:
gem 'neography'
And run Bundler:
$ bundle
Or install manually with:
$ gem install neography
Integration
Let’s start by creating a few User nodes:
me   = Neography::Node.create(name: 'Me',   age: 31)

bob  = Neography::Node.create(name: 'Bob',  age: 29)

mark = Neography::Node.create(name: 'Mark', age: 34)

mary = Neography::Node.create(name: 'Mary', age: 32)

john = Neography::Node.create(name: 'John', age: 33)

andy = Neography::Node.create(name: 'Andy', age: 31)
Now, let’s create the friendship relationship between the nodes:
me.both(:friends) << bob

bob.both(:friends) << mark

mark.both(:friends) << mary

mary.both(:friends) << john

john.both(:friends) << andy
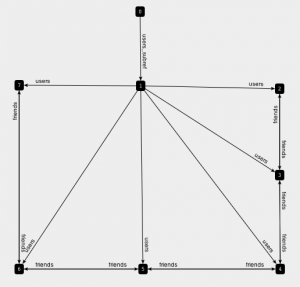
Visually, this is how the friendship relationship is represented:

Next, we traverse the nodes to find all friendship relationship from Me to Andy:
me.all_simple_paths_to(andy).incoming(:friends).depth(5).nodes.each do |node|

  puts node.map{|n| n.name }.join(' => ')

end
And the complete example looks like this:
require 'rubygems'

require 'neography'
me   = Neography::Node.create(name: 'Me',   age: 31)

bob  = Neography::Node.create(name: 'Bob',  age: 29)

mark = Neography::Node.create(name: 'Mark', age: 34)

mary = Neography::Node.create(name: 'Mary', age: 32)

john = Neography::Node.create(name: 'John', age: 33)

andy = Neography::Node.create(name: 'Andy', age: 31)
me.both(:friends) << bob

bob.both(:friends) << mark

mark.both(:friends) << mary

mary.both(:friends) << john

john.both(:friends) << andy me.all_simple_paths_to(andy).incoming(:friends).depth(5).nodes.each do |node|   puts node.map{|n| n.name }.join(' => ')

end
Starting the server
In order to execute the completed example we first need to initialize the Neo4j server. The first option is run the server that we installed earlier using Homebrew:
$ neo4j start
Another option is to use Neography’s rake tasks to install/start/stop/restart the server. To do so just add the following line to your Rakefile:
require 'neography/tasks'
And the following tasks will be available to you:
rake neo4j:install[edition,version]  # Install Neo4j

rake neo4j:reset_yes_i_am_sure       # Reset the Neo4j Server

rake neo4j:restart                   # Restart the Neo4j Server

rake neo4j:start                     # Start the Neo4j Server

rake neo4j:stop                      # Stop the Neo4j Server
Running the example
When we run the example:
$ ruby neography_example.rb
We get the following output:
Me => Bob => Mark => Mary => John => Andy
This shows all traversed nodes from Me to Andy, just as we expected.
Neoid
What is Neoid, according to the author:
Make your ActiveRecords stored and searchable on Neo4j graph database, in order to make fast graph queries that MySQL would crawl while doing them. Neoid to Neo4j is like Sunspot to Solr. You get the benefits of Neo4j speed while keeping your schema on your plain old RDBMS.
Prerequisites
Since Neoid works with ActiveRecord, let’s start by creating a simple Rails app:
$ rails new neoid_example -S -J
Installing Neoid
You can add neoid to your Gemfile:
gem 'neoid', git: 'git://github.com/elado/neoid.git'
And run Bundler:
$ bundle
Starting the server
Because Neoid is powered by Neography, we have the same options as Neography’s server options. We can either run the standalone server, or include the rake tasks provided by Neography:
Starting the standalone server:
$ neo4j start
To use Neography’s rake tasks to install/start/stop/restart the server, just add the following line to your Rakefile:
require 'neography/tasks'
And the following tasks will be available to you:
rake neo4j:install[edition,version]  # Install Neo4j

rake neo4j:reset_yes_i_am_sure       # Reset the Neo4j Server

rake neo4j:restart                   # Restart the Neo4j Server

rake neo4j:start                     # Start the Neo4j Server

rake neo4j:stop                      # Stop the Neo4j Server
Integration
Now that we have a basic rails app, the next step is to create two models: User and Friendship. The first will hold a few basic attributes, such as name and age. The latter will hold the friendship relationship between the users.
Generating the user model:
$ rails g model user
Generating the friendship model:
$ rails g model friendship
Next, we need to update the migration for both models:
# User migration
class CreateUsers < ActiveRecord::Migration

  def change

    create_table :users do |t|

      t.string :name

      t.string :age

      t.timestamps

    end

  end

end
# Friendship migration
class CreateFriendships < ActiveRecord::Migration

  def change

    create_table :friendships do |t|

      t.integer :user_id

      t.integer :friend_id

      t.timestamps

    end

  end

end
Now, we need to add a custom initializer that contains the configuration needed for Neoid. The author recommends creating the initializer in config/initializers/01_neo4j.rb:
require('neography') unless defined?(Neography)
ENV["NEO4J_URL"] ||= "http://localhost:7474"
uri = URI.parse(ENV["NEO4J_URL"])
neo = Neography::Rest.new(uri.to_s)
Neography.configure do |c|

  c.server = uri.host

  c.port = uri.port
  if uri.user && uri.password

    c.authentication = 'basic'

    c.username = uri.user

    c.password = uri.password

  end

end
Neoid.db = neo
The next step will be to update the User model to include Neoid and set it as Node, and one has_many association:
class User < ActiveRecord::Base

  include Neoid::Node
  attr_accessible :name, :age
  has_many :friends, class_name: Friendship
  neoidable do |c|

      c.field :name

    end

end
Now, we need to update our Friendship model to include Neoid and set it as a Relationship, and a couple of belong_to associations:
class Friendship < ActiveRecord::Base

  include Neoid::Relationship
  attr_accessible :friend
  belongs_to :user

    belongs_to :friend, class_name: User
  neoidable do |c|

    c.relationship start_node: :user, end_node: :friend, type: :friends

  end
  class << self

    def create_both(user, friend)

      user.friends.create(friend: friend)

      friend.friends.create(friend: user)

    end

  end
end
For the final step of this setup we just need to run the migrations:
$ rake db:migrate
Now that the setup is done, we need to add some data. Let’s open the rails console and add a few users and a few friendships.
Here we are creating six users.
me   = User.create(name: 'Me',   age: 31)

bob  = User.create(name: 'Bob',  age: 29)

mark = User.create(name: 'Mark', age: 34)

mary = User.create(name: 'Mary', age: 32)

john = User.create(name: 'John', age: 33)

andy = User.create(name: 'Andy', age: 31)
Next, we need to create the friendship relationship between the users:
Friendship.create_both(me, bob)

Friendship.create_both(bob, mark)

Friendship.create_both(mark, mary)

Friendship.create_both(mary, john)

Friendship.create_both(john, andy)
Using Neo4j’s web interface, we can see how the relationships are visually represented:
Running the example
With the data in place, we now need to traverse and find all friends between Me and Andy. To do this, let’s update our User model and add the following instance method:
def all_friends_to(user)

  neo_node.all_simple_paths_to(user.neo_node).incoming(:friends).depth(5).nodes.each do |node|

    puts node.map{|n| n.name }.join(' => ')

  end

end
Next, restart the rails console and execute the following:
me   = User.first

andy = User.last

me.all_friends_to(andy)

=> "Me => Bob => Mark => Mary => John => Andy"
As we can see, this shows all traversed nodes from Me to Andy, just as expected.
Conclusion
This article demonstrated how to install Neo4j and the basic idea of how to integrate it with a Ruby/Rails application using the different solutions available. Even though the examples given here barely scratched the surface of Neo4j, it should hopefully give you enough knowledge and curiosity to start integrating it on your own projects.
I hope you enjoyed reading this article as much as I enjoyed writing it. Happy New Year!
Resources
Frequently Asked Questions (FAQs) about Using a Graph Database with Ruby
What is the significance of using a graph database with Ruby?
A graph database is a type of NoSQL database that uses graph theory to store, map and query relationships. It is particularly useful when dealing with complex, interconnected data. Ruby, on the other hand, is a dynamic, open-source programming language that focuses on simplicity and productivity. When used together, they provide a powerful tool for managing and analyzing complex data structures. The graph database provides the ability to handle complex relationships with ease, while Ruby provides a simple and productive programming environment.
How does the integration of a graph database with Ruby work?
The integration of a graph database with Ruby involves using a Ruby gem, such as ‘neo4j’, which provides a wrapper for the Neo4j graph database. This gem allows you to interact with the graph database using Ruby code. You can create nodes, define relationships, and perform complex queries all within your Ruby application.
What are the benefits of using a graph database with Ruby?
Using a graph database with Ruby offers several benefits. Firstly, it allows for efficient handling of complex, interconnected data. Secondly, it provides a simple and productive programming environment, thanks to Ruby’s focus on simplicity and productivity. Lastly, it allows for easy integration with existing Ruby applications, thanks to the availability of Ruby gems like ‘neo4j’.
Can I use other programming languages with a graph database?
Yes, you can use other programming languages with a graph database. Most graph databases provide APIs that allow you to interact with them using various programming languages. However, the specific process and tools may vary depending on the programming language and the graph database you are using.
What are some use cases for using a graph database with Ruby?
There are many use cases for using a graph database with Ruby. For example, you can use it to build a social network application where you need to manage complex relationships between users. You can also use it in a recommendation system where you need to analyze user behavior and preferences to provide personalized recommendations. Other use cases include fraud detection, network analysis, and many more.
How can I get started with using a graph database with Ruby?
To get started with using a graph database with Ruby, you first need to install the necessary Ruby gem, such as ‘neo4j’. Then, you can start creating nodes and relationships in your graph database using Ruby code. There are many resources available online, including tutorials and documentation, that can guide you through the process.
Are there any challenges or limitations in using a graph database with Ruby?
While using a graph database with Ruby offers many benefits, there can be challenges or limitations. For example, while graph databases are excellent for handling complex relationships, they may not be the best choice for simple, tabular data. Additionally, while Ruby is a powerful and productive programming language, it may not be as performant as some other languages for certain tasks.
What is the future of using a graph database with Ruby?
The future of using a graph database with Ruby looks promising. As the amount of complex, interconnected data continues to grow, the need for tools that can efficiently handle this data also grows. With its ability to handle complex relationships with ease and its simple and productive programming environment, using a graph database with Ruby is likely to become increasingly popular.
Can I use a graph database with Ruby on Rails?
Yes, you can use a graph database with Ruby on Rails. There are Ruby gems available that provide integration with Ruby on Rails, allowing you to use a graph database in your Rails application.
Are there any resources available to learn more about using a graph database with Ruby?
Yes, there are many resources available to learn more about using a graph database with Ruby. These include online tutorials, documentation, and community forums. Additionally, many graph database providers offer resources and support to help you get started.

