Up and Running with ESLint — the Pluggable JavaScript Linter


Key Takeaways
- ESLint is a powerful and extendable JavaScript linter tool that can check code for potential issues, enforce consistent coding style, spot errors, and save development time.
- ESLint allows for a multitude of configurable rules, an API for creating custom rules, support for ES6, ES7, and JSX, and can be integrated with multiple editors and IDEs.
- The tool offers over a hundred rules including stylistic rules, best practices, potential errors, and ECMAScript 6 specific checks.
- ESLint provides an ability to automatically fix some of the errors it identifies, although this feature should be used with caution as it can sometimes break the formatting of the code.
- ESLint supports the creation of custom rules through its API, allowing for a more tailored approach to linting based on specific project needs.

This article was peer reviewed by Tim Severien. Thanks to all of SitePoint’s peer reviewers for making SitePoint content the best it can be!
Does the term “linting” sound familiar to you? It’s a process of using a tool to automatically check your code for potential problems. There are several key benefits you can reap from using such a tool.
- Keeping your code style consistent. Linters allow you to check you code style for issues like spacing, indentation and placement of braces. Once your team agrees on the coding style, it can be documented in a config file and checked automatically.
- Spotting potential errors and bad patterns. Linters can also be used to perform more advanced checks to uncover possible errors such as duplicate variables, unreachable code or invalid regular expressions. A warning from the linter will allow you to fix the errors before they even reach runtime.
- Enforcing quality. When you follow a certain style guide in your project, it is important to enforce it with tooling, otherwise, there will always be people tempted to cut corners. If a linting tool is wired into your build process, you may simply prevent the project from starting or being committed into your repository if there are unfixed errors.
- Saving time. The main benefit derived from the previous three is that linters save you effort during development. You’ll no longer need to spend valuable time arguing with your colleagues about a misplaced brace, and you might uncover a bug or two on early stages.
There has already been an article on the available linters for JavaScript but today we’ll focus on one of the tools mentioned by the author — ESLint.
ESLint
ESLint is a linting tool created back in 2013 by Nicholas C. Zakas and is currently the most powerful and extendable linter available for JavaScript. It provides a rich set of features which make it the ideal choice of your next linting tool. These features include:
- A multitude of rules which can be additionally configured to your taste.
- An API for creating your own rules.
- Numerous plugins with rules for specific libraries, frameworks and practices.
- Built-in support for ES6, ES7 and JSX.
- A recommended set of rules, as well as third-party configurations available to quickly get you started.
- Can be integrated with multiple editors and IDEs such as Sublime, Vim, JetBrains products and Visual Studio Code.
Setting Up a Project
Before you implement ESLint in your own existing projects, it would be wise to give it a trial run on something simple. Let’s set up a test project which we’ll use as a playground for further exploration. It will only have a single JavaScript file, the required npm modules and a couple of npm commands to run the linter.
First of all, we’ll generate an npm project (if you’re unsure about installing or using npm, see this tutorial). Create a new folder, open it in the terminal and run npm init. You will be prompted for some information about your project and once you answer all of the questions, npm will generate a new package.json file in the same folder.
Once we’re done with npm, we’ll also need a JavaScript file to lint. Let’s create one called scripts.js and save some code there:
function doGood() {
    var message = "doing good!";
    var message = 'or am i?';

    console.log("doing something");;

    var toDoList = ["List",,'things',"to do"];
}
You don’t need a linter to already spot some of the problems in the code. But hey, we don’t want to hear it from you or me, rather from ESLint itself.
Installation and Configuration
To install ESLint all you need to do is run npm i eslint --save-dev from the inside of your project folder. We could have installed ESLint globally, but I’m a firm believer that every project should bundle its own dependencies to make sure that every developer working on the project is using the same tools.
Once ESLint is installed, we need to configure it before running it for the first time. This can be conveniently done by running ESLint with the --init flag. Since we don’t have ESLint installed globally, the command will look like this:
./node_modules/.bin/eslint --init
This command will start the configuration wizard. The wizard will offer you three ways to create the configuration:
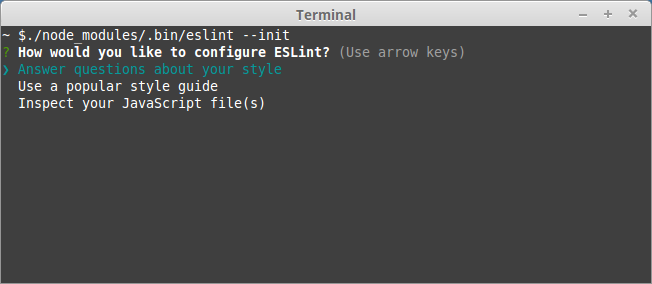
- Choosing Answer questions about your style will require you to answer some questions about your project setup, such as which environment are you targeting, ECMAScript version, modules, usage of CommonJS or JSX and some styling preferences. This is a quick way to set up a project with a minimal set of recommended rules.
- Choosing Use a popular style guide will allow you to base your configuration on one of the popular styles guides from Google, Airbnb and others. This option works well of you already follow or plan to base yours on one of these styleguides
- Inspect your JavaScript file(s) will try to derive the linting rules from your existing code base. Works well when you already have an existing code base which you wouldn’t want to change.
Since we’re just getting started with a new project, let’s choose the first option and sign up for the newest ECMAScript features:
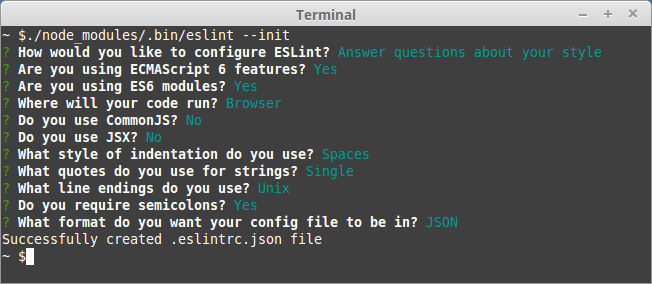
The last question will allow you to choose the format of the configuration file. The options are JSON, YAML and JavaScript but we’ll go with JSON since it’s probably the most familiar to everybody.
Once you’ve answered all of the questions, ESLint will generate a .eslint.json file with the following content:
{
    "env": {
        "browser": true,
        "es6": true
    },
    "extends": "eslint:recommended",
    "parserOptions": {
        "sourceType": "module"
    },
    "rules": {
        "indent": [
            "error",
            4
        ],
        "linebreak-style": [
            "error",
            "unix"
        ],
        "quotes": [
            "error",
            "single"
        ],
        "semi": [
            "error",
            "always"
        ]
    }
}
As you can see, it contains some environment configuration as well as the rules it asked you about. The extends property is set to eslint:recommended which means that ESLint will use its own set of recommended rules as a base which you can later override. We’ll leave it as is for demonstration purposes, but later you can either remove it, or replace it with a different third-party rule set.
Running ESLint
Now that we have a basic configuration in place, let’s try to run the thing and see if it works.
To run ESLint we can use the following command which will lint all of the .js files in the root folder of the project:
./node_modules/.bin/eslint *.js
To avoid repeatedly typing this into the terminal, we can save it as an npm script. Open package.json and add another script next to test.
"scripts": {
    "test": "echo \"Error: no test specified\" && exit 1",
    "lint": "eslint *.js"
},
Note that we don’t need to write the full path to ./node_modules/.bin since when running npm scripts, that folder is added to PATH automatically.
We can run it now using
npm run lint
Go ahead and try. You should see a report of errors warning us about all kinds of problems in scripts.js:
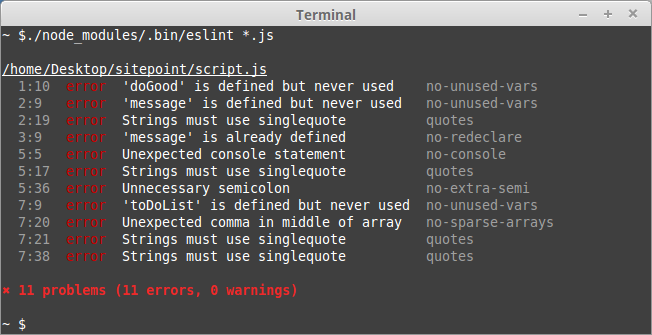
Don’t worry when the node script itself reports an error, this is supposed to happen, since ESLint returned a non-zero exit code. If needed, this can be suppressed by adding exit 0 to the script (as discussed here).
Only some of the rules are enabled in the recommended set. There a lot more of them available.
Rule Overview
ESLint has over a hundred rules in its arsenal. We won’t go through all of them since the list is really considerable. We’ll just walk you through some of the more common ones to give you an idea of what ESLint is capable of.
You can enable any of these rules by listing it under the rules property in your configuration file. Each rule can be set to a certain severity: 0 (or off) to disable a rule, 1 or (warn) to emit a warning and 2 (or error) to trigger an error. Some rules, like the ones in our configuration file, can accept an array with the severity as the first element followed by additional options. Consult the documentation if you’re not sure what values a particular rule supports.0
Stylistical Rules
Some of the rules are pretty trivial and just serve to enforce a specific code style:
- block-spacing – enforces spaces inside of code blocks
{ ... }; - comma-dangle – requires or forbids dangling commas in arrays or objects;
- eol-last – enforces a new line at the end of each file.
It mostly doesn’t matter how you configure these rules as long as the whole team agrees on them.
Best Practices
There are a number of rules that cover guidelines which are considered to improve the source code and are acclaimed in the developer community. Some of the interesting mentions are:
- complexity – a maximum cyclomatic complexity threshold allowed in your sources;
- default-case – always require a
defaultblock in yourswitchstatements; - eqeqeq – requires to use strict comparison operators:
===and!==; - no-implicit-coercion – disallows implicit type conversion methods, such as
!!falseor+'2'; - no-magic-numbers – forbids using “magic numbers”: numbers which appear in the code but have no associated identifiers;
- yoda – requires or disallows “yoda” condition statements;
- no-shadow – disallows “shadowing” variables: declaring variables with the same name as an existing variable in the parent scope.
Although some of these rules might have exceptions in certain cases, they are generally accepted as beneficial and are recommended for consideration.
Potential Errors
Another set of rules helps you avoid writing code that is overly complex or is likely to lead to errors. Of course, it cannot guarantee that your application has no bugs or logical flaws, but it will at least help you avoid common pitfalls. Some of the examples are:
- no-cond-assign – forbids assignments in conditional statements;
- no-dupe-args – disallows duplicate arguments in function declarations;
- no-inner-declarations – forbids function ar variable declaration in nested blocks;
- no-invalid-regexp – checks if your regular expressions are valid;
- no-unreachable – checks if there’s any unreachable code after a
return,throw,continueorbreakstatements.
ECMAScript 6
There is another set of rules consisting of checks specific to the ECMAScript 6 standard. If you prefer to use the latest features, you might find these interesting. A few examples are:
- constructor-super – requires
super()calls in constructors; - no-dupe-class-members – checks for duplicate class members;
- no-var – requires
letorconstinstead ofvar.
There are many other rules to explore, so we suggest you review the complete list on your own after you’re done with this article.
Running in Different Environments
When we initially configured ESLint we expected our code to run in the browser. But suppose we want to use it in a Node.js environment as well. For example, we would like to use Node’s module.exports feature by adding the following code snippet to our example:
if (module && module.exports) {
    module.exports = doGood;
}
Running the linter again will cause new errors to appear:
10:5   error  'module' is not defined               no-undef
10:15  error  'module' is not defined               no-undef
11:5   error  'module' is not defined               no-undef
This happens because the linter doesn’t expect Node-specific variables to appear in the code. To fix that, we can instruct it to be aware of the Node environment:
"env": {
    "browser": true,
    "es6": true,
    "node": true
},
If you run the linter again, it will work like a charm. There’s also a small set of rules particular to the Node environment.
Configuration Comments
Sometimes it’s necessary to override the configuration from the inside of the source code. This can happen in different cases. For example, if your code contains a copy of a third-party library which doesn’t adhere to your coding standards. Or you have a specific piece of code that must be an exception to the common rules. You can achieve this using special comments in the source code.
Imagine, that we want to disable the no-sparse-arrays rule in our function. We can do that by adding the following comment to that line:
var toDoList = ["List",,"things","to do"]; // eslint-disable-line no-sparse-arrays
If we want to suppress all errors for our function, we can wrap it into an eslint-disable/eslint-enable block.
/* eslint-disable */
function doGood() {
    var message = "doing good!";
    var message = "or am i?";

    console.log("doing something");

    var toDoList = ["List",,"things","to do"]; // eslint-disable-line no-sparse-arrays
}
/* eslint-enable */
Or, to disable linting for a whole file, we can just add a single /* eslint-disable */ comment at the beginning of the file.
Although there are valid cases for such overriding, don’t let exceptions become the norm. You should still aim at fixing the errors, not suppressing them.
Automatic Error Correction
ESLint has an interesting ability to automatically fix some of the errors it discovers. Rules that can automatically fix the code are marked with a wrench icon in the overall rule list. At the moment most of these rules are purely stylistic. Let’s try to run our initial example through auto-correction. To do that, add the --fix flag to the command we’ve used to run ESLint:
./node_modules/.bin/eslint *.js --fix
Here’s how our example is going to look like after it has fixed some of the errors:
function doGood() {
    var message = 'doing good!';
    var message = 'or am i?';

    console.log('doing something');

    var toDoList = ['List',,'things','to do'];
}
As you can see, it has successfully changed all of the quotes to single quotes and removed the extra semicolon. This is a useful feature, however, be careful with it. In some cases, it has been known to break the formatting of the code. Always review the changes it has performed before committing them.
Creating custom rules
If you feel that the available built-in and third-party rules don’t cover all of your needs, then you can consider writing your own. ESLint provides an API which allows you to create custom rules. This subject is more technical, requires a deeper knowledge of JavaScript, Node, a basic understanding of parsers and therefore deserves an article of its own. The general idea is that each rule contains two things: meta information, such as the name and description, and the actual implementation. The rule is implemented as an object containing a set of callbacks that are called while ESLint traverses the abstract syntax tree of your JavaScript code providing access to the current node. This is essentially an implementation of the “visitor” pattern. The ESLint developer guide provides more details as well as examples on how to implement your own rules.
In Conclusion
Hope this article gave you an idea on how simple it is to set up ESLint in your project and how greatly it can improve your work process. If you realize the need for this in your project, I suggest you give it a try as soon as possible. The earlier you adopt this tool, the greater the benefit you will reap. Start slow with the recommended set of rules and grow from there by tweaking the rules for your particular workflow. In some time ESLint should become your trusted partner and an essential part of any project.
Are you using ESLint? If not, would you consider giving it a try? Let me know in the comments below.
Frequently Asked Questions (FAQs) about ESLint
What is the difference between ESLint and other JavaScript linters like JSLint?
ESLint is a pluggable JavaScript linter, which means it allows you to customize the rules according to your coding style or the standards of your project. This is a significant advantage over other linters like JSLint, which have a fixed set of rules that cannot be modified. ESLint also supports the latest ECMAScript features, JSX, and object rest/spread syntax, making it a more versatile tool for modern JavaScript development.
How can I install and configure ESLint?
ESLint can be installed using npm, the Node.js package manager. Once installed, you can configure ESLint by creating a .eslintrc file in your project root. This file allows you to specify the rules you want ESLint to enforce. You can also extend the configuration from popular style guides like Airbnb or Google.
Can ESLint fix my code automatically?
Yes, ESLint has an –fix option that can automatically fix many common coding errors. This can save you a lot of time and effort in manual code correction. However, not all problems can be fixed automatically, especially those that may change the logic of your code.
How can I integrate ESLint with my text editor or IDE?
Most modern text editors and IDEs have plugins or extensions that support ESLint. For example, if you’re using Visual Studio Code, you can install the ESLint extension from the marketplace. Once installed, the extension will highlight and report the linting errors directly in your editor.
What are the benefits of using ESLint in my JavaScript projects?
ESLint helps you to write cleaner and more consistent code by enforcing a set of coding standards. It can catch potential bugs and issues before they become problems. By using ESLint, you can also improve your coding skills and learn best practices in JavaScript.
Can I use ESLint with TypeScript?
Yes, ESLint supports TypeScript through the typescript-eslint project. You can install the @typescript-eslint/parser and @typescript-eslint/eslint-plugin packages to enable TypeScript linting.
How can I ignore certain files or directories in ESLint?
You can use an .eslintignore file to specify the files or directories that ESLint should ignore. The syntax is similar to .gitignore files.
Can I use ESLint with other tools like Prettier?
Yes, ESLint can be used alongside Prettier, a code formatter. There’s a plugin called eslint-plugin-prettier that integrates Prettier as an ESLint rule.
How can I share my ESLint configuration across multiple projects?
You can create a sharable configuration that can be published on npm and used across multiple projects. This is useful if you’re working in a team or organization with a common coding style.
What are some popular ESLint configurations?
Some popular ESLint configurations include Airbnb, Google, and Standard. These configurations are widely used in the JavaScript community and can be a good starting point for your projects.
Pavels is a software developer from Riga, Latvia, with a keen interest for everything web-related. His interests range from back-end to front-end development, as well as analysis and automation. If you have something to discuss, you can always reach him via Facebook or LinkedIn.