Photoshop is obviously a great tool for editing images, but Photoshop’s extensive color capabilities are often underutilized. Depending on your purposes, certain color modes in Photoshop can transform your work from “properly edited” to dazzling, vibrant, highly colorful images. It doesn’t matter if you are a graphic designer, a web designer, or a photographer; you have to be able to manipulate and correct your colors. Some people choose to work strictly in CMYK mode, which is limiting, because many Photoshop filters don’t work in CMYK mode. Others choose to work in RGB mode and then switch to CMYK mode after they are done. That is fine, but there can be drastic changes to colors when switching modes.
About Lab Color Mode
Lab color mode is a rarely-used (but extremely useful) color correction tool within Photoshop. Lab mode is made up of three channels: the lightness or luminance channel, and the “A” and “B” channels. The “A” channel is for the colors ranging from red to green, and the “B” channel is for the color ranges of blue to yellow. Lab works differently than CMYK and RGB. CMYK is for print, and RGB is for devices such as monitors, but neither color mode is consistent when viewed on different monitors. When working on your projects, you will find that your images will look one way on one monitor, and completely different on another screen. Lab mode is different, because it is consistent regardless of which screen (or how many screens) you are working on. Lab mode makes altering colors on your images surprisingly easily, and you can achieve effects that you wouldn’t normally be able to produce in CMYK or RGB. You can invert and change colors, emphasize lights and shadows, and highlight reflections. In the example below, we are going to change the sunset to a nighttime image in just a few steps. Download the sample image of the sunset, found here. The image offers a nice sunset with a lot of orange and contrasting clouds. If you need to change a sunset to a moonlit image, the best sunset image to use is one where the sun is nice and round (as opposed to one that emanates rays of sunshine). This is because you don’t normally see rays of light coming from the moon.
First we need to convert the color mode to lab. To do this, go to “Image” > “Mode” > “Lab Color.”
We are going to turn this sunset to a moonlit photo simply by inverting the colors in the image. If we were in RGB or CMYK color mode, and we hit Command/Ctrl + “I” to invert the colors, it would also invert black to white and white to black. That is not what we want at all, and fortunately, lab mode offers much better control over our colors.
To invert the colors of your images in lab mode, simply add a Curves Adjustment Layer. In our options, we are going to leave the lightness/luminance alone for now.
Instead, our main focus is going to be on the “A” and “B” channels. Select the a channel, and you will see that the curve adjustment is a diagonal line. Simply drag the low side (at the leftmost point) upwards and drag the upper point (the rightmost point) downward to invert the red and green tones.
The image offers a nice sunset with a lot of orange and contrasting clouds. If you need to change a sunset to a moonlit image, the best sunset image to use is one where the sun is nice and round (as opposed to one that emanates rays of sunshine). This is because you don’t normally see rays of light coming from the moon.
First we need to convert the color mode to lab. To do this, go to “Image” > “Mode” > “Lab Color.”
We are going to turn this sunset to a moonlit photo simply by inverting the colors in the image. If we were in RGB or CMYK color mode, and we hit Command/Ctrl + “I” to invert the colors, it would also invert black to white and white to black. That is not what we want at all, and fortunately, lab mode offers much better control over our colors.
To invert the colors of your images in lab mode, simply add a Curves Adjustment Layer. In our options, we are going to leave the lightness/luminance alone for now.
Instead, our main focus is going to be on the “A” and “B” channels. Select the a channel, and you will see that the curve adjustment is a diagonal line. Simply drag the low side (at the leftmost point) upwards and drag the upper point (the rightmost point) downward to invert the red and green tones.


 Then, select the “B” channel and do the same thing, inverting the yellow and blue tones of your image.
 Now is the time to go back to the luminance channel of your image and tweak it to give you the best results. I didn’t actually alter the curve segment itself, but I grabbed the black slider and moved it slightly to the right. This darkens the areas that are supposed to be black in our moonlight transformation.
 Lab mode works very well for this purpose. While RGB and CMYK store light colors, dark colors, highlights, and shadows together, lab mode keeps colors and luminance in separate channels, which means that you can alter colors without altering highlights and shadows, and vice versa.
Making Colors More Vibrant
Lab mode isn’t just for drastic night-to-day (or, in our example, day-to-night) transformations; you can also perform more subtle color improvements that carefully enhance existing colors. Let’s take this image of a flower and make its colors even more bold and vibrant. You can start by downloading the sample image from here.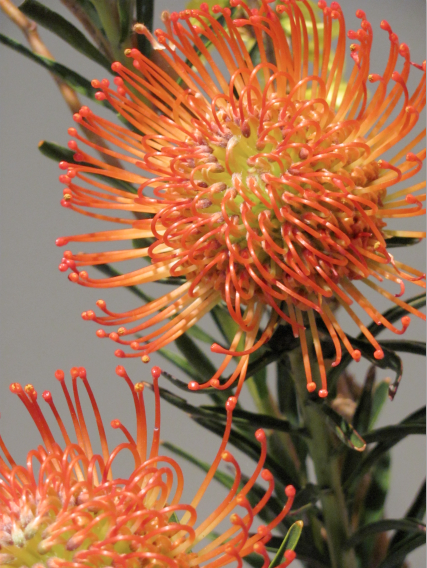 This image is already beautiful, but I am going to show you how the make the colors of the flowers even better, just so you can see how much of a difference a few careful tweaks can make.
Open your image in Photoshop and switch the color mode to lab. Then, click on the “New Adjustment Layer” icon and choose Curves.
This image is already beautiful, but I am going to show you how the make the colors of the flowers even better, just so you can see how much of a difference a few careful tweaks can make.
Open your image in Photoshop and switch the color mode to lab. Then, click on the “New Adjustment Layer” icon and choose Curves.
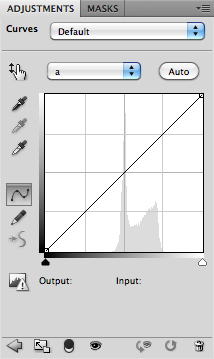 We are going to leave the luminance channel alone again, and we are going to focus instead on the “A” and “B” channels. Select the “A” channel, and instead of reversing the position of the points, bring them inward equally. You can tell how far inward you have brought them by looking at the input value to the right of the Adjustments Layer Panel under the curves chart itself. The more you bring each side inward toward the center, the more vibrant the colors will be. Observe below how I moved the points inward toward the center.

 Repeat the same process for the “B” channel, bringing both sides inward equally until you are happy with the results.

 With this technique, you can get some really vibrant and amazing colors. The reason that you must bring the points in equally is so that your colors don’t breach each other, resulting in strange colors or odd halos in your images. But, if you’re looking for unusual colors or exotic halo effects, distorting the lab mode’s color channels can create some really fantastic effects.
Have you tried lab color mode? Do you work primarily in CMYK or RGB mode? Do you have any preferred techniques for enhancing colors?
With this technique, you can get some really vibrant and amazing colors. The reason that you must bring the points in equally is so that your colors don’t breach each other, resulting in strange colors or odd halos in your images. But, if you’re looking for unusual colors or exotic halo effects, distorting the lab mode’s color channels can create some really fantastic effects.
Have you tried lab color mode? Do you work primarily in CMYK or RGB mode? Do you have any preferred techniques for enhancing colors?
Frequently Asked Questions (FAQs) about Photoshop’s Lab Color Mode
How does Photoshop’s Lab Color Mode differ from other color modes?
Photoshop’s Lab Color Mode is unique because it separates color from luminosity, or lightness. This allows for more precise color adjustments without affecting the image’s brightness. Other color modes, like RGB and CMYK, combine color and luminosity, which can lead to less precise color adjustments. Lab Color Mode is particularly useful for enhancing colors and creating bolder, more vibrant images.
Can I use Lab Color Mode to darken an image?
Yes, you can use Lab Color Mode to darken an image. By adjusting the ‘L’ channel, which represents lightness, you can control the brightness of your image. Decreasing the lightness will darken the image, while increasing it will lighten the image. This allows for precise control over the image’s brightness without affecting its color.
How can I make the outline of an image more bold using Lab Color Mode?
To make the outline of an image more bold in Lab Color Mode, you can use the ‘Unsharp Mask’ tool. This tool increases the contrast along the edges of the image, making the outline appear more bold. You can adjust the amount, radius, and threshold settings to control the intensity of the effect.
Can I use Lab Color Mode to edit text in an image?
Yes, you can use Lab Color Mode to edit text in an image. By selecting the text with the ‘Magic Wand’ tool or ‘Quick Selection’ tool, you can adjust the color and brightness of the text independently from the rest of the image. This allows for precise control over the appearance of text in an image.
How can I use HTML and CSS to make something bold?
While Photoshop’s Lab Color Mode is great for editing images, HTML and CSS are used for styling web content. To make text bold in HTML, you can use the tag. In CSS, you can use the ‘font-weight’ property with a value of ‘bold’. These methods will make your text stand out and draw attention to important information.
Can I use Lab Color Mode to create colorful images?
Absolutely! Lab Color Mode is perfect for creating colorful images. By adjusting the ‘a’ and ‘b’ channels, which represent color, you can create a wide range of vibrant and bold colors. This makes Lab Color Mode a powerful tool for creating eye-catching images.
How can I use Lab Color Mode to enhance the colors in my image?
Enhancing colors in Lab Color Mode is easy. By adjusting the ‘a’ and ‘b’ channels, you can increase or decrease the intensity of colors in your image. This allows for precise control over the color balance and saturation, helping you to create more vibrant and visually appealing images.
Is Lab Color Mode suitable for printing?
Lab Color Mode is primarily used for digital images. While it can be used for printing, it’s important to note that some colors in Lab Color Mode may not be accurately reproduced by all printers. For best results, it’s recommended to convert your image to CMYK color mode before printing.
Can I use Lab Color Mode to edit black and white images?
Yes, you can use Lab Color Mode to edit black and white images. By adjusting the ‘L’ channel, you can control the brightness of the image, while the ‘a’ and ‘b’ channels can be used to add subtle color tones.
How can I learn more about using Lab Color Mode in Photoshop?
There are many resources available to learn more about using Lab Color Mode in Photoshop. Adobe’s official website offers tutorials and guides, and there are numerous online forums and communities where you can ask questions and share tips with other Photoshop users. Additionally, many books and online courses cover the use of Lab Color Mode in depth.
 James George
James George is a professional web developer and graphic designer. James is an expert in design, and a professional web developer, with a special interest in WordPress. Founder of Design Crawl, James has been a professional designer since 2005.