
Although I’ll be covering Adobe’s Creative Site 2 in more detail in the Design View, I thought I’d take a look at a new feature that grabbed my attention — ‘Live Trace’.
Till now, I’d have to say that automatic tracing tools have always sounded like a great idea, but have never been truly useful. My experiences generally went something like:
1) Fiddle with colors, sensitivity sliders, and other more mysterious options.
2) Trace picture.
3) Be generally impressed but not really satisfied.
4) Fiddle with colors, sensitivity sliders, and other more mysterious options.
5) Trace picture.
6) Be generally impressed but not really satisfied.
7) Repeat steps 1 thru 6 four or five more times.
8) Obtain a raw vector graphic I’m happy to start working with.
9) Begin working with an insane hornet’s nests of tangled and interwoven vector shapes. Squeal as cleaning up stray points mysteriousy deletes huge chunks of the graphic from time to time, forcing a backtrack.
10) Admit defeat and hand trace it.
The good news is Adobe may have nailed it now with Illustrator’s new ‘Live Trace’ drawing mode.
Here’s a quick test I ran a test using our CSS super-guru, Rachel Andrew’s pic from her CSS Anthology book cover.
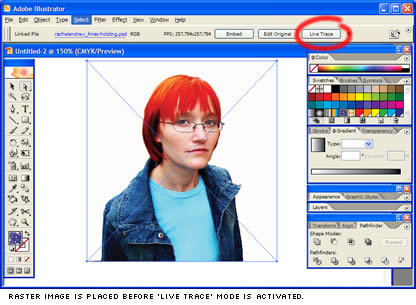
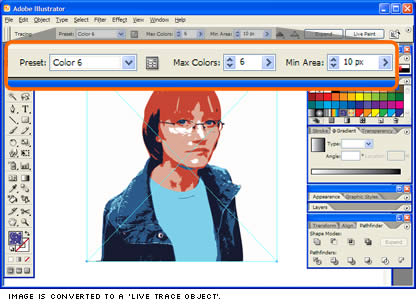
After placing the image in Illustrator, I selected it and switched on ‘Live Trace’. From this point on you are working with what Adobe refer to as a ‘Live Trace Object’, — this is no longer a pure raster image, nor a pure vector object — it’s something else again.
You have complete freedom to ‘tune’ the artwork during this phase, with control over the number of colors, line and edge quality, and the size of the smallest rendered object. There is also a comprehensive set of presets, including ‘Photo High Fidelity’, ‘Comic Art’, ‘Technical Drawing’ and ‘Hand Drawn Sketch’. These are usually good places to begin your tuning.
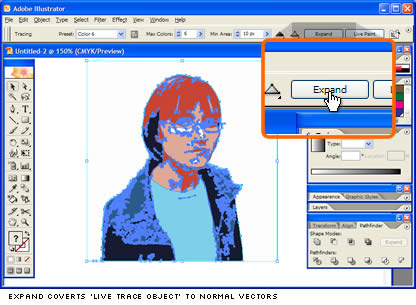
When you’re happy with your artwork, you need to convert it back to a pure vector object by switching out of ‘Live Trace’ with the ‘Expand’ button.
So now we have a vector drawing. Big deal, right?
The major difference between ‘Live Trace’ and previous built-in auto-trace features is simply the quality of the artwork it churns out. The vector shapes it produces look as if they were made with a ‘cookie cutter’. None of the shapes overlap and they fit perfectly together like a brand new jigsaw. This is a screenprinter’s dream.
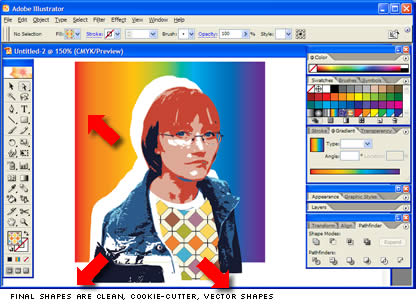
Of course, you’re always going to want adjust, edit and change the raw conversion, but it’s still a very effective way to get that raw image quickly.
All in all, seriously useful and a very handy addition to Illustrator.
Frequently Asked Questions (FAQs) about Tracing in Illustrator CS2
What is the difference between tracing in Illustrator CS2 and newer versions?
Illustrator CS2 uses a different tracing mechanism compared to newer versions. In CS2, the tracing feature is called “Live Trace,” which automatically converts bitmap images into vector artwork. In contrast, newer versions use “Image Trace,” which offers more advanced options and controls for fine-tuning the traced artwork. However, the basic concept remains the same: converting raster images into editable vector graphics.
How can I improve the quality of my traced artwork in Illustrator CS2?
To improve the quality of your traced artwork in Illustrator CS2, you can adjust the tracing options. These include the threshold, minimum area, corner angle, and path fitting. Experimenting with these settings can help you achieve the desired level of detail and accuracy in your traced artwork.
Can I trace colored images in Illustrator CS2?
Yes, you can trace colored images in Illustrator CS2. The software allows you to choose whether to trace your image in black and white, grayscale, or color. You can select the appropriate option from the “Mode” dropdown in the Tracing Options dialog box.
Why is my traced artwork not as detailed as the original image?
Tracing in Illustrator CS2 converts bitmap images into vector artwork, which may result in some loss of detail. This is because vector graphics are made up of paths, not pixels. However, you can increase the detail of your traced artwork by adjusting the tracing options, such as the threshold and minimum area.
Can I edit my traced artwork in Illustrator CS2?
Yes, once you’ve traced an image in Illustrator CS2, you can edit the resulting vector artwork. You can adjust the colors, shapes, and paths using the various tools available in Illustrator. To do this, you’ll need to expand the traced artwork by clicking “Expand” in the Control panel.
How can I save my traced artwork in Illustrator CS2?
After tracing and editing your artwork in Illustrator CS2, you can save it in various formats, including AI (Adobe Illustrator), EPS (Encapsulated PostScript), PDF (Portable Document Format), and SVG (Scalable Vector Graphics). To save your artwork, go to File > Save As, choose your desired format, and click “Save.”
Can I use Illustrator CS2 to trace text?
Yes, you can use Illustrator CS2 to trace text. However, keep in mind that traced text will become vector artwork and will no longer be editable as text. If you want to maintain the text’s editability, consider using Illustrator’s text tools instead of tracing.
Why is my traced artwork pixelated in Illustrator CS2?
If your traced artwork appears pixelated in Illustrator CS2, it could be due to the resolution of the original image or the tracing settings. Try increasing the resolution of your image before tracing, or adjust the tracing options for better results.
Can I trace a logo in Illustrator CS2?
Yes, you can trace a logo in Illustrator CS2. This can be useful if you only have a bitmap version of a logo and need a vector version for scaling or editing purposes. Remember to adjust the tracing options to achieve the best possible result.
How can I learn more about tracing in Illustrator CS2?
To learn more about tracing in Illustrator CS2, you can refer to Adobe’s official documentation, online tutorials, or community forums. You can also experiment with the software’s tracing features and settings to gain hands-on experience.