


In this article, we’ll explore Svelte 3, a front-end JavaScript framework that takes a slightly different approach to frameworks. Whereas frameworks like React ship a large bundle of JavaScript, Svelte applications are compiled by the Svelte compiler into JavaScript that claims to be much smaller than the equivalent React code. And because the code runs through the Svelte compiler, it can also be optimized.
Svelte also takes a very different approach to managing data and surgically updates the DOM — no useState hooks in sight — and it’s a lot of fun to work with. Even if you’re a big fan of React or any of the other popular frameworks, Svelte is worth checking out. In this introduction, we’ll build a small example application to get a taste of what Svelte can offer. Let’s get started!
Key Takeaways
- Svelte 3 differentiates itself by compiling directly to optimized JavaScript, reducing the runtime size compared to frameworks like React that operate at runtime.
- Unlike traditional frameworks that use virtual DOMs, Svelte updates the real DOM directly, leading to more efficient data management and DOM manipulation.
- The framework simplifies component creation with scoped CSS and integrated reactive states without needing additional libraries for state management.
- Svelte’s compiler approach allows for less code and less boilerplate, making development quicker and applications faster.
- The framework supports advanced features like reactivity and component communication with minimal syntax, reducing the learning curve for new developers.
- Svelte is an ideal choice for developers looking for a lightweight, efficient alternative to more traditional, heavier frameworks like React and Vue.
Getting Started with Svelte
We’re not going to dive too much into bundling and the infrastructure of Svelte apps in this tutorial, so we’ll follow the Svelte tutorial to get an application up and running.
We’ll need to have Node and Git installed locally. Then we can run:
npx degit sveltejs/template github-repository-searcher
This will clone the Svelte template repository into the github-repository-searcher folder (the app we’re building will use the GitHub API to search for repositories) and set up all the tooling for us. I highly recommend this approach if you’re focusing on learning Svelte: it will let you dive right into the framework and not get bogged down in build configuration.
Once that command above has completed, you can cd github-repository-searcher to change to that directory, and then run npm install to install all the dependencies. Once that’s done, npm run dev will get the app up and running, using the Rollup bundler to build the application. Visiting http://localhost:5000 should present you with the Svelte Hello World page, and now we’re good to get building!
Build a Svelte Component
Before we start building out more Svelte components, let’s take a look at the existing component that the template comes with. The first thing to note is that Svelte components are defined in a .svelte file. App.svelte (located in the src folder) is split into three parts:
<script>
  export let name;
</script>

<style>
  /* CSS removed to save space */
</style>

<main>
  <h1>Hello {name}!</h1>
  <p>
    Visit the
    <a href="https://svelte.dev/tutorial">Svelte tutorial</a>
    to learn how to build Svelte apps.
  </p>
</main>
Working with these Svelte files will be much easier if your editor understands them and can syntax highlight them correctly. Svelte provides a VS Code extension, which is what I use, but if you use a different editor I suggest searching on Google. Svelte has a good-sized community, so it’s likely that plugins exist for most popular editors.
Svelte components are split into three parts:
- The
scripttag is where all the JavaScript for the component is written. - The
styletag is where all the component’s CSS is defined. In a Svelte component, all CSS is scoped to that component by default, so any styles here only apply to the component, not globally. - Anything else provided in the component is treated as HTML for the component to output. Svelte also provides templating logic to support conditional renders, looping over arrays, and so on.
To run our application, use npm run dev. This will run Rollup, our bundler, and also a small HTTP server that will serve our application up on port 5000.
Asking the User for a GitHub Username
The first step of our application is to ask the user to provide a GitHub username. We’ll then take this name and search GitHub for a list of repositories that the user has. Let’s update App.svelte to do just that.
First, in the script block, delete the export let name line. This is how we define props in Svelte, which work just like props in React. The export keyword here declares that this value is a prop that will be provided by the component’s parent. In our case though, our component won’t take any properties, so we can delete it. You’ll also need to then update src/main.js to remove the props: {...} code, as our App component doesn’t take any props. Once you’ve done that, main.js should look like this:
import App from './App.svelte';

const app = new App({
  target: document.body,
});

export default app;
This file contains what is effectively the entry point to your application. Think of it as equal to the ReactDOM.render, if you’re familiar with React.
Let’s update App.svelte with the HTML we want. We’ll create a simple form that asks the user for a username:
<script>
</script>

<style>
  main {
    width: 80%;
    max-width: 800px;
    margin: 20px auto;
    padding: 20px;
  }

  label {
    font-weight: bold;
  }

  input {
    width: 80%;
  }
</style>

<main>
  <form>
    <label for="username">Enter a GitHub username:</label>
    <input type="text" name="username" placeholder="jackfranklin" />
    <button type="submit">Load repositories</button>
  </form>
</main>
We won’t focus on CSS in this tutorial (I’m no designer!), but I’ve applied a small amount of CSS to make things look a little nicer. Now that we have our form, let’s look at how we hook it up with Svelte. The first thing to note is that there’s no explicit useState hook or similar; the approach Svelte takes is much closer to that of other frameworks like Vue or Angular, where you instead bind an input to a value. This is a common theme of Svelte, and shouldn’t be a surprise given one of its explicit goals is to allow developers to write less code.
Let’s declare a variable for the input:
let usernameInputField = '';
Then use Svelte’s bind:value directive in the template:
<input type="text" name="username" placeholder="jackfranklin" bind:value={usernameInputField}>
Svelte will do the rest for us: as the user types in the input, the variable usernameInputField will be updated and kept in sync.
Once the user has typed in a username, we need to listen out for when they’ve submitted the form. Svelte uses the following syntax to bind event listeners:
<form on:submit={onSubmit}>
This will call the onSubmit function when the user submits the form. There’s one more trick that Svelte has up its sleeve though, and that’s event modifiers:
<form on:submit|preventDefault={onSubmit}>
Now when Svelte sees a submit event on this form, it will automatically call event.preventDefault() for us. I love this: it’s one less thing for us to worry about and one more thing we can hand off to the framework.
Back in our script tag we can define this onSubmit function. It will take the username and call the GitHub API to get a list of repositories (it will return the first 30 repositories, so you’ll need to paginate if you want to get all of them, but we’ll leave that for now):
async function onSubmit() {
  const url = `https://api.github.com/users/${usernameInputField}/repos`;

  const response = await fetch(url);
  const repositories = await response.json();
  console.log('loaded repositories', repositories)
}
Once we have these repositories, we want to list them on the page and allow the user to search for a given repository. Rather than do this all in the App.svelte component, let’s create a new component called Search.svelte. It will take the list of repositories and provide an input for the user to search for the repository they’re after.
Create a new file in the existing directory called Search.svelte. I like to start my components with a small amount of boilerplate just to check I’ve got everything set up:
<script>
</script>

<style>
</style>

<p>Search component</p>
Then when I render this component on the page, I’ll be able to tell if it’s rendering correctly.
Passing Props between Svelte Components and Conditional Rendering
The search component will take the list of our fetched repositories as a property. To declare that a component takes a property, we declare a variable that’s exported. In Search.svelte, add this line to the <script> portion of the component:
export let repositories;
You could also initiate it to a value if you want to set a default, should the parent not pass it in. This may look a little odd, and it does take a bit of getting used to, because you’re not really exporting the variable in the traditional ES modules sense, but more declaring that you expect your parent component to pass some repositories in.
We want to render our new Search.svelte component but only when the user has submitted the form and we have fetched repositories. Svelte’s templating has support for conditional rendering, in the form of #if blocks. This might take some getting used to if you’re a React user, because you don’t use regular JS conditionals like you do in JSX, but rather you use the Svelte templating language.
Any HTML that we want conditionally rendered can be put inside an #if block:
{#if someCondition}
  <p>someCondition is true!</p>
{/if}
We can create a repositories variable in App.svelte that defaults to undefined, and then when we load the repositories we’ll set it to that list of fetched repositories. We can then render Search.svelte only when we have those repositories. Update App.svelte so it looks like so:
let usernameInputField = "";
let repositories = undefined;

async function onSubmit() {
  const url = `https://api.github.com/users/${usernameInputField}/repos`;

  const response = await fetch(url);
  repositories = await response.json();
}
By moving the repositories variable outside of the function, it’s available throughout our component and we can refer to it in our template too. Let’s also update App.svelte and import our Search component. Add this to the top of the JavaScript in App.svelte:
import Search from './Search.svelte'
Once a component is imported, we can render it in our template. Let’s make our template render the Search component when we’ve fetched the repositories:
<main>
  <form on:submit|preventDefault={onSubmit}>
    <!-- snipped to save space -->
  </form>

  {#if repositories}
    <Search repositories={repositories} />
  {/if}
</main>
Creating a component and passing props into it will look very familiar if you’ve used JSX before. Svelte allows for one further shortcut though. Take this code:
<Search repositories={repositories} />
We can turn this into:
<Search {repositories} />
When the prop name and the variable you want to pass as the prop have the same name, you can omit the first part and pass the variable wrapped in a pair of braces. This is a nice shortcut that cuts down typing!
Now, if you load up the app, type in a username and hit enter, you should see the “Search component” text rendered on the page. Now we’ve got this working, we’re ready to dive in and get those repositories listed and allow the user to filter them.
Each Loops in Svelte
To loop over our repositories, we can use #each blocks, which take an array and output some HTML for each item that’s in the array.
Within Search.svelte, add a loop that will output the name of every repository we found. Remember that in a Svelte template, much like JSX, we use {} to insert dynamic content into the HTML. Search.svelte should now look like this:
<script>
  export let repositories;
</script>

<style>
</style>

{#each repositories as repository}{repository.name}{/each}
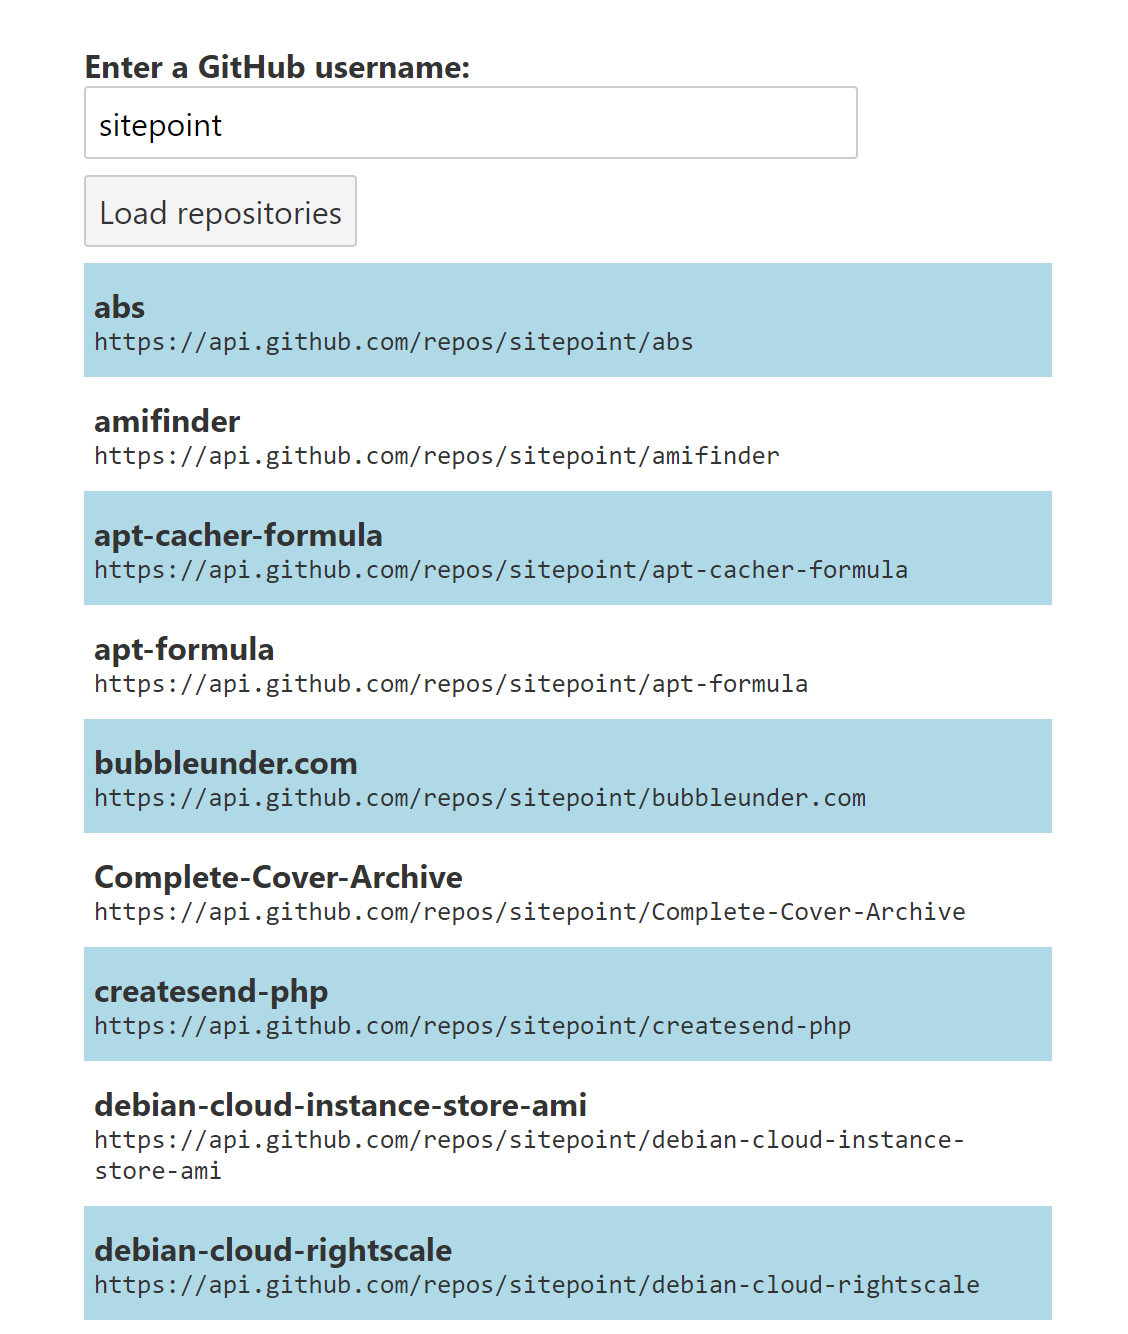
The output is messy, but if you load the app you should see a big list of all the repositories we found. Let’s get this looking a bit cleaner, before we do anything else. Feel free to use your own CSS here, but this is the code I end up with and how it looks:
<script>
  export let repositories;
</script>

<style>
  ul {
    list-style: none;
    margin: 0;
    padding: 0;
  }
  li {
    padding: 10px 5px;
  }

  li:nth-child(odd) {
    background-color: lightblue;
  }

  code {
    display: block;
  }
</style>

<ul>
  {#each repositories as repository}
    <li><strong>{repository.name}</strong> <code>{repository.url}</code></li>
  {/each}
</ul>
This is one area where Svelte really shines for me out of the box: all the CSS in a Svelte component is scoped by default to that component. So I can style the elements directly without worrying that those styles will then impact other matching elements outside of this component.
That doesn’t mean I don’t use classes, or IDs, or other selectors to be precise about the elements I’m styling in my Svelte component, but it’s great that I don’t have to worry about global styles by default. As an added bonus, if I write some CSS that becomes unused, Svelte will highlight it for me. Because CSS is scoped to just the component, Svelte can confidently detect unused CSS and prompt you to remove it.
Searching for Repositories
Let’s add a search box to Search.svelte so we can allow the user to search for names of repositories. Just like with the form where we asked the user for a GitHub username, we’ll bind the value to a variable so it updates automatically as the user types. I’ve also added some extra styling and CSS just to make things look nicer (feel free to change the styling to suit your preferences):
<script>
  export let repositories;

  let userSearchTerm = "";
</script>

<style>
  /* All the CSS from the previous step is still present, but removed from this code snippet to save space */
  .search-wrapper {
    border: 1px solid #ccc;
    border-radius: 10px;
    padding: 5px;
    margin: 10px auto;
  }

  .search-form input {
    border-top-left-radius: 10px;
    border-top-right-radius: 10px;
    width: 100%;
  }
</style>

<div class="search-wrapper">
  <form class="search-form">
    <input
      type="text"
      bind:value={userSearchTerm}
      placeholder="search for repositories" />
  </form>
  <!-- list of repositories here as per previous code sample -->
</div>
Now the user can type in the box, but what we want to do now is filter our list of repositories as the user types. So, how do we run code when the user updates the input? The answer lies in how Svelte deals with Reactivity.
In a Svelte component, consider a line like this:
console.log(userSearchTerm)
If you add that, you’ll see it logged out just once, when the component is first created and run. But try prefixing this line with $:, like so:
$: console.log(userSearchTerm)
If you load up the app and type into the search box, you’ll see this code logged every time you type. Svelte uses this syntax to let you tell the Svelte compiler that you want this code run every time anything it references changes. You might think this syntax looks odd — and you’d be right — but it’s perfectly valid JavaScript, albeit JavaScript syntax that’s rarely used. (It’s called a labelled statement.)
If you want to run more than one line of code, you can wrap it in a pair of braces to create a block:
$: {
 console.log(userSearchTerm)
 console.log('and again', userSearchTerm)
}
This is really useful when you need to update or create new values based on others. For example:
$: value = x * 2;
This code will set value to double that of x, but also ensure that value is updated whenever x is updated in the future.
So, for our particular use case we can define a new variable, filteredRepos, which is updated when userSearchTerm changes, which filters the repositories to only those whose name matches what the user searched for:
$: filteredRepos = repositories.filter((repo) => {
  return repo.name.toLowerCase().includes(userSearchTerm.toLowerCase());
});
Svelte will automatically re-run this for us when the user updates the search term, or even if we get passed in a new set of repositories.
Now I’ll update the template each line to use this new array, filteredRepos:
{#each filteredRepos as repository}
This will now update correctly as we type into the search field, and you should see that you’re now able to search for repositories!
Alternative Solutions to Searching as the User Types
We used Svelte’s $: syntax to update the repositories as the user typed, but we can also structure our code slightly differently to avoid it. We know that Svelte automatically re-renders templates when data changes, so we can take that into account. We can define a filter method which takes our repositories and search term, and returns the matching results:
function filter(repositories, userSearchTerm) {
  return repositories.filter((repo) => {
    return repo.name.toLowerCase().includes(userSearchTerm.toLowerCase());
  });
}
And now we can call this function directly in our template:
{#each filter(repositories, userSearchTerm) as repository}
And this still works correctly. I’m not sure if I like this approach as much, personally. I don’t like that the filtering call is buried deep within the template, and I like that having the explicit $: filteredRepos = ... line makes it clear to anyone reading the code that our repositories get updated as the user types.
Another solution is to use event listeners. We can bind to the on:input event of the text field, and filter our repositories when we get an input event. First we bind to the event in our template:
<input
  type="text"
  bind:value={userSearchTerm}
  on:input={onUserSearchInput}
  placeholder="search for repositories" />
And then we write a function to update a new variable, filteredRepositories, when the user types:
let filteredRepositories = repositories;

function onUserSearchInput() {
  filteredRepositories = repositories.filter((repo) => {
    return repo.name.toLowerCase().includes(userSearchTerm.toLowerCase());
  });
}
And finally we use that new variable in our template:
{#each filteredRepositories as repository}
However, this approach opens us up to a bug. If the repositories prop updates, our filteredRepositories list won’t be updated, because we only set it initially in the event listener. You can try this yourself by searching for one username in our app, and then searching for another. You won’t see the list of repositories updated when you search for the second time.
We can fix this by updating our initial declaration of filteredRepositories to be reactive:
$: filteredRepositories = repositories;
But now we have another bug where if the list of repositories changes whilst a filter is applied, the filter isn’t applied to the new list of repositories.
Let’s revert back to the initial solution we had:
$: filteredRepositories = repositories.filter((repo) => {
  return repo.name.toLowerCase().includes(userSearchTerm.toLowerCase());
});
Neither of the bugs I mentioned above occur, and everything updates as you’d expect. I’ve found that leaning into Svelte’s features and making use of its support for reactivity will make your code cleaner (notice that this solution uses far less code than the one where we bound the event listener ourselves) and decreases the chance for bugs where your UI gets out of sync with your state.
Bundling Svelte for Production
Now that our application is fully functional, let’s bundle it up for production. The Svelte starter template defines npm run build as the command you can run to bundle your application ready for production. Running that on our application generates bundle.js, which is 6kB in size, and bundle.css which is 1kB in size. Whilst 6kB might sound like a lot, and you could write a simple app like this without the help of a framework, note that a lot of the cost of that 6kB bundle is fixed: you’ve already paid the price of bundling Svelte, so the file size as your application grows wouldn’t be expected to get that much larger. Of course, it will grow with all the code you write, but in terms of framework cost, that’s pretty small. And you can take things further with code splitting and other techniques to bring your initial bundle size down as much as possible.
Svelte Provides a Promising Alternative to React and Vue
I hope it’s come across in this article: I really like Svelte! I really enjoy working with the framework and love the decisions the Svelte team have made to create a framework that does a lot of the work for me behind the scenes. It’s an explicit goal of the Svelte framework to reduce the amount of code developers write, and in a world where many developers feel they write a lot of boilerplate, Svelte has been like a breath of fresh air.
Svelte FAQ
Svelte is a JavaScript framework for building user interfaces. It’s different from traditional frameworks because it shifts the work from the browser to the build step, resulting in smaller and faster runtime code.
Svelte moves the heavy lifting of the framework from the client-side (runtime) to the build step, generating highly optimized and minimal JavaScript code. This leads to faster load times and a smaller runtime footprint compared to frameworks that do more work in the browser.
In Svelte, components are written in a syntax that resembles HTML, CSS, and JavaScript. During the build process, Svelte compiles these components into highly efficient JavaScript code, minimizing the amount of framework-specific code that needs to be shipped to the client.
No, Svelte does not use a virtual DOM. Instead, it compiles components to highly optimized JavaScript at build time, which updates the DOM directly during runtime without the need for a virtual representation.
SvelteKit is a higher-level framework built on top of Svelte. It provides routing, server-side rendering, and other features to help developers build complete web applications. It simplifies the process of creating Svelte applications with a more opinionated structure.
Some advantages of Svelte include smaller bundle sizes, faster runtime performance, a simple and intuitive syntax, and a reduced need for boilerplate code. It is well-suited for developers who prioritize a lightweight and efficient approach to building web applications.