One-click Shopping
Over the last few years, online shopping has become increasingly popular with consumers all over the world. It’s simple to understand why: eshops are easily accessible, open 24/7, typically offer lower prices (and a wider variety of goods) than their bricks-and-mortar counterparts, and come with additional bonuses such as personalized recommendations, generous return policies, and safe-shopping guarantees. This popularity is confirmed by the statistics: the US Census Bureau estimates that in Q3 2008, ecommerce accounted for $US34.4 billion of retail sales, up from $US27.5 billion in 2006.
As ecommerce has evolved over the years, so too have the tools available to merchants looking to build an online presence. The sophistication of modern ecommerce solutions is such that setting them up requires at most a few clicks and some back-end data entry; usually the software can (and will) do everything else for you. This ease of use is a boon to small and medium-sized merchants, many of who are entering the online marketplace for the first time, and are looking for a simple system that allow them to set up and run an online store with minimal fuss.
If you’re one of these merchants – an individual, a small business, or even a large one – and you’ve been toying with the idea of taking your products to new customers and markets via the Internet, then this article is for you. In it, I’ll be discussing how to quickly and easily build your online shop using one of the new breed of ecommerce solutions: an open-source, community-driven shopping cart system called the OXID eShop. Come on in, and let’s make a start!
Introducing OXID eShop
Let’s start with the basics – what is OXID eShop, anyhow?
OXID eShop, in the words of its official web site, is a “modular, state-of-the-art, and standards-based” shopping cart system for online stores. Written using PHP and MySQL, it provides a framework for shop owners to create and maintain a web-based store, by allowing them to define a product catalogue, set prices and payment methods, manage inventory, and respond to orders. OXID eShop also has a long track record for small to large enterprises, and is therefore both battle-tested and rich in features.
Here’s a quick list of the key features:
- Custom payment and shipping methods: OXID eShop allows a great deal of fine-tuning when it comes to determining payment and shipping methods. Shop administrators can easily support various payment options (including credit card, COD, and PayPal), allow or disallow payment conditions per country or user group, and define custom rules for shipping cost calculation.
- Promotions and discounts: The OXID shop management system includes functions to set up discounts during specific time periods – for example, Christmas sales – as well as to specific groups of users, such as VIP members. Discount coupons are also supported.
Reviews: In the spirit of sites like Amazon.com, OXID eShop harnesses the wisdom of the community by allowing users to comment on products they’ve purchased. This provides useful feedback to other users, as well as product manufacturers. - Customer communication: Good communication is the key to customer loyalty, and OXID eShop includes a number of tools to assist the process. Shop owners can keep users informed about new products via an opt-in newsletter, allow users to comment on service and products in a guestbook, or display shop news on the main storefront page. There’s also a price alert mechanism, which allows the shop to notify users when prices fall below a particular limit.
It’s also worth noting that OXID eShop comes in three flavors: the Enterprise Edition, the Professional Edition, and the Community Edition. The Community Edition, which is the version used in this article, is offered to users free of charge under the GNU General Public License. The other two editions are commercial packages for mission-critical use; they provide additional functionality and include vendor support, guarantees, indemnification, and more business benefits.
Install and Configure the Software
To start using OXID eShop, you’ll need to first make sure that you have everything needed for a successful installation of the product. You’ll require an Apache web server with PHP, and a MySQL database server.
You can find a complete list of requirements including a list of required PHP extensions on the OXID web site. Once you’ve confirmed that your host meets all the installation requirements, download a copy of OXID eShop Community Edition from the official web site. Transfer your files to a location on your server under your web server root directory, either by uploading the package and unpacking it on your server, or unpacking first and then uploading all individual files.
The next step is to create a MySQL database to store all the application information and a database user account that will be used to access the OXID eShop database. You can run the following SQL commands on the server if you have access to the command line; or you can run them using a tool like phpMyAdmin which is commonly provided by web hosts; or else the administration panel provided by your web host should include the appropriate controls.
To create the database run:
CREATE DATABASE oxid;Creating a MySQL user account with privileges to only access this database is a security precaution that ensures other MySQL databases on the system remain secure, even if the security of your OXID system is compromised. The following command will create a user named ‘oxid‘ with a password of ‘sh0pp3r‘:
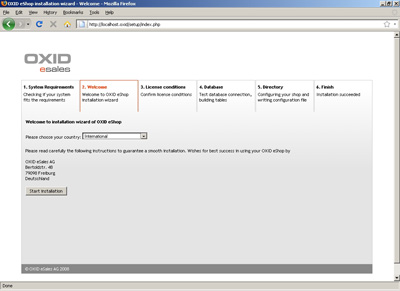
GRANT ALL ON oxid.* TO oxid@localhost IDENTIFIED BY 'sh0pp3r';With the database and user account created, it’s time to set up all the required tables. This is simpler than it sounds – the OXID eShop installer will do all the work for you. All you need to do is open your web browser and navigate to the root folder of your OXID installation. You should see a page like this:

Assuming that your system meets all the requirements, installation is a point-and-click process. Click the Proceed with setup button to continue. In the next step, select your country and click the Start installation button:
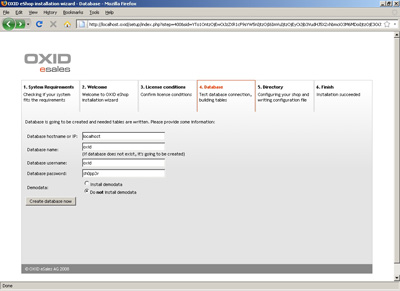
You will then be asked to accept the terms of the OXID license. Once done, the system will prompt you for your database connection information. Enter the values for your MySQL server, together with the user credentials created previously, but make sure you select the option Do not install demodata. This prevents the installer from installing test data in the system – we’ll be adding our own soon enough!
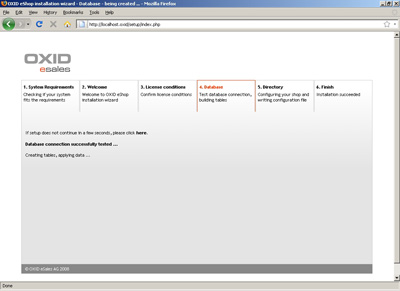
Click the Create database now button and the OXID installer will now go to work creating the necessary database tables. In the final step, specify the HTTP and file paths to your OXID installation (these should be filled in for you):
Make sure you select the Delete setup directory after installation option so that the installer deletes the setup files as this prevents unauthorized users from resetting your hard work at a later date. Also, before submitting the form, make sure that the temporary directory specified exists and is writable by your web server, or else create it with the necessary permissions; failure to do this will produce an installation error. There are many ways to do this, depending on how your hosting environment is set up; check with your hosting provider, or visit the G-Loaded web site for an overview of various approaches. Click the Save and continue button to proceed.

At the end of it all, if OXID eShop has been successfully installed and configured, you should see a similar image to this:
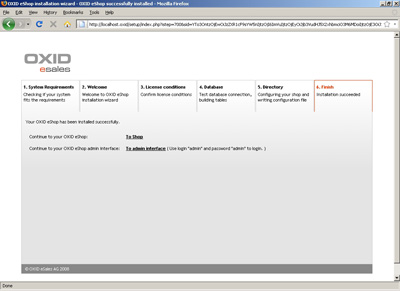
That’s it – you’re done! Next, we find out how to begin setting up product listings.
Create eShop Product Categories
In most online stores, products are arranged in categories so that shoppers can easily find them. OXID eShop also supports this kind of categorization. In this step, you’ll learn how to define product categories as a prelude to actually listing products for sale.
To begin, visit the OXID eShop administration panel at http://yourservername/admin (assuming you installed OXID to your web server’s document root) and log in as the administrator. There is also a link to the administration panel on the final configuration screen above.
You’ll be presented with a login form; log in as admin, with password admin, and you should see a screen similar to the image below:
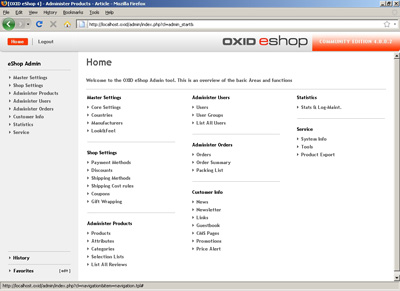
Select the eShop Admin > Administer Products > Categories menu, and you’ll be presented with a form to define product categories, as seen below:
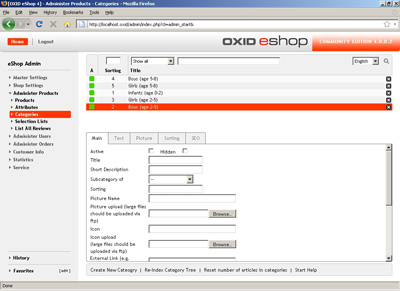
Let’s say that our store will be selling a wide variety of children’s toys, and they’ll be categorized by age suitability. So our products could be arranged in the following categories:
- Infants (aged 0–2)
- Boys (aged 2–5)
- Girls (aged 2–5)
- Boys (aged 5–8)
- Girls (aged 5–8)
- and so on …
Before we add anything, make sure to set the language to English in the top right-hand corner. To define these categories, set a title for each category and mark it Active. You can add an optional description as well. Once the category is defined, it will appear at the top of the page. To create a new category, use the Create New Category link at the bottom of the page.
Some useful tips when defining categories:
- You can create subcategories by assigning each new category to a parent category. But be warned about creating too extensivea category tree, as your visitors will find it confusing and hard to navigate.
- You can attach an image or icon to each category by using the Picture tab of each category. This is useful in making your store more visually appealing.
- You can define the order in which categories are displayed by setting a value for the Sorting field. Smaller values are sorted first.
More information on how to handle product categories is available in the OXID manual.
Add Products for Sale
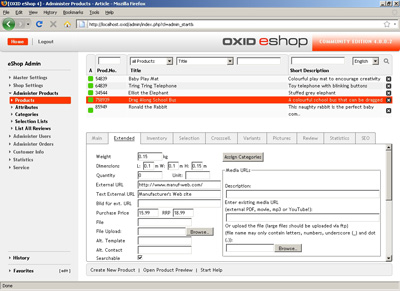
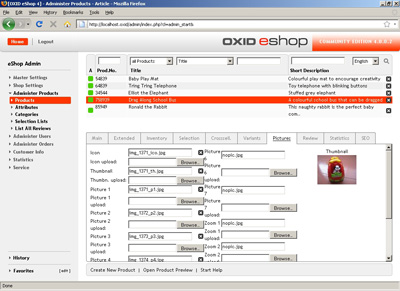
Once the product categories have been defined, the next step is to populate them with actual products. This is accomplished by using the eShop Admin > Administer Products > Products menu, which provides a tabbed form to input product records.

Of the various tabs shown, the four most important ones are as follows:
- Main: allows you to set basic information for each product, such as name in the product catalogue, the internal product number (SKU), search tags, the price, and both short and extended descriptions. You can also specify which category this product should appear in.

- Extended: lets you define product attributes, including its dimensions and weight. You can also specify whether the product is eligible for free shipping, and define an external URL (such as the manufacturer’s web site) for the product.
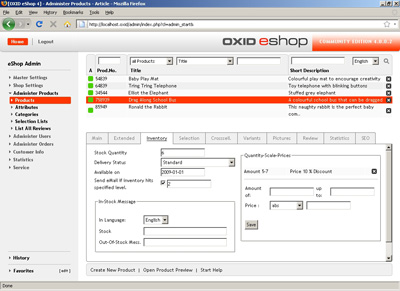
- Inventory: enables you to specify how many units of the item are available in stock, and define an email alert when inventory falls to a particular limit. You can also specify volume discounts for the products, either in absolute or percentage terms.
- Pictures: lets you upload pictures of the product. This is a key tab, as users will rely on these pictures when deciding whether or not the product fits their needs. OXID eShop allows you to upload thumbnail images, regular product pictures, and magnified (zoomed) product images, so you can give customers as much visual information as possible.
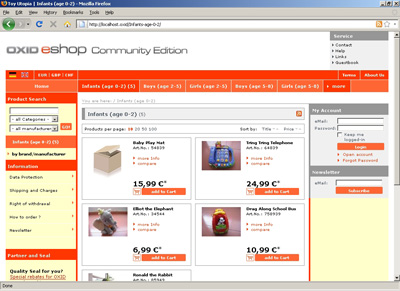
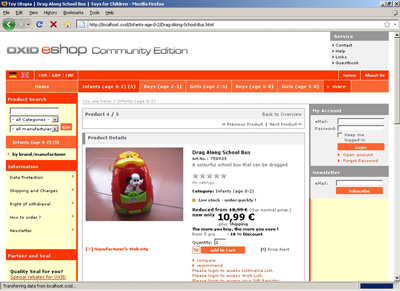
Once you’re done saving the product, it will appear at the top of the page. You can create a new product listing via the Create New Product link at the bottom of the page. To see the result, visit the shop homepage, choose the appropriate category, select the product.
Some useful tips when working with products:
- Ensure that you categorize your products correctly, and enter a few search terms for each so that customers can find them easily. You should also take advantage of OXID’s multi-category system, which allows you to list a product in more than one category.
- Upload as many product pictures as possible, so that customers have a clear idea of what they’re purchasing.
- Use the Crosssell tab to link two or more products together, and the Statistics tab to see how well a particular product is selling.
More information on product management is available in the OXID manual.
Define Payment and Shipping Options
Once you have your products defined, you also need to set up payment and shipping methods. Look under eShop Admin > Shop Settings > Payment Methods, and you’ll find a list of predefined payment methods.

You can select any of these and remove the Active flag to disallow it. To set up a new payment method, select the New Payment Method option at the bottom of the page to display an input form. Add a new payment method by specifying a name, as well as indicating if and by how much prices should be marked up when using this method.
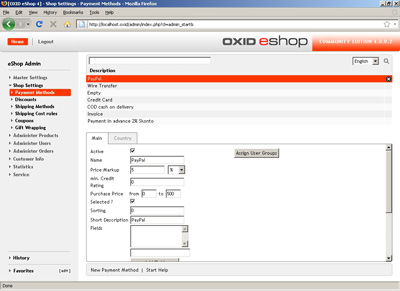
It’s also possible to specify for what purchase amounts this payment method is applicable – for example, you might wish to allow wire transfer as a payment method only for amounts in excess of 250 currency units – as well as also define the sort order and default payment method.
You must also specify the user groups and countries this payment method is applicable to. This can be done by selecting them in the Assign User Groups and Countries tab. In case your country is unlisted, visit eShop Admin > Master Settings > Countries to configure it.
Next, you need to configure the rules used to calculate shipping costs by visiting the administration page under eShop Admin > Shop Settings > Shipping Cost Rules. To set up a new shipping cost rule, select the Create New Shipping Cost Rule option at the bottom of the page to display an input form. Add a new rule by specifying a descriptive name and the condition that activates this rule – for example, weight over 2 kilograms – and the shipping amount for this condition. You can also specify whether this cost rule applies per shopping cart or per product.
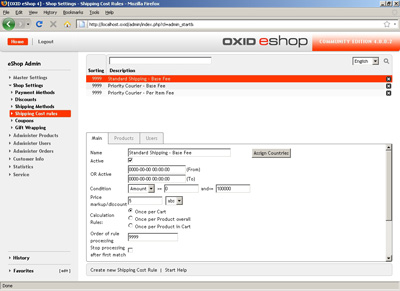

Shipping cost rules can also be assigned to a particular category, product, or user group. So, for example, you could have a lower shipping fee on items in the Infants category, or a lower shipping fee for frequent shoppers. These special rules can be set in the Products and Users tabs of the Shipping Cost Rules form.
Once you’re done defining your shipping rules, the final step is to attach these rules to shipping methods. Visit the administration page under eShop Admin > Shop Settings > Shipping Methods, and set up your shipping methods by selecting the Create New Shipping Method option at the bottom of the page to display an input form.
Note that, in order for the shipping method to be available to users, it must be assigned at least one shipping cost rule, at least one country, and at least one payment method.

OXID’s implementation of shipping and payment methods is rule-based, and requires a thorough reading of the manual to be fully understood. Given that it’s fairly powerful and flexible to configure, be prepared to spend a few hours to make it work just the way you want. Fortunately, there are quite a few examples in the OXID manual to help you on your way – take a look at Shipping cost basics and Payment method basics for more information.
Define Global eShop Settings
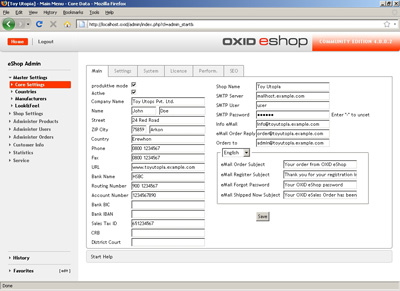
You’re almost done! All that’s left now is to define some global settings for your online shop. These can be found under eShop Admin > Master Settings > Core Settings. Each of the tabs on this page allows you to control a different aspect of the system. While most items can be left at their default values, you might want to pay special attention to the Main tab, which lets you enter essential information for the online store: the shop name, address and contact information, email message parameters, and bank routing information.
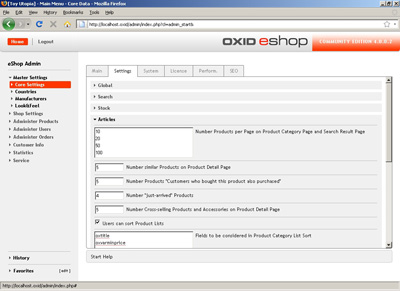
Within the Settings tab are global shop settings, such as the number of products to display per page, the product search algorithm, shop default language, product image sizes, and other interface elements. Apart from setting the default shop language (in Settings > Language) and adding or changing the default set of currencies your shop can accept (in Settings -> Other Settings), you should probably leave most of these as they are.
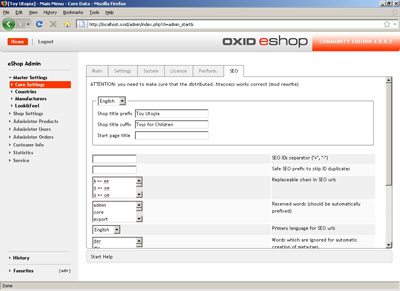
Finally, visit the SEO tab, and set a title for your shop. Typically, this would be the name of your shop, together with a very brief description. This information helps make your shop visible to various web search engines.
Every online store has different policies regarding data protection, returns, shipping rates, and security. With this in mind, OXID eShop allows you to customize some of its pages so that you can clearly state your store’s online policies. To begin doing this, visit the eShop Admin > Customer Info > CMS Pages tab, where you’ll see a list of static templates.
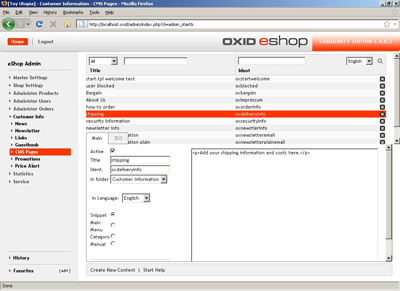
The title of each page template is self-explanatory: select it to customize the text on the page using an online editor. Your changes will be immediately reflected on the shop homepage. You can also disable particular templates by removing their Active flag. More information on changing static page templates is available in the OXID manual.
Process Orders
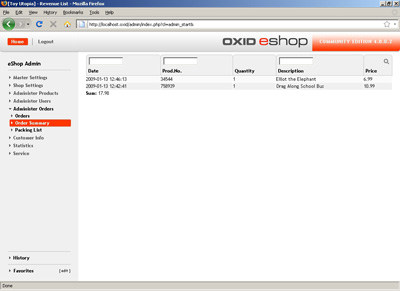
At this point, your store is fully configured and ready to serve customers. But there’s one final bit that you should know about, and it’s also probably the most important: handling orders! OXID eShop’s administration panel includes a fully-featured order processing system, which can be found under eShop Admin > Administer Orders > Order Summary.
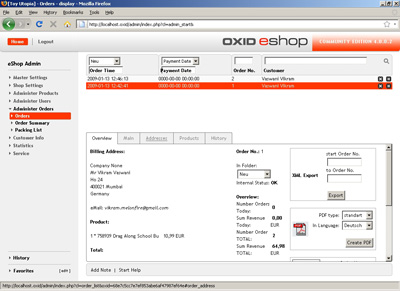
Selecting any of the orders pops up the details of the purchase request, including the price, shipping and billing address, and product details. Selecting the Ship Now command changes the order status (with an optional email to the customer), while using the Create PDF command generates a PDF version of the order, which can be printed and enclosed with the shipment (XML export is also supported).
The order management module can also assist with printing packing slips: use the eShop Admin > Administer Orders > Packing List command to automatically generate printable packing slips for open orders.

As this article demonstrates, OXID eShop Community Edition provides a robust framework on which you can build your online store. The best part? It’s free! So what are you waiting for?
 Vikram Vaswani and Harish Kamath
Vikram is the CEO of Melonfire, a company specializing in software solutions and content syndication. Harish is a software developer who enjoys finding creative solutions to impossible problems.