
Key Takeaways
- Sendgrid, Mailgun, and Postmark are three leading providers in the Email as a Service market, each offering unique features, scalability, and analytics.
- Sendgrid is the largest player, offering extensive analytics, a variety of pricing plans, and the ability to handle high email volumes. However, it lacks statistics for inbound mail.
- Mailgun, recently acquired by Rackspace.com, offers a wide range of features and competitive pricing. It provides two ways for accepting inbound mail and has a straightforward pricing based on send volume.
- Postmark, a newer contender, offers a one price fits all approach and focuses on speed and reliability. It provides a clean interface and a basic set of features, including a Spam Score API for checking outbound and inbound mail traffic for spam.
Introduction
In part 1 of this article, we discussed concept of Email as a Service, and benefits it can bring. In this part we will talk a bit more about three leading and upcoming providers in this market -Sendgrid, Mailgun and Postmark. Each of these companies have their own set of unique features, and I will review these, along with the pricing and an inside look. These providers were selected by the fact that they all cover the important parts like SMTP hosting, inbound mail, scalability and analytics, together with many ways to integrate their service into your app (which can be a mobile app, or a website app).
Sendgrid
We’ll start off with Sendgrid, which can be considered the largest player in this market. They have some pretty impressive customers like Pinterest, Spotify and FourSquare. SMTP hosting seems to be their core business, even though they also provide inbound mail. They give you lots of choice with their pricing plans, while the other companies provide a more simpler pricing.
SMTP hosting
Sendgrid’s massive infrastructure makes sure they can always handle your email volume, no matter how much you want to send. What sets them apart is that from a relatively low price commitment, you can get advanced stuff like a dedicated or multiple IP address(es), or even IP white labeling. In features they are close to Mailgun, and their scale and customer base has to convince you they’re a good fit.
Inbound mail
The ability to process inbound mails is offered by Sendgrid, which can be used to handle replies from within your app. You can specify a hostname for your inbound mail domain, and after that you can integrate it with their API into your app. You can use JSON or XML for adding, editing or removing an entry. You can have incoming mails checked for spam before being parsed. There are no statistics for your inbound mail.
Analytics
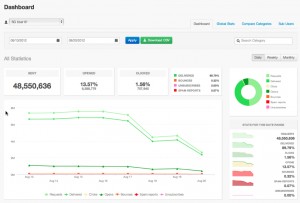
Sendgrid offers you the option to integrate Google Analytics, and provide an extensive set of reporting in their interface. They have a dashboard to display email metrics like sent mails, and open and click rates. And you can open reports to find out more about your spam reports, unsubscribes, bounces etc. There is an option to combine all these parameters, and dive into a specific time frame to see how it all works together. It’s quite extensive, and it should give you a good feel about your email handling.
Setting up
![]()
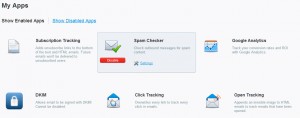
Sendgrid offers a clean interface, with everything neatly divided into interest areas. They make it easy for you to select what you want in an email service, segregated as apps which you can add to your service. This is also where you should look if you want to send an newsletter, because this is an app too. Overall their interface is easy to work with.
Pricing
Sendgrid’s pricing is quite similar to that of Mailgun, and you are looking at a $80+ monthly commitment if you want to all the professional goodies. Prices per 1.000 emails are ranging from $0,85 to $0,45 and even lower if you send more than 1.7 million emails per month.
Mailgun
Acquired by Rackspace.com recently, Mailgun is becoming a serious contender in the Email as a Service market. They have a wide range of features and competitive pricing. Their customer base is not as impressive as Sendgrid, but has some nice names like Uservoice and the Financial Times. Their pricing is mostly based on send volume, instead of features, except for professional features like a dedicated IP.
SMTP hosting
You get all the features right away, even with their free plan. The only difference with their higher paid plans are the IP addresses (shared) and DKIM signing (Mailgun’s). But that’s no problem when you’re just starting up, and want to keep your overhead low. Mailgun offers all the features described in part 1, and is up to par with Sendgrid on their more expensive plans. This is also their main selling point, giving you pro features right from the start.
Inbound mail
Mailgun offers you two ways for accepting inbound mail. You can set up a mailbox within Mailgun, which works like a normal email address. You can use this for a specific function, like for example adding a calendar event from within your app or ordering items. This triggers an email to your specified email address, which can be fetched with POP and IMAP after which your backend can process it.
You can also use “Mailgun Routes”, where you define a list of sequenced routes to process your incoming mail. You can have the message stripped from signatures and replies, and have it forwarded to an URL via HTTP or a different email address. This can be used for triggering a specific action after a message is filtered based on one or more expressions. This gives you more flexibility in processing your inbound mails.

Analytics

All the basics are here, but not as fancy as Sendgrid’s. There’s an overview for all the important metrics like open and click rates, bounces and unsubscribes. And that’s about it actually, that is for the normal mail processing. The secret is in their campaign module, which has some nice features like daily activity charts for what’s happening in the receiver’s inbox and even reporting on geo coverage.
Setting up

Mailgun shows what it’s got right after you login when it comes to their main functionality. This might come as a bit overwhelming, but saves you the search. And once you get the hang of it, you might appreciate this approach. Because their really detailed features are uncovered after you set up things like a mailing list or a mailbox. So you’re only shown what you need at first.
Pricing
Like mentioned above, Mailgun’s pricing is really straightforward Pricing is based on a monthly commitment, and raising your commitment gives you a lower price per mail, and more professional features like (up to) a dedicated IP subnet and custom DKIM signing. Pricing ranges from $1 tot $,10 per 1.000 mails.
Postmark
New kid on the block Postmark tries to battle the competition with a one price fits all attitude, and a sales which actually doesn’t say anything about their features. They try to assure you that their experience and technical skills are all you need, using layman’s terms to describe what they are offering. Their customer base has some interesting names like Tender App and Readability.
SMTP hosting
Postmark has some nice features like a weekly digest reports with your important metrics, but also a WordPress plugin for easy integration. They also provide a Spam Score API (based on SpamAssassin), which you can use for both your outbound and inbound mail traffic to have it checked for spam. Using it for your outbound mail before a message is sent is a good prevention for being marked as spam. There is no option for sending a newsletter.
Inbound mail
The ability to receive inbound mail is fairly new within Postmark, and they are actively expanding its features. Every mail is parsed into a JSON object for you to have it processed (as a with outbound mail, you can run it through their Spam Score API first). You can also set up an MX record to use your own domain name for receiving mail.
Analytics
Postmark offers some nice looking graphs, which give you a quick view into your sent and received mails. It also includes your bounce rate and number of spam complaints. You can also keep track of your statistics by using their API.
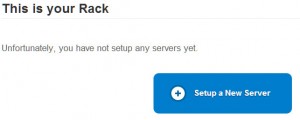
Setting up

Talk about a clean interface, Postmark starts with nothing but the ability to start a server, a dedicated mail processor for each app you have. After that you can send an email with their API as an HTTP request (using JSON), or via SMTP. In the interface you can setup hooks to give a signal when an email bounces, or send parsed JSON data from inbound mail to have it processed in your backend. Most of the setting up is done using the API however.
Pricing
As stated Postmark just offers one price, being $1,50 per 1.000 emails, up to a volume of 500.000. All of their features are included in this price.
Conclusion
Sendgrid and Mailgun are in a neck and neck race when it comes to features and price per mail, but offer a different pricing strategy. Their interfaces are quite different, but both offer a free plan for you to see what you prefer. Postmark has basic set of features to begin with, but is definitely catching up with it’s competitors. Let me know your thoughts and views based on your experience.
Frequently Asked Questions (FAQs) about Email as a Service: SendGrid, Mailgun, and Postmark
What are the key differences between SendGrid, Mailgun, and Postmark?
SendGrid, Mailgun, and Postmark are all powerful email service providers, but they each have their unique features and strengths. SendGrid is known for its robust email delivery system and scalability, making it a great choice for large businesses. Mailgun, on the other hand, is praised for its powerful APIs and excellent deliverability, making it ideal for developers and tech-savvy users. Postmark stands out for its speed and reliability, as well as its focus on transactional emails, making it a good choice for businesses that prioritize quick and reliable email delivery.
How does pricing compare between SendGrid, Mailgun, and Postmark?
Pricing for these services varies and is often based on the volume of emails sent. SendGrid offers a free tier for up to 40,000 emails in the first 30 days, then 100/day forever. Mailgun has a “pay-as-you-go” model, with the first 10,000 emails and 100 validations free each month. Postmark starts at $10/month for 10,000 emails, with additional emails at $1.25 per 1,000. It’s important to consider your business’s specific needs and email volume when comparing prices.
Which email service provider offers the best deliverability rate?
All three providers – SendGrid, Mailgun, and Postmark – have high deliverability rates. However, the exact rate can vary depending on several factors, including the quality of your email list, your sender reputation, and the content of your emails. It’s recommended to follow best practices for email marketing to ensure high deliverability, regardless of the service provider you choose.
How user-friendly are SendGrid, Mailgun, and Postmark?
User-friendliness can be subjective and depends on the user’s technical skills and familiarity with email service providers. However, generally speaking, SendGrid is known for its user-friendly interface and comprehensive documentation. Mailgun is highly appreciated by developers for its powerful APIs, but non-technical users might find it a bit challenging. Postmark is praised for its clean, intuitive interface and excellent customer support.
What kind of customer support do SendGrid, Mailgun, and Postmark offer?
All three providers offer robust customer support. SendGrid provides 24/7 support via email and chat for all paid plans. Mailgun offers email support for all plans and 24/7 emergency phone support for premium plans. Postmark provides support via email and also has an extensive knowledge base on their website.
How do SendGrid, Mailgun, and Postmark handle security?
Security is a top priority for all three email service providers. They all offer features like two-factor authentication and secure data storage. Additionally, they comply with key industry standards and regulations to ensure the security and privacy of your data.
Can I use these services for bulk email sending?
Yes, all three services – SendGrid, Mailgun, and Postmark – support bulk email sending. However, it’s important to note that they have different features and pricing structures for bulk emails, so you should consider your specific needs and budget when choosing a service.
Do SendGrid, Mailgun, and Postmark offer email tracking?
Yes, all three providers offer email tracking features. This includes tracking opens, clicks, bounces, and other important email metrics. These insights can help you optimize your email campaigns and improve your email marketing performance.
Can I integrate SendGrid, Mailgun, and Postmark with other software?
Yes, all three email service providers offer integrations with a variety of other software and platforms. This includes CRM systems, marketing automation tools, ecommerce platforms, and more. These integrations can help streamline your workflows and make your email marketing more efficient.
Which email service provider is the best for my business?
The best email service provider for your business depends on your specific needs and circumstances. Factors to consider include your email volume, budget, technical skills, and specific features you need. It’s recommended to try out different services and see which one works best for you.