

The Android platform is Googles attempt to give the iPhone a run for its money. In the last year or two, it grew to be a worthy opponent. One reason for this is the fact that it has a lot of funky goodness to offer: Developers enjoy the possibilities and of course the portability that lets them use their beloved Java libraries with ease since non-native Android applications run on a special Java Virtual Machine or JVM.
JRuby is the award-winning open source software that brings Ruby, our pearl of beauty, on the workhorse that is the JVM which, like I said, is also powering Android applications. To put it in a nutshell, the most natural thing happened and Ruboto was born! Domo arigato indeed.
Since I love both Ruby and Android, I had to test-drive Ruboto, which I did last week. I thought, why not make a short article out of my little adventure? (If you would like to write an article about some cool Ruby stuff yourself, feel free to contact us!)
Let me give you a quick overview of how things come together first and then I’ll show you how to try it yourself.
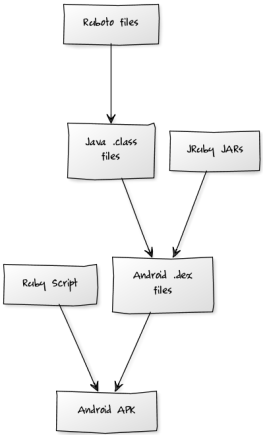
As you can see, Java source files together with the JRuby JARs are being packed together to an Android application that is able to run your custom Ruby scripts while giving you access to the Android APIs. This is a powerful approach since it enables you to also change the Ruby scripts afterwards without the need to recompile the whole app. The implication here is that you can write Ruby code directly on your device and run it. Admittedly, this is not the most finger friendly way to code, but it is actually nice to have a working IRB on your device to quickly try out something.
How is it Done?
For simplicity and the sake of my mental health I’m only going to show you how I did it on my Linux machine. If you are using Mac or Windows, there are tutorials for you out there too.
System Setup
First you need to have a JDK (Java Development Kit) and Ant (think of Bundler for Java).
sudo apt-get install default-jdk ant
Please verify that you have at least Ant version 1.8.1 or higher. If not, you can get it from here.
Now the Ruboto tutorial installs everything Ruby related via Aptitude, but I tend to favor RVM (the Ruby Version Manager). You can install it simply with bash -s stable < <(curl -s https://raw.github.com/wayneeseguin/rvm/master/binscripts/rvm-installer) but you should read their install guide first.
After you successfully installed RVM, you can use it to automatically install a Ruby environment for you. I decided to use the latest JRuby version by running rvm install jruby.
Now as you may or may not know, RVM handles your gemsets for your Ruby versions quite transparently, allows us to install the necessary gems with a simple gem install rake bundler ruboto jruby-jars.
The final step is to install the Android SDK. All you have to do for that is download the SDK from here, extract it in a location of your choice (psst, /opt/android-sdk/ is nice!) and add this location to your path variable (e.g. by adding something like
export PATH=${PATH}:/opt/android-sdk/tools to your ~/.bashrc file)
To generate your first Ruboto app, just type ruboto gen app --package org.ruboto.example.quick_start --target android-7 and
cd into the newly created directory quick_start.
Device Setup
I just used my actual Android phone instead of the emulator, but if you prefer using the emulator or if anything went wrong and you need to know more details of the installation process etc, just visit the official Ruboto getting started Tutorial.
In order to use your Android device to try out your app, you need to allow Unknown sources in Settings/Applications and enable USB debugging in Settings/Applications/Development (Settings/Security and Settings/Developer_options since Android 4.0).
One last thing needs to be done before we can install the sample app to the device. You need to create the file /etc/udev/rules.d/51 android.rules by adding the line SUBSYSTEM=="usb", ATTR{idVendor}=="0bb4", MODE="0666", GROUP="plugdev" and fire a quick sudo chmod a+r /etc/udev/rules.d/51-android.rules on it.
Please note that you need to exchange the “0bb4” with your actual vendor ID. The most common ones should be
- HTC: 0BB4
- Samsung: 04E8
- Google: 18D1
- LG: 1004
- Motorola: 22B8
- Huawei: 12D1
The rest can be found here. Again, if you’re using Windows or Mac you will have to do different things. Please go and read these instructions.
The Fun Part
Well, that was easy wasn’t it? Seriously, get a beer or the like if you haven’t already, because the fun part can finally begin: Let’s write some Ruby code! You should now be able to build and install the sample app to your device, assuming it is connected via USB, with a simple rake install.
Since the sample app is really boring, we should make it do something more fun. When I started to play around I thought of writing a little game at first or something with the devices camera but the thing is, this kind project is either totally dumb or too complex to be done in a small article like this one. A friend of mine then told me about a project that he’s working on where he wants to remotely control his fancy TV via Ruby and that made me think. Why not build a small script that connects to a TCP server and sends a message. I liked the idea because it is not much code, itis quickly done, can be easily extended into something potentially useful and I just like network stuff.
The first thing we change is the name of the app in res/values/strings.xml. Right after that, we open the AndroidManifest.xml and just above the </manifest>-tag at the end, we add <uses-permission android:name="android.permission.INTERNET">. Obviously this gives our app the permission to access the network. Now, we can finally
add the Ruby code in src/quick_start_activity.rb. Just replace everything in this file with the following code
[gist id=”1723300″]
Run rake install again to deploy the changes to your device.
What does this code do? After starting the app you should see two text fields and a button. In the first text field we enter a host name of a server in the same network or in the internet. On this machine we should start a TCP Server, which can be done either with the help of the all mighty netcat (nc -l 1234) or with some Ruby code
[gist id=”1723307″]
When we enter a message in the other text field in our app and press the send button we should get the message displayed on the server side. What a great day for science! You know what to do now … go build a laser death ray and control it from your Android device or something like this! (I’m not responsible for any casualties!)
What are your thoughts about JRuby, Android and Ruboto? Just a toy or a game changer?
Frequently Asked Questions about Ruboto: Ruby’s and Android’s First Born
What is Ruboto and how does it work?
Ruboto is a platform that allows developers to write Android apps using the Ruby language. It is a package that includes JRuby, a Java implementation of Ruby, and provides a bridge between Ruby and Android’s APIs. This means you can write Android apps using Ruby, and also have access to Java libraries if needed. Ruboto works by generating Android project scaffolding that can be run on an emulator or device. It also provides scripts for creating, updating, and running Ruboto projects.
How do I install Ruboto?
To install Ruboto, you first need to have a Ruby development environment set up. Once you have Ruby installed, you can install Ruboto by running the command ‘gem install ruboto’. After installation, you can use the ‘ruboto’ command to create and manage your Ruboto projects.
How does Ruboto compare to RubyMotion?
Both Ruboto and RubyMotion allow you to write Android apps in Ruby, but they have some key differences. RubyMotion is a commercial product, while Ruboto is open-source and free to use. RubyMotion compiles Ruby code into native code, which can result in better performance, while Ruboto uses JRuby to run Ruby code on the Java Virtual Machine. This means that Ruboto apps can be a bit slower, but they also have access to Java libraries.
Can I use Java libraries in my Ruboto apps?
Yes, one of the advantages of Ruboto is that it allows you to use Java libraries in your Ruby code. This is possible because Ruboto uses JRuby, which is a Java implementation of Ruby. This means you can use any Java library in your Ruboto app, just like you would in a Java Android app.
How do I update my Ruboto installation?
To update Ruboto, you can use the ‘gem update ruboto’ command. This will update Ruboto to the latest version. If you want to update a specific Ruboto project, you can use the ‘ruboto update app’ command in the project directory.
What are the system requirements for Ruboto?
Ruboto requires a Ruby development environment and the Android SDK. It also requires Java, as it uses JRuby to run Ruby code on the Java Virtual Machine. The specific versions required can vary, so it’s best to check the Ruboto documentation for the most up-to-date information.
Can I use Ruboto to develop iOS apps?
No, Ruboto is specifically designed for developing Android apps. If you want to develop iOS apps using Ruby, you might want to look at RubyMotion, which supports both Android and iOS development.
How do I debug my Ruboto apps?
Ruboto apps can be debugged using the standard Android debugging tools. You can also use Ruby’s debugging tools, as Ruboto apps are essentially Ruby programs running on the Java Virtual Machine.
Can I use Ruboto with Rails?
No, Ruboto is not designed to work with Rails. Ruboto is for developing Android apps, while Rails is a web development framework. However, you can use Ruboto to develop an Android app that interacts with a Rails backend.
Is there a community or forum where I can ask questions about Ruboto?
Yes, the Ruboto community is quite active and there are several places where you can ask questions and get help. The Ruboto website has a forum, and there is also a Ruboto group on Google Groups. Additionally, you can find a lot of useful information and examples on the Ruboto GitHub page.

