I remember teaching user interface design courses back in the mid-nineties. In those courses there was a slide entitled “Rapid Prototyping,” and on that slide were all the reasons why rapid prototyping was a bad idea. Most of the reasoning centered around prototyping tools being so complex back then, they needed to be operated by developers; subsequently, the design process tended to be influenced by all design work needing to be interpreted through the lens of what a prototyper could actually achieve.
Fast forward to 2010 and there’s been a rethinking on prototyping. A slew of new prototyping tools have appeared over the past few years and they’re rapidly being adopted by interaction designers. I guess the creators of these tools never attended one of my courses!
(As you read on, make sure you pay attention, because there’s a quiz at the end!)
What Changed?
In fact, two things changed to bring prototyping tools back into favor: the tools themselves and the task they’re being used to accomplish.
-
Prototyping tools today are much more designer-friendly. The adoption of user interface markup languages (like HTML, XAML, and MXML) our ability to build and run more sophisticated software today has made it easier to create design tools that work for designers, rather than developers.
-
At the same time, the nature of what we’re designing is changing. As we move away from designs that are a series of relatively static pages or screens, to designingapplications that use fewer, more dynamic pages, it becomes harder to prototype these experiences using the traditional tools of paper prototyping and diagramming applications.
So we have perfect conditions for a new wave of prototyping tools: rising demand and increasing capability.
Microsoft’s Contribution: Expression Blend SketchFlow
Among this new breed of prototyping tools we find Microsoft Expression Blend SketchFlow (for the purposes of this tutorial, I’ll be referring to it as simply SketchFlow). While maintaining the Microsoft tradition of remarkably long product names, SketchFlow takes a fairly unique approach to prototyping.
Expression Studio
First, I’d like to point out that SketchFlow is part of Microsoft’s Expression Studio range of design tools. After a lackluster history with design tools, Microsoft seems to be finally getting their act together with Expression Studio (disclaimer: I’ve previously worked at Microsoft). Expression Studio is up to its third release and comprises four or five products depending on how you count them:
-
Expression Blend: For building user interfaces for Silverlight, Windows, and Surface.
-
Expression Blend SketchFlow (part of Blend): For prototyping user interfaces.
-
Expression Web: For building user interfaces for web standards.
-
Expression Design: For creating graphic assets for the Web or Silverlight, Windows, and Surface.
-
Expression Encoder: For preparing video assets for the Web or Silverlight, Windows, and Surface.
You can check out the SitePoint article by Raena Jackson Armitage for more information on Expression Web. There will also be later articles in this series, which will cover Expression Blend and Expression Web in more detail.
SketchFlow and Expression Blend
It’s important to note the relationship between SketchFlow and Expression Blend. Expression Blend is the production tool for Silverlight, Windows (Windows Presentation Foundation), and Surface, whereas SketchFlow is a prototyping tool built on top of Expression Blend.
The fact that the prototyping tool is built on top of the production tool raises some interesting possibilities—which you may see as positive or negative, depending on your disposition:
-
The positive is that you have access to all the production tool’s features, so you can take your prototype as deep as you want, by accessing production features like data binding, web services, third-party components, and, let’s face it, the entire Microsoft .NET platform. This also means you can more easily migrate your prototype (or parts of your prototype) into production if you wish.
-
The downside of this access to the underlying production tools is that designers can be overwhelmed by the depth of functionality lurking just below the surface of SketchFlow. Being productive with SketchFlow does require you to understand some of the basic ideas of the Microsoft platform, which may be more that you wished for when you thought you were just going to draw boxes on some pages.
So SketchFlow is just for Microsoft projects?
Expression Blend is the production tool of choice if you’re designing for Microsoft Silverlight, Windows (WPF), or Surface. So if you’re prototyping for these platforms, choosing SketchFlow as your prototyping tool is a no-brainer—particularly since SketchFlow comes free with Expression Blend in the Expression Studio suite, or in many MSDN subscriptions.
If you’re prototyping for other platforms (including HTML/CSS/Ajax) then SketchFlow is certainly an option, especially if you already have Blend or SketchFlow experience. However, in this case—aswith most prototyping tools—you’ll be unable to migrate your prototype into production. You’ll have to build the production version from scratch.
Let’s Give It a Whirl
We’ll now have a look at how SketchFlow works. You might find it quite different from other prototyping tools of which you’re familiar.
The Case Study
For the sake of argument, let’s say I need to add a portfolio to my new website at www.automaticstudio.com.au. I’m imagining a feature that allows site visitors to browse through my portfolio of interaction design projects in a dynamic and engaging way.
I figure Microsoft Silverlight will be a good option for the dynamic elements, because:
-
as a designer, I can create a cross-platform interactive experience in Expression Blend with little or no code
-
I can easily integrate the Silverlight component with the surrounding HTML page
Create Your First SketchFlow Project
Getting started with SketchFlow is as simple as firing up Expression Blend. You can download an evaluation copy of Blend on Microsoft’s website (Windows only I’m afraid.)
When Blend starts you’ll be presented with a welcome screen. If you want to see what a SketchFlow prototype looks like, choose Samples, and open one of the “…Sketch” prototypes (to run the prototype, press F5 in Blend).
Figure 1. Expression Blend includes a few sample SketchFlow prototypes

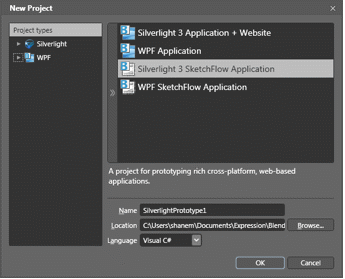
When you’re ready to start on our own SketchFlow prototype, return to the welcome screen (Help>Welcome Screen), select Projects, and click New Project…. You can choose WPF for Silverlight 3 SketchFlow Application.
Figure 2. To start your own SketchFlow project, select New Project and Sliverlight 3 SketchFlow Application
The SketchFlow/Blend User Interface
Let’s have a quick look at the Expression Blend user interface. What you’ll first notice is that there’s a lot going on! No need to panic, though.
Figure 3. The Expression Blend UI can be overwhelming at first

The Blend user interface itself is quite busy on its own, and SketchFlow just adds more features. My advice is: do yourself a favour and get rid of some of the panels and tools you won’t need at first.
If you want to clean up the Blend workspace, close the following for now:
-
SketchFlow Animation panel
-
Resources panel
-
Data panel
-
States panel
-
Projects panel (If you’re a .NET programmer, have a quick look first—you’ll see that SketchFlow projects are standard .NET Visual Studio projects.)
Once you’ve done that, the UI looks more approachable, as shown in Figure 4, “The SketchFlow user interface after a bit of tidying up”.
Figure 4. The SketchFlow user interface after a bit of tidying up

Let’s have a look around.
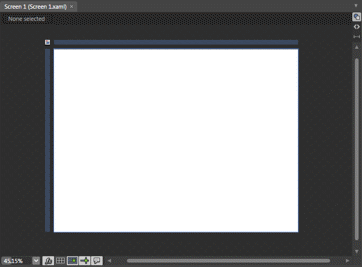
Artboard
The artboard is probably fairly obvious; it’s where we’ll lay out the screens of our application.
Figure 5. The Artboard shows the contents of your application’s screen
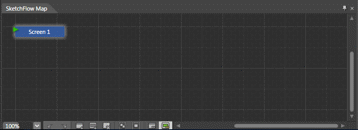
SketchFlow Map
The SketchFlow Map is an important part of SketchFlow—it’s where we draw out the flow of our application, and it’s where you should normally start when creating a SketchFlow prototype.
Figure 6. The SketchFlow Map is where you’ll normally start a SketchFlow project
Objects and Timeline Panel
The Objects and Timeline panel shows you a hierarchical view of the contents of your screen. (Adobe users beware—by default it’s in the reverse order of what you’re used to.)
Figure 7. The Objects and Timeline panel shows you the contents of the current screen

Properties Panel
Another panel you’ll spend a lot of time in is theProperties panel, where you manipulate the properties of the currently selected item. This is the first place where the full extent of the underlying platform shows itself—thereare a lot of properties!
Figure 8. The Properties panel is where you’ll set the attributes of items in your screens

Start with the Screen Flow
The first step in most SketchFlow projects is to map out the flow of your application. On the SketchFlow Map panel, you can drag out a series of screens and connect them up with arrows to show the main user paths through your application.
Figure 9. The SketchFlow Map lets you map out the flow of your application
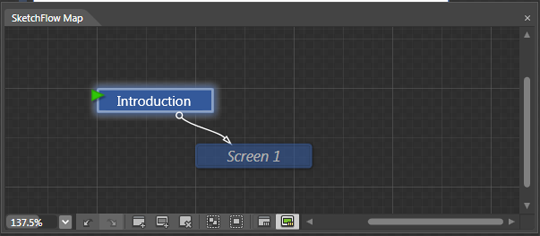
The SketchFlow Map is probably my favorite feature of SketchFlow. Using it encourages you to consider flow before you think about the contents of individual screens. Ultimately, it’s the flow that causes the most usability problems, and it’s also the most difficult (and expensive) to fix if you get it wrong.
While the SketchFlow Map is made up of screens, my advice is to avoid worrying about what is or is not a screen at first. Just use the SketchFlow Map to draw out the main sequences of actions your users will take. Once you have that flow nailed down, it’ll be much easier to translate those steps into screens.
 Shane Morris
Shane Morris is one of Australia’s most respected user experience professionals. Through consulting, mentoring and training he has helped organisations create compelling digital experiences since 1991. In that time he has worked on desktop applications, internet applications, mobile user interfaces, physical devices and web sites. Shane has taught user experience topics around the world and is a key contributor to “101 Things I Learned in Interaction Design School†at ixd101.com.