Expression Web – Your New PHP Tool Kit
Key Takeaways
- Expression Web 3 is a versatile web development tool from Microsoft that supports multiple coding languages, including PHP, making it suitable for a variety of web development projects.
- The software includes intuitive features like code highlighting and completion, live PHP page previews, and the ability to import elements directly from Photoshop documents.
- Users can test their web pages in multiple browsers using the Super Preview feature, which allows for easy comparison and compatibility checks across different browser versions.
- Expression Web 3 promotes clean, standards-compliant coding by providing tools that highlight and help correct errors in real-time, enhancing both the efficiency and quality of web development work.
- The tool’s integration with PHP allows for dynamic web page creation, and its design and code views facilitate both visual and code-based development approaches.
- For those transitioning from other platforms or upgrading, Expression Web 3 offers competitive upgrade pricing and an intuitive interface that may reduce the learning curve.
In the Beginning
To start, we need to grab a few key items.Grab a Photoshop Comp
We’ll build a simple PHP page using this Photoshop comp I prepared earlier. If you’d like to follow along with this tutorial, feel free to grab the comp as well. Of course, if you’re feeling adventurous, it’s a great opportunity to play with a design you already have in mind!Install Expression Web or Expression Studio
Naturally, we’ll need a copy of Expression Web, which you can download from the Microsoft Expression site. You can choose a standalone installer for Expression Web and Super Preview alone, or install the complete Expression Studio. The trial is completely unlimited and lasts for 60 days, which should be more than enough time to decide whether you want to purchase.Install PHP
Expression Web includes support for coding PHP, but if we want to also preview PHP pages, we’ll need to install the PHP binaries.If you’ve yet to do so, grab the Windows PHP installer from the PHP for Windows web site. The easiest option here is to use the Installer option, as opposed to the source code. PHP, as always, is free.There are two important configuration variables you’ll need to check before proceeding, however: create or edit your php.ini file, and look for thedoc_root and cgi.force_redirect lines. doc_root must be uncommented and set to localhost, and cgi.force_redirect must be uncommented and set to 0. If the installer has failed to do this for you, edit it now. Since this will be a development environment, it’s probably a good idea to ensure that display_errors is set to Yes.You now have all the bits and pieces you’ll need to follow along with this tutorial.Exploring Expression Web
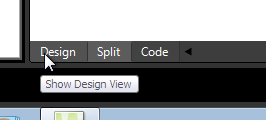
I like to become acquainted with a new app by leaping straight into action. When you first launch Expression Web, you’ll be greeted with a workspace full of sidebars, toolbars, and other goodies. In the center, you’ll see your document. Figure 1, “The Expression Web 3 workspace with a simple document open” illustrates how it looks.Figure 1. The Expression Web 3 workspace with a simple document open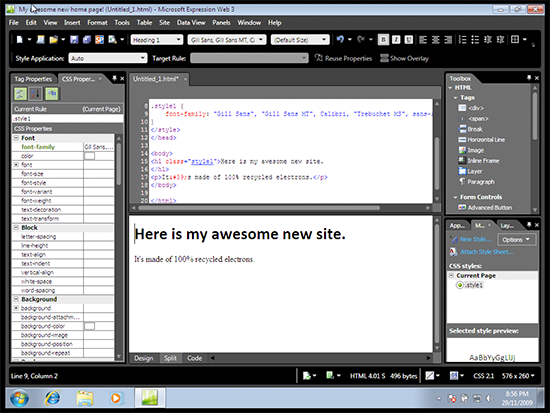 This screenshot shows a simple document in Expression Web’s Split view, showing design and code at the same time. Markup can be entered in the top section, and the bottom area will reveal how it looks. You can swap between the Code, Design, or Split views using the tabs at the bottom of this window, shown in Figure 2, “Swap between Design, Split, and Code views”.Figure 2. Swap between Design, Split, and Code views
 The panels to the left and right contain tools that we’ll find useful once we start working. To the left we have a tag and CSS properties panel, where we’re able to add various attributes and JavaScript events to any element, or adjust the element’s CSS properties. To the right, there’s a toolbox from which we can drag and drop a number of common elements, such as
 div elements, form widgets, or components such as Flash or Silverlight. If you’re an ASP.NET developer, there’s a collection of draggable goodies here for you, too. Other panels are available, but they’re hidden by default; you can reveal them using the Panels menu at the top of your screen.Looking at my design comp, I have a fairly good idea of what needs to happen: there should be a container div to hold the contents of the page, a nice heading area sitting to the left, and the contents of the page in a div on the right.Figure 3. A wireframe view of the structure of this page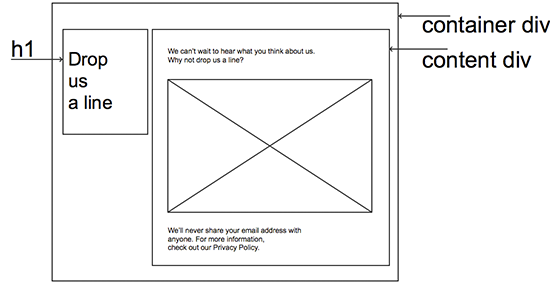
Design View
Since I’m a text editor, code-it-by-hand kind of gal, my first instinct is to leap into the code and start typing away. However, I’m curious about how well Expression’s visual editor will cope with what I need. Let’s switch into Design view.Below, I’ve added some very basic elements to provide a shell for my document. I’ve dropped in adiv using the Toolbox panel to my right, which will become my container div. Inside it I’ve placed another div for the page contents, the h1 for the heading, and some text placeholders. In the image below, you can see a dotted line around the div I’m currently working in. At the top is a series of oblongs with elements in them—that’s my current position within the document’s tree.Figure 4. Uncharted territory for your humble author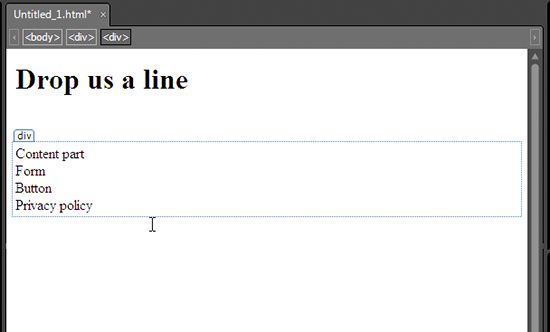 Let’s see how easy it is to apply some CSS. We’ll start by selecting the body element. In Design view, this is easily achieved by clicking on the name of the element at the top of the Design window.Next, we’ll add a new style, using the Add New Style
button from the CSS panel at the bottom right. The Style Wizard window appears, with a plethora of interesting options to select.By default, Expression will assume that you intend to apply a style called
 .style1, .style2, and so on. As we know, these sorts of style names are inappropriate for semantic markup. Fortunately, it’s super easy to change the selector so that it uses the body element instead. You can type it, or select it from the pull-down shown below.Figure 5. Choose the body element here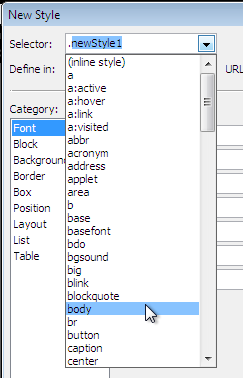 Another great option here is to choose whether we’d like this to be placed in a style declaration within the page, or in a new style sheet. If we select the option to place this style declaration in a new style sheet, Expression helpfully creates one for us. That’s cool!Figure 6. Why yes, I would like that new style sheet
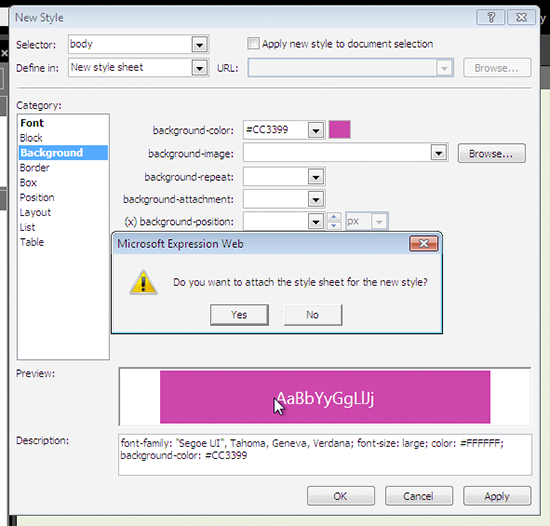 Using the Wizard, we can add all the required properties: font, background and text color, and the like. (Our Photoshop composition has a background image in it, but we’ll deal with that later.) Declarations are arranged into appropriate categories, and some panels even give you handy pointers—the Box category shows you a diagram of the CSS box model to help you remember how the parts of a box go together, which is great for newbies.Figure 7. A box model cheat sheet
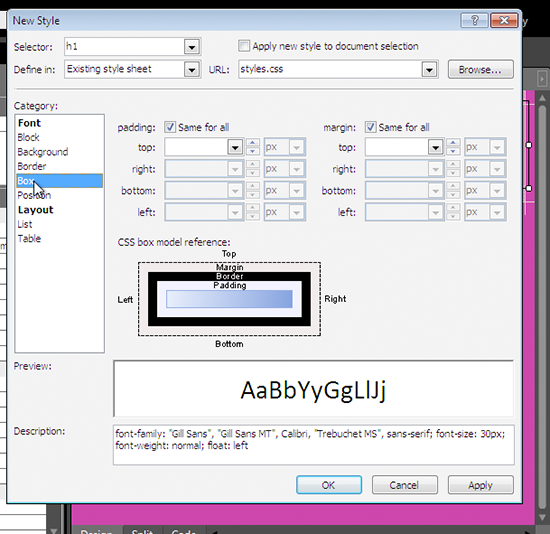 Hit OK when you’ve added your declarations.Now that there’s a style sheet in place, we can view the CSS properties for each element in the CSS Properties panel on the left.We’ll use the same process to set up the positioning of the rest of the parts of this document, according to those instructions on the wireframe. To add
 id attributes to an element, use the Tag properties tab on the leftmost panel, and set the id for each of the elements you want to select. Then, use the Add Style button to add the styles for each ID. I’ve chosen to make the container div element 80% width, the h1 element 30% width, and the contents div 65% width.If you’ve yet to save your pages, now is the right time to do it. Be sure to save your HTML page as a PHP page—when you’re in the Save As dialog, select PHP from the Save as type pull-down menu.WYSIWYG Blues
Grizzled web veterans have horrific stories to tell of the kind of convoluted mess that a WYSIWYG editor can create. People with little or no knowledge of HTML can create some seriously grotty markup and styles using WYSIWYG tools, where best practice can fall by the wayside in favor of ease of use: layout tables, absolutely positioneddivs, and incomprehensible styles sheets abound. Indeed, a truly determined newbie can easily createthat kind of page, even with Expression Web.The process we’ve used here is a good way to enjoy the benefits of Expression Web’s visual approach to web page construction without cluttering your document with weird crufty markup. If you prefer to use the more pointy-and-clicky tools, such as drawing divs directly onto the screen or formatting the text with the toolbars, be sure to use Expression’s tidy-up tools: the Optimize HTML and CSS Report wizards will help you identify any extraneous cruft.Super Duper, Super Preview
With a very basic layout now in place, let’s see how it shapes up. Hit the red-and-blue Super Preview button on the topmost toolbar. Super Preview’s split screen appears, asking which browsers you’d like to use. On the Internet Explorer side, you can choose from IE6, IE8, and IE7 compatibility mode. If you have Firefox installed, this will also figure as a choice. Super Preview also allows you to open your mockup image for comparison and supports several image file formats, including PSD files.Figure 8. A smorgasbord of preview options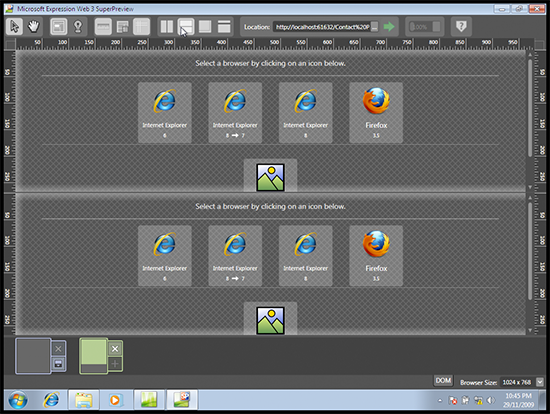 I have a narrow screen, so I’ve changed my split panes to top/bottom, rather than left/right. Once you’ve chosen two browsers to compare, hit the big green button beside the address bar and watch your pages load in both browsers at once.Super Preview is more than just a browser preview widget, though—there’s plenty of interesting tools to use. When the previews have loaded, try clicking an element in either screen; a box will highlight in both screens to show you any subtle differences between the two. In Figure 9, I’ve chosen IE6 and 8 as my two browsers, then clicked the
 h1 element. The display is showing me that there’s quite a bit of a difference in width, position, and boxsize. (Surprised? Neither am I. Stay classy, IE6.)Super Preview offers other ways to compare the two. If you’re short on screen real estate, as I am, you can use the Overlay comparison instead. Both views are made visible, like onion skins, so that it’s very easy to see discrepancies.Figure 9. Subtle differences are highlighted in the Overlay view There’s even a DOM browser tab available at the bottom of the screen, helping you to identify pesky elements.Of course, you can also preview your work in any browser installed on your system. PressF12to launch your default browser and see your work.In either instance, the Expression Development Server will launch. Because it’s a real web server, rather than merely opening files from your hard drive, you’ll be able to see any dynamic content like PHP or ASP code you’ve used. This will come in very handy later when we pop in some PHP.So far, so good! However, I’m itching to write some of my own code, and if you’re a hand coder type, I bet you are too. Let’s head back into Expression Web, and this time we’ll edit the code ourselves.
Code View
Back in Expression Web, I’ve swapped to Code view using the tabs below my window. The code created by the Design view seems quite tidy so far. Expression’s syntax highlighting is reasonably clear. Elements’id attributes and the style sheet link itself are hyperlinks; control-clicking one of these whisks us away to that part of the style sheet. That’s convenient, and kind of nifty. Figure 10. shows how mine turned out:Figure 10. The Code view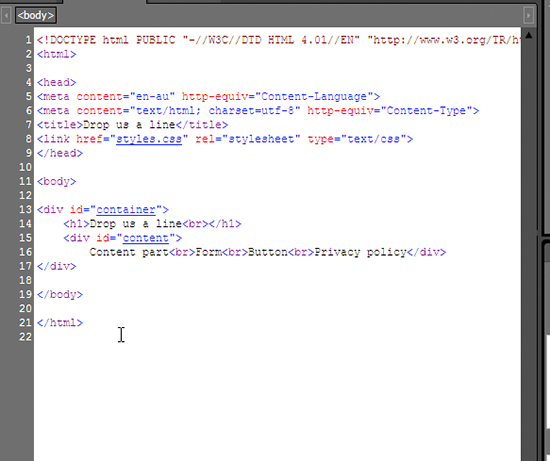 Let’s code up the rest of our form and add some more CSS. You’ll find the markup and CSS I used in the code archive for this article, but I strongly encourage you to write your own. That way, you’ll see Expression Web’s helpful code completion features in action.Expression Web’s code completion helper is called Intellisense, and as we start writing code, we’ll see it kick in. To start with, let’s remove the placeholder text and add a paragraph with the text from the top of our form. Watch carefully as you type, and you’ll see Intellisense kick in. When writing HTML, the Intellisense helper suggests elements as soon as you open a bracket, reveals suitable attributes or events if you enter a space, helpfully inserts quotes for you when you use an equals sign, and even inserts the right closing tag for you when you close your brackets. In the CSS view, indents, closing semicolons, and helpful suggestions work in much the same way.For more keystroke-saving power, Expression comes with a number of preset code snippets you can invoke by pressing Ctrl Enter, and then typing a shortcut or selecting from a list. It’d take a while to learn them all, but once you do, you have some powerful text macros on your hands. These include useful tools like DOCTYPEs, common
 meta elements, empty script blocks, and more. You’ll also find the Code Snippet menu, offering the default set of snippets; of course, you could configure your own. If you find that you’re often constructing the same sort of text in lots of projects, the Code Snippet function will certainly save you some time.For my part, I find that Intellisense is a little too intelligent for my tastes, and I often find myself typing in extra closing quotes and tags out of sheer force of habit. It’s possible to grow used to any editor’s code completion tools with time, practice, and adjusting the configuration to suit your own style. Fortunately it’s easy to configure your Intellisense and Code Snippet preferences: just look for them in the application’s general editing preferences (Tools > Page Editor Options). Of course, if the very idea of code completion bugs you, you can even turn them all off.Highlighting Bad Behavior
Expression Web’s aim is to help you create standards-compliant code with ease, and there’s a range of tools that can help us here. Expression Web’s tools are smart enough to detect which HTML DOCTYPE or CSS schema you’re using for your documents, and make suggestions accordingly.In Code view, if you try to use an invalid element or an unsupported CSS property, you’ll see the familiar red underline that usually means you’ve misspelled a word. In Expression Web, this red underline means that you’ve used some inappropriate code. Of course, this is handy for typos too—Figure 11. shows what happened when I mistakenly left the u out ofbackground:Figure 11. backgrond-color is indeed unsupported by the CSS 2.1 schema I’m also in the habit of typing self-closing elements in HTML 4 documents, which is very naughty. Expression Web does a good job of telling me off about this.Figure 12. Closing slashes are invalid in HTML 4
 You’ll find that you’ll see this red underline whenever you try to include any unsuitable elements, which is a great help for creating standards-based markup.Expression Web also includes a series of reporters that can help you identify invalid markup, browser support issues, potential accessibility hiccups, or CSS problems. I’ve fired up the Compatibility Checker (Tools > Compatibility) to check out my HTML; this checks both the validity of the code, and potential browser support issues. In the example below, I’m checking for whether there’s any part of my page that will cause problems in IE6.Figure 13. The Compatibility report options
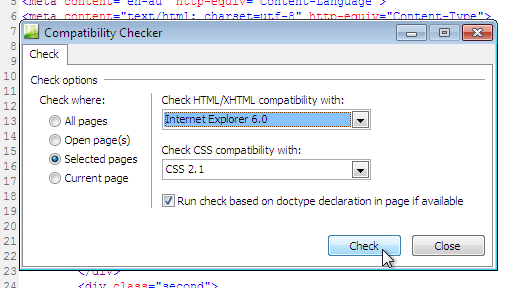 I’ve used fairly simple markup, so the reporter has nothing to say about IE6 compatibility. However, it did detect that I neglected to put the
 label and textarea in a block level element, which is required for HTML 4 validity. Oops! Double-clicking the errors reveals the offending markup.Figure 14. Better fix that then!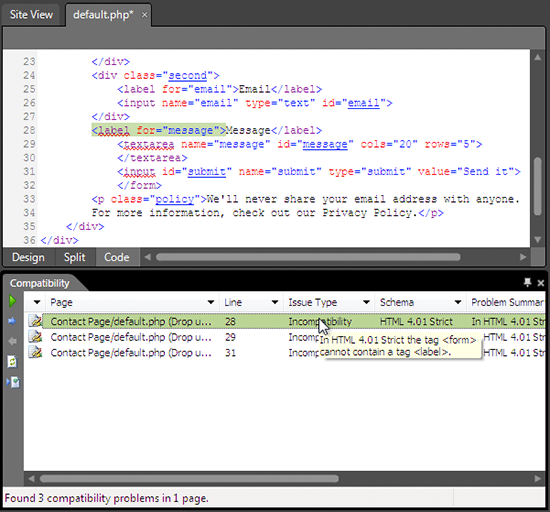
Importing Graphics from Photoshop
There’s a graphic element I need to pull up from my design comp. Time to fire up Photoshop and start exporting some layers, right? Actually, there’s no need for Photoshop today.Expression Web features a handy way to extract graphics from a Photoshop file right there in the app; this means spending less time messing about exporting individual layers in Photoshop, and more time making stuff look pretty. The PSD I’m working from has a swirly background, which I’d like to add now.From the File menu, choose Import > Adobe Photoshop (psd), and browse to the location of your Photoshop document. Expression Web will open up the document, with the layers intact. I only need the swirls, so I’ll uncheck all the other layers. The result so far is seen below, complete with alpha transparency and all.Figure 15. My background image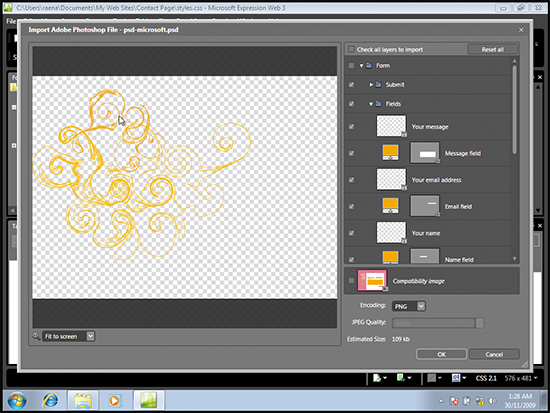 When I’m ready to save it, Expression asks me where to put the image. I’ll put it in the same directory as my CSS and PHP file, and insert that into the style sheet. That’s all there is to it!Importing your graphics in this manner is quite a time saver. There’s no need to save the PSD as some funky format first, or pre-slice the image—simply open up the file right there in Expression. That’s neat.
Bring On the PHP
We’ve added markup and styles, and constructed some quite nice static pages—now it’s time to add some action to our form with PHP. We’ll be storing our feedback in a comma-separated value (CSV) file, so let’s add that functionality to this form. Remember, you should be saving your work often; now is a great time to do that!Keep It Simple, Stup-… er, Sweetheart
Since this is more an Expression Web tutorial, rather than a PHP tutorial, we’ll keep this very, very simple. This example is inappropriate for your production environment; in the real world you’d need additional functionality, such as a way to filter out spammers or perhaps storing feedback in a database. For a more comprehensive look at form handling and security, check out our other PHP tutorials published here at SitePoint.Here’s a very simple set of functions that will accept the form input, check to see whether the name and message are filled in, and write these to a file. If the form data hasn’t been submitted, the script will show the empty form.First, I’ll extract the form from the existing markup, add a form action (action="default.php") and include that in a new file, form.inc.php. Next, I’ll create some functions at the top of default.php to deal with the form’s submission. decide selects whether to show the form, or proceed with inspecting the form. process_form will do some rudimentary checking to ensure the form was actually completed, and write_data will store the three values from the field input in a CSV, and respond with a friendly message. There’s a big gap in the page now where the form used to be; I’ll put a call to decide in there.In the below code example, you’ll find my very simple form handler:<?phpfunction decide() {if(isset($_REQUEST['submit'])) { process_form(); } else { include("form.inc.php"); }}function process_form() {if (!isset($_POST['name']) || !isset($_POST['message'])) {echo "<p>There was an error in the form: Both the name and message are required.</p>";include("form.inc.php");} else {write_data();}}function write_data() {$name = $_POST['name'];$email = $_POST['email'];$message = $_POST['message'];$data = $name . "","" . $email . "","" . $message . ""rn";$file = fopen("feedback.csv", "a+");if($file) {fwrite($file, $data);fclose($file);$response = "<p>Thanks for the feedback :D</p>";} else {$response = "<p>Sorry, there was an error storing your feedback.</p>";}}?>As I was coding away, it was good to see Expression Web’s syntax highlighting and Intellisense features help me out here as well. Below, you’ll see an example of some code being highlighted—plus those hyperlinks are available for PHP includes as well, making it a cinch to jump to them whenever needed.Figure 16. Some clear syntax highlighting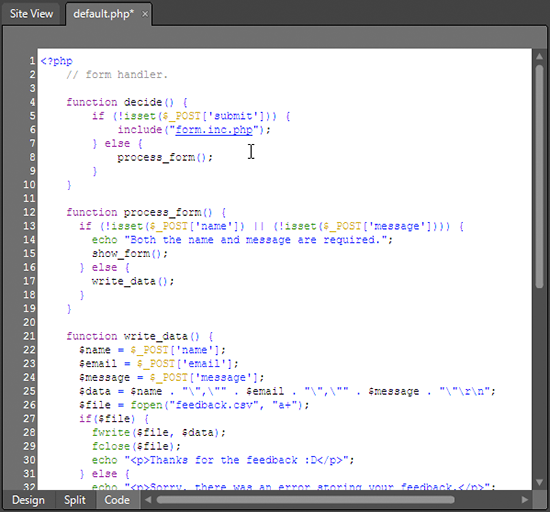 If you became accustomed to using Ctrl-Enter to bring up the Intellisense helper before, there’s one new keystroke to learn here in PHPmode; to see PHP functions instead of HTML elements, press Control-L. You’ll see a menu appear with a ready function reference, and as before, you can insert a number of common functions by scrolling or typing ahead.Figure 17. Typing ahead for a string function
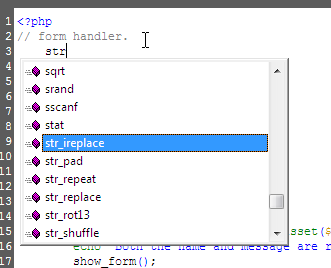 As you move through the function, a tool tip appears to let you know what the expected variables will be. Each variable is highlighted as you complete it. In this example, I’m using the
 fopen function, and it’s prompting me to move ahead with the required variables.Figure 18. A handy reminder of the expected variables$_PSOT['string'] here!Figure 19. Global variables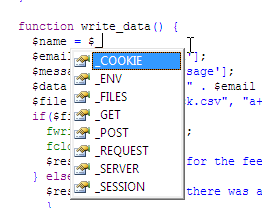 You can configure the Intellisense PHP options in the Page Editor dialog we mentioned before. Of note is the ability to turn off various functions; if you’re using IIS and have no use for MySQL or Apache functions, time to unclutter that menu!When you’re happy with your script, it’s time to test it out! The Design view is unable to show PHP code in action, so we’ll need to use a real browser for this one. Hit F12 to launch your favorite browser. Again, because Expression includes a web server, we can test the script locally.If all went well, you should have a nice looking form at your disposal, ready to collect some feedback!
Conclusion
Although this form is extremely simple, we’ve covered a good deal of ground. Along the way, we’ve learned how to use Expression’s Design view to visually edit our pages, seen how its code completion tools can help us create great, tidy markup, imported some graphics from Photoshop, and finally breathed some life into it with PHP. By now, you should have a strong idea of what’s possible in Expression Web 3. Why not grab your own copy and take it out for a spin?Frequently Asked Questions (FAQs) about Expression Web 3 and PHP
What is Microsoft Expression Web 3 and how does it relate to PHP?
Microsoft Expression Web 3 is a professional-level website design tool that allows you to create modern, standards-based sites. It supports PHP, a popular scripting language used for web development. This means you can use Expression Web 3 to design and develop dynamic, interactive websites using PHP.
How do I start using PHP in Expression Web 3?
To start using PHP in Expression Web 3, you need to set up a PHP development environment. This involves installing a web server, PHP, and a database system. Once set up, you can create PHP scripts in Expression Web 3 and run them on your web server.
Can I use regular expressions in PHP?
Yes, PHP supports regular expressions, which are a powerful tool for manipulating text. You can use regular expressions in PHP to match patterns in strings, replace text, and perform other complex text processing tasks.
How do I download and install Microsoft Expression Web 4?
Microsoft Expression Web 4 is available for download from the Microsoft website. After downloading the installer, run it and follow the on-screen instructions to install the software. Note that Microsoft no longer supports Expression Web, so you may want to consider using a more modern web design tool.
What are PHP expressions and how do they work?
In PHP, an expression is anything that has a value. This includes variables, constants, function calls, and complex combinations of these. PHP expressions are used in many different contexts, such as in assignment statements, control structures, and function arguments.
How do I use PHP expressions in Expression Web 3?
You can use PHP expressions in Expression Web 3 just like you would in any PHP script. Simply write your PHP code in the Code view, and use the PHP tags to enclose your PHP code.
What are the benefits of using PHP with Expression Web 3?
Using PHP with Expression Web 3 allows you to create dynamic, interactive websites. PHP is a server-side scripting language, which means it runs on the web server and can interact with databases, manipulate files, and perform other server-side tasks.
Can I use PHP to create forms in Expression Web 3?
Yes, you can use PHP to create forms in Expression Web 3. PHP provides several functions for handling form data, such as $_GET and $_POST. You can use these functions to retrieve form data and process it on the server.
How do I debug PHP code in Expression Web 3?
Debugging PHP code in Expression Web 3 can be a bit tricky, as the software does not have built-in PHP debugging features. However, you can use various PHP debugging techniques, such as error reporting and logging, to find and fix errors in your PHP code.
What resources are available for learning more about PHP and Expression Web 3?
There are many resources available for learning more about PHP and Expression Web 3. These include online tutorials, books, and community forums. The PHP.net website and the Microsoft Expression Web community are particularly useful resources.
Raena Jackson Armitage is an Australian web developer with a background in content management, public speaking, and training. When she is not thinking about the Web, she loves knitting, gaming, all-day breakfasts, and cycling.

