Photoshop Tip: Locking Transparent Pixels
 It’s very easy to change a block of color in Photoshop if it has strong, defined edges. You could use the Paint Bucket or Color Replacement tool to change the color, but if you want to change the color of an object that has faded edges or is semi-transparent you need to apply press the “Lock Transparent Pixels” button on the layers palette to do just that.
Here’s an example. Let’s say for example you have some sort of colored shaped with soft edges. Take the green heart shape below. It’s solid on the outside but the inside fades to transparent.
 Now let’s say we wanted to change the heart from green to red using the Paint Bucket. If we click on a green section with the Paint Bucket tool with red as a foreground color, this is what we get.
 We’ve lost the faded edge and it looks pretty rough all around.
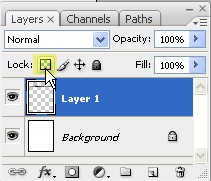
To deal with this problem, click on the “Lock Transparent Pixels” button near the top of the layers palette in Photoshop. The important thing to remember is that this only works on layers with transparency, it has absolutely no effect if the object is part of the background layer.
Frequently Asked Questions about Locking Transparent Pixels in Photoshop
What is the purpose of locking transparent pixels in Photoshop?
Locking transparent pixels in Photoshop is a technique used to prevent changes to the transparent areas of a layer. This feature is particularly useful when you want to paint or edit only the opaque portions of a layer without affecting the transparent pixels. It allows for more precise editing and can save a significant amount of time, especially when working with complex images or designs.
How do I lock transparent pixels in Photoshop?
To lock transparent pixels in Photoshop, select the layer you want to work on in the Layers panel. Then, look for the ‘Lock’ icon at the top of the panel. Click on the first icon which represents ‘Lock Transparent Pixels’. A lock symbol will appear next to the layer, indicating that the transparent pixels are now locked.
Can I unlock transparent pixels once they are locked?
Yes, you can easily unlock transparent pixels in Photoshop. To do this, simply click on the ‘Lock Transparent Pixels’ icon again. The lock symbol next to the layer will disappear, indicating that the transparent pixels are now unlocked and can be edited.
What happens if I try to paint over locked transparent pixels?
When you lock transparent pixels and then try to paint over them, Photoshop will only apply the paint to the opaque areas of the layer. The transparent pixels remain unaffected. This allows you to make changes to the visible parts of the layer without worrying about accidentally altering the transparent areas.
Can I use the ‘Lock Transparent Pixels’ feature with all types of layers?
The ‘Lock Transparent Pixels’ feature can be used with any layer that contains transparent pixels. However, it cannot be used with background layers as these do not have any transparent pixels. To use this feature with a background layer, you would first need to convert it to a regular layer.
Does locking transparent pixels affect other editing tools in Photoshop?
Locking transparent pixels primarily affects the painting tools in Photoshop. However, it can also impact other editing tools that change pixel information, such as the clone stamp or healing brush tools. When transparent pixels are locked, these tools will only affect the opaque areas of the layer.
Can I lock transparent pixels in multiple layers at once?
Photoshop does not currently support locking transparent pixels in multiple layers at once. You would need to select each layer individually and lock the transparent pixels.
What is the difference between ‘Lock Transparent Pixels’ and ‘Lock Image Pixels’?
Lock Transparent Pixels’ prevents changes to the transparent areas of a layer, while ‘Lock Image Pixels’ prevents any changes to the layer’s pixel information. This means that when ‘Lock Image Pixels’ is enabled, you cannot paint on or otherwise modify the layer.
Can I lock transparent pixels in Photoshop Elements?
Yes, the ‘Lock Transparent Pixels’ feature is also available in Photoshop Elements. The process for locking transparent pixels is the same as in the full version of Photoshop.
Are there any shortcuts for locking and unlocking transparent pixels?
Yes, you can use the ‘/’ key to quickly lock and unlock transparent pixels in Photoshop. This can be a great time-saver when working with multiple layers.
Jennifer Farley is a designer, illustrator and design instructor based in Ireland. She writes about design and illustration on her blog at Laughing Lion Design.