Build a Photo Gallery Using CakePHP and Flickr
Key Takeaways
- CakePHP, phpFlickr, and Flickr Component are essential tools for creating a personalized photo gallery using images from Flickr. These tools allow for rapid application development and easy interaction with the Flickr API.
- The process involves setting up files in CakePHP, specifying your API key, configuring your controller to handle the gallery, modifying routes to manage gallery calls, and adding code blocks to pull specific photosets from Flickr.
- The final step involves creating a view that includes the title and description of the current photoset, a list of links to all available photosets, and thumbnails. JavaScript can be added to enhance the user experience, and Lightbox can be used for overlaying images on the page.
Want to share your Flickr photostream with the world, but only once you’ve given it a nice, customized touch? Look no further than CakePHP — and a few lines of code — to pull off some magic! In this article, we’ll use the Flickr API and CakePHP to take the images we’ve loaded onto Flickr and use them to build our own, non-Flickr web gallery.
Before baking this delicious (no, not del.icio.us — that’s another article entirely!) code, you’ll need to get your hands on a few ingredients:
- CakePHP, a PHP framework for rapid application development. The current version as of this writing is 1.1.13.
- phpFlickr, a PHP class that facilitates interaction with the Flickr API.
- Flickr Component, a CakePHP component developed by Miguel Ros (rossoft) that ties the phpFlickr class into the controller and view of our application.
If you’re not familiar with CakePHP, check out the SitePoint article, The CakePHP Framework: Your First Bite. You’ll want to have a decent understanding of how the framework works before diving into this example.

Setting Up the Files
With CakePHP installed, you’ll need to create a phpflickr folder at /app/vendors/phpflickr/ and drop phpFlickr into it. Next, place the Flickr Component into the /app/controllers/components/ folder. In the flickr.php component file, you’ll need to specify your API key in the $_api_key variable, like this:
var $_api_key='PLACEKEYHERE';If you don’t already have an API key, you’ll need to apply for one.
phpFlickr can cache the data it receives from the Flickr API to speed up subsequent calls. If you’re using a file cache, you’ll need to make sure the Flickr cache folder has been created and has write permissions. To set or change the cache folder, change the constant declared at the top of the Flickr component file as follows:
define('FLICKR_CACHE_DIR', CACHE . 'flickr/');You now need to set up your controller to handle the gallery. I’m feeling pretty wild and crazy, so I’m going to call the controller GalleryController, and save it to /app/controllers/gallery_controller.php:
class GalleryController extends AppController{

  var $name = 'Gallery';

  var $components = array('Flickr');

  var $uses = null;

}
The $name attribute is required if you’re using PHP4, but can be omitted if you’re using PHP5. The components array will automatically load our Flickr component. Finally, we set $uses to null to prevent the controller from auto-loading a model.
Routing
The next thing we need to do is modify our routes to handle the gallery calls. Add the following to your /app/config/routes.php file:
$Route->connect('/gallery/*',

    array('controller' => 'gallery', 'action'=>'index'));
This routes all URLs that start with /gallery/ to run the index method of our gallery controller.
The Gallery Controller
Brace yourself! There really isn’t much to this magic, but I’ll explain what’s happening line by line in a moment. Add the following block to the gallery_controller.php file:
function index($id = null)

{

  $photosets = $this->flickr->photosets_getList('USER_ID');

  $this->set('sets', $photosets);

  $currset = $id == null ? $photosets['photoset'][0]['id'] : $id;

  $this->set('currset', $this->flickr->photosets_getInfo($currset));

  $this->set('thumbs', $this->flickr->photosets_getPhotos($currset));

}
The first thing we see here is that the index function is expecting an $id. This is a photoset ID that we can pass in to pull out a specific photoset.

The next line uses the Flickr API to retrieve all the photosets for a particular user. Authentication is not necessary for this task, unlike other aspects of the API. You’ll need to know your user ID, also called an NSID. If you’re not sure what it is, try using the API explorer with the flickr.people.findByEmail or .findByUsername calls:
$photosets = $this->flickr->photosets_getList('USER_ID');Remember to replace USER_ID with your user ID, which you retrieved from the Flickr site.
Next up, we assign the photosets data to a sets variable for use in the view:
$this->set('sets', $photosets);Next, we determine which is the current photoset ID. If the ID is null, we grab the ID of the first photoset in the list. Otherwise, we use the ID that was passed in:
$currset = $id == null ? $photosets['photoset'][0]['id'] : $id;After that, we get the title and description of the current photoset, and assign it to a currset variable for use within the view:
$this->set('currset', $this->flickr->photosets_getInfo($currset));Finally, we grab a list of all the photos and assign it to the thumbs variable for use within the view:
$this->set('thumbs', $this->flickr->photosets_getPhotos($currset));Just like that, we’re almost done. The last thing on our plate is to figure out how to lay this gallery out.
The View
You’ll need to create a new folder in /app/views/ called gallery, if you haven’t already. And in that folder, you’ll need to create an index.thtml file.
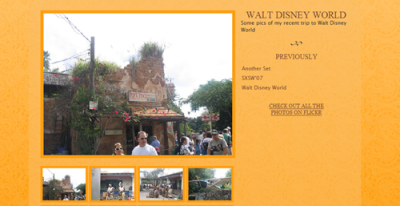
I’ve decided to break my gallery into three main parts:
- the title and description of the current photoset (presented much like a blog post)
- the list of links to all the available photosets
- the thumbnails, one of which will be shown at a larger size
Title and Description
To show the title and description for the current photoset, we tap into the $currset variable we declared in our gallery controller:
<div class="post">

  <h2><?php echo $currset['title']?></h2>

  <p><?php echo $currset['description']?></p>

</div>
Photosets
To display the list of links to photosets, we loop through each of the photosets in our $sets variable, using the title for the link text and creating a link to our gallery controller using the photoset ID as the parameter:
<ul>

  <?php foreach($sets['photoset'] AS $item): ?>

  <li><?php echo $html->link($item['title'], '/gallery/' . $item['id']);?></li>

  <?php endforeach; ?>

</ul>
Clicking on any of the links will load that particular photoset.
If you’d like to change the order in which the photosets appear in the list, you’ll need to go into Flickr and use the Organize feature.
Photos
I want to output a reasonably large image before getting into my thumbnails. Here’s how I do it:
<img id="mainimg" src="<?php echo $flickr-

>buildPhotoURL($thumbs['photo'][0], 'medium')?>" title="<?php echo

$thumbs['photo'][0]['title']?>"  alt="<?php echo

$thumbs['photo'][0]['title']?>" />
This code grabs the first thumbnail from the $thumbs array that we set in our controller and uses the phpFlickr library method buildPhotoURL to build the source URL for the image tag. In this case, I’m grabbing a medium-sized version of the photo, which is 500 pixels long on its longest side, but you can choose one of the following versions of the image:
square, which has dimensions of 75x75pxthumbnail, which is 100px on longest sidesmall, which is 240px on longest sidemedium, which is 500px on its longest sidelarge, which is 1024px on longest sideoriginal, which is the original image file
Last but not least, I loop through each of the photos in the $thumbs array to build the thumbnail display. I request the thumbnail-sized version from the buildPhotoURL method for the image source URLs and link each thumbnail to its medium version on the Flickr server:
<ul id="thumbs">

  <?php foreach($thumbs['photo'] as $item): ?>

  <li><a href="<?php echo $flickr->buildPhotoURL($item, "medium")?>" title="<?php echo $item['title']?>"><img

        src="<?php echo $flickr->buildPhotoURL($item, "thumbnail")?>"

        alt="<?php echo $item['title']?>" /></a></li>

  <? endforeach; ?>

</ul>
A Sprig of JavaScript
To make this gallery a little more interesting, let’s add just a touch of JavaScript:
<script type="text/javascript">

if (document.getElementById)

{

  window.onload = function()

  {

    var imgs = document.getElementById('thumbs').getElementsByTagName('a');

    for (var i = 0; i < imgs.length; i++)

    {

      imgs[i].onclick = function()

      {

        document.getElementById('mainimg').src = this.href;

        return false;

      }

    }

  }

}

</script>
This code grabs the links on the thumbnails and attaches onclick handlers to each one. When the user clicks on a thumbnail, the new image will load in place of the large image on my gallery page, instead of sending the user to the Flickr site.
It’s important to consider the ramifications of using JavaScript. Check out the SitePoint article Quality JavaScript from Scratch to learn more.
Lightbox

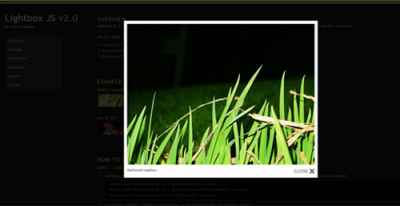
Alternatively, you might like to add more than just a sprig of JavaScript. If you’re a fan of Lightbox — a script that sexily overlays images on the page — simply modify the output for each of the thumbnail links and include the Lightbox script in the layout file. Here’s the updated code for the thumbnail output:
<li><a href="<?php echo $flickr->buildPhotoURL($item, 'medium')?>"

title="<?php echo $item['title']?>" rel="lightbox[]" ><img src="<?php echo

$flickr->buildPhotoURL($item, 'thumbnail')?>" alt="<?php echo $item['title']?>"

/></a></li>
Lightbox uses the title attribute of the link to display a description when the larger image is viewed. And the rel attribute is required to tell Lightbox to include this image in the set.
That’s it — you’ve now got a Lightbox-enabled photo gallery!
Lots of Fun
As I’ve shown here, it can be really easy to put together your own photo gallery using CakePHP and Flickr. Play around with the API and experiment with the cool ways in which you can manipulate the data coming out, or add new and exciting JavaScript effects — a carousel, for example. The Flickr API offers plenty of flexibility.
Jonathan Snook has been involved in the Web since '95, and is lucky to be able to call his hobby a career. He worked in web agencies for over six years and has worked with high profile clients in government, the private sector, and non-profit organizations. Jonathan Snook currently runs his own web development business from Ottawa, Canada and continues to write about what he loves on his blog at Snook.ca.


