Invoicing. It’s a pain all freelancers have felt – juggling to-do lists, making sure we invoice on time, fighting PayPal and Moneybookers … the invoicing process is a tedious and confusing one for most. Fret not, however – this vacuum may have been filled. We’re going to take a look at Paydirt in this article and, at the end, give you a chance to start using it free.
Introduction
If you’re a freelancer or have ever done any freelance work for a client, you know how difficult the invoicing process can be. The following scenario might seem familiar, or at least realistic: it’s the end of October, and you’ve written three articles for Sitepoint, two for PHPMaster and one for JSPro, all of which have been published. You’ve also written four for three different sites, of which three were published. All those sites require you to invoice for your articles at the end of the month, and pay out what they owe in various intervals over the following month. To top it off, you also landed a freelance web development project that was partially done by the end of October and needs to be invoiced for half the total amount. You can already see where this is going – complete and utter chaos.
The problem
At the root of the problem is dissonance. Working for many people at once is taxing enough on our professional psyche and often produces diluted work as is, combating invoice issues and time tracking across clients, currencies and locales is not something we should have to deal with. Who do we invoice this month? The following month? Which articles are eligible, which are only scheduled for publication? Which project is at what percentage of completion? How many are done and which ones are billable? Did I tell John I was going to invoice him by the hour, or by the project?
The problem with invoicing freelance work is client dissonance
True, most of these issues can be avoided with proper task management, but managing tasks and managing the billing of those tasks are two very different things. Why not have it all in one place, instead of all the information being scattered across folders in Todoist, Google Drive or even our hard drive?
The solution
It just so happens that there’s a new kid on the block in terms of web apps, addressing exactly these problems, and more. We’ll be taking an in depth look at Paydirt, a web application aimed directly at freelancers and their invoicing needs. If you’d like to follow along, feel free to make a trial account at their website. Follow the “tour” to create your first sample client/project, then take some time to get familiar with the Settings screen, and fill out the necessary data, in particular the invoicing settings as that’ll allow us to really see what Paydirt is all about.


As you can see, there is a plethora of useful options, right from the get-go. This essentially templates your invoices, so you have as little trouble as possible when rendering them into PDFs and auto-mailing them to your clients.
Now visit the Email Templates part of the Settings.
When creating invoices, Paydirt offers you the ability to send them to the client through the app, so that you don’t have to bother with the manual process if that’s how your client operates. To set up the content of the email your client will receive, click “Edit” next to either template. This turns some of the words into tags, which enables you to add dynamic values to your emails which get parsed into actual content on sending. For example, {{ our_business_name }} converts into the name of your business you entered while setting up your account.

Now let’s try and make a sample project.
Test drive
By now, you must have made a sample client as the tour instructed, but let’s make another, just to follow through all available options. Going into the “Clients” part of the top menu, we click “Add a client” and for the purpose of this example, I’ll be entering my own blog and myself as the contact person. The fields are straightforward and clear and we know what we need to enter, where, why and when.

We are also able to define a color badge for our client which contains the first two letters of their name. This will make it easier to tell clients and invoices apart later on.
That was painless, wasn’t it? We now have a single client with no billable data.

As we can see, an individual client screen offers us two options – add a job, and create a project. Jobs are exactly what you think they are – building a website, building a part of a website, writing an article, fixing someone’s SEO, etc. Jobs are what you do, and what you can charge people for. Jobs can be billed by the hour or they can have a fixed (total) price, depending on your arrangement with the client.
On the other hand, a project is a container for jobs. Projects are nothing but “wrappers” for jobs, and are ideal for team environments. In Paydirt, you can manage a team of people (under Settings – Manage Team) and each of your members can be responsible for a specific project / job.

If you look at the screenshot, you’ll notice I added another team member to my team with the same permissions as myself. The newly added user instantly receives an email with login credentails and can start working. If I now add a project with three jobs, and a general work job to my Bitfalls client, things would look thusly:

I can now start working on any job I want, and if my second user logs in, he will see the same jobs and clients I’ve already defined. Now, while it’s unfortunate Paydirt still doesn’t offer an ability to dedicate a team member to a specific client or job only in order to prevent them from seeing and meddling with the rest (in case you’re managing multiple teams, for instance), the app is young and I’m certain the functionality is somewhere on their to do list.
Now that we have several jobs defined, we can try invoicing the client. There are several ways to do this, so let’s cover them all. Paydirt lets you invoice without a job – a blank invoice draft – by going into Invoices and selecting the client you want to invoice from the dropdown menu.

If we then click Draft Invoice, we are taken to a screen which offers all this client’s unbilled jobs, and allows us to enter a blank invoice. Since we have no unbilled jobs (all our jobs are considered billed because they’re fresh and haven’t been worked on yet), we select Create a Blank Invoice and enter the invoice creation screen. This simple and self-explanatory screen allows us to add invoice items, change addresses, add extra info and even include specific taxes. Once done, we have a ready invoice draft which we can then send and finalize.
Let’s not do this right now though. Instead, let’s make a job-based invoice. Job based invoices are, quite obviously, produced by billing for work done on specific jobs. But Paydirt won’t let you charge for a job before you’ve logged some time into it (or given it a fixed price), so let’s do that now. On the Bitfalls client screen (or whichever sample client you made), pick a job inside a project (you’ll see why soon) and mouse over the lower left portion of its frame (the part that says “0.00 hrs worked in total”). You’ll notice a small clock appearing – clicking it will take you to the “log time” screen for the given job. Here, you can enter the details, like so:
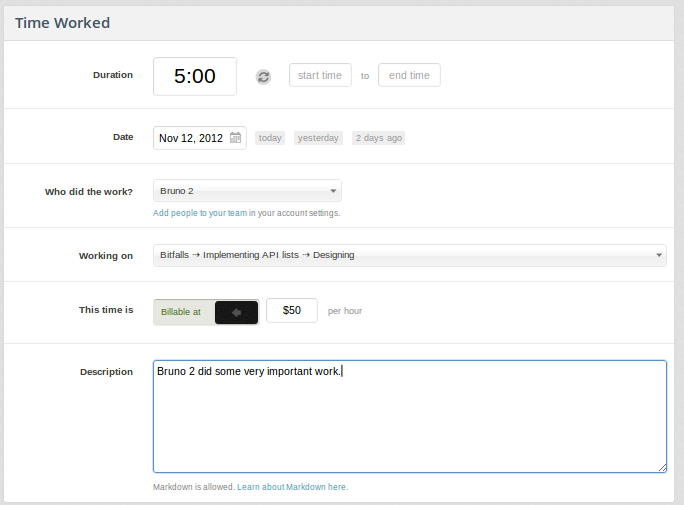
The log screen thus allows us to enter a duration and date of done work, a description, whether or not to count the time as billable and even the team member who did the work. Saving this data changes our job on the job screen and calculates the billable amount through the per-hour price we provided earlier and the duration we just gave. Now let’s try billing a fixed price job. Let’s select the second job in the project, and change it to Total under Edit, giving it a price of $500. Notice that as soon as you save it, regardless of whether you picked “I’m working on this job” or “I’ve finished this job”, the amount you provided is immediately added to the project total.

Timed jobs, time tracker, and the browser extension
Finally, let’s add an estimate of two hours to the last job. To bill such a timed job, let’s use the time tracker. In the bottom right corner of the screen is a small “show time tracker” button. Click it, and a sidebar appears with a list of all your clients and jobs. Use this screen to activate timing for a given job – in our example, the one we just added an estimate for. You can click start, or select a time in the past when you started – this option is there in case you forgot to activate it on time.

Let’s say we started working on it an hour go, so click the arrow next to “Start” and select “1 hour ago”. This instantly spawns the job timer with 1 hour already logged and continues counting. You can even select this time as non-billable, but we’ll leave it as billable for now and click stop timer.

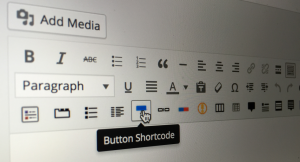
What this did was move the estimation slider of our job to a given percentage, depending on what we set as expected and how much we actually worked on it, and allows us to bill that part of the work. If you now look at this job again, you’ll notice that not only does it have a billable amount attached to it, but this billable amount is also added to the project total! In one fell swoop, we’ve generated a work report for three different job types, summed their cost and prepared them for invoicing. But since our job has an estimation of 2 hours, let’s fill it all the way up, shall we? For this, you’ll need the awesome Paydirt browser extension (links in the footer for Firefox and Chrome). After you install it, activate it.

Obviously, the extension in this form is nothing but the time tracker undocked from the Paydirt app – and even so, it’s incredibly useful. This allows you to start logging time for a job without having the app open. Pretty nifty, but nothing revolutionary, right? Well, check this out. If you go into Settings -> Keyword Settings, you can define certain trigger keywords for the extension. What are trigger keywords? The extension checks where you are on every tab that comes into focus. It scans the content of the tab for certain keywords, and if it finds a match, it offers that you Start a Timer for the client whose keywords it matched. What this means is that when I visit my blog’s backend at Blogger.com, I get this:

which, when moused over, turns into this:

This not only enables faster access to time tracking for my projects, but actually effectively reminds me that I should probably start tracking time because I’m on a client-related website. Give it a go – try modifying the keywords to match a site, any site, and make the extension trigger (you might have to re-sync the extension with your Paydirt account after you do – this is done by right clicking the extension and selecting Options). Then, log more time into our “Estimated” task, so that we reach (or breach) 2 hours of work, like so:

Generating, sending and paying an invoice
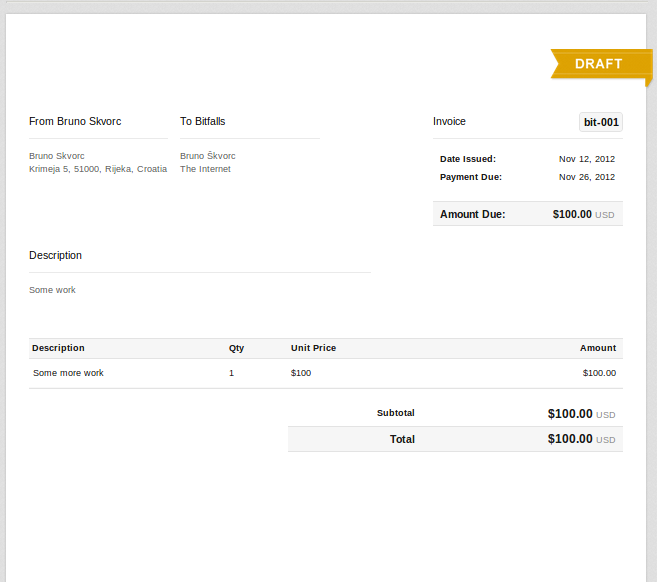
It’s time to generate the invoice for our project. Click Draft An Invoice next to the project sum, select the jobs you’d like to bill, proceed, edit some details if necessary, and save. The invoice will automatically turn the job titles into a list in the description, and will list the billable jobs in a clear, separated manner under invoice items. If you’d like time logged for the same job to be logged as a sum, you can select that before clicking Create This Invoice. That’s it – your invoice is ready for sending to the client. You can now download or print it under “More actions”, view it online as it’ll appear to your client, duplicate it for the purposes of templating for another identical job, or even delete it completely. If you download it and send or upload to your client manually, there’s an option “Mark as sent”, but in this case, let’s use Send Invoice.


The dialog that appears allows us to customize the message to our client, tweak some included links (i.e. the very useful Paypal link which automatically lets your user pay you through Paydirt, and marks the invoice as paid if that happens) and finally, send the invoice email. Before the dialog even closes, we should have an email not unlike this one in our inbox:
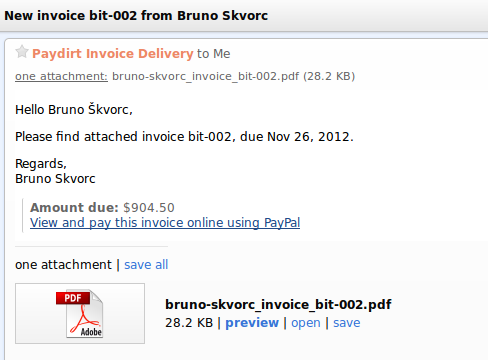
That’s it! Now if the client uses the Paypal link in the email, they can pay directly through the app. You, as the service provider, will be notified of the payment and will be able to automatically send them the template “Thank you” email. Your invoice will be marked as paid, the job will become unbillable again, and you can proceed to work on other tasks (or the same job again).
Conclusion
As you can see, Paydirt is a treasure trove of useful and commonly needed options for anyone’s invoicing needs. Not only does it offer seamless time tracking, team management and invoicing, but it also allows you to send templates emails, lets you trigger time tracking from anywhere, and offers a direct payment link for your clients – all in the effort of automating and forgetting about the troubles of the invoicing process. While the material we’ve gone through in this walkthrough is extensive, Paydirt offers much, much more.
Pricing for Paydirt is already very reasonable, starting at just $8 per month, each of the plans provides a 14 day free trial period.
However, we know the best people to really put Paydirt through its paces are SitePoint readers so, in a fit of generosity, Paydirt is offering the chance of winning one of three one-year licenses to SitePoint readers who try the app out and post a comment with their favorite feature, and/or tweet about this article with the hashtag #paydirtapp (do both and you’re in the draw twice). Closing date is December 19th, and we’ll announce the winners here and in the SitePoint newsletter of December 20th.
So, now that you know the basics of using Paydirt, get out there and push the app to its limits and tell us here what you like most about it.
 Bruno Skvorc
Bruno is a blockchain developer and technical educator at the Web3 Foundation, the foundation that's building the next generation of the free people's internet. He runs two newsletters you should subscribe to if you're interested in Web3.0: Dot Leap covers ecosystem and tech development of Web3, and NFT Review covers the evolution of the non-fungible token (digital collectibles) ecosystem inside this emerging new web. His current passion project is RMRK.app, the most advanced NFT system in the world, which allows NFTs to own other NFTs, NFTs to react to emotion, NFTs to be governed democratically, and NFTs to be multiple things at once.