
Optical Character Recognition (OCR) is the process of converting printed text into a digital representation. It has all sorts of practical applications — from digitizing printed books, creating electronic records of receipts, to number-plate recognition and even circumventing image-based CAPTCHAs.
Tesseract is an open source program for performing OCR. You can run it on *Nix systems, Mac OSX and Windows, but using a library we can utilize it in PHP applications. This tutorial is designed to show you how.
Key Takeaways
- Tesseract is an open-source program that can perform Optical Character Recognition (OCR), a process of converting printed text into a digital representation, which can be used in PHP applications.
- Tesseract can be installed on *Nix systems, Mac OSX and Windows, with the help of a library. The installation process includes setting up a Virtual Machine, installing the Tesseract binary, and testing and customizing the installation.
- The Tesseract library can be used in a PHP application to create a simple web application which allows users to upload an image and see the results of the OCR process.
- A practical application of Tesseract OCR technology is to find and format a telephone number embedded within an image. This involves performing OCR on the image, extracting the relevant information, and validating each candidate until a valid telephone number is found.
Installation
Preparation
To keep things simple and consistent, we’ll use a Virtual Machine to run the application, which we’ll provision using Vagrant. This will take care of installing PHP and Nginx, though we’ll install Tesseract separately to demonstrate the process.
If you want to install Tesseract on your own, existing Debian-based system you can skip this next part — or alternatively visit the README for installation instructions on other *nix systems, Mac OSX (hint — use MacPorts!) or Windows.
Vagrant Setup
To set up Vagrant so that you can follow along with the tutorial, complete the following steps. Alternatively, you can simply grab the code from Github.
Enter the following command to download the Homestead Improved Vagrant configuration to a directory named ocr:
git clone https://github.com/Swader/homestead_improved ocrLet’s change the Nginx configuration in Homestead.yml from:
sites:
    - map: homestead.app
      to: /home/vagrant/Code/Project/public
…to…
sites:
    - map: homestead.app
      to: /home/vagrant/Code/public
You’ll also need to add the following to your hosts file:
192.168.10.10 homestead.appInstalling the Tesseract Binary
The next step is to install the Tesseract binary.
Because Homestead Improved uses a Debian-based distribution of Linux, we can use apt-get to install it after logging into the VM with vagrant ssh. It’s as simple as running the following command:
sudo apt-get install tesseract-ocrAs I mentioned above, there are instructions for other operating systems in the README.
Testing and Customizing the Installation
We’re going to be using a PHP wrapper, but before we start building around that we can test that Tesseract works using the command-line.
First, right-click and save this image.
(Image courtesy of Clipart Panda)
Within the VM (vagrant ssh), run the following command to “read” the image and perform the OCR process:
tesseract sign.png outThis creates a file in the current folder named out.txt which all being well, should contain the word “CAUTION”.
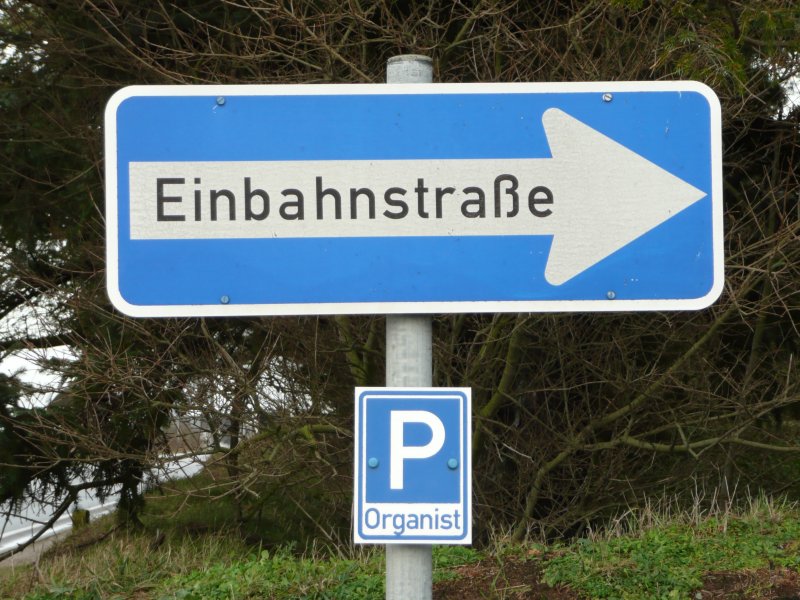
Now try with the file sign2.jpg:
(Image is an adapted version of this one).
tesseract sign2.jpg outThis time, you should find that it’s produced the word “Einbahnstral’ie”. It’s close, but it’s not right — even though the text in the image is pretty crisp and clear, it failed to recognize the eszett (ß) character.
In order to get Tesseract to read the string properly, we need to install some new language files — in this case, German.
There’s a comprehensive list of available language files here, but let’s just download the appropriate file directly:
wget https://tesseract-ocr.googlecode.com/files/tesseract-ocr-3.02.deu.tar.gz…extract it…
tar zxvf tesseract-ocr-3.02.deu.tar.gzThen copy the files into the following directory:
/usr/share/tesseract-ocr/tessdatae.g.
cp deu-frak.traineddata /usr/share/tesseract-ocr/tessdata
cp deu.traineddata /usr/share/tesseract-ocr/tessdata
Now run the previous command again, but using the -l switch as follows:
tesseract sign2.jpg out -l deu“deu” is the ISO 639-3 code for German.
This time, the text should be correctly identified as “Einbahnstraße”.
Feel free to add additional languages by repeating this process.
Setting up the Application
We’re going to use this wrapper library to use Tesseract from PHP.
We’re going to create a really simple web application which allows people to upload an image, and see the results of the OCR process. We’ll use the Silex microframework to implement it — although don’t worry if you’re unfamiliar with it, as the application itself will be very simple.
Remember that all the code for this tutorial is available on Github.
The first step is to install the dependencies using Composer:
composer require silex/silex twig/twig thiagoalessio/tesseract_ocr:dev-masterNow create the following three directories:
- public
- uploads
- views
We’ll need an upload form (views\index.twig):
<html>
  <head>
    <title>OCR</title>
  </head>
  <body>

    <form action="" method="post" enctype="multipart/form-data">
      <input type="file" name="upload">
      <input type="submit">
    </form>

  </body>
</html>
And a page for the results (views\results.twig):
<html>
  <head>
    <title>OCR</title>
  </head>
  <body>

    <h2>Results</h2>

    <textarea cols="50" rows="10">{{ text }}</textarea>

    <hr>

    <a href="/">← Go back</a>

  </body>
</html>
Now create the skeleton Silex app (public\index.php):
<?php

require __DIR__.'/../vendor/autoload.php';

use Symfony\Component\HttpFoundation\Request;

$app = new Silex\Application();

$app->register(new Silex\Provider\TwigServiceProvider(), [
  'twig.path' => __DIR__.'/../views',
]);

$app['debug'] = true;

$app->get('/', function() use ($app) {

  return $app['twig']->render('index.twig');

});

$app->post('/', function(Request $request) use ($app) {

    // TODO

});

$app->run();
If you visit the application in your browser, you should see a file upload form. If you’re following along and using Homestead Improved with Vagrant, you’ll find it at the following URL:
http://homestead.app/The next step is to perform the file upload. Silex makes this really easy; the $request object contains a files component, which we can use to access any uploaded files. Here’s some code to process the uploaded file (note that this goes in the POST route):
// Grab the uploaded file
$file = $request->files->get('upload');

// Extract some information about the uploaded file
$info = new SplFileInfo($file->getClientOriginalName());

// Create a quasi-random filename
$filename = sprintf('%d.%s', time(), $info->getExtension());

// Copy the file
$file->move(__DIR__.'/../uploads', $filename);
As you can see, we’re generating a quasi-random filename to minimize filename conflicts — but ultimately in the context of this application, it doesn’t really matter what we call the uploaded file.
Once we have a copy of the file on the local filesystem, we can create an instance of the Tessearct library, passing it the path to the image we want to analyze:
// Instantiate the Tessearct library
$tesseract = new TesseractOCR(__DIR__ . '/../uploads/' . $filename);
Performing OCR on the image is really straightforward. We simply call the recognize() method:
// Perform OCR on the uploaded image
$text = $tesseract->recognize();
Finally, we can render the results page, passing it the results of the OCR:
return $app['twig']->render(
    'results.twig',
    [
        'text'  =>  $text,
    ]
);
Try it out on some images, and see how it performs. If you have trouble getting it to recognise images, you might find it useful to refer to the guide on improving quality.
A Practical Example
Let’s look at a more practical application of OCR technology. In this example, we’re going to attempt to find and format a telephone number embedded within an image.
Take a look at the following image, and try uploading it to your application:

The results should look like this:
:ii‘i
Customer Service Helplines


British Airways Helpline

09040 490 541
It hasn’t picked up the body text, which we might expect due to the poor quality of the image. It’s identified the telephone number, but there’s also some additional “noise” in there.
In order to try and extract the relevant information, there are a few things we can do.
You can tell Tesseract to restrict its output to certain character ranges. So, we could tell it to only return digits using the following line:
$tesseract->setWhitelist(range(0,9));There’s a problem with this, however. Rather than ignore non-numeric characters, it usually interprets letters as digits instead. For example, the name “Bob” could be interpreted as the number “808”.
Instead, let’s use a two-stage process:
- Attempt to extract strings of numbers, which might be telephone numbers
- Use a library to validate each candidate in turn, stopping once we find a valid telephone number
For the first part, we can use a rudimentary regular expression. To try and determine whether a string of numbers is a valid telephone number, we can use Google’s libphonenumber.
Note: I’ve written about libphonenumber here on Sitepoint as part of an article entitled Working with Phone Numbers in JavaScript.
Let’s add a PHP port of the libphonenumber library to our composer.json file:
"giggsey/libphonenumber-for-php": "~7.0"Don’t forget to update:
composer updateNow we can write a function which takes a string, and tries to extract a valid telephone number from it:
/**
 * Parse a string, trying to find a valid telephone number. As soon as it finds a
 * valid number, it'll return it in E1624 format. If it can't find any, it'll
 * simply return NULL.
 *
 * @param  string   $text           The string to parse
 * @param  string   $country_code   The two digit country code to use as a "hint"
 * @return string | NULL
 */
function findPhoneNumber($text, $country_code = 'GB') {

  // Get an instance of Google's libphonenumber
  $phoneUtil = \libphonenumber\PhoneNumberUtil::getInstance();

  // Use a simple regular expression to try and find candidate phone numbers
  preg_match_all('/(\+\d+)?\s*(\(\d+\))?([\s-]?\d+)+/', $text, $matches);

  // Iterate through the matches
  foreach ($matches as $match) {

    foreach ($match as $value) {

      try {

        // Attempt to parse the number
        $number = $phoneUtil->parse(trim($value), $country_code);

        // Just because we parsed it successfully, doesn't make it vald - so check it
        if ($phoneUtil->isValidNumber($number)) {

          // We've found a telephone number. Format using E.164, and exit
          return $phoneUtil->format($number, \libphonenumber\PhoneNumberFormat::E164);

        }

      } catch (\libphonenumber\NumberParseException $e) {

        // Ignore silently; getting here simply means we found something that isn't a phone number

      }

    }
  }

  return null;

}
Hopefully the comments will explain what the function is doing. Note that if the library fails to parse a string of numbers as a telephone number it’ll throw an exception. This isn’t a problem as such; we simply ignore it and continue onto the next candidate.
If we find a telephone number, we’re returning it in E.164 format. This provides an internationally recognised version of a number, which we could then use for placing a call or sending an SMS.
Now we can use it as follows:
$text = $tesseract->recognize();

$number = findPhoneNumber($text, 'GB');
We need to provide libphonenumber with a “hint” as to the country a telephone number is based. You may wish to change this for your own country.
We could wrap all of this up in a new route:
$app->post('/identify-telephone-number', function(Request $request) use ($app) {

  // Grab the uploaded file
  $file = $request->files->get('upload');

  // Extract some information about the uploaded file
  $info = new SplFileInfo($file->getClientOriginalName());

  // Create a quasi-random filename
  $filename = sprintf('%d.%s', time(), $info->getExtension());

  // Copy the file
  $file->move(__DIR__.'/../uploads', $filename);

  // Instantiate the Tessearct library
  $tesseract = new TesseractOCR(__DIR__ . '/../uploads/' . $filename);

  // Perform OCR on the uploaded image
  $text = $tesseract->recognize();

  $number = findPhoneNumber($text, 'GB');

  return $app->json(
    [
      'number'     =>  $number,
    ]
  );

});
We now have the basis of a simple API — hence the JSON response — which we could use, for example, as the back-end of a simple mobile app for adding contacts or placing calls from a printed telephone number.
Summary
OCR has many applications — and it’s easier to integrate into your applications than you may have anticipated. In this article, we’ve installed an open-source OCR package; and, using a wrapper library, integrated it into a very simple PHP application. We’ve only really touched the surface of what’s possible, but hopefully this has given you some ideas as to how you might use this technology in your own applications.
Frequently Asked Questions (FAQs) about OCR in PHP
How can I install Tesseract OCR for PHP?
To install Tesseract OCR for PHP, you need to have PHP installed on your system. Once you have PHP, you can use Composer, a dependency management tool for PHP, to install Tesseract. Run the following command in your terminal: composer require thiagoalessio/tesseract_ocr. This command will download and install the Tesseract OCR package in your project.
What are the prerequisites for using Tesseract OCR with PHP?
Before you can use Tesseract OCR with PHP, you need to have PHP installed on your system. Additionally, you need to install Composer, which is a tool for dependency management in PHP. You also need to install the Tesseract OCR engine on your system.
How can I use Tesseract OCR to read text from images?
To use Tesseract OCR to read text from images, you first need to create an instance of the TesseractOCR class and pass the path of the image file to its constructor. Then, you can call the ‘recognize’ method to extract the text from the image. Here is a basic example:require_once 'vendor/autoload.php';$tesseract = new TesseractOCR('path/to/your/image.png');echo $tesseract->recognize();
Can Tesseract OCR recognize handwriting?
Tesseract OCR is primarily designed to recognize printed text in various languages. However, it can also recognize handwriting to some extent, although the accuracy may not be as high as with printed text. The accuracy depends on the clarity and legibility of the handwriting.
How can I improve the accuracy of Tesseract OCR?
There are several ways to improve the accuracy of Tesseract OCR. One way is to preprocess the image to improve its quality. This can include binarization, noise removal, and skew correction. Another way is to use a language pack that matches the language of the text in the image.
Can Tesseract OCR recognize text in multiple languages?
Yes, Tesseract OCR can recognize text in over 100 languages. However, you need to install the appropriate language pack for each language you want to recognize.
How can I specify the language for Tesseract OCR?
You can specify the language for Tesseract OCR by using the ‘lang’ method. For example, to specify French as the language, you would do the following:$tesseract->lang('fra')->recognize();
Can Tesseract OCR recognize text in a specific area of an image?
Yes, Tesseract OCR can recognize text in a specific area of an image. You can specify the area by using the ‘region’ method and passing the coordinates of the top-left corner and the width and height of the area.
How can I handle errors in Tesseract OCR?
Tesseract OCR throws an exception when it encounters an error. You can handle these exceptions by using a try-catch block. In the catch block, you can log the error message or display it to the user.
Can I use Tesseract OCR in a web application?
Yes, you can use Tesseract OCR in a web application. However, keep in mind that OCR is a resource-intensive process, so it may affect the performance of your application if you process large images or a large number of images.