Flash’s Hidden Gems: The NumericStepper Component

Key Takeaways
- The NumericStepper component in Flash MX 2004 is a versatile UI element that allows for incremental adjustments to numerical values, ideal for dynamic feedback in applications or for rapid selection in forms.
- Key properties of the NumericStepper include minimum, maximum, stepSize, and value, which can be set via the Property Inspector or programmatically with ActionScript for dynamic applications.
- Compared to the ComboBox component, the NumericStepper provides a quicker and more user-friendly method to adjust values through simple up and down arrows or keyboard commands.
- The NumericStepper can be used in various applications, such as form elements for date selection or experimental controls for adjusting complex values in real-time.
- The component is demonstrated through practical examples in the article, showing its implementation in settings like date selection tools and dynamic text field generators, highlighting its ease of integration and customization.
Perhaps one of the easiest components to overlook in Flash MX 2004 is tucked away in the UI Components section of the Components Panel, and carries the uninteresting name NumericStepper.
Perhaps you’re developing experimental effects and require on-screen controls to alter dynamic feedback within those effects. Maybe you’re building complex forms that allow users to quickly select numerical data. Either way, it’s time to cast your eye over the NumericStepper component.
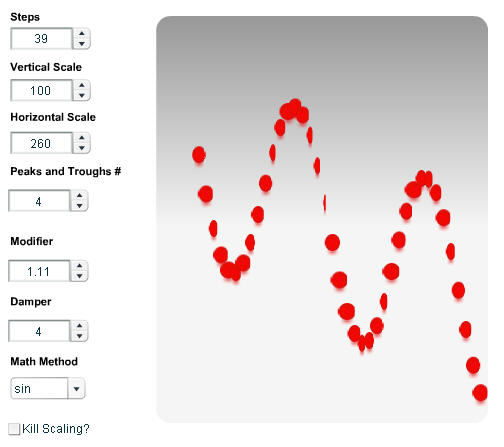
Let’s look at an example. All the dynamics of the movie pictured below are controlled with instances of the NumericStepper.
NumericStepper is an extremely valuable component, but at its most basic, it’s designed to step up or down through a series of numbers incrementally. There are several properties of the component that we can get and set. These extremely useful properties, which we’ll explore in this article, are as follows:
minimum: the minimum value of the componentmaximum: the maximum value of the componentpreviousValue: the previous incremental value of the component (read-only)stepSize: the incremental change value for the componentvalue: the currently selected value of the component
nextValue: the next incremental value of the component (read-only)
Potential uses for the NumericStepper component include:
- used as form elements to facilitate rapid numeric value selection
- used as date selection elements (months, years etc)
- used in experimental applications to control complex values
The main difference between the NumericStepper and ComboBox components, apart from the methods, properties and events, is to do with ease of use.
While you can accomplish similar effects using the ComboBox component, the NumericStepper component allows you to increment up or down a selection rapidly via the ‘up’ and ‘down’ arrows, or the up and down keys on the keyboard. Using the ComboBox, you need to click the ComboBox, wait for it to display the options, then select the desired value from a dropdown.
The NumericStepper solution is obviously much quicker than the ComboBox, and its capabilities allow NumericStepper to be implemented and used easily and effectively in some unique applications.
Numeric Stepper Basics
To get a feel for this component, let’s add a single instance of NumericStepper to the stage. We’ll then populate some dynamic text boxes with a couple of the NumericStepper component’s properties.
The source FLA file for this example is called NumericStepperBasics.fla and can be found in this article’s downloadable code archive.
Setting the Stage
- Start by creating a new Flash document. Accept the default width, height and frame rate settings.
- Rename the default layer Actions and add another layer beneath it called Components. Drag an instance of the NumericStepper component from the UI Components section of the Components panel into the first frame of the Components layer. Name the instance
StepperMain. - Select the NumericStepper component instance and add the following values within the Property Inspector:
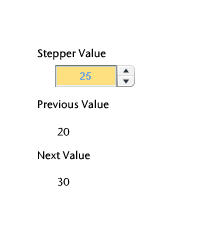
maximum:100,minimum:0;stepSize:5,value:10. - Create two dynamic text boxes one above the other. Name the instances
previousTextBoxandnextTextBox.When we click the NumericStepper component, these text boxes will be populated with the
nextandpreviousvalues of the component. We’ll add the ActionScript that achieves this in a moment. - Add relevant labels to the component and text boxes if you wish, as shown in the above screenshot.
Note: Here, we’ve added the component’s property values via the Property Inspector, but we can also add these values programmatically via ActionScript if we wish (more on this later).
Let’s move on. Now, we’ll add the ActionScript that allows us to see the component in action…
Adding the ActionScript
- With the first frame of the Actions layer selected, add the following code within the Actions Panel:
- Save the Flash document to a location of your choice and preview your work in Flash.
As you can see, clicking on the NumericStepper instance increments or decrements the values of the component, and pushes the
nextandpreviousvalues into the dynamic text areas.This example gave us a nice simple introduction to the component. We can now build on these foundations by creating more complex creations for use in your projects.
var palletteArray = new Array();

palleteArray = ["0x7FAAD4", "0xFFDF7F"];

function setTheme() {

  _global.style.setStyle("themeColor", palleteArray[0]);

  _global.style.setStyle("backgroundColor", palleteArray[1]);

  _global.style.setStyle("fontSize", 11);

  _global.style.setStyle("fontWeight", "bold");

  _global.style.setStyle("color", palleteArray[0]);

}

setTheme(); // Called at startup


var stepsListener = new Object();

stepsListener.change = function() {

  populateTextBoxes();

};

stepperMain.addEventListener("change", stepsListener);


function populateTextBoxes() {

  if ((stepperMain.value<stepperMain.maximum) && (stepperMain.value>stepperMain.minimum)) {

    nextTextBox.text = stepperMain.nextValue;

    previousTextBox.text = stepperMain.previousValue;

  }

}
The first thing that we are doing here is creating a new array called ‘palletteArray‘, which we populate with a couple of color codes that we’ve selected for our interface: a nice pastel yellow (#7FAAD4) and a complementary blue (#FFDF7F).
Note: Creating an array of colors makes it much easier to switch those colors if we need to: we simply change the values of different array members. This solution allows us to avoid having to search through the code, changing individual hexadecimal values as we find them.
We then have a function called setTheme(), which is called at startup. It sets the theme for the NumericStepper component (or any other Flash MX 2004 component on the stage) using the palletteArray array we set up earlier.
We then create a new listener object that listens for a change in the value of the NumericStepper component. When a change is detected, the populateTextBoxes() function is called. It pushes the nextValue and previousValue properties of the component to the relevant dynamic text boxes.
Date Selection
The source FLA file for this example is NumericStepperDates.fla.
This example is a little different as it uses the NumericStepper component to create simple date controls within the application. These date controls might be used within an online application form, or a Flash-driven blog-searching application. In this example, we’ll just send the output of a function to the Output Panel.
Setting the Stage
We’ll use some of the same core code that we used in the previous example and build upon that to create a different outcome; also in this example we will populate the NumericStepper component using ActionScript rather than hard-coding its contents via the Property Inspector.
- Create a new Flash document with default properties and rename the default layer
Actions. Below it, add a further layer calledComponents. - Drag 2 instances of the NumericStepper component from the UI Components section of the Components Panel into the first frame of the Components layer. Name the instances
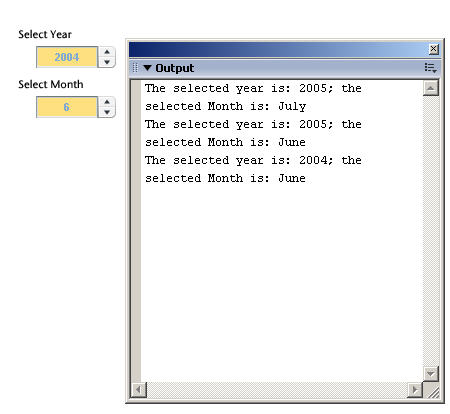
StepperYearandStepperMonth. - Add relevant text labels above each component (e.g. Select Year, Select Month).
Adding the ActionScript
It’s now time to populate the components with the values we want for the month and year. When the values in either of the component instances change, the selected date is pushed to the Output Panel.
- Select the first frame of the ‘
Actions‘ layer and add the following code within the Actions Panel: - Save your Flash document and preview your work.
When you click on either of the NumericStepper instances, the
pushDate()function is called and the selected month and year are traced out to the Output Panel in a convenient manner.
Note: Code highlighted in bold has altered from the previous example.
var monthArray = new Array();

monthArray = ["January", "February", "March", "April", "May", "June", "July", "August", "September", "October", "November", "December"];


var palletteArray = new Array();

palleteArray = ["0x7FAAD4", "0xFFDF7F"];

function setTheme() {

  _global.style.setStyle("themeColor", palleteArray[0]);

  _global.style.setStyle("backgroundColor", palleteArray[1]);

  _global.style.setStyle("fontSize", 11);

  _global.style.setStyle("fontWeight", "bold");

  _global.style.setStyle("color", palleteArray[0]);

}

setTheme();


var stepsListener = new Object();

stepsListener.change = function() {

  pushDate();

};

stepperYear.addEventListener("change", stepsListener);

stepperMonth.addEventListener("change", stepsListener);


function pushDate() {

  trace("The selected year is: "+stepperYear.value+

    "; the selected Month is: "+monthArray[stepperMonth.value-1]);

}

function populateYearStepper() {

  var now = new Date();

  stepperYear.minimum = now.getUTCFullYear();

  stepperYear.maximum = now.getUTCFullYear()+10;

  stepperYear.stepSize = 1;

  stepperYear.value = now.getUTCFullYear();

}

populateYearStepper();

function populateMonthStepper() {

  var now = new Date();

  stepperMonth.minimum = 1;

  stepperMonth.maximum = 12;

  stepperMonth.stepSize = 1;

  stepperMonth.value = now.getUTCMonth()+1;

}

populateMonthStepper();
Initially, we create a new array called monthArray, which holds the names of the months of the year; we will use this later in the example to get month names from the pushDate() function.
Note that in this example, we tie both instances of the component to the same listener object. Whenever the value of either instance changes, the pushDate() function is called.
stepperYear.addEventListener("change", stepsListener);

stepperMonth.addEventListener("change", stepsListener);
We have two functions in this example (populateYearStepper(), and populateMonthStepper()), both of which are called at startup. They dynamically populate the stepperYear and stepperMonth NumericStepper instances, respectively.
The populateYearStepper() function creates a new date object, then pushes the minimum, maximum, stepSize and value properties into the stepperYear component instance using various iterations of the getUTCFullYear() method. This produces a minimum value, which is the current year, and a maximum value, which is the current year plus 10. It sets the step size to 1 and the initial value of the NumericStepper instance to the current year.
A similar process occurs with the populateMonthStepper() function, which populates the stepperMonth instance with the month numbers (1-12). It then sets the initial value to the current month using the following code:
now.getUTCMonth()+1The getUTCMonth() method returns an integer between 0 and 11, indicating the month value in the Date object (January will appear as 0, December as 11, etc.). We add 1 to this to obtain the number we wish to display in the NumericStepper.
When either of the values of the NumericStepper instances change, the pushDate() function is called. We use this function to trace out the selected date.
The year is simple enough to trace out, as we can easily get the value of the stepperYear NumericStepper instance using stepperYear.value.. But, in order to convert the zero-based month value into a month name, we need to look up its position within the monthArray array we initiated earlier.
trace("The selected year is: "+stepperYear.value+

"; the selected Month is: "+monthArray[stepperMonth.value-1]);There are multiple iterations and uses of the NumericStepper component that can be derived from this example, so I suggest that you experiment and see how you can apply this component in your own projects.
Experimental Control
As we’ve already mentioned, another interesting application of the NumericStepper component is to use it as a control for experimental effects, such as the one shown in the screenshot at the beginning of this tutorial.
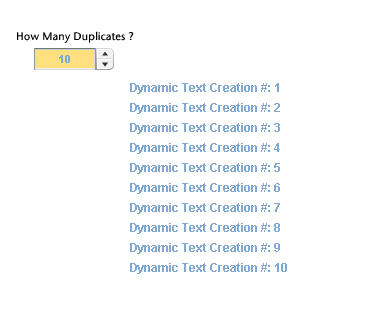
In this example, we’ll use the component dynamically to create multiple dynamic iterations of text fields via the createEmptyMovieClip() and createTextField() method.
The value property of the NumericStepper instance is retrieved and used to iterate through a loop, which creates a series of text fields. On each subsequent change of the component’s value, the screen is redrawn with the number of text fields reflecting the value within the component.
The source FLA file for this example is called NumericStepperDynamicText.fla and can be found in the code archive for this article.
Note: The code archive includes another example of this FLA in which the dynamic creations are placed randomly on the stage. The file’s named NumericStepperDynamicRandomText.fla
While this example shows how to dynamically control the creation and destruction of Movie Clips and text fields, I’m going to skim through the dynamic creation code. Instead, I’ll concentrate on the logic flow through the example so you can get on with dissecting the example and modifying it for your needs.
Setting the Stage
- Create a new Flash document with default properties and rename the default layer
Actions. Add below it a layer calledComponents. - Drag an instance of the NumericStepper component from the UI Components section of the Components Panel into the first frame of the Components layer. Name the instance
StepperMain. - With the NumericStepper component instance selected, add the following values within the Property Inspector:
maximum:100,minimum:0;stepSize:5,value:10.From a setup point of view, that’s all we need to do. The rest of the example is controlled via ActionScript.
Adding the ActionScript
- Select the first frame of the
Actionslayer and add the following code within the Actions Panel: - Save your Flash document and preview your work.
It’s as simple as falling off a bike! This example shows the basics of using the component as a starting point that triggers dynamic object creation.
var palletteArray = new Array();

palleteArray = ["0x7FAAD4", "0xFFDF7F"];

function setTheme() {

  _global.style.setStyle("themeColor", palleteArray[0]);

  _global.style.setStyle("backgroundColor", palleteArray[1]);

  _global.style.setStyle("fontSize", 11);

  _global.style.setStyle("fontWeight", "bold");

  _global.style.setStyle("color", palleteArray[0]);

}

setTheme();


var stepsListener = new Object();

stepsListener.change = function() {

  removeDeadClips();

  createTextBoxes();

};

stepperMain.addEventListener("change", stepsListener);


function createTextBoxes() {

  if (stepperMain.value>stepperMain.minimum) {

    var yPos = 30;

    var yStart = stepperMain._y;

    var yStep = 20;

    var xStart = 150;

    var textMC = _root.createEmptyMovieClip("textMC", 10);

    for (var i=1; i<=stepperMain.value; i++) {

      var field = textMC.createTextField("sampleText"+i, i, xStart, yStart+yPos, 200, 25);

      field.multiline = true;

      field.wordWrap = true;

      field.border = false;

      //Format Text

      formatText(field, i);

      var yPos += yStep;

    }

  }

}

createTextBoxes();


function formatText(field, number) {

  var textFormatter = new TextFormat();

  textFormatter.color = palleteArray[0];

  textFormatter.bullet = false;

  textFormatter.underline = false;

  textFormatter.font = "_sans";

  textFormatter.size = 12;

  textFormatter.bold = true;

  field.text = "Dynamic Text Creation #: "+number;

  field.setTextFormat(textFormatter);

}


function removeDeadClips() {

  for (z in _root) {

    if (typeof (_root[z]) == "movieclip") {

      _root[z].removeMovieClip();

    }

  }

}
As before, we set up the change event handler. This time, it fires two functions (removeDeadClips() and createTextBoxes()) when the value of the NumericStepper component changes.
After setTheme(), the first function to be called at startup is createTextBoxes(), which takes the initial value of the stepperMain instance, and creates an empty movie clip. It then iterates through a for loop using the stepperMain.value property as the limiting value.
As we iterate through the for loop, a series of text fields are created and formatted using the formatText() function. This sets general properties of the text field, including color from the palletteArray array, and adds some simple dynamic text.
When the stepperMain NumericStepper instance value is changed, the removeDeadClips() function is called from the event handler. It removes the empty movie clip we created to hold the text fields.
Note: While only a single Movie Clip is created dynamically on the stage, and we could simply remove it using removeMovieClip(), I chose to use the function in this example. This approach provides extra benefits in that, if I wish to create multiple Movie Clips later on, I can simply alter the function to suit my needs, and point it at a particular level or nested Movie Clip instance.
After the stage has been cleared up, we call the createTextField() function again, to create the empty Movie Clip and dynamic text fields.
Just the Beginning…
While the examples presented in this tutorial have shown a few different uses for the NumericStepper component, the possibilities really are without limits. Use your imagination and the skills you’ve developed here, and you can create some interesting applications of the component.
And when you do create some interesting applications using the component, don’t be shy about sharing them with the rest of the SitePoint community. We’re looking forward to seeing what you’ve done!
Frequently Asked Questions (FAQs) about Numeric Stepper Component
What is a Numeric Stepper Component?
A Numeric Stepper Component is a user interface element that allows users to increase or decrease a value in small, fixed increments. It is typically used in forms where users need to input a specific number within a certain range. The component includes an input field for the number and two buttons, usually marked with plus and minus signs, to increase or decrease the value.
How does a Numeric Stepper Component work in Flash?
In Flash, the Numeric Stepper Component works by allowing users to select a number within a specified range. The component includes an input field where the user can manually enter a number, and two buttons to increase or decrease the value. The component also includes properties that allow developers to set the minimum and maximum values, the step size, and the initial value.
How can I customize the appearance of a Numeric Stepper Component?
The appearance of a Numeric Stepper Component can be customized using CSS. This includes changing the color, size, and style of the input field and buttons, as well as the layout of the component. Some components also allow you to customize the appearance of the number in the input field, such as changing the font, size, and color.
What is the difference between a Numeric Stepper Component and a Slider Component?
A Numeric Stepper Component and a Slider Component are both used to select a number within a range, but they work in slightly different ways. A Numeric Stepper allows users to increase or decrease the value in fixed increments by clicking buttons or entering a number manually. A Slider, on the other hand, allows users to select a value by dragging a handle along a track.
How can I use a Numeric Stepper Component in a form?
A Numeric Stepper Component can be used in a form to allow users to input a number within a certain range. The component can be linked to a form field, so that the value selected by the user is submitted with the form. The component can also be set to a specific value when the form is loaded, and can be reset to this value when the form is reset.
Can I use a Numeric Stepper Component in a mobile application?
Yes, a Numeric Stepper Component can be used in a mobile application. The component can be designed to be touch-friendly, with large buttons and a clear, easy-to-read number display. It can also be customized to fit the look and feel of the mobile application.
How can I set the minimum and maximum values for a Numeric Stepper Component?
The minimum and maximum values for a Numeric Stepper Component can be set using the component’s properties. These properties can be set in the component’s initialization code, or they can be changed dynamically at runtime.
Can I use a Numeric Stepper Component to input decimal numbers?
Yes, a Numeric Stepper Component can be used to input decimal numbers. The step size of the component can be set to a decimal value, allowing users to increase or decrease the value in fractional increments.
How can I handle errors in a Numeric Stepper Component?
Errors in a Numeric Stepper Component can be handled using event listeners. For example, if a user tries to enter a number that is outside the specified range, an event can be triggered that displays an error message or changes the value to the nearest valid number.
Can I use a Numeric Stepper Component in a data grid?
Yes, a Numeric Stepper Component can be used in a data grid. The component can be used as an editor for a numeric column in the grid, allowing users to increase or decrease the value in fixed increments.
Steven is cofounder of phireworx.com, a Fireworks resource site, and contributing author of Fireworks MX Magic (New Riders), Special Edition Using Fireworks MX (Que), and Fireworks MX Fundamentals (New Riders). Steve wrote SitePoint's The Flash Anthology: Cool Effects & Practical ActionScript