

Comments are everywhere. Blogs, social networks, fan sites, learning resources – they all have some kind of a commenting system. Often we would like to present our users options to both leave a comment and reply as well. The most natural way to represent replies is to nest them (like a Russian doll).
This article shows how to implement nested comments in a Rails app with the help of the closure_tree gem. Also, it will describe some cool features that the gem provides, pinpointing gotchas along the way.
The source code is available on GitHub.
The working demo can be found on http://nested-comments.radiant-wind.com/.
Key Takeaways
- Implement nested comments in a Rails application using the `closure_tree` gem, which provides efficient nesting capabilities and features for managing hierarchical data.
- Start by creating a basic Rails application, add the `closure_tree` and `bootstrap-sass` gems for functionality and styling, and then set up a simple Comment model with routes and controllers for creating and displaying comments.
- Modify your Comment model to act as a tree with `acts_as_tree`, and update your database schema to include parent-child relationships among comments.
- Utilize the `closure_tree` gem’s methods like `hash_tree` to efficiently retrieve and display nested comments, ensuring the UI clearly reflects the hierarchical structure.
- Enhance user interaction by allowing replies to comments directly from the same page, using AJAX to update the comment thread dynamically without reloading the page.
Preparing the Project
I will use Rails 4.0.4, but you can implement the same solution using Rails 3
Okay, here’s the plan: We are going to create a simple application that allows users to open new discussion threads, as well as leave their comments on already opened ones. In the first iteration, this app will only present an option to start a new thread, while the second will add nesting.
Create a new application without a default testing suite:
$ rails new nested_comments -T
Here is the list of gems that we are going to use:
gem 'closure_tree'

gem 'bootstrap-sass'
Not much, eh? As always, I use Twitter Bootstrap for some basic styling – you can use any other CSS Framework or create your design from scratch.
The closure_tree gem, created by Matthew McEachen, will help us create nesting for our Comment model. There are some alternatives to this gem, specifically ancestry created by Stefan Kroes. I was using ancestry for a while, but it has not been updated for quite a long time, though open issues are present on GitHub. As such, I decided to switch to closure_tree (I have noticed that ancestry now seems to be evolving more actively). Also, I like some of the options that closure_tree provides. Still, the solution described here can be implemented with ancestry as well.
Let’s create the Comment model:
rails g model Comment title:string author:string body:text
I am keeping things simple here – the comment has a title, author (author’s name or nickname), and a body. For the purposes of this article, these will be enough, but in the real application you would probably want to set up some kind of authentication.
The next point in our checklist is setting up the routes:
config/routes.rb
root to: 'comments#index'

resources :comments, only: [:index, :new, :create]
After that, create the controller:
controllers/comments_controller.rb
class CommentsController < ApplicationController

  def index

    @comments = Comment.all

  end
  def new

  end
  def create

  end

end
For now, the new and create methods are empty, we will work them out later. The index method just fetches all the comments from the comments table – pretty straightforward.
Let’s spend a couple of minutes and apply some Bootstrap styling to our pages.
layouts/application.html.erb
[...]

<body>
<div class="container">

  <% flash.each do |key, value| %>

    <div class="alert alert-<%= key %>">

      <button type="button" class="close" data-dismiss="alert">×</button>

      <%= value %>

    </div>

  <% end %>

</div>
<div class="container">

  <%= yield %>

</div>
</body>

[...]
comments/index.html.erb
<div class="jumbotron">

  <div class="container">

    <h1>Join the discussion</h1>

    <p>Click the button below to start a new thread:</p>

    <p>

      <%= link_to 'Add new topic', new_comment_path, class: 'btn btn-primary btn-lg' %>

    </p>

  </div>

</div>
<%= render @comments %>
render @comments means that we are rendering each element from the @comments array using the partial
comments/_comment (convention over configuration rocks!). This partial is not created yet, so let’s do that now:
comments/_comment.html.erb
<div class="well">

  <h2><%= comment.title %></h2>

  <p class="text-muted">Added by <strong><%= comment.author %></strong> on

    <%= l(comment.created_at, format: '%B, %d %Y %H:%M:%S') %></p>
  <blockquote>

    <p><%= comment.body %></p>

  </blockquote>

</div>
The partial renders the comment’s title, author name, creation date and time using the l method (which is actually a shorthand for the localize method defined in I18n) and, lastly, body.
Now, we can return to the controller’s methods:
controllers/comments_controller.rb
[...]

def new

  @comment = Comment.new

end
def create

  @comment = Comment.new(comment_params)
  if @comment.save

    flash[:success] = 'Your comment was successfully added!'

    redirect_to root_url

  else

    render 'new'

  end

end
private
  def comment_params

    params.require(:comment).permit(:title, :body, :author)

  end
[...]
Please note that, if you are using Rails 3 or the protected_attributes gem with Rails 4, you won’t have to define the comment_params method. Instead, you will need to specify attr_accessible in the Comment model like this:
models/comment.rb
[...]

attr_accessible :title, :body, :author

[...]
On to the view:
comments/new.html.erb
<h1>New comment</h1>
<%= render 'form' %>
And now – guess what – we need to create the form partial:
comments/_form.html.erb
<%= form_for(@comment) do |f| %>

  <% if @comment.errors.any? %>

    <div id="error_explanation">

      <h2><%= pluralize(@comment.errors.count, "error") %> prohibited this comment from being saved:</h2>
      <ul>

        <% @comment.errors.full_messages.each do |msg| %>

          <li><%= msg %></li>

        <% end %>

      </ul>

    </div>

  <% end %>
  <div class="form-group">

    <%= f.label :title %>

    <%= f.text_field :title, class: 'form-control' %>

  </div>
  <div class="form-group">

    <%= f.label :author %>

    <%= f.text_field :author, class: 'form-control', required: true %>

  </div>
  <div class="form-group">

    <%= f.label :body %>

    <%= f.text_area :body, class: 'form-control', required: true %>

  </div>
  <%= f.submit class: 'btn btn-primary' %>

<% end %>
As you can see, this is a pretty simple form – nothing much to talk about, really. We will return to it in a few minutes.
At this point, you can test how your app is working – go ahead and create a couple of comments. We’ve finished the ground work and are ready to integrate closure_tree into the app.
Making It Nested
According to closure_tree‘s documentation, the first thing to do is add a parent_id column to the comments table:
$ rails g migration add_parent_id_to_comments parent_id:integer

$ rake db:migrate
This column will store the ID of the immediate parent for the resource. In the case of no parent, this column will have a null value. We also need to create a new table that will contain the hierarchy for the comments.
$ rails g migration create_comment_hierarchies
Now open the migration file and modify it:
migrate/create_comment_hierarchies.rb
class CreateCommentHierarchies < ActiveRecord::Migration

  def change

    create_table :comment_hierarchies, :id => false do |t|

      t.integer  :ancestor_id, :null => false   # ID of the parent/grandparent/great-grandparent/... comments

      t.integer  :descendant_id, :null => false # ID of the target comment

      t.integer  :generations, :null => false   # Number of generations between the ancestor and the descendant. Parent/child = 1, for example.

    end
    # For "all progeny of…" and leaf selects:

    add_index :comment_hierarchies, [:ancestor_id, :descendant_id, :generations],

              :unique => true, :name => "comment_anc_desc_udx"
    # For "all ancestors of…" selects,

    add_index :comment_hierarchies, [:descendant_id],

              :name => "comment_desc_idx"

  end

end
Don’t forget to run the migration:
$ rake db:migrate
Now we need to tell our model that it should be nested. That is easy:
models/comment.rb
acts_as_tree order: 'created_at DESC'
Note that we use order here. That is optional, but you probably would want to specify some kind of ordering for the resources. In this case, the most reasonable order is by descending creation date.
At this point, we can display the “reply” link. Actually, creating a reply is the same as creating the root comment. The only difference is specifying the parent_id attribute, so let’s pass it as a GET parameter.
comments/_comment.html.erb
[...]

<blockquote>

  <p><%= comment.body %></p>

</blockquote>
<p><%= link_to 'reply', new_comment_path(comment.id) %></p>

[...]
Unfortunately, this will not work right away, because new_comment_path method does not expect any arguments to be passed. We have to modify routes a bit:
routes.rb
[...]

resources :comments, only: [:index, :create]

get '/comments/new/(:parent_id)', to: 'comments#new', as: :new_comment

[...]
I’ve redefined the new route here adding an optional parent_id GET parameter.
Now tweak the new method a bit:
controllers/comments_controller.rb
def new

  @comment = Comment.new(parent_id: params[:parent_id])

end
We also have to add this parent_id to the form. We do not want our users to see it, so use the hidden_field helper method:
comments/_form.html.erb
[...]

<%= f.hidden_field :parent_id %>
<div class="form-group">

  <%= f.label :title %>

  <%= f.text_field :title, class: 'form-control' %>

</div>

[...]
The create method needs to be modified as well:
controllers/comments_controller.rb
[...]

def create

  if params[:comment][:parent_id].to_i > 0

    parent = Comment.find_by_id(params[:comment].delete(:parent_id))

    @comment = parent.children.build(comment_params)

  else

    @comment = Comment.new(comment_params)

  end
  if @comment.save

    flash[:success] = 'Your comment was successfully added!'

    redirect_to root_url

  else

    render 'new'

  end

end

[...]
Here, we check the presence of the parent_id attribute to create either a root comment or a nested one. Note the use of params[:comment].delete(:parent_id). delete is a method that removes an element with a specific key from the hash, returning the element as a result. As a result, parent_id will be passed to the find_by_id method as an argument. We delete it from the params hash because we did not permit parent_id in our comment_params private method.
There is one more thing that could be improved. If I am clicking a “reply” link, I will be redirected to a new page with a form. That is okay, but I would probably want to see the actual comment that I am responding to:
comments/new.html.erb
<h1>New comment</h1>
<% if @comment.parent %>

  <%= render 'comment', comment: @comment.parent, from_reply_form: true %>

<% end %>
<%= render 'form' %>
@comment.parent will return nil if the comment has no parent so the link will not be rendered. Also, note the from_reply_form variable that we are passing to the partial. We are going to use it to tell the comment’s partial that it is being rendered from the form so there is no need to provide the “reply” link again – the user is already replying to the comment! Now, change that partial:
comments/_comment.html.erb
[...]

<% from_reply_form ||= nil %>

<% unless from_reply_form %>

  <p><%= link_to 'reply', new_comment_path(comment.id) %></p>

<% end %>

[...]
Here we are using a “nil guard” – the ||= operator. If the from_reply_form has a value, it does nothing to it. If the from_reply_form is not defined, it assigns nil to it. We need to use a “nil guard” because this partial is also being called from the index.html.erb without passing the from_reply_form.
Now, check if the replying is working. Well, it works but there is an issue – the comments are not nested. The parent_id column is being set but our comments are being rendered one by one, which definitely should be fixed.
Luckily, closure_tree provides us with the hash_tree method that builds a nested hash of our resources. Be warned, if your comments table is large enough, the server might bog down loading all the resources at once. If this occurs, use the limit_depth option to control the level of nesting like this:
Comment.hash_tree(limit_depth: 2)
Go on and tweak the index method:
controllers/comments_controller.rb
def index

  @comments = Comment.hash_tree

end
The hash tree will look like the following:
{a =>

  {b =>

    {c1 =>

      {d1 => {}

    },

    c2 =>

      {d2 => {}}

    },

    b2 => {}

  }

}
Now the tricky part. We do not know how many levels of nesting our comments could have, but we want to render them all. To achieve this, we have to implement a recursion algorithm that will dig into the nested comments as long as they are present. It’s a good idea to create a helper method for that:
helpers/comments_helper.rb
module CommentsHelper

  def comments_tree_for(comments)

    comments.map do |comment, nested_comments|

      render(comment) +

          (nested_comments.size > 0 ? content_tag(:div, comments_tree_for(nested_comments), class: "replies") : nil)

    end.join.html_safe

  end

end
On each iteration, take a comment and its children storing it in the comment and nested_comments variables. Next, render the comment (the _comment.html.erb partial is used) and check if there are any more nested comments. If yes, we call the same comments_tree_for method again passing the nested_comments variable. Also, note that we wrap the result of this method call with a div tag that has the replies class.
When the map method finishes its work, join all rendered comments and calling html_safe because, otherwise, plain HTML would be rendered.
Now this helper can be used:
comments/index.html.erb
[...]

<%= comments_tree_for @comments %>
This works, but we have to visually nest the replies. With the replies wrapped in a div.replies tag, we can add a very simple styling to it:
stylesheets/application.css.scss
.replies {margin-left: 50px;}
If you want to limit this visual nesting by, say, 5 levels add this line:
stylesheets/application.css.scss
/* 5 levels nesting */

.replies .replies .replies .replies .replies {margin-left: 0;}
closure_tree provides some other fancy methods for our resources. For example, we could check whether the comment has any replies using the leaf? method. It will return true if this resource is the last in the nesting chain.
Using this method, we can encourage the users to reply to a comment:
comments/_comment.html.erb
[...]

<% from_reply_form ||= nil %>

<% unless from_reply_form %>

  <% if comment.leaf? %>

    <small class="text-muted">There are no replies yet - be the first one to reply!</small>

  <% end %>

  <p><%= link_to 'reply', new_comment_path(comment.id) %></p>

<% end %>

[...]
You can also check whether the resource is the root node with the help of the root? method:
comments/_comment.html.erb
<div class="well">

  <h2><%= comment.title %></h2>

  <p class="text-muted"><%= comment.root? ? "Started by" : "Replied by" %> <strong><%= comment.author %></strong> on

    <%= l(comment.created_at, format: '%B, %d %Y %H:%M:%S') %></p>

[...]
Currently, we do not provide an option to delete a comment, but you might be wondering what would happen with the nested comments if the root is deleted. Well, by default their parent_id columns would be set to null so these comments would become root nodes. You can change this behavior by passing a dependent option to the acts_as_tree method. Possible values are:
:nullify– setparent_idtonull.:delete_all– delete all nested resources without running any callbacks.:destroy– delete all nested resources and run appropriate callbacks for each resource.
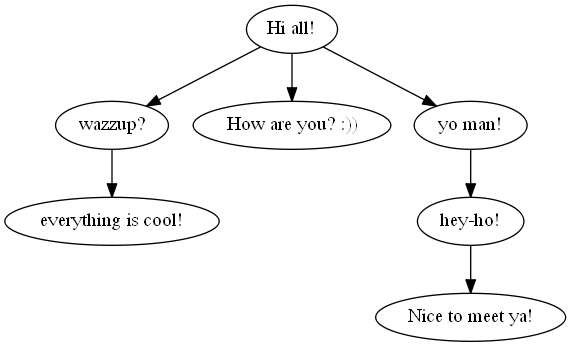
Graph Visualization
You can even visualize the nesting with a graph. closure_tree provides a to_dot_digraph method that creates a .dot file with an appropriate instructions for a Graphviz – an awesome and free-to-use graph visualization tool. It actually can build complex graphs with a lot of nodes and relations between them.
Each node of the graph has its own label – the to_digraph_label method is used to draw it. Let’s open our model and override it like this:
models/comment.rb
[...]

def to_digraph_label

  title

end
Now each node will have the comment’s title. Now you can try this:
- Open the console (
rails console) and issue this command:
File.open("example.dot", "w") do |f|

  f.write(Comment.root.to_dot_digraph)

end
It will take the first root comment with all its children and build their relations saving it to the
example.dotfile. - Download and install Graphviz.
- Open a command prompt, navigate to the directory where
example.dotis located and rundot -Tpng example.dot > example.png. - Look at the visualized graph inside the
example.png!
Conclusion
That’s all for this article, folks. We have taken a look at closure_tree and incorporated it into our app in no time. Don’t forget that this gem can be used in many different cases – for example, when building nested menus or specifying relations of some other kind.
Have you used closure_tree in your app? Share your experience in the comments!
Thanks for reading, see you again soon!
Frequently Asked Questions (FAQs) about Nested Comments in Rails
What is the main difference between Closure Tree and Ancestry?
Closure Tree and Ancestry are both gems used in Ruby on Rails for managing hierarchical data structures. The main difference between the two lies in their approach to storing and retrieving data. Closure Tree uses a closure table to store all paths in the tree, which makes it faster for reading operations but slower for writing. On the other hand, Ancestry uses a path enumeration approach, storing the entire path from the root to the node in each record. This makes it faster for writing operations but slower for reading.
How can I implement nested comments using Closure Tree?
To implement nested comments using Closure Tree, you first need to add the gem to your Gemfile and run the bundle install command. After that, you can generate a migration to add a closure_tree_id column to your comments table. Then, in your Comment model, you need to add ‘acts_as_tree’ to enable the Closure Tree functionality. Finally, you can use the ‘children’ and ‘parent’ methods provided by Closure Tree to create and manage your nested comments.
Can I use Ancestry to create a comment reply system?
Yes, you can use Ancestry to create a comment reply system. Ancestry stores the path from the root to each node, which makes it easy to retrieve all ancestors or descendants of a node. This feature can be used to create a hierarchical comment system where each comment can have multiple replies, and each reply can have its own replies.
How can I migrate from Closure Tree to Ancestry?
Migrating from Closure Tree to Ancestry involves changing the way your data is stored and retrieved. You need to remove the Closure Tree gem from your Gemfile, add the Ancestry gem, and run the bundle install command. Then, you need to generate a migration to add an ancestry column to your comments table and remove the closure_tree_id column. Finally, you need to update your Comment model to use ‘has_ancestry’ instead of ‘acts_as_tree’.
What are the performance implications of using Closure Tree vs Ancestry?
The performance implications of using Closure Tree vs Ancestry depend on the nature of your application. If your application involves a lot of reading operations, Closure Tree might be a better choice because it stores all paths in the tree, making it faster to retrieve data. However, if your application involves a lot of writing operations, Ancestry might be a better choice because it stores the entire path from the root to the node in each record, making it faster to write data.
How can I handle large data sets with Closure Tree or Ancestry?
Both Closure Tree and Ancestry can handle large data sets, but they have different strategies for doing so. Closure Tree uses a closure table to store all paths in the tree, which can result in a large number of records for large data sets. However, it provides methods for batch inserting and deleting nodes to manage this. Ancestry, on the other hand, stores the entire path from the root to the node in each record, which can result in long strings for deep trees. However, it provides methods for pruning and compacting trees to manage this.
Can I use Closure Tree or Ancestry with other databases besides PostgreSQL?
Yes, both Closure Tree and Ancestry are compatible with other databases besides PostgreSQL. They work with any database that supports ActiveRecord, including MySQL, SQLite, and others.
How can I visualize the tree structure created with Closure Tree or Ancestry?
Both Closure Tree and Ancestry provide methods for retrieving the tree structure in a format that can be easily visualized. Closure Tree provides the ‘hash_tree’ method, which returns a nested hash representing the tree. Ancestry provides the ‘arrange’ method, which returns a nested hash representing the tree. You can use these methods in combination with a library like D3.js to create a visual representation of your tree.
How can I handle orphan nodes with Closure Tree or Ancestry?
Both Closure Tree and Ancestry provide methods for handling orphan nodes, i.e., nodes whose parent has been deleted. Closure Tree provides the ‘rebuild!’ method, which rebuilds the closure table and removes orphan nodes. Ancestry provides the ‘orphan_strategy’ option, which can be set to :destroy to automatically delete orphan nodes, or :rootify to make them root nodes.
Can I use Closure Tree or Ancestry in a multi-tenant application?
Yes, both Closure Tree and Ancestry can be used in a multi-tenant application. They both support scoping, which allows you to restrict the tree operations to a specific tenant. In Closure Tree, you can use the ‘with_scope’ method to apply a scope. In Ancestry, you can use the ‘scope_pattern’ option to define a scope.