Making A Clipping Mask With Text In Photoshop
 Use the Move Tool, to centre the word in the middle of the image.
4. Click on the background layer in the Layers Palette to select it and then click on the Create A New Layer button.
 A new empty layer will appear in the Layers Palette.
5. Using the Paint Bucket tool, fill the new layer with white.
 You now need to rearrange the stacking order of the layers to create your clipping mask. At the moment the background layer is locked.
6. Double-click anywhere on the background layer to open up the New Layer dialog box. Rename the layer as Trees and click OK.
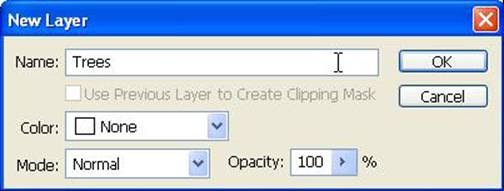 7. Click on the Trees layer in the Layers Palette and drag it to the top of the layers so that Trees are hiding the words Snowfall.
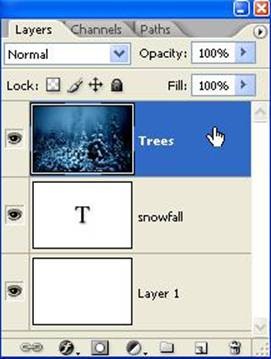 8. Click on the Layers Palette menu (the little triangle in the upper right corner) and choose Create Clipping Mask.
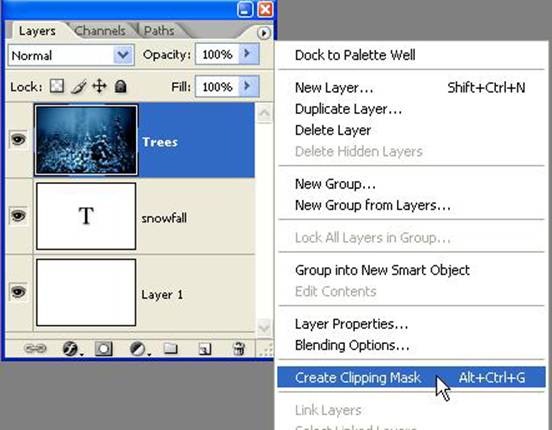 The clipping mask, kicks into action and you will see the letters forming the word Snowfall are filled with the image of the snowy trees.
 The nice thing here is that you can move your text around and the image coming through varies.
Adding A Drop Shadow
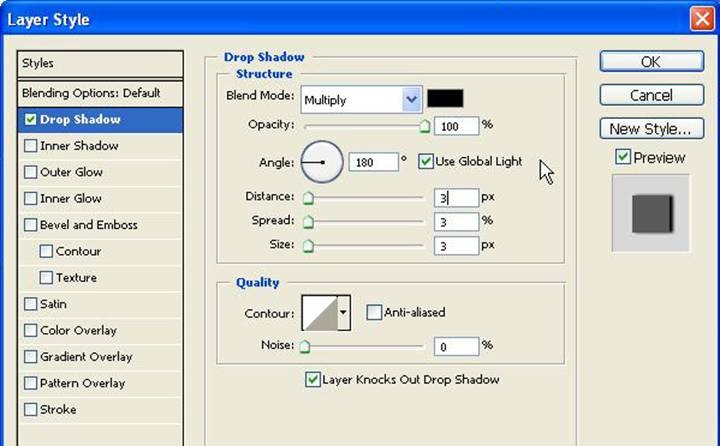
To complete the image we will add a drop shadow to the text. It adds a little extra impact! 1. Select the Snowfall type layer to make it active, and then click the Add a Layer Style button (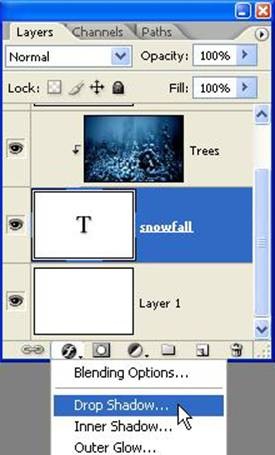 2. In the Layer Style dialog box, change the Opacity to 100%, the angle to 180 and the distance, spread and size to 3.
 And that’s it. You can do this with any shape on a layer. It doesn’t have to be text. Hope you find it useful.
If you enjoyed reading this post, you’ll love Learnable; the place to learn fresh skills and techniques from the masters. Members get instant access to all of SitePoint’s ebooks and interactive online courses, like Foundations of Photoshop.
Comments on this article are closed. Have a question about Photoshop? Why not ask it on our forums?
Frequently Asked Questions (FAQs) about Making a Clipping Mask with Text in Photoshop
What is a clipping mask in Photoshop and how does it work?
A clipping mask in Photoshop is a feature that allows you to use the content of a layer to control the visibility of the layers above it. This means you can use the shape, text, or any other element on one layer to ‘mask’ or hide parts of the layer above it. The layer that is being used to control the visibility is called the ‘masking layer’, while the layer whose visibility is being controlled is called the ‘clipped layer’.
How can I create a clipping mask with text in Photoshop?
To create a clipping mask with text in Photoshop, you first need to create a text layer and a layer with the image or pattern you want to clip. The text layer should be below the image layer. Then, with the image layer selected, go to the ‘Layer’ menu, select ‘Create Clipping Mask’. The image or pattern will now only be visible within the shape of the text.
Can I use multiple layers in a clipping mask?
Yes, you can use multiple layers in a clipping mask. The bottom layer will act as the mask, and all layers above it that are part of the clipping mask will be clipped to the shape of the bottom layer. You can create complex designs by stacking multiple layers and using them as clipping masks.
How can I edit the text in a clipping mask?
To edit the text in a clipping mask, simply select the text layer and use the text tool to make your changes. The image or pattern in the clipping mask will adjust automatically to fit the new shape of the text.
Can I use a clipping mask with shapes other than text?
Yes, you can use a clipping mask with any shape or element in Photoshop, not just text. The process is the same: the layer with the shape acts as the mask, and the layers above it are clipped to the shape of the mask.
How can I remove a clipping mask?
To remove a clipping mask, select the clipped layer and go to the ‘Layer’ menu, then select ‘Release Clipping Mask’. The layer will return to its original state, no longer clipped to the shape of the layer below it.
Can I use a clipping mask with a gradient?
Yes, you can use a clipping mask with a gradient. The gradient will be applied to the shape of the mask, creating a smooth transition of colors within the shape of the mask.
How can I move the image within the clipping mask?
To move the image within the clipping mask, select the image layer and use the move tool to adjust the position of the image. The image will move within the shape of the mask, but the mask itself will stay in place.
Can I use a clipping mask with a transparent background?
Yes, you can use a clipping mask with a transparent background. The transparent areas of the mask will show the layers below the mask, while the opaque areas of the mask will show the clipped layer.
Can I save a design with a clipping mask as a PNG or JPEG?
Yes, you can save a design with a clipping mask as a PNG or JPEG. When you save the design, the clipping mask will be applied, and the saved image will only show the visible parts of the clipped layer.
Jennifer Farley is a designer, illustrator and design instructor based in Ireland. She writes about design and illustration on her blog at Laughing Lion Design.
