
In a previous post, we used the Vimeo API to build a rudimentary video application with Silex and Twig. We added login and user feed functionality and wrapped it all up with a video searching feature. In this one, we’ll add in liking a video, adding a video to a watchlist for later, and uploading videos via the Vimeo API.
![]()
Key Takeaways
- The Vimeo API allows developers to add the capability for users to like and add videos to a watchlist for later viewing. The ‘interact’ scope must be added to the Vimeo login for these functionalities.
- The Vimeo API also enables video uploading, but this functionality must be unlocked through a request to Vimeo. Once approved, the ‘upload’ scope can be added to the generated access tokens.
- In the code, AJAX requests to the server are made when a user interacts with a video. The response status ‘204’ indicates the server has fulfilled the request but there’s no response body. This can be used to disable the button as a form of feedback to the user that the operation has been fulfilled.
- Uploading videos through the API involves creating an app on Vimeo’s developer site and getting an access token. Then, the POST method is used to create a video upload ticket. This ticket provides an upload link where the video file can be PUT. After the upload is complete, the DELETE method is used to complete the upload process.
Prerequisites
To get up to speed, please skim through the code presented in the previous part and get it to run in your development environment (preferably Homestead Improved). Alternatively, just download the final code of the previous post here. Once you’re ready, continue with the content below.
Interacting with Videos
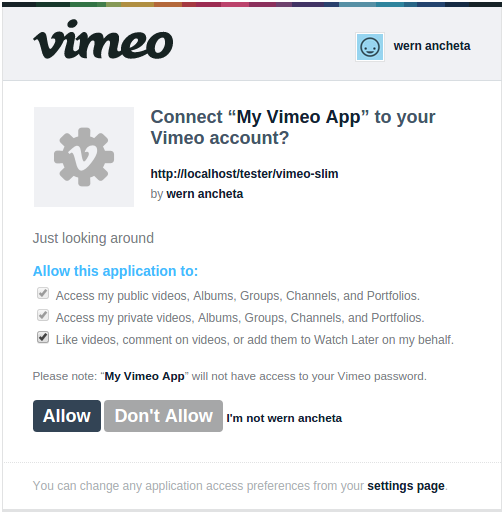
In this section, you’re going to add the capability to like and add videos to be watched later. But before that, you first need to update the scopes for the Vimeo login (in the previous post, we only asked for public and private scope permissions). Add interact as one of the items, and once that’s done, access the login page in the browser and try logging in again.
$scopes = array('public', 'private', 'interact');
$state = substr(str_shuffle(md5(time())), 0, 10);
$_SESSION['state'] = $state;

$url = $vimeo->buildAuthorizationEndpoint(REDIRECT_URI, $scopes, $state);

$page_data = array(
    'url' => $url
);
It should now show an additional item under permissions. Check that to allow video interactions.
Open the videos.php file in the templates directory and add the buttons that the user will use for interacting with the video. Each button has the data-uri attribute which stores the uri of the video. You extract this value later on with JavaScript and pass it to the server. You can add this right below the video description.
<div>
    <button class="like" data-uri="{{ row.uri }}">like</button>
    <button class="watch-later" data-uri="{{ row.uri }}">watch later</button>
</div>
At the bottom of the page, add jQuery and the script where you will add the code for making an AJAX request to the server.
<script src="http://cdnjs.cloudflare.com/ajax/libs/jquery/2.1.3/jquery.min.js"></script>
<script src="assets/js/videos.js"></script>
Create the videos.js file in the assets/js directory and add the following code.
$('.like').click(function(){
    var self = $(this);
    var uri = self.data('uri');
    $.post(
        '/tester/vimeo-slim/video/like',
        {
            'uri': uri
        },
        function(response){
            if(response.status == '204'){
                self.prop('disabled', true);
            }
        }
    );
});

$('.watch-later').click(function(){
    var self = $(this);
    var uri = self.data('uri');
    $.post(
        '/tester/vimeo-slim/video/watchlater',
        {
            'uri': uri
        },
        function(response){
            if(response.status == '204'){
                self.prop('disabled', true);
            }
        }
    );
});
What this does is extract the value of the data-uri attribute and then makes an AJAX request to the server with the value. If the response is 204, this means that the server has fulfilled the request but there’s no response body. You can disable the button as a form of feedback to the user that the operation has been fulfilled.
In the index.php file, add the routes that would handle the AJAX requests. Each of these routes are similar, only the API endpoint is different. First, it checks if the uri is passed along in the request and extracts the video ID by replacing the /videos string with an empty one.
Then, set the access token and make the request to the /me/likes/{video_id} endpoint. You also need to pass in an empty array for the data since the request method expects an array of parameters as its second argument. Unlike in the previous example, the PUT method is explicitly specified since the request uses POST by default and the API requires the request to be a PUT request. Lastly, set the content type of the response to json and then return the status of the response. This would return ‘204’ if the request was successful.
$app->post('/video/like', function () use ($app, $vimeo) {

    if($app->request->post('uri')){

        $video_id = str_replace('/videos/', '', $app->request->post('uri'));

        $vimeo->setToken($_SESSION['user.access_token']);

        $response = $vimeo->request('/me/likes/' . $video_id, array(), 'PUT');

        $app->contentType('application/json');
        echo '{"status": ' . json_encode($response['status']) . '}';

    }

});
The route for marking the video to be watched later is similar, only this time you have to use /me/watchlater/{video_id} as the endpoint.
$app->post('/video/watchlater', function () use ($app, $vimeo) {

    if($app->request->post('uri')){

        $video_id = str_replace('/videos/', '', $app->request->post('uri'));

        $vimeo->setToken($_SESSION['user.access_token']);

        $response = $vimeo->request('/me/watchlater/' . $video_id, array(), 'PUT');

        $app->contentType('application/json');
        echo '{"status": ' . json_encode($response['status']) . '}';

    }

});
Uploading Videos
Uploading videos can also be done through the API, though you have to make a request to Vimeo for this functionality to be unlocked. If you’re planning to deploy an app which allows users to upload videos, you can request upload access from your app page.
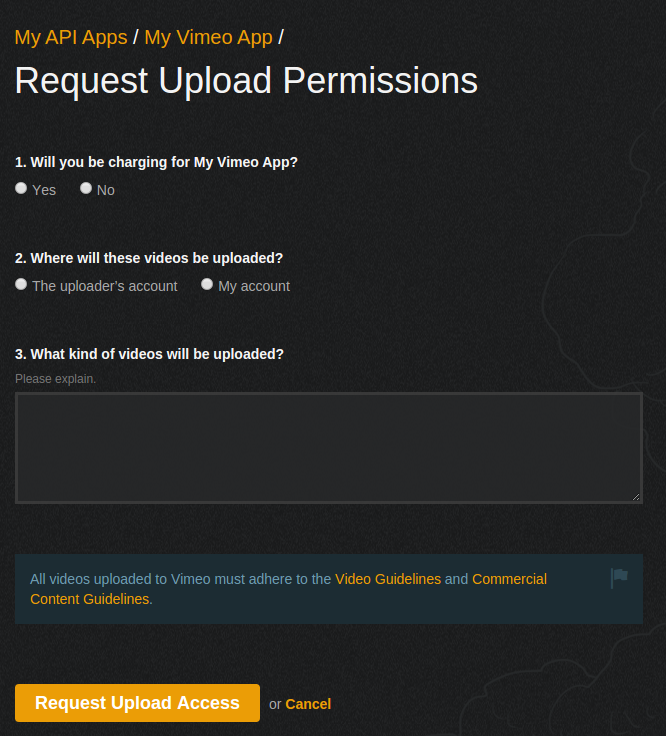
It could take up to 5 business days to receive the decision on your request. Vimeo provides a way for generating access tokens with specific scopes on it, and one of those is the upload scope. Unfortunately, even if an access token with the upload scope is generated, the upload wouldn’t work if the upload functionality hasn’t been approved by Vimeo.

Here’s the code for rendering the upload view.
$app->get('/upload', function () use ($app, $vimeo) {

    $page_data = array();
    $app->render('upload.php', $page_data);

});
And here’s the upload view (templates/upload.php). What it’s doing is checking if there are any errors in the flash session. If so, they’re shown to the user. Below that, create a form that allows the user to upload a video.
{% if flash.errors %}
<div>
    error uploading file: {{ flash.errors[0] }}
</div>
{% endif %}
<form method="POST" enctype="multipart/form-data">
    <input type="file" name="video" value=""/>
    <button type="submit">upload</button>
</form>
Before moving on, install the Upload library for handling the video uploads.
composer require codeguy/uploadFor the route that’s responsible for handling the uploads, set the access token.
$app->post('/upload', function () use ($app, $vimeo) {

    $vimeo->setToken($_SESSION['user.token']);
});
Next, set the upload directory. Be sure to create the directory and change the file permissions if necessary so that the upload can work correctly. Also set the input field which holds the file selected by the user.
$storage = new \Upload\Storage\FileSystem('uploads');
$file = new \Upload\File('video', $storage);
Rename the file so you won’t have issues referring to it in the code.
$new_filename = uniqid();
$file->setName($new_filename);
Add the validation rules so that only mp4 files with a size not greater than 25Mb can be uploaded. You then wrap the code for uploading the file inside a try catch block. If an error occurs, flash the error into session. This is the value that’s being accessed earlier in the upload.php view.
$file->addValidations(array(
    new \Upload\Validation\Mimetype('video/mp4'),
    new \Upload\Validation\Size('25M')
));

try {
    $file->upload();

} catch (\Exception $e) {
    $errors = $file->getErrors();
    $app->flash('errors', $errors);
}
Finally, construct the path to the uploaded file and try to upload it to Vimeo. You do that by calling the upload method on the Vimeo library. This accepts the path to the file as its argument. If an error occurs while uploading the file, flash it to the session.
$new_filepath = 'uploads/' . $new_filename . '.' . $file->getExtension();

try {
    $vimeo->upload($new_filepath);
} catch (\Exception $e) {
    $app->flash('errors', array('error uploading to Vimeo'));
}

$app->redirect('upload');
Conclusion
In this article, you’ve learned how to use the Vimeo API to perform different operations on a user’s Vimeo account. You’ve learned how give different permission to the app, interact with the videos, and then finally upload videos. All the code used in this article is available in this Github repo.
Questions? Comments? Leave them below!
Frequently Asked Questions (FAQs) about Vimeo’s API
How can I upload videos using Vimeo’s API?
Uploading videos through Vimeo’s API involves a few steps. First, you need to create an app on Vimeo’s developer site and get your access token. Then, you can use the POST method to create a video upload ticket. This ticket will provide you with an upload link where you can PUT your video file. After the upload is complete, you can use the DELETE method to complete the upload process. Remember to handle any errors that may occur during the upload process.
What is the purpose of the watchlist feature in Vimeo’s API?
The watchlist feature in Vimeo’s API allows users to save videos to watch later. This feature is particularly useful for users who come across interesting videos but do not have the time to watch them immediately. By adding these videos to their watchlist, they can easily access them later when they have more time.
How can I add a video to my watchlist using Vimeo’s API?
To add a video to your watchlist using Vimeo’s API, you need to use the PUT method with the endpoint /me/watchlater/{video_id}. Replace {video_id} with the ID of the video you want to add to your watchlist. If the request is successful, the API will return a status code of 204.
How can I remove a video from my watchlist using Vimeo’s API?
To remove a video from your watchlist using Vimeo’s API, you need to use the DELETE method with the endpoint /me/watchlater/{video_id}. Replace {video_id} with the ID of the video you want to remove from your watchlist. If the request is successful, the API will return a status code of 204.
How can I like a video using Vimeo’s API?
To like a video using Vimeo’s API, you need to use the PUT method with the endpoint /me/likes/{video_id}. Replace {video_id} with the ID of the video you want to like. If the request is successful, the API will return a status code of 204.
How can I unlike a video using Vimeo’s API?
To unlike a video using Vimeo’s API, you need to use the DELETE method with the endpoint /me/likes/{video_id}. Replace {video_id} with the ID of the video you want to unlike. If the request is successful, the API will return a status code of 204.
What are the video formats supported by Vimeo’s API for upload?
Vimeo’s API supports a wide range of video formats for upload, including MP4, MOV, WMV, AVI, and FLV. However, for the best results, Vimeo recommends using MP4 format with H.264 codec.
What are the video size and duration limits for uploading through Vimeo’s API?
The video size and duration limits for uploading through Vimeo’s API depend on your Vimeo account type. Basic users can upload up to 500MB of video per week, Plus users can upload up to 5GB per week, and Pro users can upload up to 20GB per week. There are no duration limits, but the file size limit may restrict the length of your video.
How can I handle errors during video upload through Vimeo’s API?
If an error occurs during video upload through Vimeo’s API, the API will return an error message and a status code. You should handle these errors in your code by checking the status code and taking appropriate action based on the error message.
Can I upload videos to Vimeo’s API from a server?
Yes, you can upload videos to Vimeo’s API from a server. You need to create an upload ticket as usual, but instead of uploading the video file from your local machine, you can PUT the video file from your server to the upload link provided by the upload ticket.