

You’re probably already familiar with automated testing and its benefits. Having a set of tests for your application allows you to make changes to your code with confidence, knowing that the tests have your back should you break anything. It’s possible to take things a step further and write your tests before you write the code; a practice known as Test-driven development (TDD).
In this tutorial, we will talk about what TDD is and what benefits it brings to you as a developer. We’ll use TDD to implement a form validator, which ensures that any values input by the user conform to a specified set of rules.
Note that this article will focus on testing front-end code. If you’re looking for something focused on the backend, be sure to check out our course: Test-Driven Development in Node.js
Key Takeaways
- Emphasize Early Testing: TDD ensures immediate test coverage by writing tests before the code, catching behavioral bugs early in the development lifecycle.
- Refactor with Confidence: The red-green-refactor cycle in TDD allows developers to refactor code with the assurance that existing tests will validate changes without breaking functionality.
- Design by Contract: TDD encourages designing APIs with the end-user in mind, focusing on usability without the initial burden of implementation details.
- Avoid Unnecessary Code: Regular testing during development helps keep the codebase simple and clean, adhering to the KISS principle and reducing the likelihood of redundant code.
- Integration Independence: By focusing on unit tests that verify the functionality of isolated code pieces, TDD minimizes dependencies on integration, making each unit reliable on its own.
- Iterative Improvement: TDD supports the iterative improvement of code through continuous testing and refactoring, leading to higher quality, more maintainable software.
What is TDD?
Test-driven development is a programming methodology with which one can tackle the design, implementation, and testing of units of code, and to some extent the expected functionality of a program.
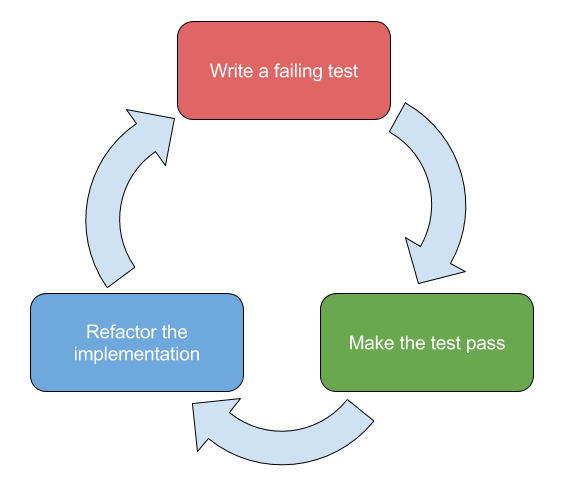
Complementing the test-first approach of Extreme Programming, in which developers write tests before implementing a feature or a unit, TDD also facilitates the refactoring of code; this is commonly referred to as the Red-Green-Refactor Cycle.
-
Write a failing test – write a test that invokes your logic and assert that the correct behavior is produced
- In a unit test, this would be asserting the return value of a function or verifying that a mocked dependency was called as expected
- In a functional test, this would be ensuring that a UI or an API behaves predictably across a number of actions
-
Make the test pass – implement the minimum amount of code that results in the test passing, and ensure that all other tests continue to pass
-
Refactor the implementation – update or rewrite the implementation, without breaking any public contracts, to improve its quality without breaking the new and existing tests
I’ve used TDD to some extent since I was introduced to it at the beginning of my career, but as I have progressed to working on applications and systems with more complex requirements, I have personally found the technique to be time-saving and conducive to the quality and robustness of my work.
Before proceeding, it might be worth familiarizing yourself with some of the various types of automated tests that can be written. Eric Elliot summarises them well:
- Unit tests – ensure that individual units of the app, such as functions and classes, work as expected. Assertions test that said units return the expected output for any given inputs
- Integration tests – ensure that unit collaborations work as expected. Assertions may test an API, UI, or interactions that may result in side-effects (such as database I/O, logging, etc…)
- End-to-end tests – ensure that software works as expected from the user’s perspective and that every unit behaves correctly in the overall scope of the system. Assertions primarily test the user interface
Benefits of Test-Driven Development
Immediate test coverage
By writing test cases for a feature before its implementation, code coverage is immediately guaranteed, plus behavioral bugs can be caught earlier in the development lifecycle of a project. This, of course, necessitates tests that cover all behaviors, including error handling, but one should always practice TDD with this mindset.
Refactor with confidence
Referring to the red-green-refactor cycle above, any changes to an implementation can be verified by ensuring that the existing tests continue to pass. Writing tests that run as quickly as possible will shorten this feedback loop; while it’s important to cover all possible scenarios, and execution time can vary slightly between different computers, authoring lean and well-focused tests will save time in the long term.
Design by contract
Test-driven development allows developers to consider how an API will be consumed, and how easy it is to use, without having to worry about the implementation. Invoking a unit in a test case essentially mirrors a call site in production, so the external design can be modified before the implementation stage.
Avoid superfluous code
As long as one is frequently, or even automatically, running tests upon changing the associated implementation, satisfying existing tests reduces the likelihood of unnecessary additional code, arguably resulting in a codebase that’s easier to maintain and understand. Consequently, TDD helps one to follow the KISS (Keep it simple, stupid!) principle.
No dependence upon integration
When writing unit tests, if one is conforming to the required inputs, then units will behave as expected once integrated into the codebase. However, integration tests should also be written to ensure that the new code’s call site is being invoked correctly.
For example, let’s consider the function below, which determines if a user is an admin:
'use strict'

function isUserAdmin(id, users) {
    const user = users.find(u => u.id === id);
    return user.isAdmin;
}
Rather than hard code the users data, we expect it as a parameter. This allows us to pass a prepopulated array in our test:
const testUsers = [
    {
        id: 1,
        isAdmin: true
    },

    {
        id: 2,
        isAdmin: false
    }
];

const isAdmin = isUserAdmin(1, testUsers);
// TODO: assert isAdmin is true
This approach allows the unit to be implemented and tested in isolation from the rest of the system. Once there are users in our database, we can integrate the unit and write integration tests to verify that we are correctly passing the parameters to the unit.
Test-Driven Development With JavaScript
With the advent of full-stack software written in JavaScript, a plethora of testing libraries has emerged that allow for the testing of both client-side and server-side code; an example of such a library is Mocha, which we will be using in the exercise.
A good use case for TDD, in my opinion, is form validation; it is a somewhat complex task that typically follows these steps:
- Read the value from an
<input>that should be validated - Invoke a rule (e.g. alphabetical, numeric) against said value
- If it is invalid, provide a meaningful error to the user
- Repeat for the next validatable input
There is a CodePen for this exercise that contains some boilerplate test code, as well as an empty validateForm function. Please fork this before we start.
Our form validation API will take an instance of HTMLFormElement (<form>) and validate each input that has a data-validation attribute, the possible values of which are:
alphabetical– any case-insensitive combination of the 26 letters of the English alphabetnumeric– any combination of digits between 0 and 9
We will write an end-to-end test to verify the functionality of validateForm against real DOM nodes, as well as against the two validation types we’ll initially support. Once our first implementation works, we will gradually refactor it by writing smaller units, also following TDD.
Here’s the form that our tests will use:
<form class="test-form">
    <input name="first-name" type="text" data-validation="alphabetical" />
    <input name="age" type="text" data-validation="numeric" />
</form>
Between each test, we create a new clone of the form to remove the risk of potential side effects. The true parameter passed to cloneNode ensures that the form’s child nodes are also cloned:
let form = document.querySelector('.test-form');

beforeEach(function () {
    form = form.cloneNode(true);
});
Writing our first test case
The describe('the validateForm function', function () {}) suite will be used to test our API. Within the inner function, write the first test case, which will ensure that legal values for both the alphabetical and numeric rules will be recognized as valid:
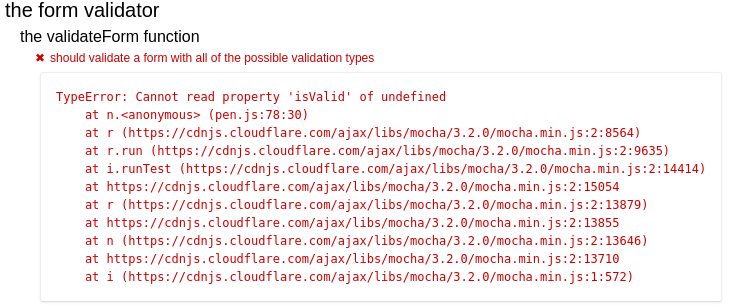
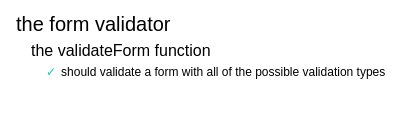
it('should validate a form with all of the possible validation types', function () {
    const name = form.querySelector('input[name="first-name"]');
    const age = form.querySelector('input[name="age"]');

    name.value = 'Bob';
    age.value = '42';

    const result = validateForm(form);
    expect(result.isValid).to.be.true;
    expect(result.errors.length).to.equal(0);
});
Upon saving the changes to your fork, you should see the test fail:
Now let’s make this test green! Remember that we should endeavor to write the minimum, reasonable (no return true;!) amount of code to satisfy the test, so let’s not worry about error reporting for now.
Here’s the initial implementation, which iterates over our form’s input elements and validates the values of each using regular expressions:
function validateForm(form) {
    const result = {
        errors: []
    };

    const inputs = Array.from(form.querySelectorAll('input'));
    let isValid = true;

    for (let input of inputs) {
        if (input.dataset.validation === 'alphabetical') {
            isValid = isValid && /^[a-z]+$/i.test(input.value);
        } else if (input.dataset.validation === 'numeric') {
            isValid = isValid && /^[0-9]+$/.test(input.value);
        }
    }

    result.isValid = isValid;
    return result;
}
You should now see that our test passes:
Error handling
Below our first test, let’s write another which verifies that the return result object’s error array contains an Error instance with the expected message when an alphabetical field is invalid:
it('should return an error when a name is invalid', function () {
    const name = form.querySelector('input[name="first-name"]');
    const age = form.querySelector('input[name="age"]');

    name.value = '!!!';
    age.value = '42';

    const result = validateForm(form);

    expect(result.isValid).to.be.false;
    expect(result.errors[0]).to.be.instanceof(Error);
    expect(result.errors[0].message).to.equal('!!! is not a valid first-name value');
});
Upon saving your CodePen fork, you should see the new failing test case in the output. Let’s update our implementation to satisfy both test cases:
function validateForm(form) {
    const result = {
        get isValid() {
            return this.errors.length === 0;
        },

        errors: []
    };

    const inputs = Array.from(form.querySelectorAll('input'));

    for (let input of inputs) {
        if (input.dataset.validation === 'alphabetical') {
            let isValid = /^[a-z]+$/i.test(input.value);

            if (!isValid) {
                result.errors.push(new Error(`${input.value} is not a valid ${input.name} value`));
            }
        } else if (input.dataset.validation === 'numeric') {
            // TODO: we'll consume this in the next test
            let isValid = /^[0-9]+$/.test(input.value);
        }
    }

    return result;
}
Now let’s add a test that asserts that numeric validation errors are handled correctly:
it('should return an error when an age is invalid', function () {
    const name = form.querySelector('input[name="first-name"]');
    const age = form.querySelector('input[name="age"]');

    name.value = 'Greg';
    age.value = 'a';

    const result = validateForm(form);

    expect(result.isValid).to.be.false;
    expect(result.errors[0]).to.be.instanceof(Error);
    expect(result.errors[0].message).to.equal('a is not a valid age value');
});
Once you’ve witnessed the test fail, update the validateForm function:
} else if (input.dataset.validation === 'numeric') {
    let isValid = /^[0-9]+$/.test(input.value);

    if (!isValid) {
        result.errors.push(new Error(`${input.value} is not a valid ${input.name} value`));
    }
}
Finally, let’s add a test to ensure that multiple errors are handled:
it('should return multiple errors if more than one field is invalid', function () {
    const name = form.querySelector('input[name="first-name"]');
    const age = form.querySelector('input[name="age"]');

    name.value = '!!!';
    age.value = 'a';

    const result = validateForm(form);

    expect(result.isValid).to.be.false;
    expect(result.errors[0]).to.be.instanceof(Error);
    expect(result.errors[0].message).to.equal('!!! is not a valid first-name value');
    expect(result.errors[1]).to.be.instanceof(Error);
    expect(result.errors[1].message).to.equal('a is not a valid age value');
});
Given our error handling implementation for the second and third test, this new case should pass immediately. You can confirm that you’ve followed the steps correctly by verifying your implementation against mine.
Refactoring Our Validator
Although we have a working function that is covered with tests, it emits a number of code smells:
-
Multiple responsibilities
- We’re querying the inner DOM nodes of our input, specifying our ruleset, and computing our overall result in the same function. In terms of the SOLID principles, this violates the Single responsibility principle
- Additionally, a lack of abstraction results in code that is more difficult for other developers to understand
-
Tight coupling
- Our current implementation interweaves the above responsibilities in a way that makes updates to each concern brittle; changes to one detail of our large method will make debugging difficult in the case that we introduce an issue
- Furthermore, we can’t add or alter validation rules without updating the
ifstatements. This violates SOLID’s Open/closed principle
-
Duplication of logic – if we wish to update the format of our error messages, or push another object to our array, then we must update this in two places
Fortunately, as we’ve written the functional tests for our validator function, we can make our code better with the confidence that we won’t break it.
Let’s use TDD to write separate functions for:
- Mapping our inputs to validation queries
- Reading our validation rules from an appropriate data structure
The createValidationQueries function
By mapping our NodeList of HTMLInputElements to objects representing the name of a form field, the type against which it should be validated, and the value of said field, not only will we decouple validateForm function from the DOM, but we’ll facilitate validation rule lookup when we replace our hard-coded regular expressions.
For example, the validation query object for the first-name field would be:
{
    name: 'first-name',
    type: 'alphabetical',
    value: 'Bob'
}
Above the validateForm function, create an empty function called createValidationQueries. Then, outside of the describe suite for validateForm, create another describe suite named ‘the createValidationQueries function’.
It should include the single test case:
describe('the createValidationQueries function', function () {
    it(
        'should map input elements with a data-validation attribute to an array of validation objects',

        function () {
            const name = form.querySelector('input[name="first-name"]');
            const age = form.querySelector('input[name="age"]');

            name.value = 'Bob';
            age.value = '42';

            const validations = createValidationQueries([name, age]);

            expect(validations.length).to.equal(2);

            expect(validations[0].name).to.equal('first-name');
            expect(validations[0].type).to.equal('alphabetical');
            expect(validations[0].value).to.equal('Bob');

            expect(validations[1].name).to.equal('age');
            expect(validations[1].type).to.equal('numeric');
            expect(validations[1].value).to.equal('42');
        }
    );
});
Once you’ve witnessed this fail, write the code for the implementation:
function createValidationQueries(inputs) {
    return Array.from(inputs).map(input => ({
        name: input.name,
        type: input.dataset.validation,
        value: input.value
    }));
}
When this passes, update validateForm‘s for loop to call our new function and to use the query objects to determine the validity of our form:
for (let validation of createValidationQueries(form.querySelectorAll('input'))) {
    if (validation.type === 'alphabetical') {
        let isValid = /^[a-z]+$/i.test(validation.value);

        if (!isValid) {
            result.errors.push(new Error(`${validation.value} is not a valid ${validation.name} value`));
        }
    } else if (validation.type === 'numeric') {
        let isValid = /^[0-9]+$/.test(validation.value);

        if (!isValid) {
            result.errors.push(new Error(`${validation.value} is not a valid ${validation.name} value`));
        }
    }
}
If both our new test and the existing tests pass, as demonstrated in this pen, then we can make a bigger change; decoupling the validation rules.
The validateItem function
To remove our hard-coded rules, let’s write a function that takes our rules as a Map and asserts the validity of our inputs.
Like createValidationQueries, we’ll write a new test suite before our implementation. Above the implementation of validateForm, write an empty function called validateItem. Then in our main describe suite, write another describe suite for our new addition:
describe('the validateItem function', function () {
    const validationRules = new Map([
        ['alphabetical', /^[a-z]+$/i]
    ]);

    it(
        'should return true when the passed item is deemed valid against the supplied validation rules',

        function () {
            const validation = {
                type: 'alphabetical',
                value: 'Bob'
            };

            const isValid = validateItem(validation, validationRules);
            expect(isValid).to.be.true;
        }
    );
});
We’re explicitly passing a Map of rules to our implementation from the test as we want to verify its behavior independently of our main function; this makes it a unit test. Here’s our first implementation of validateItem():
function validateItem(validation, validationRules) {
    return validationRules.get(validation.type).test(validation.value);
}
Once this test has passed, write a second test case to verify that our function returns false when a validation query is invalid; this should pass due to our current implementation:
it(
    'should return false when the passed item is deemed invalid',

    function () {
        const validation = {
            type: 'alphabetical',
            value: '42'
        };

        const isValid = validateItem(validation, validationRules);
        expect(isValid).to.be.false;
    }
);
Finally, write a test case to determine that validateItem returns false when the validation type is not found:
it(
    'should return false when the specified validation type is not found',

    function () {
        const validation = {
            type: 'foo',
            value: '42'
        };

        const isValid = validateItem(validation, validationRules);
        expect(isValid).to.be.false;
    }
);
Our implementation should check if the specified validation type exists in the validationRules Map before testing any values against their corresponding regular expressions:
function validateItem(validation, validationRules) {
    if (!validationRules.has(validation.type)) {
        return false;
    }

    return validationRules.get(validation.type).test(validation.value);
}
Once we see this test passing, let’s create a new Map above createValidationQueries, which will contain the actual validation rules used by our API:
const validationRules = new Map([
    ['alphabetical', /^[a-z]+$/i],
    ['numeric', /^[0-9]+$/]
]);
Finally, let’s refactor the validateForm function to use the new function and rules:
function validateForm(form) {
    const result = {
        get isValid() {
            return this.errors.length === 0;
        },

        errors: []
    };

    for (let validation of createValidationQueries(form.querySelectorAll('input'))) {
        let isValid = validateItem(validation, validationRules);

        if (!isValid) {
            result.errors.push(
                new Error(`${validation.value} is not a valid ${validation.name} value`)
            );
        }
    }

    return result;
}
Hopefully, you’ll see that all of the tests pass. Congratulations on using test-driven development to refactor and improve the quality of our code! Your final implementation should resemble this Pen:
See the Pen TDD Form Validation Complete by SitePoint (@SitePoint) on CodePen.
Wrapping Up
By following TDD, we have been able to take the initial implementation of our form validation and separate it into independent and understandable parts. I hope you’ve enjoyed this tutorial and take this practice forward with you into your everyday work.
Have you used TDD on a real-world project? What did you think? If not, has this article persuaded you to give it a try? Let me know in the comments!
If you’d like to learn more about TDD with JavaScript, check out our short mini course Test-Driven Development with Node.js.
This article was peer reviewed by Vildan Softic. Thanks to all of SitePoint’s peer reviewers for making SitePoint content the best it can be!
Frequently Asked Questions (FAQs) about JavaScript Test-Driven Development
What is the importance of Test-Driven Development (TDD) in JavaScript?
Test-Driven Development (TDD) is a software development approach where tests are written before the actual code. In JavaScript, TDD is crucial as it helps to ensure the correctness of the code, improve the design, and make the code more maintainable. It allows developers to think through the requirements or design before writing their code, leading to clearer and more straightforward code. TDD also makes it easier to refactor code and add new features without worrying about breaking existing functionality.
How does TDD differ from traditional testing?
Traditional testing and TDD differ mainly in when the tests are written. In traditional testing, tests are usually written after the code has been written, often just before the product is delivered. On the other hand, in TDD, tests are written before the code. This approach ensures that every piece of code is tested and works as expected. It also encourages developers to write only the code necessary to pass the tests, leading to simpler and more maintainable code.
What are the steps involved in TDD?
TDD involves three main steps, often referred to as the “Red-Green-Refactor” cycle. The first step is to write a failing test (Red), which defines a desired improvement or new function. The second step is to write the minimum amount of code to make the test pass (Green). The final step is to refactor the code while ensuring that the tests still pass.
What tools can be used for TDD in JavaScript?
There are several tools available for TDD in JavaScript. Jest is a popular testing framework that provides a full set of testing utilities. Mocha is another testing framework that is often used with assertion libraries like Chai. Sinon.js is a library for test doubles, like spies and stubs. Istanbul is a tool for code coverage, which shows how much of your code is covered by tests.
How can I write effective tests in TDD?
Writing effective tests in TDD involves several practices. First, each test should focus on one functionality. Second, tests should be independent of each other. Changes to one test should not affect any other test. Third, tests should be written in a way that they are easy to read and understand. Using clear and descriptive names for your tests can help with this. Lastly, tests should be run frequently to catch issues early.
What are the challenges of TDD?
While TDD has many benefits, it also has some challenges. One of the main challenges is that it requires a change in mindset. Developers need to get used to writing tests before code. It can also be difficult to write good tests, especially for developers new to TDD. Additionally, TDD can be time-consuming, especially in the beginning. However, the time invested can pay off in the long run with higher quality code and fewer bugs.
Can TDD be used for front-end JavaScript?
Yes, TDD can be used for both front-end and back-end JavaScript. For front-end JavaScript, TDD can be used to test user interactions, DOM manipulations, and AJAX requests. Tools like Jest and Enzyme can be used for this purpose. Enzyme is a JavaScript testing utility for React that makes it easier to test your React Components’ output.
How does TDD help in Agile development?
TDD fits well with Agile development as both emphasize iterative and incremental development. TDD allows for continuous feedback, with each test providing feedback on the code. This feedback can guide development and help ensure that the code meets the requirements. TDD also encourages simplicity, as developers are encouraged to write only the code necessary to pass the tests.
How does TDD contribute to code refactoring?
TDD plays a significant role in code refactoring. Since tests are written before the code in TDD, any change in the functionality of the code will cause the tests to fail. This makes it easier to refactor code, as you have a safety net that ensures the refactored code still works as expected. It also makes it easier to identify and fix bugs introduced during refactoring.
Can TDD be used with other testing methods?
Yes, TDD can be used in conjunction with other testing methods. For example, you can use TDD for unit testing, where you test individual units of code in isolation. You can also use it with integration testing, where you test how different parts of your application work together. Additionally, you can use TDD with acceptance testing, where you test your application against user requirements.