

Key Takeaways
- LINQ (Language-Integrated Query) integrates querying capabilities directly into the .NET languages, enhancing data access within the programming environment.
- It extends beyond traditional database querying, supporting multiple data sources like XML and custom data sources, with various extensions like LINQ-to-SQL and LINQ-to-XML.
- LINQ utilizes IntelliSense and compile-time syntax checking, improving code reliability and reducing runtime errors.
- The syntax of LINQ is reminiscent of SQL, incorporating familiar operations such as “select” and “where” clauses, but it is integrated directly into the coding language, offering a more seamless development experience.
- LINQ-to-SQL is a powerful ORM (Object-Relational Mapper) tool within LINQ that facilitates the direct interaction with SQL databases, mapping database tables to .NET classes.
- Advanced LINQ operations include the ability to update, delete, and insert directly into databases, and it supports complex querying capabilities with the use of extension methods and lambda expressions.
Language-Integrated Query—LINQ—is a new data-access feature that does exactly what it says: allow for querying of data sources from within the language itself.
Typically in .NET we use a technology such as ADO.NET to directly query a relational database management server, such as SQL Server® or MySQL. LINQ takes this a step further by allowing querying from these same DBMS sources but within an object-oriented technology.
With LINQ we get access to compile-time syntax checking, the use of IntelliSense, and the ability to access other data sources such as XML or just about any custom data sources. There are many LINQ extensions, such as LINQ-to-SQL, LINQ-to-Sharepoint, LINQ-to-MySQL and so on.
Let’s get started with LINQ to give you an immediate feel for the syntax.
  // create an array of integers
  int[] sampleNumbers = { 1, 2, 3 };

  IEnumerable doubledNumbers = from i in sampleNumbers
                                  select i * 2;

  // produces "2, 4, 6";
  foreach (int number in doubledNumbers)
  	Console.WriteLine(number);
Our IEnumerable variable called doubledNumbers contains the output from the query expression. As you can see the syntax is similar to SQL. However Microsoft introduces “selectors” (the “i” in our case).
As we dig deeper into the LINQ syntax, these selectors will become more obvious. This sample only shows a collection of numbers. In our case, we know we are expecting the return of integers. However, to help in the cases where we may not know the exact return type at run-time, Microsoft has introduced the var keyword.
// create an array of integers
int[] sampleNumbers = { 1, 2, 3 };

var squaredNumbers = from i in sampleNumbers
                     select i * i;

// produces "1, 4, 9";
foreach (int number in squaredNumbers)
Console.WriteLine(number);
So like most lazy programmers, we will use the var keyword going forward to allow the compiler to determine the type where appropriate.
Let’s do another example of LINQ syntax to introduce WHERE clauses since we often need a subset of data.
  // create an array of random fruits
  string[] fruits = { "Blueberry", "Banana", "Orange", "Peach", "Kiwi", "Blackberry" };

  var fruitsStartingWithB = from f in fruits
                            where f.StartsWith("B") && f.Contains("berry")
                            select f;

  // produces "Blueberry, Blackberry"
  foreach (var fruit in fruitsStartingWithB)
  	Console.WriteLine(fruit);
Here we use the standard “AND” (&&) operator as part of C#. Also available is the “OR” (||) operator within the WHERE clause.
Extension Methods
LINQ makes heavy use of extension methods in order to manipulate our data into the way we require it. One of these features is the First() extension method. This takes the first item in the result and returns it. It can be used as follows:
string[] fruits = { "Blueberry", "Banana", "Orange", "Peach", "Kiwi", "Blackberry" };

string berry  = (from f in fruits
                 where f.StartsWith("B") && f.Contains("berry")
                 select f).First();

// Output is "Blueberry"
Console.WriteLine(berry);
In a subsequent article, we will discuss more extension methods that allow us to have more control over our result set as well as fine-tune the LINQ capabilities.
LINQ to SQL
How does this help us when dealing with a non-objected oriented data structure? Let’s see how LINQ can help us when dealing with relational data.
We begin with a simple query from the AdventureWorks sample database as part of Microsoft SQL Server 2008 R2 Express edition. The Express edition is available for download here. You can get the AdventureWorks sample database at the Microsoft CodePlex, available here.
Once you’ve installed SQL Server 2008 Express Edition you will want to “attach” the AdventureWorks sample database. To do this, open the SQL Server 2008 Management Studio. Right click on Databases and it select Tasks -> Attach Database. Select the .mdf file at the location you installed it at, and then you will be ready to begin the sample exercises.
Next, we create a server connection within Visual Studio with the Server Explorer toolbar window.
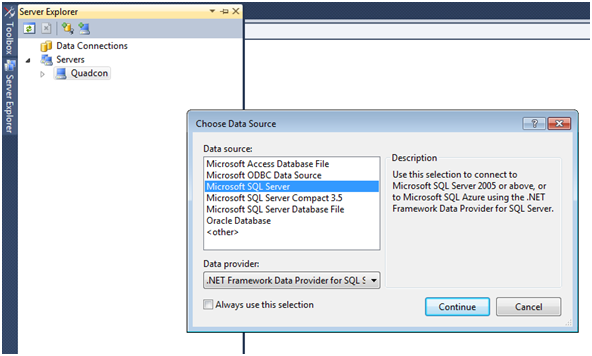
To connect to our SQL Express instance, we choose the Microsoft SQL Server data source option. Then we simply select the SQLEXPRESS instance and the AdventureWorks database as the default database option.
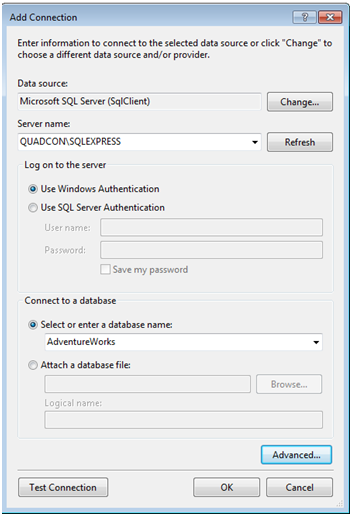
Next, we add a new item to our project. To utilize LINQ with a SQL data source we choose to create a LINQ-to-SQL data class. In the simplest explanation, LINQ-to-SQL maps object-oriented classes with a SQL database table, otherwise called an object relational mapper.
There are other ORM frameworks available, such as nHibernate or SubSonic. Each of these has their own strengths and weaknesses, but for the sake of this writing we concentrate on the features found in LINQ-to-SQL.
We name this .dbml file AdventureWorks.dbml. Once you create this, you begin with a blank slate where you have the ability to create entities. An entity is a strongly-typed data structure typically used to represent a business relationship or object. Microsoft has introduced the ADO.NET Entity Framework that takes these advanced concepts further. These topics are beyond the scope of our current discussion and may be discoursed at a future date.
In our example, we want an entity called “Employee” that represents a single instance of an employee within the AdventureWorks corporation. The on-screen details show that you can use the Toolbox to create a new entity, but we want to utilize the power of the created data source connection to our SQL Express instance by opening the Server Explorer to drag-and-drop the Employees table.
The result is a new entity object called “Employee” (take note that it is the singular wording of the “Employees” table name, these are auto-named by Visual Studio). Visual Studio not only creates the entity for us, it also auto-generates code for a DataContext object. This DataContext object represents the connection with the data source, in our case the SQL Express database connection.
The DataContext also keeps track of all changes to all entities and serves as the reference point to insert, update, or delete an entity record back to its main data source (the “Employees” database table). These objects are designed to be used once, as they are lightweight and have no discernible impact when creating thousands of instances.
Furthermore, the DataContext is different from the standard ADO.NET way of opening a SqlConnection and then executing queries; the SQL generated when performing LINQ queries are performed at run-time as well as the connection management.
A DataContext is created in one line:
AdventureWorksDataContext dataContext = new AdventureWorksDataContext();The DataContext is created and named after the DBML file created earlier. If you created your DMBL as “Sample.dbml” then your DataContext would be named SampleDataContext.
Everything at this point has been connected by Visual Studio using auto-generated code for the DBML class. From the Solution Explorer window, you can explore this auto-generated code for the AdventureWorks.dbml file by right clicking on the file to View Code. Be sure to not make any permanent changes here, any changes with the designer will automatically overwrite any changes in the auto-generated code files.
We can now query the Employees data table using LINQ. As an example we look for only female employees. For the purposes of these exercises, you can assume we are using the same reference namespaces in the “using” section at the top of the source code:
using System;
using System.Collections.Generic;
using System.Linq;
using System.Text;

AdventureWorksDataContext dataContext = new AdventureWorksDataContext();

var employees = from emp in dataContext.Employees
                where e.Gender == 'F'
                select emp;

// produces a list of employee IDs for all female employees
foreach (var employee in employees)
Console.WriteLine(employee.EmployeeID);
Updating Data
One of the columns in the Employees table is the MaritalStatus column. This is a character field that has an ‘S’ for a single employee or ‘M’ for a married employee. Due to a rash outbreak of women getting married, HR has decided to just have everyone marked as being married.
Our example, then, is to perform this update using LINQ-to-SQL.
using (AdventureWorksDataContext dataContext = new AdventureWorksDataContext())
{
var employees = from e in dataContext.Employees
                       where e.Gender == 'F'
                       select e;

// produces a list of employee IDs for all female employees
foreach (var employee in employees)
{
  employee.MaritalStatus = 'M'; // all changes have not been persisted to the database.
  Console.WriteLine(employee.EmployeeID + " is now married.");

}

       // Send changes to the database.
       dataContext.SubmitChanges();

}
The change here seems simple enough, but one thing to take note is that the changes to the Employee entity record is not saved (persisted) to the database until the DataContext’s SubmitChanges() method is called.
Relationships
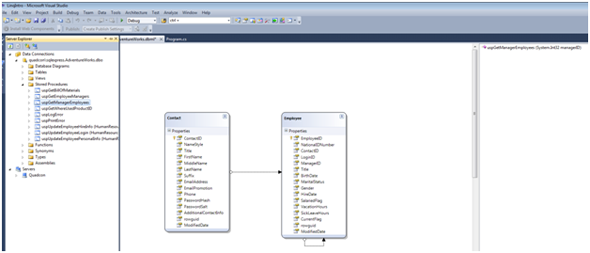
So far we have dealt with only one single Employees table. Our Employee entity has a ContactID property that is the reference key for the Contacts table. Visual Studio’s DBML designer tool will automatically recognize foreign keys within the database. We simply drag-and-drop the Contacts table from the Server Explorer window for the SQL Express connection (just as we did for the “Employees” table) onto the DBML designer to have Visual Studio create the Contact entity object for us.
The designer view now looks like this:
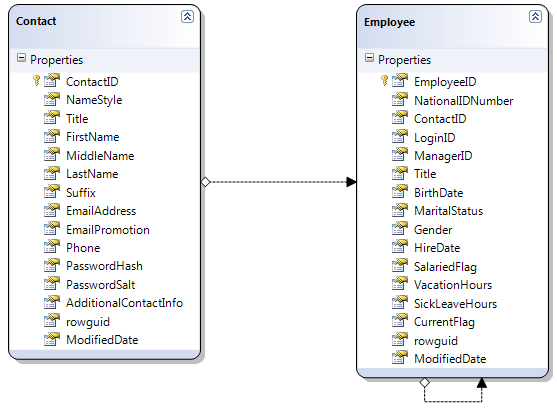
We can now reference the personally identifiable information for each of the employees. Let’s prepare a report for HR a list of employees hired after 2002.
using (AdventureWorksDataContext dataContext = new AdventureWorksDataContext())
{
   var employees = from e in dataContext.Employees
   		     where e.HireDate > DateTime.Parse("2002-01-01")
                   select e;

   foreach (var employee in employees)
       Console.WriteLine(employee.Contact.FirstName + " " + employee.Contact.LastName);

}
Directly Executing Queries from the DataContext
At this point, you may most likely be familiar with directly calling standard ANSI SQL to the database via ADO.NET and/or stored procedures. LINQ-to-SQL supports these direct queries via the ExecuteQuery() method call. This method has two overridden parameters, a standard version that takes a Type as its first parameter, or a generic version that returns the generic input type given.
ExecuteQuery(String SqlQuery, Object[] Parameters)ExecuteQuery(Type result, String sqlQuery, Object[] Parameters)When using ExecuteQuery with the generic version, we intend to use the Employee entity type so we can access the relationship with the Contact entity to get the employee’s first and last name. Thus, it is in our interest to use the generic method signature for the ExecuteQuery() call.
using (AdventureWorksDataContext dataContext = new AdventureWorksDataContext())
{

   var employees = from e in dataContext.Employees
  where e.HireDate > DateTime.Parse("2002-01-01")
                select e;

  var emps = dataContext.ExecuteQuery("SELECT * FROM HumanResources.Employee        WHERE HireDate > '2002-01-01'");

  foreach (var currentEmployee in emps)
Console.WriteLine(currentEmployee.Contact.FirstName + " " + currentEmployee.Contact.LastName);

Console.WriteLine("----------------");

 foreach (var employee in employees)
    Console.WriteLine(employee.Contact.FirstName + " " + employee.Contact.LastName);

}
When running this example, you should receive the same results for both query executions. Furthermore, LINQ-to-SQL also supports direct query execution where there aren’t any return parameters expected from the SQL execution, such as deleting records, manually inserting or updating records with the Execute() method.
HR has asked us to reverse a prior policy of making all female employees married. Now they want us to make them all single. We will do this using direct query execution with LINQ-to-SQL.
using (AdventureWorksDataContext dataContext = new AdventureWorksDataContext())
 {
     int rowsAffected = dataContext.ExecuteCommand("UPDATE HumanResources.Employee WITH(ROWLOCK) SET MaritalStatus = 'S' WHERE Gender = 'F' ");

     // should display "Execution completed, 84 rows affected."
     Console.WriteLine("Execution completed, {0} rows affected", rowsAffected);

 }
Stored Procedures with LINQ-to-SQL
One of my favorite features of LINQ-to-SQL is the stored procedure support for LINQ. LINQ-to-SQL treats stored procedures as standard method calls. As part of the AdventureWorks database, there is a stored procedure called “uspGetManagerEmployees”.
To enable LINQ-to-SQL to integrate this stored procedure call, we perform a drag-and-drop from the Server Explorer window, where we select the Stored Procedure from our SQL Express connection onto the right-pane of our DBML designer.
Visual Studio will now create the method called uspGetManagerEmployees(). Because the “usp” prefix isn’t necessary for method calls, we right-click on this to choose Properties and rename it to simply “GetManagerEmployees()”.We can now call this procedure in our code:
using (AdventureWorksDataContext dataContext = new AdventureWorksDataContext())
  {
        var employees = dataContext.GetManagerEmployees(185);

        foreach (var currentEmployee in employees)
           Console.WriteLine(currentEmployee.FirstName + " " + currentEmployee.LastName);

  }
Notice the return type from the GetManagerEmployees() call is a ISingleResult object. This is where the var keyword becomes useful since we may not know the full return type. The properties for the procedure call in the Designer View show us that the result type is Auto-Generated.
However, what if we want the designer to strongly-type this return to one of the known entity types? To conduct this sample, we first create a new stored procedure called “uspGetEmployeeByID”:
CREATE PROCEDURE uspGetEmployeeByID
	-- Add the parameters for the stored procedure here
	@EmployeeID int = 0

AS
BEGIN
	-- SET NOCOUNT ON added to prevent extra result sets from
	-- interfering with SELECT statements.
	SET NOCOUNT ON;

    -- Insert statements for procedure here
	SELECT * FROM HumanResources.Employee where EmployeeID = @EmployeeID
END
GO
From the designer view, we drag-and-drop this procedure call to the right-side pane of the Designer View. We then rename the method call to remove the “usp” prefix. Furthermore, we intend to change the result type to be the Employee entity.
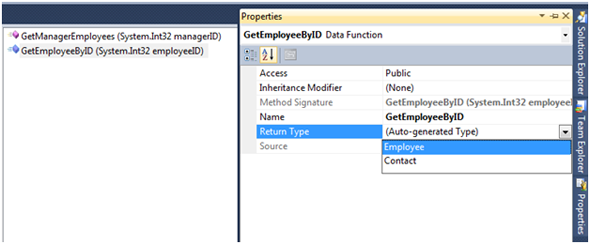
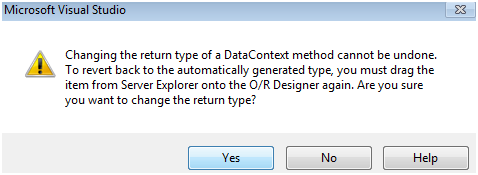
When you make this selection, you will get a warning alerting you to the one-way nature of this change. You cannot undo this change. If you need to make adjustments to the stored procedure, you must delete the method call, and then re-add it using drag-and-drop from the Server Explorer window.
Once we are satisfied with the changes that have been made, we can make a call to this new stored procedure by using the DataContext object.
using (AdventureWorksDataContext dataContext = new AdventureWorksDataContext())
{

   Employee jefferyFord = dataContext.GetEmployeeByID(15).First();

   Console.WriteLine(jefferyFord.Contact.FirstName + " " + jefferyFord.Contact.LastName);

}
Using ASP.NET and LINQ-to-SQL
LINQ allows fully bindable objects as a data source. This allows us to build fully functional datagrids with a LINQDataSource. To get started, we drag-and-drop a LinqDataSource from the Visual Studio Toolbox side bar menu onto a standard ASP.NET Web Forms .aspx page. After highlighting this new object on the page, we can now configure this DataSource to use our DataContext object for the AdventureWorks database.
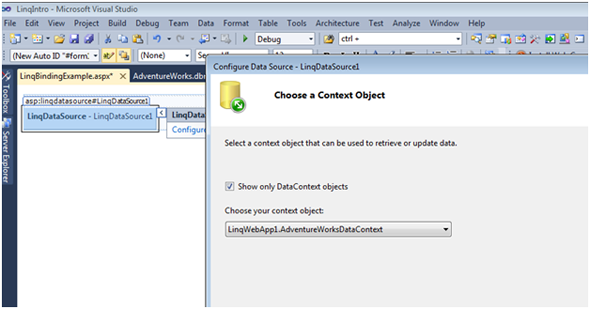
For the purposes of this sample, we simply want a read-only data source for a standard ASP.NET datagrid control. We configure our LinqDataSource object as such:
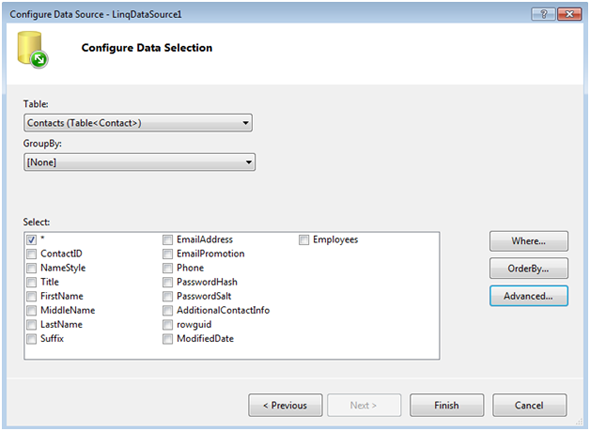
By selecting all columns, we have enough information to display the first and last names for the employee records we wish to display. More advanced features are available when configuring the data source, such as a custom query or custom order by clause with pre-sorts the records when they are returned from the LINQ query.
Furthermore, the LinqDataSource allows automatic editing, insertion, and deletion commands to be configured. These advanced topics are outside the scope of this current tutorial and may be discussed at a future date.
Next, we continue by adding a standard GridView control to our page. We can now configure this grid to use the LinqDataSource we created earlier.
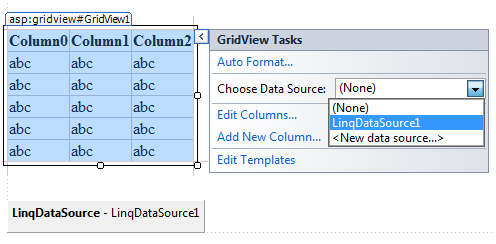
We select our newly created LinqDataSource1 object as the data source for the Grid View. After we select this, the GridView control will instantly change to reflect the new schema of the LinqDataSource object.
You are now ready to view the page in the browser. Be aware that the page may take some time to fully load, as the LinqDataSource is currently configured to return all rows and columns from the Contacts table from the AdventureWorks database.
To prepare a report for HR that shows a list of all employees and their email addresses, we can choose the Edit Columns task from the SmartTag popup for the GridView and select only the columns we wish to show.
The full HTML of the .aspx page should look as follows:
<!DOCTYPE html PUBLIC "-//W3C//DTD XHTML 1.0 Transitional//EN" "https://www.w3.org/TR/xhtml1/DTD/xhtml1-transitional.dtd">
<html xmlns="https://www.w3.org/1999/xhtml">
<head runat="server">
    <title></title>
</head>
<body>
    <form id="form1" runat="server">
    <div>
        <asp:GridView ID="GridView1" runat="server" AutoGenerateColumns="False"
            DataKeyNames="ContactID" DataSourceID="LinqDataSource1">
            <Columns>
                <asp:BoundField DataField="ContactID" HeaderText="ContactID"
                    InsertVisible="False" ReadOnly="True" SortExpression="ContactID" />
                <asp:CheckBoxField DataField="NameStyle" HeaderText="NameStyle"
                    SortExpression="NameStyle" />
                <asp:BoundField DataField="Title" HeaderText="Title" SortExpression="Title" />
                <asp:BoundField DataField="FirstName" HeaderText="FirstName"
                    SortExpression="FirstName" />
                <asp:BoundField DataField="MiddleName" HeaderText="MiddleName"
                    SortExpression="MiddleName" />
                <asp:BoundField DataField="LastName" HeaderText="LastName"
                    SortExpression="LastName" />
                <asp:BoundField DataField="Suffix" HeaderText="Suffix"
                    SortExpression="Suffix" />
                <asp:BoundField DataField="EmailAddress" HeaderText="EmailAddress"
                    SortExpression="EmailAddress" />
            </Columns>
        </asp:GridView>
        <br />
    </div>
    <asp:LinqDataSource ID="LinqDataSource1" runat="server"
        ContextTypeName="LinqWebApp1.AdventureWorksDataContext" EntityTypeName=""
        TableName="Contacts">
    </asp:LinqDataSource>
    </form>
</body>
</html>
Final Thoughts
Overall, LINQ is a powerful tool that allows you to rapidly develop your code and spend less time focused on the data management aspects of it.
This increases our productivity because we can query all data within Visual Studio without the need for knowing the underlying structure of how a database server is configured, or even knowing the data source itself.
Frequently Asked Questions (FAQs) about LINQ
How do I get started with LINQ in Visual Studio 2022?
To get started with LINQ in Visual Studio 2022, you first need to create a new project. Go to ‘File’ > ‘New’ > ‘Project’ and select ‘Console App (.NET Core)’. Name your project and click ‘Create’. Once your project is set up, you can start using LINQ by adding the necessary ‘using’ statements at the top of your code file. For example, ‘using System.Linq;’. Now you can write LINQ queries in your code.
How do I open DBML in designer mode with Visual Studio?
To open a DBML file in designer mode in Visual Studio, you need to right-click on the DBML file in the ‘Solution Explorer’ and select ‘Open With’. From the list of options, select ‘LINQ to SQL Classes Designer’. If this option is not available, you may need to install or update the LINQ to SQL Tools in Visual Studio.
What are the LINQ to SQL Tools in Visual Studio?
LINQ to SQL Tools in Visual Studio is a component that provides a visual designer for creating LINQ to SQL object-relational mapping. It allows you to create a visual model of your database schema, and automatically generates the corresponding data classes. This tool is very useful for creating and managing your database schema in a visual way.
How do I use LINQ with MySQL?
To use LINQ with MySQL, you need to use a provider that supports LINQ to MySQL. One such provider is dotConnect for MySQL. After installing dotConnect, you can use it to create a connection to your MySQL database and then write LINQ queries to interact with your database.
Why are my DBML files not opening in graphic designer in Visual Studio?
If your DBML files are not opening in the graphic designer in Visual Studio, it could be due to a number of reasons. One common reason is that the LINQ to SQL Tools component is not installed or needs to be updated. You can install or update this component through the Visual Studio Installer. Another reason could be that the DBML file is not associated with the LINQ to SQL Classes Designer. You can fix this by right-clicking on the DBML file in the Solution Explorer, selecting ‘Open With’, and then selecting ‘LINQ to SQL Classes Designer’.
How do I get LINQ to SQL to work in Visual Studio 2022?
To get LINQ to SQL to work in Visual Studio 2022, you need to install the LINQ to SQL Tools component. You can do this through the Visual Studio Installer. Once this component is installed, you can create a new LINQ to SQL Classes item in your project, which will allow you to create a visual model of your database schema and automatically generate the corresponding data classes.
How do I use LINQ to query a database?
To use LINQ to query a database, you first need to create a data context, which is a class that represents your database. You can create this class using the LINQ to SQL Classes Designer. Once you have a data context, you can write LINQ queries to interact with your database. For example, you can use the ‘from’, ‘where’, and ‘select’ keywords to select data from your database.
What is the difference between LINQ and SQL?
LINQ (Language Integrated Query) and SQL (Structured Query Language) are both languages used for querying databases, but they have some key differences. SQL is a language specifically designed for managing and manipulating relational databases. LINQ, on the other hand, is a component of the .NET framework that provides a consistent model for querying and manipulating data. One of the main advantages of LINQ over SQL is that LINQ queries are strongly typed, which means they are checked at compile time, whereas SQL queries are not checked until runtime.
Can I use LINQ with other databases besides SQL Server?
Yes, you can use LINQ with other databases besides SQL Server. However, you will need to use a provider that supports LINQ for the specific database you are using. For example, if you are using MySQL, you can use a provider like dotConnect for MySQL.
How do I update data in a database using LINQ?
To update data in a database using LINQ, you first need to retrieve the data you want to update using a LINQ query. Once you have the data, you can modify it as needed. After you have made your changes, you need to call the ‘SubmitChanges’ method on your data context to save your changes to the database.