

The app store is home to several thousand apps that contain user data. Up until iOS 8, there weren’t many ways to provide security around that data without using options found in third party APIs.
Apple recognized the need for accessible and reliable security in iOS and beginning with the introduction of iOS 7 and the iPhone 5S Touch ID, It’s not only more secure than the other alternatives, but much easier and convenient for the end user.
Today, we’ll look at how to integrate Touch ID into your own app.
Key Takeaways
- Touch ID and its API are driven by the Local Authentication framework, which was made available in iOS 8, enabling app developers to evaluate specific security policies for a device’s user.
- LAContext, the only exposed class in the Local Authentication framework, serves as a way to carry out any type of authentication that can be performed by its parent framework.
- The authentication workflow involves choosing a policy to authenticate against, asking iOS if that policy can be evaluated, and then performing the actual authentication. If authentication doesn’t pass, iOS first evaluates if another attempt can take place.
- Integrating Touch ID into an app involves importing the Local Authentication framework, creating an instance of the LAContext class, and using the canEvaluatePolicy method to check if the device supports Touch ID. If it does, the evaluatePolicy method is used to authenticate the user.
Local Authentication
Touch ID and its API are driven by the Local Authentication framework, which was made available in iOS 8. With it, you can evaluate specific security policies for a device’s user. Right now, this framework contains only one exposed class – LAContext.
As the name implies, all authentication is strictly specific to the device and its user. There are many scenarios where a user would want to authenticate themselves to the device. A common use would be when the user attempts to purchase apps inside the app store.
LAContext – Touch ID’s Driving Force
LAContext serves as a way to carry out any type of authentication that can be performed by its parent framework. The supported types of authentication are housed inside the LAPolicy enumeration, which contains only one value – DeviceOwnerAuthenticationWithBiometrics. Keeping this lone value in an enumeration keeps it scalable, so perhaps Apple will use this for future types of local authentication in addition to Touch ID.
There is one other important enumeration to know about on LAContext, and that is LAError. When the authentication process encounters a problem, it will be one of the errors represented inside LAError. Let’s take a look at what those are:
- AuthenticationFailed: Invalid credentials.
- UserCancel: User canceled authentication.
- UserFallback: User chose fallback method, i.e. enter password.
- SystemCancel: iOS canceled authentication.
- PasscodeNotSet: User hasn’t set up a system wide 4 digit passcode.
- TouchIDNotAvailable: Device doesn’t support Touch ID.
- TouchIDNotEnrolled: User hasn’t set up Touch ID.
Authentication Workflow
Now that we know which framework and object to use, let’s discuss the authentication workflow.
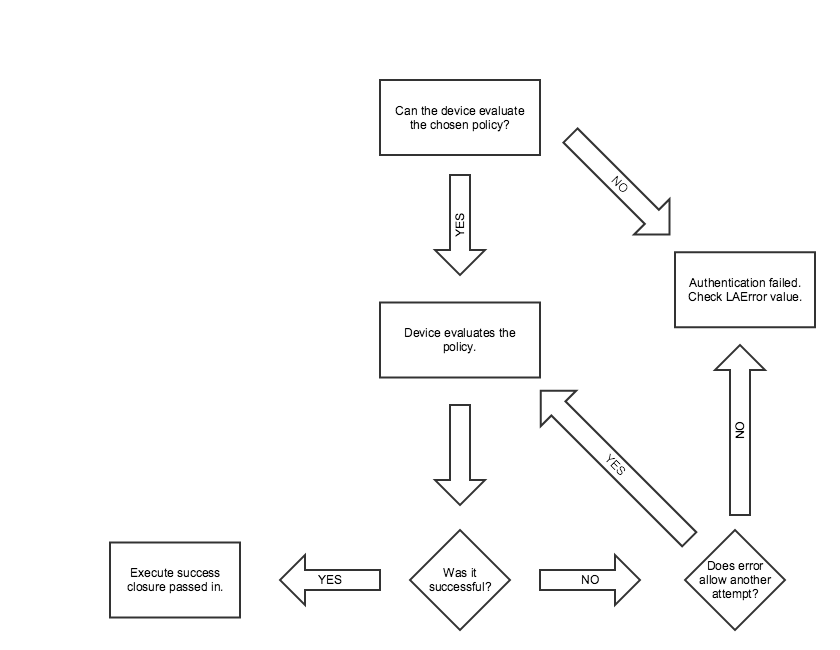
The first thing we will need to do is choose a policy to authenticate against. After that, we then ask iOS if that policy can be evaluated. This preflights authentication for efficiency purposes, as there is no reason to continue any further if the system has no chance of successful authentication.
Next, the actual authentication takes place. No matter the outcome, the closure that’s provided will execute. I’ll show you an example of this shortly. If authentication didn’t pass, iOS first evaluates if another attempt can take place. For instance, this would occur if a fingerprint couldn’t be read correctly and the “Try Again” message appeared.
If the authentication context doesn’t allow for multiple attempts, than an NSError object will be initialized. It’s property called localizedDescription will also be set, representing one of the values found inside LAError. You can look at the error’s code property to see the exact LAError value set. This flowchart summarizes the entire work flow:
Project Setup
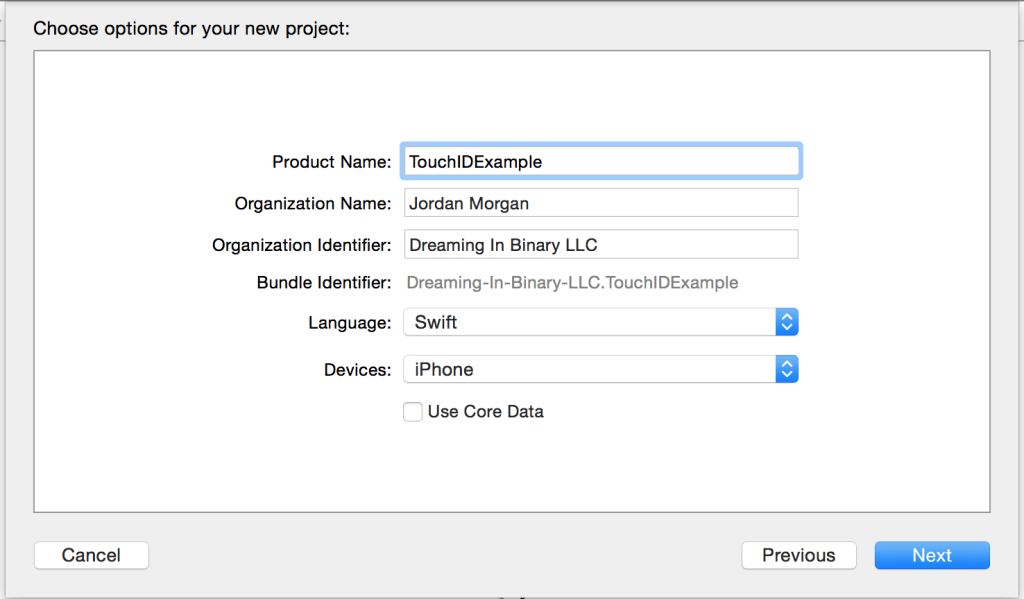
Open Xcode and create a new project. We’ll use the single view application template. On the next screen, be sure to choose Swift as your programming language and name the project accordingly.
This template gives us the bare essentials to start an app. The only files we will be dealing with are ViewController.swift and Main.storyboard. We will start by creating a simple user interface to show whether or not authentication was successful . Open the storyboard now to begin.
User Interface
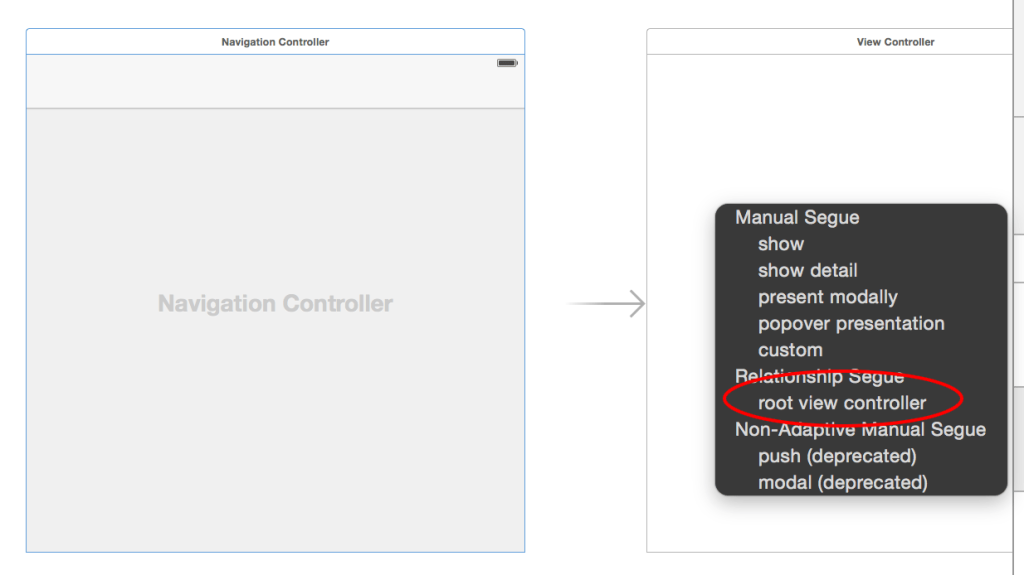
First we’ll embed the included view controller into a navigation controller. In the object inspector, drag out a “Navigation Controller” and drop it into the storyboard. Place it right underneath the existing view controller.
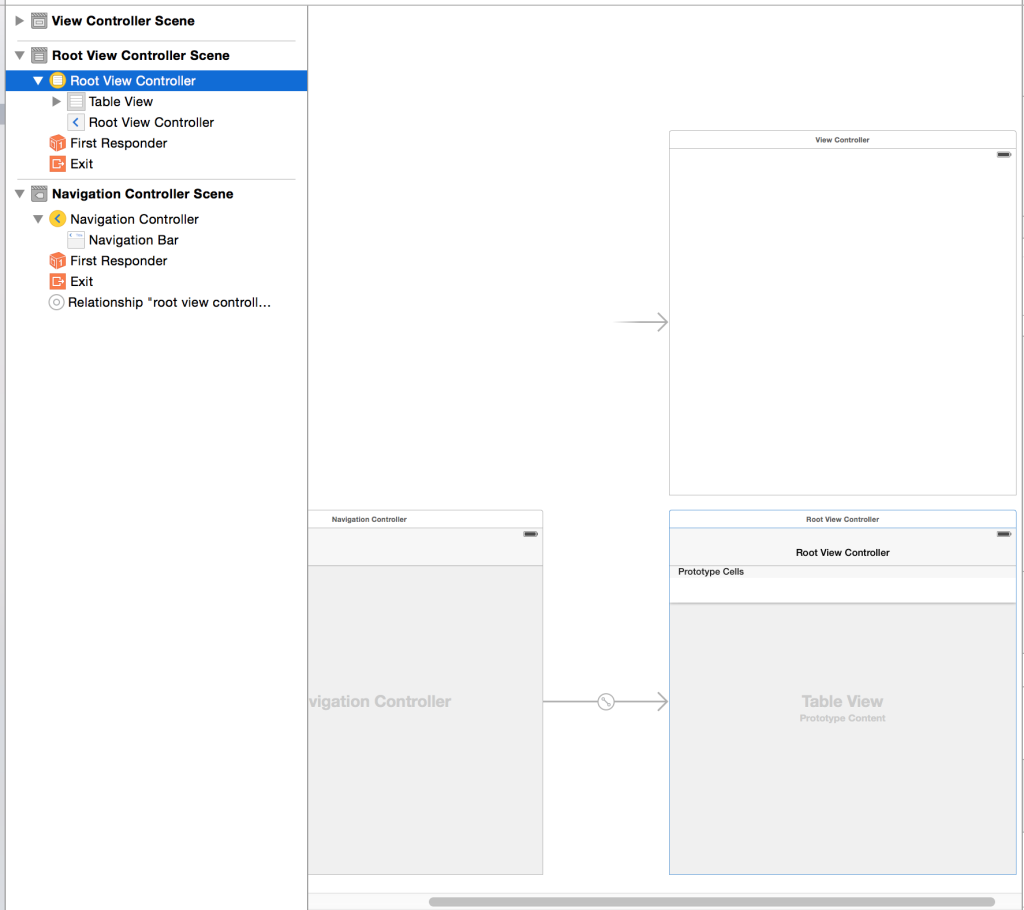
Now, select the root view controller in the document inspector and press the delete key. By default, Xcode gives us a table view controller as the root view controller. We just want to work with a blank canvas for our user interface.
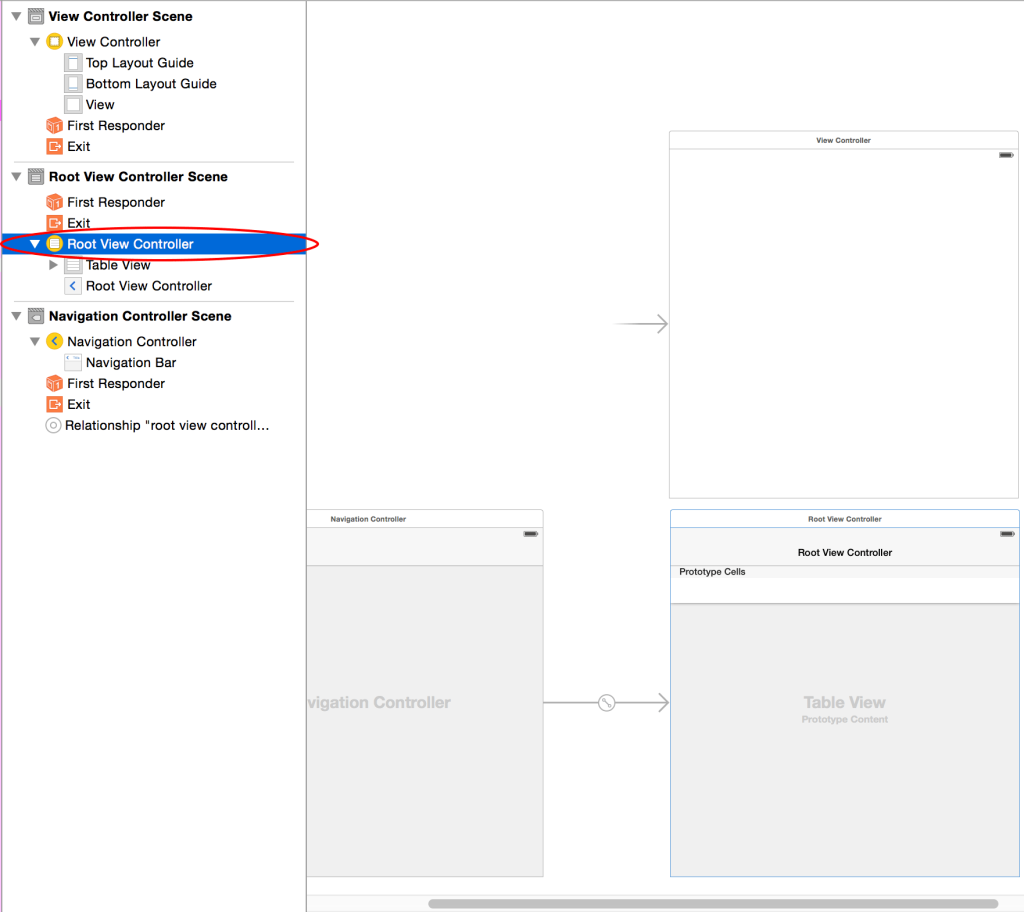
Next, control + drag the navigation controller to the default view controller and let go. Select “root view controller” as below:
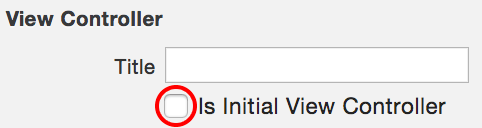
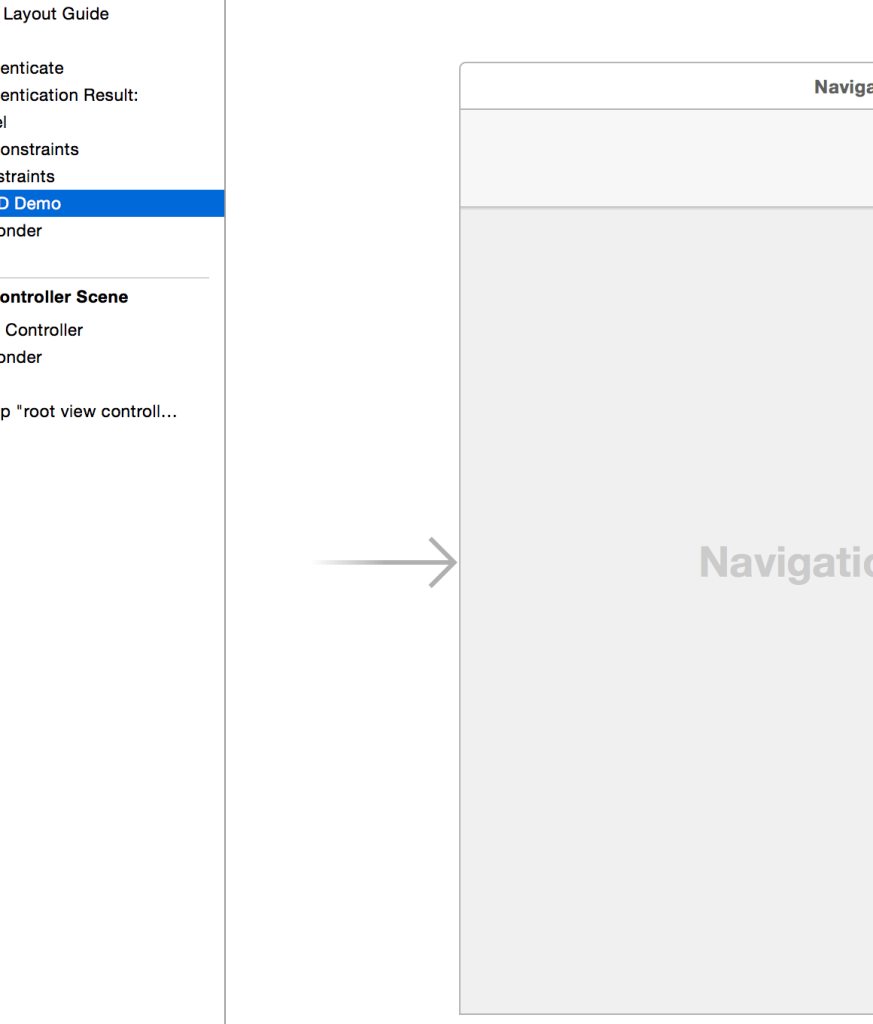
Last, be sure the starting point is set to our newly added navigation controller. To change it, click the navigation controller, open up the attributes inspector, and check “Is Initial View Controller”:
Your navigation controller should have the black arrow pointing to it like this:
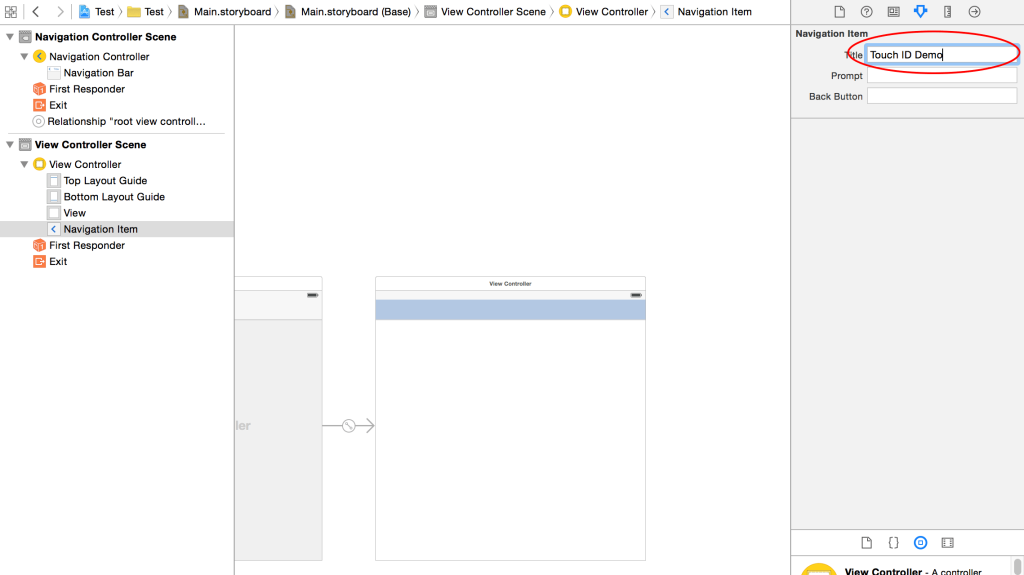
Next, click on the “Navigation Item” of the root view controller in the document outline. In the attributes inspector, change the title to “Touch ID Demo”:
Button Setup
From here on, we will just be dealing with the root view controller for the user interface.
Now, drag a button onto the view controller. Double click it and change its text to “Authenticate”. Open up its size inspector and change the following values to:
-X: 266
-Y: 189
-Width: 149
-Height: 30
Label Setup
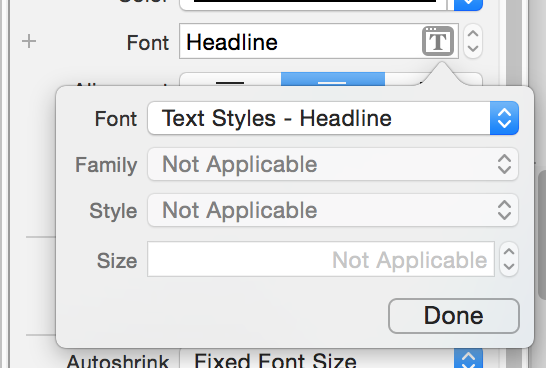
Next drag a label underneath the button. Change its text to “Authentication Result” and its font to the “Headline” style. This uses dynamic text, and even though the user interface isn’t important here, it’s good to start making a habit of incorporating adaptive design methodologies into your workflow.
For its size and coordinates, use these values:
-X: 186
-Y: 273
-Width: 229
-Height: 20
Now, drag out one more label. Since this will be showing the authentication results, just set the text to a blank string (““) and its font style to ”Body“. We want this to sit right underneath the ”Authentication Result” label, so set its size and coordinates like this:
-X: 121
-Y: 312
-Width: 358
-Height: 218
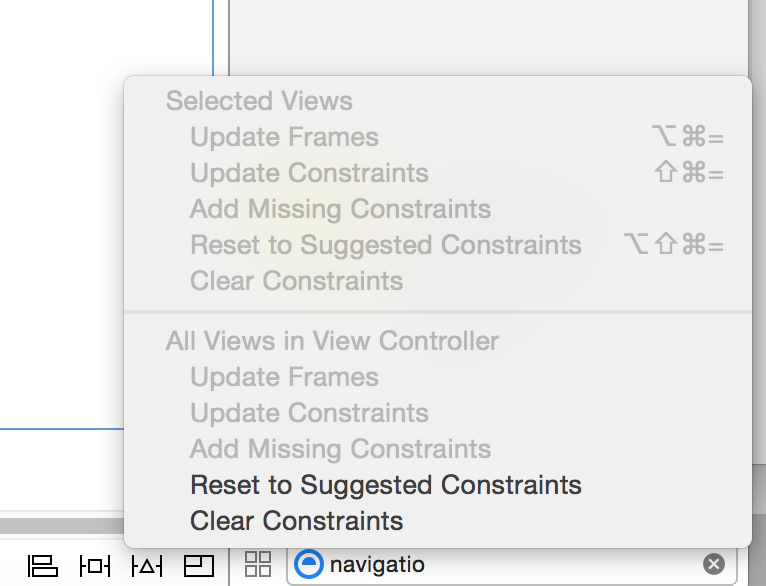
As far as the constraints are concerned, we will let Xcode add those for us. Select any label or button on the view controller, click on the “Resolve Auto Layout” button towards the bottom, and then click on “Reset to Suggested Constraints” in the “All Views in View Controller” section.
Hook Up Outlets & Actions
When the user taps on the button we added earlier, we will begin the authentication process. When it finishes, the blank label will be updated with the result. To accomplish that, we will need an IBAction for the button and an IBOutlet for the blank label.
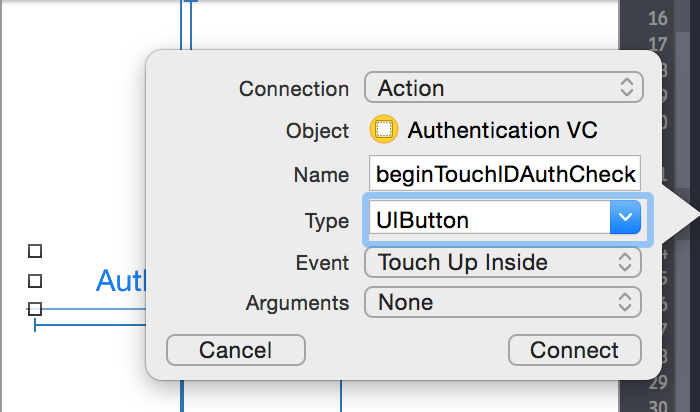
Choose the button on the storyboard and enable the assistant editor. Control + drag from the button to ViewController.swift anywhere below the viewDidLoad function and let go. Setup the IBAction like this:
Perform the same steps for the blank label, instead choosing “Outlet” for the connection and naming it “lblAuthResult”.
Performing Touch ID Authentication
As mentioned earlier, we will need to import the Local Authentication framework to allow us access to the LAContext class. To do this, open up ViewController.swift and import it right below UIKit:
import LocalAuthentication
Next, we will write a utility function that will take care of updating the label we just added an outlet to. When the authentication is completed, this label will show red text if something went wrong, and green text if authentication was successful. Add the following code anywhere inside ViewController.swift:
func writeOutAuthResult(authError:NSError?)

    {

        dispatch_async(dispatch_get_main_queue(), {() in

            if let possibleError = authError

            {

                self.lblAuthResult.textColor = UIColor.redColor()

                self.lblAuthResult.text = possibleError.localizedDescription

            }

            else

            {

                self.lblAuthResult.textColor = UIColor.greenColor()

                self.lblAuthResult.text = "Authentication successful."

            }

        })
    }
This function is fairly easy to follow. Anytime we perform authentication, we will call this function to let the user know what the result was. If authentication didn’t fail, the NSError parameter will be nil. If it’s not, something went wrong and we will populate the label with the error.
One thing to take note of is the use of grand central dispatch. Since any code run when authentication either succeeds or fails will be on another thread, we promote code inside this function to run on the main thread. If you take dispatch_async() out, any updates to the label might take 10–15 seconds.
Now we will add the Touch ID authentication logic inside the beginTouchIDCheck() function that we added earlier from our button.
Add this code and I’ll explain how it works next:
@IBAction func beginTouchIDAuthCheck()

    {

        let authContext:LAContext = LAContext()

        var error:NSError?
        //Is Touch ID hardware available & configured?

        if(authContext.canEvaluatePolicy(LAPolicy.DeviceOwnerAuthenticationWithBiometrics, error:&error))

        {

            //Perform Touch ID auth

            authContext.evaluatePolicy(LAPolicy.DeviceOwnerAuthenticationWithBiometrics, localizedReason: "Testing Touch ID", reply: {(wasSuccessful:Bool, error:NSError?) in
                if(wasSuccessful)

                {

                    //User authenticated

                    self.writeOutAuthResult(error)

                }

                else

                {

                    //There are a few reasons why it can fail, we'll write them out to the user in the label

                    self.writeOutAuthResult(error)

                }
            })
        }

        else

        {

            //Missing the hardware or Touch ID isn't configured

            self.writeOutAuthResult(error)

        }

    }
The first thing that we do is get an authentication context by initializing an instance of LAContext. It’s authentication function will be expecting a pointer to an NSError, so the next declaration of error takes care of that.
Next, we call the canEvaluatePolicy function which returns a boolean specifying whether or not the given policy can be evaluated. The “&” sign in front of the error parameter just means that we are passing the address of the operator. This works much the same way as out parameters do in C#. If an error occurs, the error object will be initialized with the relevant information.
If we can evaluate the given policy, evaluatePolicy is called and we supply a reason briefly explaining why we are asking to perform authentication. The closure we include is what will be called as soon as the evaluation is complete.
From here, you’ll want to take specific actions based on the result. If it was successful, as noted by the boolean parameter, then you’d probably allow the user to “proceed” with something (i.e. unlock a file, sign in to something, delete data, etc).
If something went wrong, more than likely you’ll take certain actions depending on the error. No matter the case, in this example, we just write out the outcome to the label. I added some detailed comments to show where you would want to take more specific actions.
That completes the all coding needed to integrate Touch ID into your app. If you need the full source code for the completed project, you can find it on GitHub.
Conclusion
The Local Authentication framework is extremely easy to use. In addition, if fills a very important need – to keep user’s data secure. It used to fall on the developer to create a feasible form of authentication for an app, but now the most common authentication method in all of iOS is made available to any developer who wants to use it.
What do you plan on using local authentication for? Social sign in, data access, or maybe something a bit more creative? Be sure to let us know in the comments below, and as always, thanks for reading!
Frequently Asked Questions (FAQs) about Integrating Touch ID in iOS App
How can I integrate Touch ID in my iOS app?
Integrating Touch ID in your iOS app involves a few steps. First, you need to import the LocalAuthentication framework into your project. This framework provides APIs that allow you to integrate Touch ID. Next, you need to create an instance of the LAContext class, which provides methods for evaluating authentication policies and access controls. Then, you can use the canEvaluatePolicy method to check if the device supports Touch ID. If it does, you can then use the evaluatePolicy method to authenticate the user.
What are the prerequisites for integrating Touch ID in an iOS app?
To integrate Touch ID in your iOS app, you need to have a few things in place. First, you need to have an iOS device that supports Touch ID. This includes iPhone 5s or later, iPad Pro, iPad Air 2, or iPad mini 3 or later. Second, you need to have Xcode 8.0 or later installed on your Mac. Lastly, your app needs to target iOS 9.0 or later.
Can I use Touch ID for user authentication in my app?
Yes, you can use Touch ID for user authentication in your app. The LocalAuthentication framework provides APIs that allow you to authenticate users using their fingerprints. This can provide a more secure and convenient way for users to log in to your app, as they don’t need to remember a password.
What happens if the device does not support Touch ID?
If the device does not support Touch ID, the canEvaluatePolicy method of the LAContext class will return false. In this case, you should provide an alternative way for users to authenticate, such as entering a password or PIN.
How can I handle authentication errors in Touch ID?
The evaluatePolicy method of the LAContext class provides an NSError parameter that you can use to handle authentication errors. This parameter contains an error code and a localized description of the error. You can use this information to display an appropriate error message to the user.
Can I use Touch ID to authenticate purchases in my app?
Yes, you can use Touch ID to authenticate purchases in your app. You can do this by using the LAContext class’s evaluateAccessControl method. This method allows you to authenticate a user before they can access certain resources or perform certain actions in your app, such as making a purchase.
Is it possible to use both Touch ID and Face ID in my app?
Yes, it is possible to use both Touch ID and Face ID in your app. The LocalAuthentication framework provides APIs that support both types of biometric authentication. You can use the biometryType property of the LAContext class to determine which type of biometric authentication is available on the device.
How secure is Touch ID?
Touch ID is a very secure form of authentication. It uses a secure enclave to store fingerprint data, which is encrypted and protected with a key available only to the device. This data is never stored on Apple servers or backed up to iCloud.
Can I customize the Touch ID authentication prompt?
Yes, you can customize the Touch ID authentication prompt. You can do this by setting the localizedFallbackTitle property of the LAContext class. This property allows you to specify a custom message that is displayed in the authentication dialog.
What should I do if the user fails Touch ID authentication multiple times?
If the user fails Touch ID authentication multiple times, the system will automatically disable Touch ID and require the user to enter their device passcode. After entering their passcode, the user can enable Touch ID again in the device settings.

