
I’ve made the case for ColdFusion, but you still need to know how to install it! In this tutorial, I’ll show you how to install ColdFusion 6.1 on a Windows machine, and walk you through the basic set up process. If you’re not running Windows, don’t worry: you can skip ahead to the setup procedure and follow along as we tweak the server to fit your needs.
We’ve all heard how powerful ColdFusion is and most of us have experienced this power at one time another. We’ve also heard how easy it can be to program in ColdFusion versus other languages that are currently available. But, one thing you don’t hear is how easy it is to install and set up a ColdFusion server. To some, setting up and configuring the server is child’s play; to others, it’s not so easy.
In this tutorial, I’ll show you how to set up a ColdFusion Development server on your home computer (Windows 2000 or XP), and how to get it to work with Apache 2.x (I’ll show you how to install this as well).
Before we begin, you’ll need a few things:
- A copy of ColdFusion MX (I’ll show you how to get a copy if you don’t already have a CD)
- A computer with the following minimum requirements:
- Intel Pentium Processor (or AMD equivalent)
- 256 MB of RAM (512 MB or 1 GB would be best)
- 400MB of hard disk space (this is only for the server; you’ll need more space for your sites and code)
Now that you know what you need, it’s time to begin.
Key Takeaways
- ColdFusion MX 6.1 can be installed on Windows platforms including Windows 2000 and XP, with the process taking about an hour or two depending on download and installation times.
- A prerequisite for installing ColdFusion MX 6.1 is to have a web server like Apache installed; the tutorial provides guidance on installing Apache 2.x.
- The ColdFusion MX 6.1 installation involves downloading the Developer or Trial Edition from the Macromedia website and running the installer, which includes options for server configuration.
- Post-installation, Apache may require minimal configuration adjustments to ensure ColdFusion runs smoothly, such as modifying the httpd.conf file to load the ColdFusion module.
- Initial setup of ColdFusion MX 6.1 includes configuring the ColdFusion Administrator and setting strong passwords for security best practices.
- The tutorial also covers basic ColdFusion Administrator configurations like setting up data sources and mappings to facilitate development work.
Getting ColdFusion MX 6.1
To start, I’ll assume you don’t have ColdFusion MX 6.1 on CD. So, head over to the Macromedia Website and download the developer edition (If you have DreamWeaver MX or MX 2004 you can get the CF server off this CD).
Depending on how often you visit Macromedia.com you’ll either automatically be shown the page to download the ColdFusion MX 6.1 server (see image below), or you’ll be shown a login screen. If you have an account with Macromedia, log in at this time; if not, you’ll need to register for a Macromedia account before you’ll be allowed to download the ColdFusion Server.
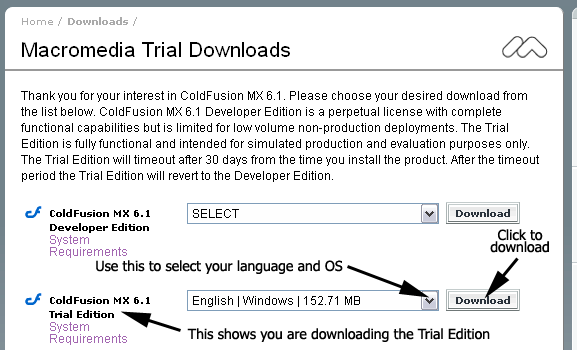
From here, you’ll want to select either the ColdFusion MX 6.1 Developer Edition or the ColdFusion MX 6.1 Trial Edition. It doesn’t matter which you select because, after 30 days, the trial edition becomes the Developer Edition.
You’ll want to select the Windows version of the server in your language. For me, this was the English Windows Version (if you want to follow along with another operating system, feel free to grab the version for your OS).
Once you’ve made your selection, click the “Download” button to begin the download. I recommend you either save it to your desktop, your C drive, or anywhere you’ll be able to find it. Keep in mind that this file is 152.71 MB — it’ll take a bit of time to download. I’m on a cable modem with a 4 MB pipe, and it took me about 10 minutes at 250-270KB/Second.
If you run download manager software, be aware that it might not be able to download the ColdFusion server from Macromedia’s Website. I use GetRight and I have to turn it off before I can download the file.
Now that you’ve downloaded the file, let’s begin the installation process.
Installing Apache
Before you can begin the installation of ColdFusion, you’ll need to have a Web server installed and running. I’ve chosen Apache for this tutorial, since it’s readily available and familiar territory to most Web developers. For those who are new to Apache, there’s no need to worry –Apache has a huge community following of very helpful people, many of who can also be found in the SitePoint forums.
You may wonder why I didn’t choose IIS, which is available on Windows 2000 and XP Pro. The answer is that these servers only allow you to install one Website. Yet, most people who undertake development work typically work on more than one site at a time. And this, among others, was the reason I decided to avoid it. For more information, check out IISAnswers.
If you don’t already have it installed, download the latest copy of Apache. For the purposes of this article, I downloaded Apache 2.0.50 for Windows. I grabbed the MSI installer rather than the .zip installer, but you can use either. If you are new to Apache, or you’re a Microsoft power-user, I highly recommend the MSI option, as it’s a snap to install.
Once you’ve downloaded the MSI installer, double-click on it to start the install process. You’ll see a start up screen which looks like this:

Click the Next button, and you’ll be presented with the License Agreement.
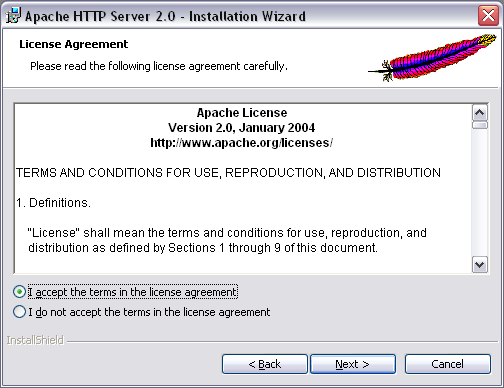
Read through it, select the “I accept…” radio button, and click Next.
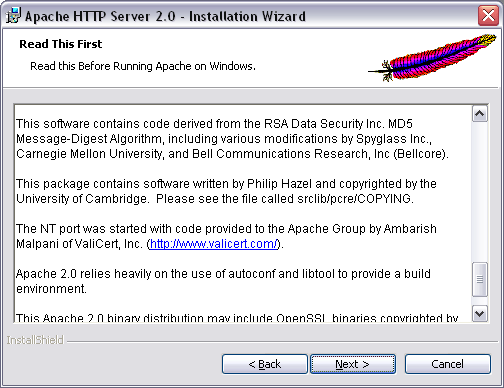
Here you see the “Read This First” screen. This contains a lot of legal jargon and sees the Apache folks give credit where credit is due. Again, read through it and click Next.
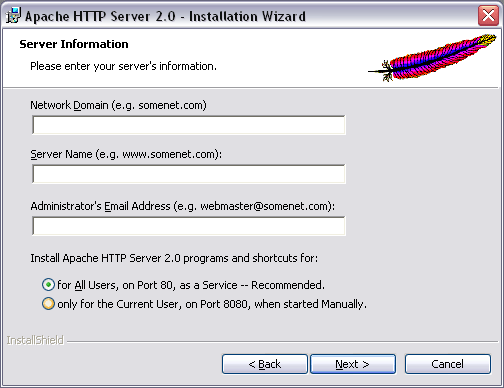
Now, you’re asked to fill in your Network Server Name and Admin email address. Feel free to enter “localhost” for the network Domain and the Server Name, and to enter your email address.
At the bottom of the screen you’ll see questions about installing Apache HTTP Server 2.0 programs and shortcuts. I chose the “for All Users” option as I’m the only user on my computer, and I want Apache to start at load and run as a service.
If your computer has multiple users, and you’re security-conscious, I’d recommend you select the “only for the Current User” option. This option runs the server on port 8080, and requires you manually to start Apache each time you want to use it. It’s a bit more work, but this option also gives you complete power over the service, and when it runs.
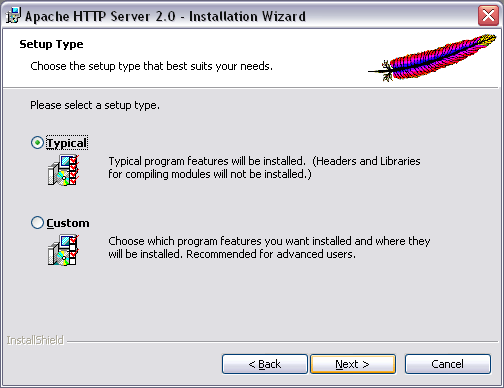
When you’ve finished filling out the network information, click on Next — you’ll see the Setup Type screen. You can either choose the Typical or Custom. In my opinion, you should only choose custom if you need certain things NOT to be installed, or if you want to tweak something. Otherwise, the Typical option is perfect for 99% of us. Click Next and let’s move on.
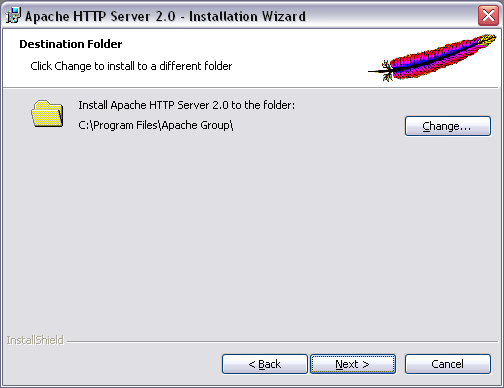
The next screen is your Destination Folder screen. This is where you can tell Apache to install; it’s also at this point that Apache configures the default Website for you (a few folders down, actually). Again, unless you have reason or knowledge enough to change it, just leave it as is and click the Next button.
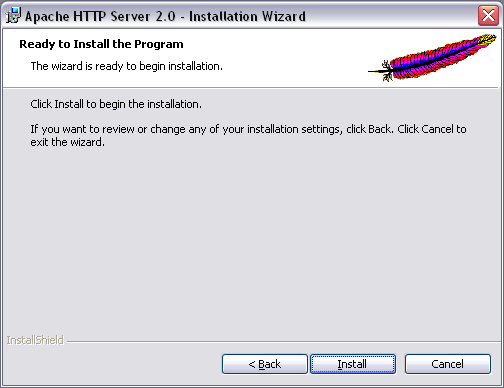
The final screen you see will be your “ready to install” prompt. This is you last chance to hit the back button and make any changes to your configuration. If you’re ready to install, click on the Install button and relax while Apache is installed and started.
Once Apache is installed, confirm that it’s running (you should see the icon in your system tray). If it’s not, start it up from your Start > Programs > Apache 2.x folder.
You can also open up your browser and browse to http://localhost/, where you should see the default Apache welcome page.
Once you’ve confirmed that Apache has started, go ahead and close any windows that are open. We’ll come back to Apache later. Now, it’s time to install the ColdFusion Server!
Installing ColdFusion MX 6.1
I’m installing on my Windows XP laptop (P4 3.06GHz, 1 GB RAM), and most of the screen shots you see from this point will reflect this. Those using Windows 2000 should be able to follow with little or no difficulty.
This is also a good time to point out that the Developer Edition can be installed on Microsoft Windows 98, ME, NT 4 SP6A, 2000 SP3, XP, or 2003. The 98 and ME installations are only for development purpose, however, and will not support a production-level service.
Double click the installation file (coldfusion-61-win.exe) to start the process. You should see the following window.
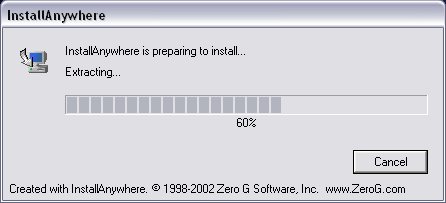
This shows that the installer is preparing the files for installation and extracting everything to a temp folder. Just sit back and give the installer a few seconds to do its thing.
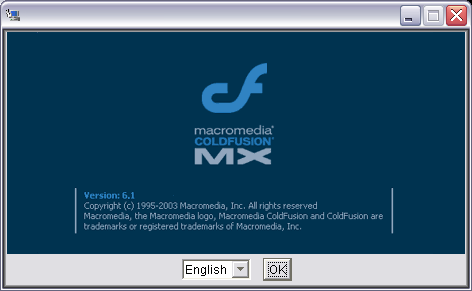
When you see this window, select your language and click OK. It’s more than likely that only one choice will be available — the language you downloaded — but double-check just to make sure.
After you click OK, you’ll see this window:

This is just an introduction that tells you what you’re about to do. Here, it tells you this wizard is designed to install CF MX 6.1 on your computer, or generate an EAR or WAR file for a J2EE server installation. If you don’t know what an EAR or WAR is, don’t worry about it — we won’t go down that road in this article.
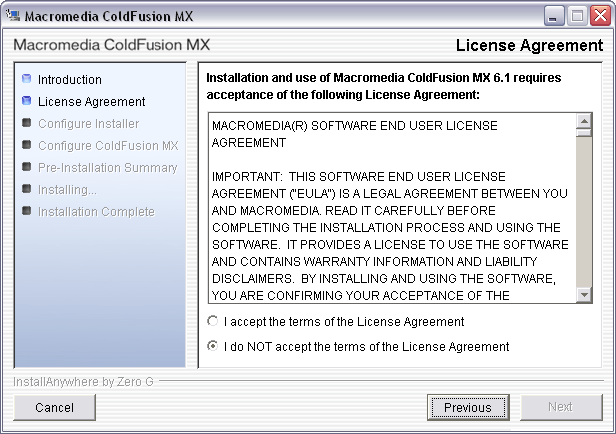
Click Next, and you’ll be presented with the License Agreement for the server. Feel free to read through it and make an informed decision before you select the “I accept” radio button and click Next. Of course, if you don’t accept it, you can’t install the server, and you won’t need to finish the rest of this article…
After you click the acceptance radio button, you’ll be presented with a screen at which you can do something! OK, it’s not much, but it is one of two critical points during this installation.
The next screen is the Install Type window.
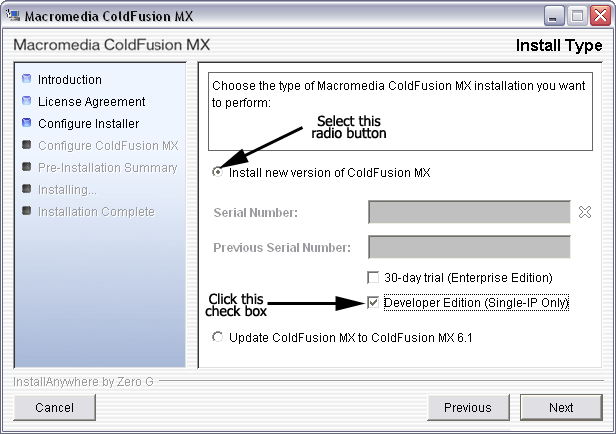
At this window, you’ll want to select the “Install new version of ColdFusion MX” and check off the “Developer Edition (Single-IP Only)” option. If you want to, you can select the 30-day trial (Enterprise Edition), but you’d only do this is if you planned to buy the server in the next 30 days, or you needed to have multiple IPs hit the server during the next 30 days.
After 30 days, the Trial Edition becomes a Developer Edition, which means the server is limited to a single IP access, but this doesn’t hinder any of the features. Basically, you’ll have a copy of Enterprise Edition that can be accessed by the local computer (127.0.0.1 / localhost) and one outside IP address. This is nice if you decide to set this server up on a dedicated computer and do you coding on another computer, then upload to the server for debugging and testing.
Click the Next button to see this screen, which presents three different installation choices.
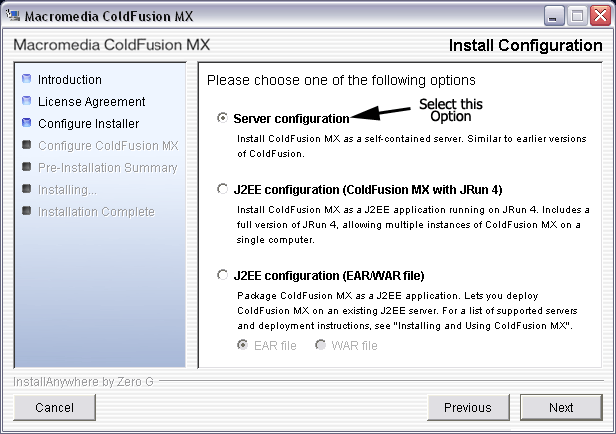
The installer is a bit vague here, so hopefully my explanations will be a little more enlightening.
- Server Configuration – This is the option you’ll check for the purposes of this tutorial, and probably for most of your future installations. This option creates ColdFusion as a standalone server that hooks into your Web server (IIS, Apache etc). This is the way most of the earlier versions of ColdFusion were installed, and is probably the option you’ll be most comfortable with.
- J2EE Configuration (ColdFusion MX with JRun 4) – You’d choose this option if you wanted to install ColdFusion as a J2EE application and run it on the Macromedia JRun Application Server. If you are familiar with Applications Servers (Websphere, JRun, Sun One, Tomcat etc.) then you might like this option — especially if you plan to integrate or tie in a lot of Java programming.
- J2EE Configuration (EAR/WAR file) – This is the option you’d select if you wanted to install ColdFusion as a J2EE Application on another Application Server. This will create an EAR or a WAR file that you can then deploy onto your J2EE server and run ColdFusion from.
The two J2EE options will not be covered here, as they can be extremely complicated for those with no or little J2EE Application Server experience.
For our purposes, we’ll select Server configuration and click the Next button.
The next screen you’ll see asks where you want to install the ColdFusion server.
I recommend you just leave this at the default unless you have specific reason to install it somewhere else.

If you accidentally type something here, or decide against putting the files into another directory, you can just click the “Restore Default Directory” button to have it default back to the C:CFusionMX folder.
After you’ve told the installer where to install ColdFusion, you’ll need to tell it where to install the CF Administrator. I recommend you leave this at the default setting unless you changed something during your Apache installation.
Go ahead and click the Next button. You should see a screen which looks like this:

This screen allows you to select the Web Server that you want ColdFusion to configure for use with ColdFusion MX and your CFML pages.
You’ll notice that there are no Web Servers/Sites listed here, but don’t worry — this is OK. We have to tell ColdFusion we want to use the Apache Web server. To do this, click the Add button.

At this point, you could select the “Built-in Web server (Development use only)” option, since we’re building a development environment. I tend to shy away from this option, though, because I’m a firm believer in having your development environment mimic your production environment as closely as possible. For example, if you use the built-in Web server, but your host has Apache, and you have problems with your code at your host, but not locally, you could spend hours or days spinning your wheels.
Once you click that button, you’ll get a new window into which you’ll input some data. The window should look like this once you fill it out:
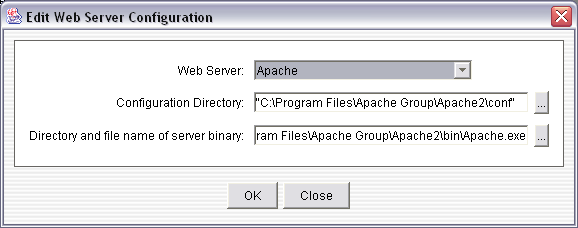
Make sure you select Apache as your Web Server and, if you left the defaults for your Apache installation, you can use “C:Program FilesApache GroupApache2conf” for the Configuration Directory and “C:Program FilesApache GroupApache2binApache.exe” as the Directory and file name of server binary.
When you’re done, click the OK button. You screen should now look like this:
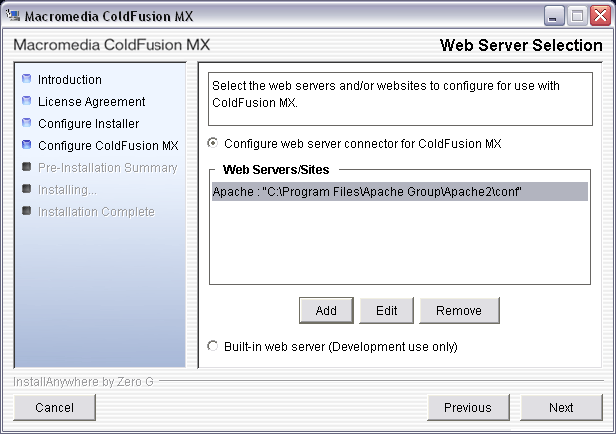
Once you’ve made your selection, click the Next button to continue the process. You’ll be presented with a screen that asks for the ColdFusion MX Administrator Location. This gives you the opportunity to identify where you want to put the CFIDE folder and all its contents (which includes the CF Admin code). Again, I recommend leaving this at the default directory unless you have a specific site set up for the administrator, or have a good idea of what you’re doing.
When you’re done, click the Next button once again. You’ll be presented with a screen that allows you to type in your Administrator Password — the password you’ll use for the ColdFusion Administrator Login.
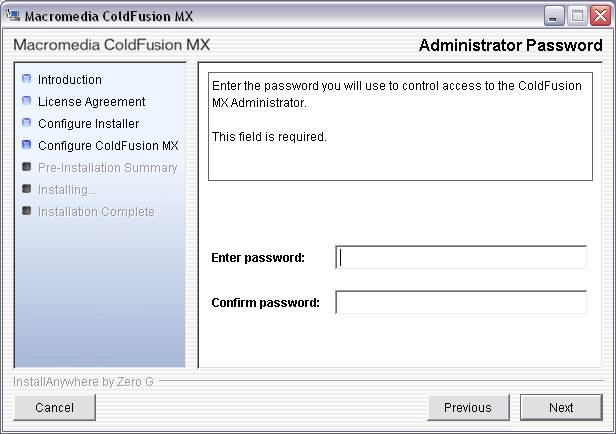
I recommend you start a good practice here, and choose a strong password. Try to think of something that has letters in upper and lower case, and try to toss in some numbers and maybe even a special character or two. The more cryptic you can be, the better. Even though this is just a development environment, it’s never too late to get into the habit of using good security practices.
Once you’ve entered your password into the text fields, click the Next button. You should be presented with the Installation Confirmation screen.
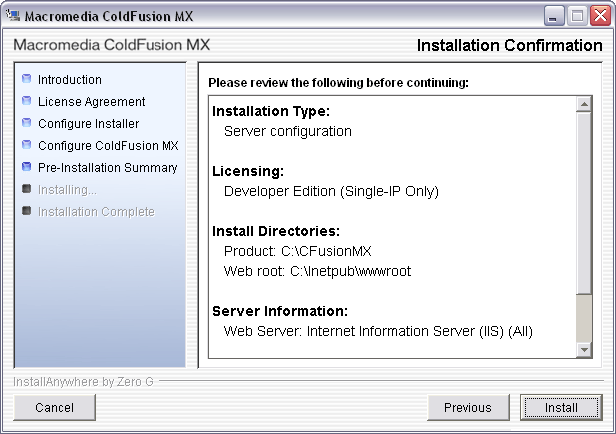
This will outline the choices you made, and some of the data you entered. Feel free to review this screen and, when you’re ready, click the Install button.
Once you’ve clicked the Install button, you’ll be launched into the install process. Depending on the speed of your machine, this could take a few minutes up to a few moments. You’ll be kept in the loop during the installation by messages that appear below the CF logo. In this image, the installer tells us it’s installing the Core ColdFusion Files.
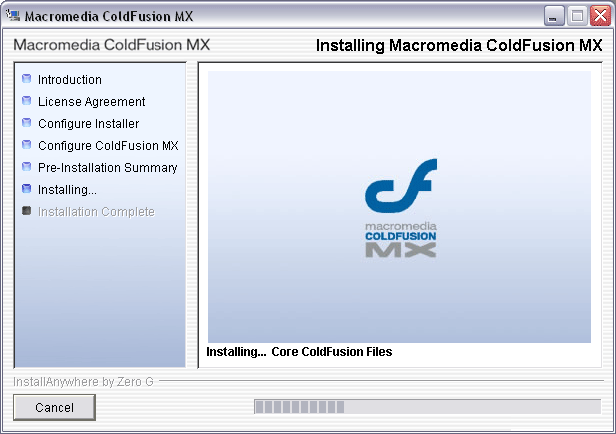
A word to the wise: if you start the ColdFusion installation process, don’t stop it. Sure, there’s a cancel button in the lower left corner, but I’ve had reports from many people that canceling at this point will corrupt the installation and prevent further installations from occurring. Just let the installer do its thing and, if you have to, you can always uninstall and reinstall after this process is complete.
When the installer is finished, you’ll see the following:
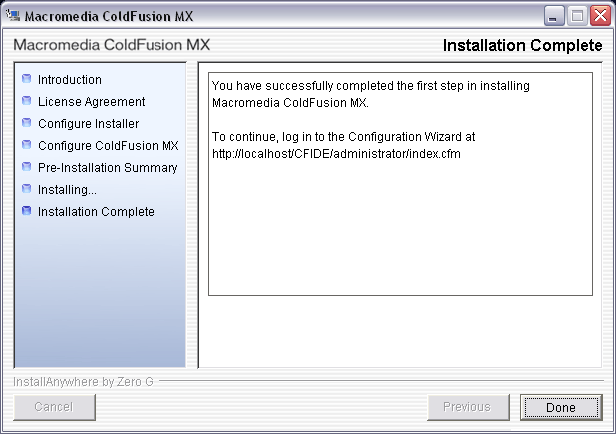
Go ahead and click the “Done” button, and you’ll see a browser window that will open the ColdFusion Administrator Login page.
If, when your browser opens, you see a blank page or an HTTP 500 Internal Server Error, don’t worry. We just have to do a bit of configuration within Apache to get things running perfectly. Keep this window open and continue to the next part of this article for more details.
Post-ColdFusion Installation Apache Configuration
Apache requires very little post-installation modification, however this doesn’t mean there isn’t anything we can’t do. I always double-check to make sure the “install” script did what it was supposed to while editing the httpd.conf.
If you haven’t confirmed that Apache is running, open your browser and point it to http://localhost/ (unless you specified a real URL during installation). You should be greeted with the wonderful Apache test page! If you see an error, review the steps above to make sure you followed all the Apache installation steps, and check your log files for more detailed errors.
Now we know Apache is running, but how about ColdFusion? Point your browser to http://localhost/CFIDE/administrator/index.cfm and see what happens. One of three possible failures could occur:
- Failure #1: Your browser prompts you to save the .cfm file to your computer.
Resolution: Two things come to mind as quick fixes here. The first is to restart Apache, since it probably hasn’t been restarted since you installed ColdFusion. The second is to check your httpd.conf file to make sure the ColdFusion module is being loaded. Locate your httpd.conf file (mine was in C:Program FilesApache GroupApache2conf), and see if you can’t locate this line:LoadModule jrun_module "C:/CFusionMX/runtime/lib/wsconfig/1/mod_jrun20.so"I ran a search for
mod_jrun20.soand got two hits, one of which was a comment.If this line exists, it’s probably near the very bottom of your httpd.conf file. This isn’t a big deal, but to make life easy, cut and paste it to appear as the last entry with your other
LoadModulecommands, which are located shortly after the “Listen 80” line.Once you’ve got your load module line in the httpd.conf file, check to make sure
index.cfmis one of theDirectoryIndexoptions. Just search the httpd.conf file for this command — you should see it appended to the end of the list. If you want you can addindex.cfmlto this list as well.Restart Apache and browse to the http://localhost/CFIDE/administrator/index.cfm URL. If everything looks good, skip ahead to the Configuring ColdFusion section of this article. If you’re still receiving errors, check your log files and confirm that the CFIDE folder and files are installed inside your webroot directory (
C:Program FilesApache GroupApache2htdocs). - Failure #2: You get a message that the CFIDE folder doesn’t exist or that it can’t find the file.
Resolution: it’s more than likely that this folder and its files were placed somewhere else, or that you’ve got Apache looking into a folder that’s different from the one into which you told the ColdFusion installer to install the CF Administrator. The first thing to do is to check that the CFIDE folder is in your webroot folder. If it is, check your Apache httpd.conf file to ensure the “DocumentRoot” line reflects the location you gave to the ColdFusion installer to install the CF Administrator. If you have to make any changes tohttpd.conffile, be sure to save and restart Apache before you try to visit the URL. - Failure #3: If you’ve got an error which isn’t mentioned in #1 or #2, or you’re still having problems, you’ve probably configured something incorrectly. Double check the steps above to make sure you followed them correctly. If you find you didn’t miss or skip anything, I recommend you make a post in the ColdFusion forums here at SitePoint to get help.
Now that Apache is installed and configured, and ColdFusion is installed, it’s time to begin the configuration of ColdFusion MX 6.1.
Post-Installation Configuration of ColdFusion MX
You can confirm that you have both Apache and ColdFusion installed and running by browsing to http://localhost/CFIDE/administrator/index.cfm. You should be greeted with a screen similar to this:

Go ahead and type in your ColdFusion Administrator Password. In the next few screens, we’ll set up some basic initial configuration and post installation tasks for ColdFusion.
The first screen will let us set up our RDS system. Personally, I’m not a big fan of RDS, especially on a Production server, but I understand that many Dreamweaver users love it. On a development box, I see no problem with it, so I recommend you leave it installed and set your RDS password to match your ColdFusion Administrator password.
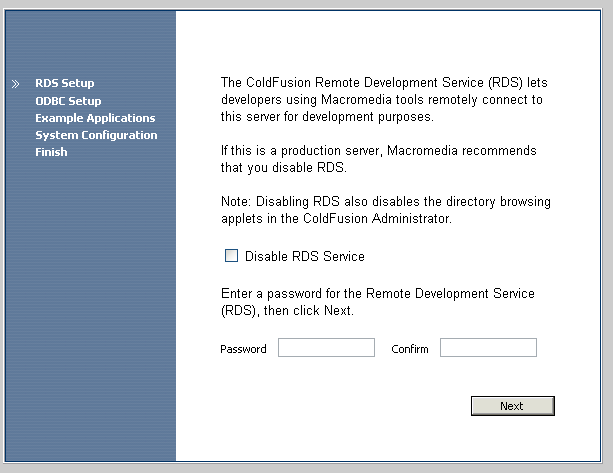
If you are doing this on a production server, I strongly recommend you investigate the vulnerabilities of running RDS, and choose a strong password that’s nothing like your ColdFusion Administrator password.
Disabling the RDS will not hinder anything you develop, but it will mean that you can’t use the Directory Browsing Applets in the ColdFusion Administrator. This is not a big deal if you know the layout of your server, but the applets can be a time and configuration life-saver. Again, choose the option that’s best for your development shop and protocols.
Once you’ve entered your password (twice), click the Next button. This next screen installs the ODBC services. Be patient — the screen will automatically refresh once the installation is done.

You shouldn’t encounter any errors at this point, but if you do post them in SitePoint’s ColdFusion forums and get some help before you proceed.
The next screen asks you if you want to install the sample applications with which ColdFusion is bundled.
As the text warns, you shouldn’t do this on a production server. However, on a development server, this can be a good thing, especially if you’re brand new to ColdFusion, or like to have real world code to reference while building your applications.
I’ve never installed these sample applications, but I suggest you learn more about them and make your own decision.
After you make your selection, click on the Next button to continue. If you opted not to install the sample applications, wait a few moments while the script processes. You should end up with this screen:
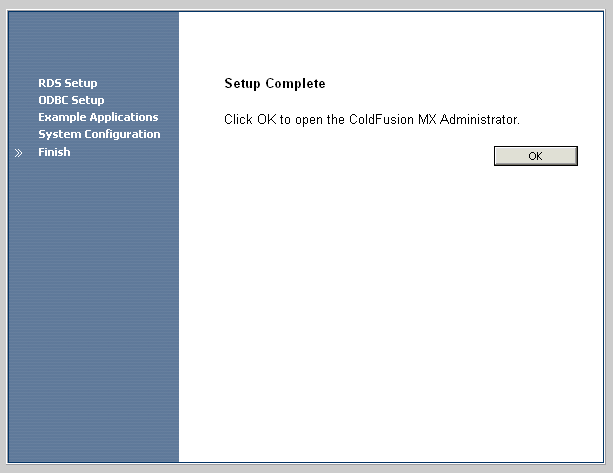
Go ahead and click the OK button. You’ll be presented with the ColdFusion Administrator. When you first load up the ColdFusion Administrator, you’ll see a screen similar to this:
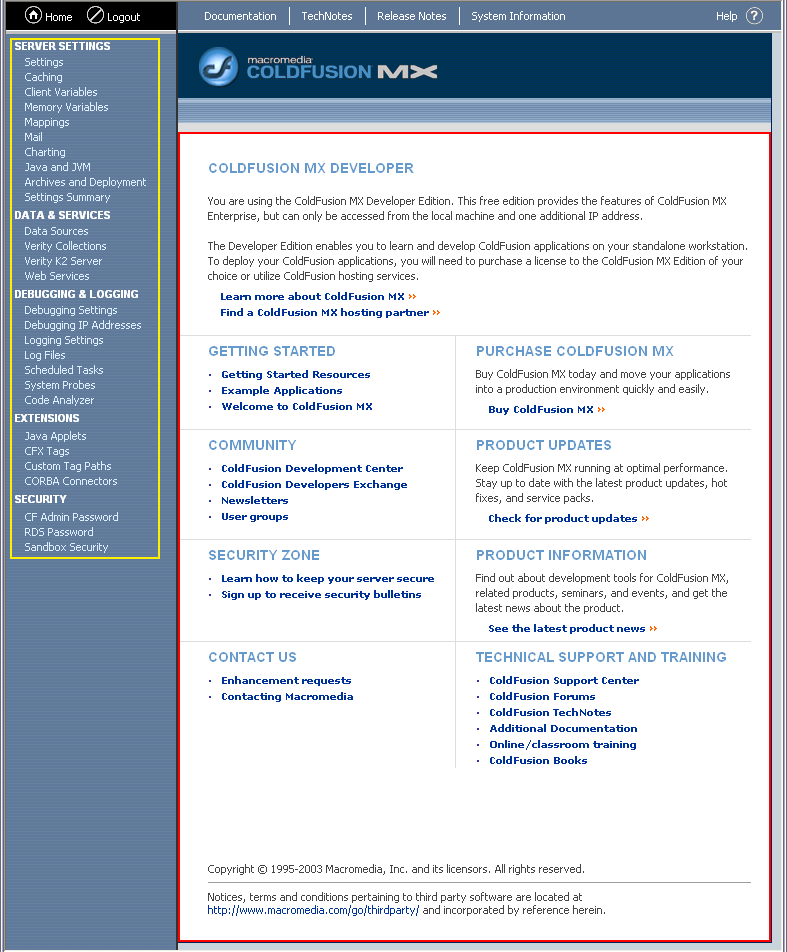
This screen is the main landing page for the ColdFusion Administrator. The area outlined in red (only in this article; it’s not actually red in the Administrator) is what I call the “Action” area. This is where you’ll either “Do” something, like configure a data source, mapping etc., or “Get” information, such as reading your log files or using the Code Analyzer.
The area outlined in yellow (again only for demonstration purposes) is the menu area. If you’ve used ColdFusion 5, you’ll notice that this menu is a bit more compact and cleaner. Also, you’ll note that all your “activities” are kept on one page.
For those that aren’t familiar with it, ColdFusion 5’s Administration menu had 3 buttons along the top that allowed you to change the menu and dive deeper into ColdFusion 5. Some liked this approach; others disliked it. Apparently those who disliked it won out, because we see this new menu in ColdFusion MX (6.x).
Now, I’m going to show you some very basic settings to get you started. For a more in-depth overview of the ColdFusion Administrator, you’ll have to wait for my next article, where we’ll go through the ColdFusion Administrator bit by bit.
Simple Settings to Start
One of the more popular areas of the ColdFusion Administrator is the Data Source area. It is in here that you set up and configure your data sources for use in your ColdFusion programming.
To get started, click on the “Data Source” link in the left-hand menu. You should see a screen that looks like this:
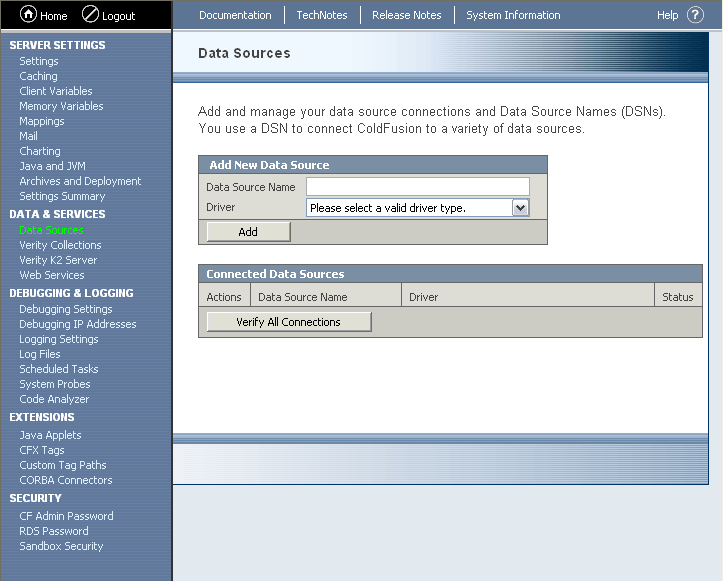
There are two areas of interest here. The first is the Add New Data Source box, which is where you’ll add new data sources to your ColdFusion server. The second is Connected Data Sources, which lists all data sources currently set up and configured on this server.
Lets start by creating a data source to a MS SQL server (the following screens will be very similar for other data sources).
First, we need to type in a Date Source Name for this connection. For this test, I’ll call it TestConnection1. We then select our drive from the Driver drop down menu, and click the Add button in the Add New Data Source area.
Once you fill in the Data Source Name, select a Driver and click the Add button. You’ll be presented with the following screen.
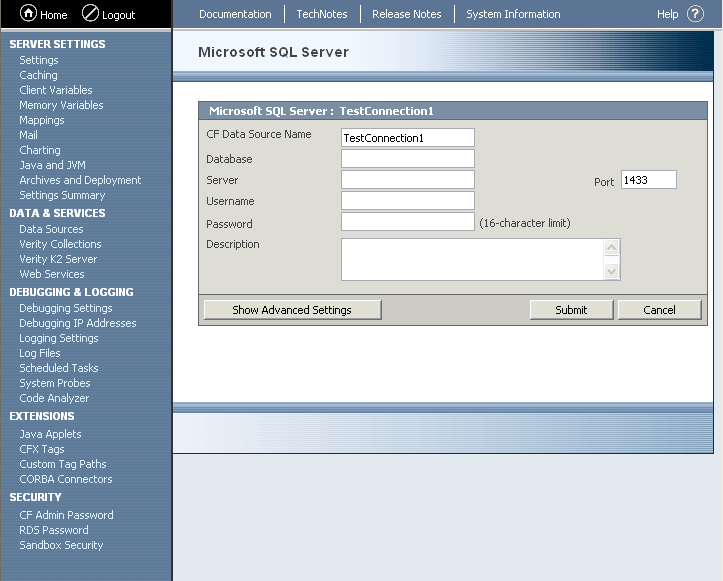
On this screen, type in the name of your Database, the name of the Server (fully qualified domain name; IP address or network name), the Port on which the server is running, the username and password for connecting to this database, and a short description.
You can leave all these blank, but that is, of course, pointless. Some people do prefer only to enter the database name and server, and leave the username and password blank; these then have to be passed in via your cfquery tag. Unless you have a reason to this, I recommend you fill in this form as completely as possible, so that, when it comes time to code your application, all you have to remember is the Data Source Name.
Once you’ve completed the form, click the Submit button. ColdFusion will try to establish a connection to this data source to ensure that it exists and can be reached with the given values. Any connection or authentication errors will be reported back so that you can resolve the issue at hand. Also note that at any time you can click on the “Verify All Connections” button in the main Data Sources page to have ColdFusion check all the current configured data sources.
Besides data sources, one other area that you might need to jump into sooner, rather than later, is Mappings. Locate the Mappings link in the menu area and click on it to get this screen.
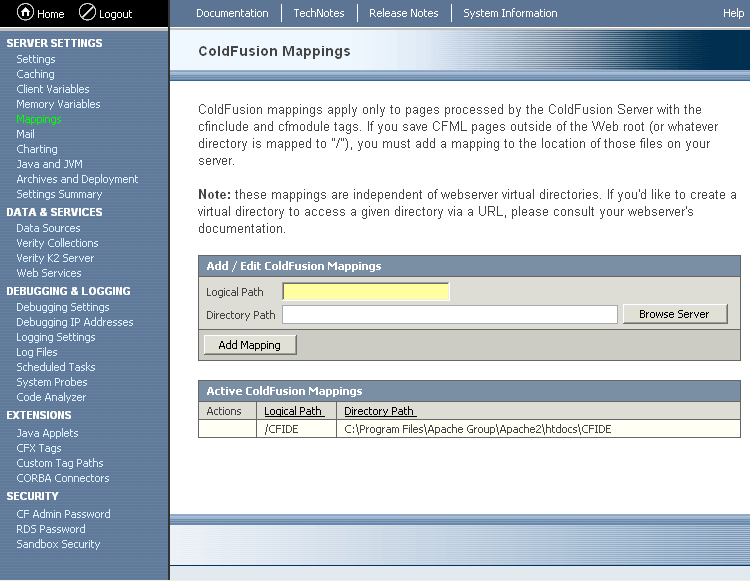
Mappings are like virtual directories in IIS, or short-cuts in windows. When you create a mapping, it tells the ColdFusion server to “treat this directory reference as xyz”. Mappings allow you to avoid the relative dot nightmare when traversing outside your root folder. Let me try to illustrate this for you.
Let’s say your webroot is at c:webrootwwwmysite1 and you want to create an includes directory, but you don’t want to reference it as ../../includes. With a mapping, you will be able to tell ColdFusion that any reference to /includes = ../../includes.
To accomplish this, put /includes in the Logical Path text field and the c:webrootincludes into the Directory Path text field. Now, whenever you reference /includes in your code, ColdFusion will automatically know to reference files in c:webrootincludes.
Mappings are extremely useful when you have multiple sites on a box. You could create a mapping for each site (mysite1, mysite2, mysite3) and, instead of referencing each as c:webrootwwwmysite1 or c:webrootwwwmysite2, you could simply reference it as /mysite1 or /mysite2.
Conclusion
That’s it for this tutorial! Feel free to spread your wings a bit and poke around other areas of the ColdFusion Administrator, and keep an eye out for my next article, where we’ll go through each item from top to bottom.
Frequently Asked Questions (FAQs) about Installing ColdFusion MX on Windows
What are the system requirements for installing ColdFusion MX on Windows?
To install ColdFusion MX on Windows, you need a system running on Windows Server (2003, 2008, 2012, 2016, 2019) or Windows (7, 8, 10). The system should have a minimum of 1GB RAM (2GB or more recommended), 500MB of available hard-disk space, and a 1.6GHz or faster processor. Also, you need a DVD-ROM drive if you are installing from a DVD and a web browser for accessing the ColdFusion Administrator and documentation.
How do I install ColdFusion MX on Windows?
To install ColdFusion MX on Windows, you need to download the installer from the Adobe website. Once downloaded, run the installer and follow the on-screen instructions. During the installation process, you will be asked to enter the serial number, choose the installation type (Server configuration or J2EE configuration), and specify the installation directory. After the installation is complete, you can access the ColdFusion Administrator to manage your ColdFusion server.
Can I install ColdFusion MX on a system with an existing ColdFusion version?
Yes, you can install ColdFusion MX on a system with an existing ColdFusion version. However, it’s recommended to uninstall the previous version before installing the new one to avoid any conflicts. Also, remember to back up your data before uninstalling the previous version.
How do I access the ColdFusion Administrator after installation?
After installing ColdFusion MX, you can access the ColdFusion Administrator by opening a web browser and typing “http://localhost/CFIDE/administrator/index.cfm” in the address bar. You will be asked to enter the password that you set during the installation process.
What should I do if the installation fails?
If the installation fails, check the installation log for any error messages. The log file is located in the installation directory. If you can’t resolve the issue, contact Adobe support for assistance.
How do I update ColdFusion MX?
To update ColdFusion MX, you need to download the update from the Adobe website and run the installer. The installer will automatically update your ColdFusion server.
Can I install ColdFusion MX on a virtual machine?
Yes, you can install ColdFusion MX on a virtual machine. The system requirements are the same as for a physical machine.
How do I uninstall ColdFusion MX?
To uninstall ColdFusion MX, go to the Control Panel, select “Programs and Features”, find ColdFusion MX in the list of installed programs, and click “Uninstall”. Follow the on-screen instructions to complete the uninstallation.
Can I install ColdFusion MX on a system with other Adobe products?
Yes, you can install ColdFusion MX on a system with other Adobe products. However, make sure that the system meets the requirements for all the installed products.
What are the benefits of using ColdFusion MX?
ColdFusion MX offers several benefits, including rapid web application development, integration with Adobe products, support for a wide range of databases, and a powerful scripting language. It also provides a user-friendly interface for managing your ColdFusion server.