Adding Inline Styles
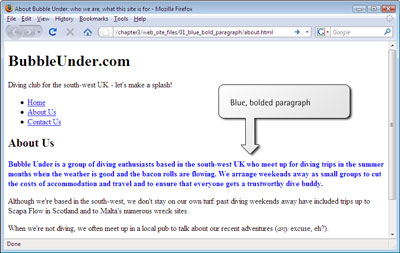
Open about.html in your text editor, and add an inline style. We want to make the text in the first paragraph after the “About Us” heading bold and blue. Refer to the previous example as you create the style.
Does the markup for your paragraph look like this?
<p style=”color: blue; font-weight: bold;”>Bubble Under is a group
of diving enthusiasts based in the south-west UK who meet up
for diving trips in the summer months when the weather is good
and the bacon rolls are flowing. We arrange weekends away as
small groups to cut the costs of accommodation and travel and
to ensure that everyone gets a trustworthy dive buddy.</p>
If your markup looks like that shown here, save about.html and take a look at it in your browser. It should appear like the page shown below.
The span Element
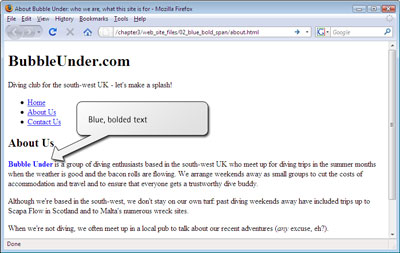
You can easily color a whole paragraph like this, but more often than not, you’ll want to pick out just specific words to highlight within a paragraph. You can do this using a span element, which can be wrapped around any content you like. Unlike p, which means paragraph, or blockquote, which signifies a quotation, span has no meaning. A span is little more than a tool for highlighting the start and end of a section to which you want to apply a style.[4] Instead of making that whole paragraph blue, we might want just the first two words, “Bubble Under,” to be blue and bold. Here’s how we can use the span element to achieve this:
<p><span style=”color: blue; font-weight: bold;”>Bubble
Under</span> is a group of diving enthusiasts based in the
south-west UK who meet up for diving trips in the summer
months when the weather is good and the bacon rolls are
flowing. We arrange weekends away as small groups to cut the
costs of accommodation and travel and to ensure that everyone
gets a trustworthy dive buddy.</p>
When we view that markup in a browser, we see the display shown below.
Let’s take a quick look at other ways that we can apply inline styles (don’t worry, this isn’t part of our project site; feel free to experiment).
<p style=”font-style: italic”>The quick brown fox jumps over the
lazy dog.</p>
Not surprisingly, that CSS declaration will italicize all the text in the paragraph. Here’s another example, in which span is used to highlight specific words:
<p>The quick brown fox <span style=”font-style: italic;
font-weight: bold”>jumps</span> over the lazy dog.</p>
Embedded Styles
Inline styles are a simple, quick way to apply some CSS effects to specific sections of a document, but this is not the best method of styling a page. Wouldn’t it be better if you could set styles in just one place, rather than having to type them out every time you wanted to use them?
Embedded style sheets are a logical step up. An embedded style sheet is a section you add to the start of a web page that sets out all the styles that will be used on that page. To do this, you need to use the style element inside the head:
<head>
<title>Bubble Under – The diving club for the south-west
UK</title>
<meta http-equiv=”Content-Type”
content=”text/html; charset=utf-8″/>
<style type=”text/css”>
p {
font-weight: bold;
}
</style>
</head>
In the markup shown above, we’ve moved the inline style into an embedded style sheet. The embedded style sheet starts with a <style type="text/css"> tag and, predictably, ends with a </style> tag. The actual style declarations are enclosed in a set of curly braces: { and }. The p that appears before the first curly brace tells the browser what elements the style rules are for; in this case, we’re making the text inside every p element bold. The p is called the selector, and it’s a great tool for quickly and easily changing the appearance of lots of elements on your page. The selector instructs the browser to apply all the declarations between the curly braces to certain elements. The selector, curly braces, and declarations combine to form what’s called a rule.
In this case, our style sheet contains one rule: “Please style all the paragraphs on this page so that the text appears in a bold font.”
If we wanted to, we could add more declarations to our rule. For instance, if we wanted to make the text bold and blue, we’d add the declaration color: blue to our rule:
<style type=”text/css”>
p {
font-weight: bold;
color: blue;
}
</style>
Jargon Break
Okay, okay. There’s been an awful lot of jargon so far. Let’s recap:
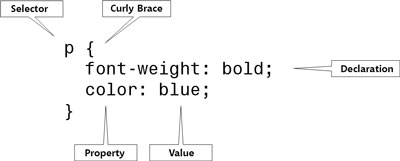
Figure 3.3. The anatomy of a rule
The anatomy of a rule
Why Embedded Styles Are Better than Inline Styles
In the example provided in Figure 3.3, “The anatomy of a rule”, text in all paragraphs will display in bold, blue type. This is useful because it saves you having to type <p style="font-weight: bold; color: blue"> every time you start a new paragraph — a clear benefit over inline styles.
If you wanted to change the color of all paragraphs text to red, you need only to change it in the style sheet at the top of the page:
<style type=”text/css”>
p {
font-weight: bold;
color: red;
}
</style>
That’s efficiency for you. For this reason, an embedded style sheet is a marked improvement over inline styles. But what if you have a web site that comprises many pages? If you want to make your changes across the whole site, using embedded style sheets in the way I demonstrated above is still not quite the perfect solution. Why not? Because, to make a site-wide change, you’d have to edit the embedded style sheet on every single page of that site. The best solution is to use an external style sheet.

