
Key Takeaways
- Utilize Node.js to build a server that extends existing functionalities to include Wi-Fi network information, making the dashboard more comprehensive.
- Implement Ractive.js for the client-side to manage real-time updates and interactions more efficiently, enhancing user experience with dynamic content updates.
- Process Wi-Fi command outputs on the server to extract and display available network details, ensuring data is structured and ready for client-side use.
- Design and use HTML templates with Ractive.js to display Wi-Fi network data, enabling interactive and responsive web elements that improve navigation and usability.
- Expand the dashboard’s capabilities by adding new endpoints and handling AJAX calls effectively, ensuring the dashboard remains scalable and maintainable.
This article was peer reviewed by Marc Towler. Thanks to all of SitePoint’s peer reviewers for making SitePoint content the best it can be!
In the past months, I’ve published a mini-series about dashboards. In the first article titled “Creating a Battery viz Using Node.js: Getting Started and Server”, I’ve shown how to create a Node.js server that checked the battery status on a laptop and returned a few useful information. In the second one, whose title was “Creating a Battery viz Using Node.js: Client”, I’ve explained how to build a Web application to visualize those information in a nicer and user-friendly way.
In this article, we’re going to build on that dashboard and add information about available WI-FI networks. A list of the available networks will be shown with a summary of the most relevant details (name, address, protected vs. open, and so on) and upon selection, further details of the network will appear in another panel.
Take a peek at our goal:
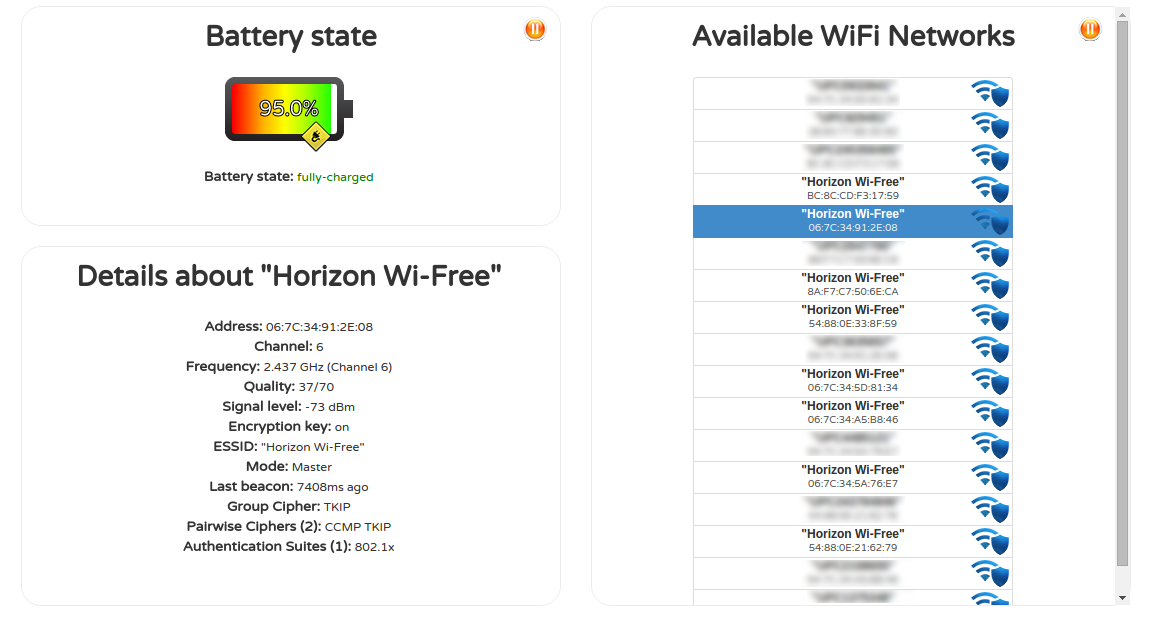
If you want, you can consider it as a starting point. I strongly suggest you to customize it since this is the best way to improve your skills with the technologies we’re going to use.
Server
On the server side, we’re going to reuse and extend what we’ve created for the battery viz. In this tutorial we’ll focus on Ubuntu but the server code is structured in such a way that you’ll need to write just a couple of adapters to support Mac or Windows’ machines.
Bash Command
To start, we extend the original configuration method by adding commands and callbacks for the new endpoint. Some renaming has been necessary to prevent clashes with commands for the battery widget.
   function switchConfigForCurrentOS () {

      switch(process.platform) {

        case 'linux':

          return {

            batteryCommand: 'upower -i /org/freedesktop/UPower/devices/battery_BAT0 | grep -E "state|time to empty|to full|percentage"',

            batteryProcessFunction: processBatteryStdoutForLinux,

            wifiCommand: 'iwlist wlan0 scanning | egrep "Cell |Address|Channel|Frequency|Encryption|Quality|Signal level|Last beacon|Mode|Group Cipher|Pairwise Ciphers|Authentication Suites|ESSID"',

            wifiProcessFunction: processWifiStdoutForLinux

          };

        case 'darwin': //MAc OsX

        ...

      }

    }
Processing Command Output
The way we process the command output is really similar to what we’ve already done for battery. We go through the output line by line and process it to extract meaningful parameters from our readings. But in this case we’re getting readings about a list of items, not a single one! So we need to identify when a new item actually starts in the output, and create a new object for each item. Then we’ll filter valid lines, adding the properties we read to our current item.
   function processWifiStdoutForLinux(stdout) {

      var networks = {};

      var net_cell = "";

      var cell = {};
      stdout.split('\n').map(trimParam).forEach(function (line) {

        if (line.length > 0) {

          //check if the line starts a new cell

          if (stringStartsWith(line, NET_CELL_PREFIX)) {

            if (net_cell.length > 0) {

              networks[net_cell] = mapWifiKeysForLinux(cell);

            }

            cell = {};

            line = line.split("-");

            net_cell = line[0].trim();

            line = line[1];

          }

          //Either way, now we are sure we have a non empty line with (at least one) key-value pair

          //       and that cell has been properly initialized

          processWifiLineForLinux(cell, line);

        }
      });

      if (net_cell.length > 0) {

        networks[net_cell] = mapWifiKeysForLinux(cell);

      }

      return networks;

    }
Before seeing in details what happens inside processWifiLineForLinux, let me highlight a few points:
- Since we add a cell to our hash only when the description of the next one starts, we would otherwise miss the final
ifstatement (to capture the last network in the output). - The code above assumes that two cells can’t share the same name. This is a reasonable assumption because networks are not indexed by their name (that info is captured by the
ESSIDfield). They are listed and assigned a progressive identifier “Cell 0X”. - The last thing we do before storing properties is a call to
mapWifiKeysForLinuxand in this case they just return the keys unaltered.
Even the function that processes each line is very similar to what we’ve created for the battery: since each line holds a field name and its values, we first check for edge cases that need to be handled in a special way, and for the remaining lines we just split them and store the key-value pair appropriately.
    function processWifiLineForLinux(cell, line) {

      var key;

      var val;
      line = line.trim();

      if (line.length > 0) {
        switch (true) {

        case stringStartsWith(line, NET_ADDRESS_PREFIX):

          line = line.split(':');

          line.splice(0, 1);

          //INVARIANT: Address in the format Address: DC:0B:1A:47:BA:07

          if (line.length > 0) {

            cell[NET_ADDRESS_PREFIX] = line.join(":");

          }

          break;

        case stringStartsWith(line, NET_QUALITY_PREFIX):

          //INVARIANT: this line must have a similar format: Quality=41/70  Signal level=-69 dBm

          line = line.split(NET_SIGNAL_PREFIX);

          cell[NET_QUALITY_PREFIX] = line[0].split("=")[1].trim();

          if (line.length > 1) {

            cell[NET_SIGNAL_PREFIX] = line[1].split("=")[1].trim();

          }

          break;

        case stringStartsWith(line, NET_EXTRA_PREFIX):

          //INVARIANT: this line must have a similar format: Extra: Last beacon: 1020ms ago

          line = line.split(":");

          //we can ignore the prefix of the string

          if (line.length > 2) {

            cell[line[1].trim()] = line[2].trim();

          }

          break;

        default:

          //INVARIANT: the field must be formatted as "key : value"

          line = line.split(":");

          if (line.length > 1) {

            //Just stores the key-value association, so that coupling with client is reduced to the min:

            //values will be examined only on the client side

            cell[line[0].trim()] = line[1].trim();

          }

        }

      }

      return cell;

    }
This discussion is the perfect chance to show you a neat trick I’ve recently “borrowed” from a fellow engineer. It will allow us to use a switch statement instead of a chain of if–elses.
Endpoint
Adding the new endpoint to our server is trivial thanks to Node’s HHTP module and the helper methods we’ve created in the previous tutorial. We just need to define the Regular Expression for the paths we want to respond to, and add an if statement to the server callback, triggered on incoming requests:
    var server = http.createServer(function (request, response) {

      var requestUrl = request.url;

      var filePath = BASE_URL + requestUrl;
      if (requestUrl === '/' || requestUrl === '') {

        response.writeHead(301,

          {

            Location: BASE_URL + 'public/demo.html'

          });

        response.end();

      } else if (RE_BATTERY.test(requestUrl)) {

        getBatteryStatus(response, onBatteryInfo, onError);

      } else if (RE_NETWORKS.test(requestUrl)) {

        getWifiStatus(response, onWifiInfo, onError);

      }
      ...
    }
At this point all we have to do is just creating a callback that will run the command, transform its output and finally send the JSON result to the client, wrapped in the HTTP response provided by http.createServer.
    function getWifiStatus(response, onSuccess, onError) {
      child_process.exec(CONFIG.wifiCommand, function execWifiCommand(err, stdout, stderr) {

        var wifi;
        if (err) {

          console.log('child_process failed with error code: ' + err.code);

          onError(response, WIFI_ERROR_MESSAGE);

        } else {

          try {

            wifi = CONFIG.wifiProcessFunction(stdout);

            onSuccess(response, JSON.stringify(wifi));

          } catch (e) {

            console.log(e);

            onError(response, WIFI_ERROR_MESSAGE);

          }

        }

      });

    }
For the final step, notice that we reused the onSuccess function that we had conveniently defined for the battery endpoint (same thing for the onError handler).
Client
Now, let me introduce you the funniest part of this example. We’re going to massively use Ractive.js for the Web client. It is a lightweight, powerful framework that combines two-way binding (AngularJS-style) with HTML templates (like mustache or Handlebars).
The stress on templates (even more than AngularJS, way more than React), is indeed one of Ractive.js’ hallmarks, together with its blazingly fast performance, as a result of a clever engine that always computes the smallest possible DOM elements to be refreshed when data change.
We’re going to add two panels to our dashboard:
- One for the list of networks in our surroundings (showing a brief summary for each item).
- Another one that only appears once a network is selected and displays detailed information for that WI-FI connection.
Template
Let’s start by discussing the HTML templates to display our data, and then we’ll see how to bind server’s data to them.
Wi-Fi List
The most complex template we need is the one showing the list of the available networks. The first dozen of lines just define the container panel, and use Ractive.js’ binding to conditionally show an icon warning about server errors, and a button to pause/resume server polling:
   <div class='col-md-6 outer-panel'>

      <div class='inner-panel networks-panel'>

        <span class='title'>Available WiFi Networks</span>
        <div class='update-error' style={{!networksUpdateError ? 'visibility:hidden;' : ''}} data-toggle="tooltip" data-placement="top" title='Unable to refresh WiFi data'>

        </div>
        <div class='play-button' on-click='networks-play' style={{!networksPaused ? 'display:none;' : ''}} data-toggle="tooltip" data-placement="top" title='Restarts WiFi updates'>

        </div>

        <div class='pause-button' on-click='networks-pause' style={{networksPaused ? 'display:none;' : ''}} data-toggle="tooltip" data-placement="top" title='Pause WiFi updates'>

        </div>
        <br>

        <br>

        {{^wifiNetworks}}

            LOADING...

        {{/wifiNetworks}}

        <div class="list-group">

        {{#wifiNetworks: num}}

          <a href="javascript:" class="list-group-item" id={{'network_' + num}} on-click="expandWifi">

            <h5 class="list-group-item-heading">{{ESSID}}</h5>

            <p class="list-group-item-text">{{Address}}</p>

            {{#isNetworkEncrypted(this)}}

              <div class='protected-wifi'>

              </div>

            {{/Encription}}

          </a>

        {{/wifiNetworks}}

        </div>
      </div>

    </div>
The double-stache {{ }}, as in mustache and Handlebars, are markers for dynamically injected content. Ractive.js allows us to use expressions and run functions inside the brackets, as long as those functions and the data used are globally available (Math.round, for example) or have been added to the data field of the JavaScript object bound to the template.
The result of the expression inside the brackets will be escaped, so it’s going to be plain text. But sometimes you might need to add few HTML lines to your elements. There’s an alternative way to do it, but if you really think you need it, you can use triple-stache {{{ }}}.
Using triple-stache is safe because the scripts will be escaped and not executed, but it is slower than double-stache, so you should try to avoid it as much as possible.
The second part of the template is much more interesting. We iterate through the list of networks with {{#wifiNetworks: num}}, capturing the index of each item in the num variable.
For each item in the list, we add a callback handling clicks (see below) and show a summary of its values.
Notice how closing tags don’t have to match opening tags text:
    {{#isNetworkEncrypted(this)}}

      ...

    {{/Encription}}
The opening one is an if tag whose condition is a function, which would make it weird running it again in the closing one. So we can use a meaningful message to pair the two tags, just for maintenance’s sake.
Selected Wi-Fi Details
    {{#selectedNetwork !== null}}

      <div class='inner-panel network-details-panel'>

      <span class='title'>Details about {{selectedNetwork.ESSID}}</span>

      <br>

      <br>

      {{#selectedNetwork:key}}

        <span class='key'>{{key}}:</span> <span class='value'>{{this}}</span>

        <br>

      {{/selectedNetwork}}

      </div>

    {{/selectedNetwork}}
The panel for the network’s details is quite simple: we only show it if we have assigned a value to the selectedNetwork field in our ractive object. Then we show the network’s name (the ESSID field), and display all the key-value pairs we have received from the server.
This is aimed to obtain the lowest possible coupling, but of course you can modify it to highlight some information or display them in a more meaningful way.
JavaScript
We’ll setup a polling daemon that asynchronously queries the server at given intervals of time. Every Ajax call will provide the updated list of WI-FI networks. All we have to do when we receive a JSON response from the server, is to acknowledge we received a successful response and update the fields in which we store the list of networks inside the ractive object.
Setup
As we’ve shown in the previous article, to bind a template to some data, we just need to create a new Ractive object, hook it up with the template’s ID (#meterVizTemplate below), and the target DOM elements, i.e. the node that is going to be the template’s parent in the DOM tree (panels below).
Then we just need to add all the objects or values we want to use in the template as fields of ractive.data. This can be done on initialization (as below) or later, using ractive.set().
    ractive = new Ractive({

      el: 'panels',

      template: '#meterVizTemplate',

      data: {

        wifiNetworks: []

        ...

      }

    });
Daemons
We’ll use the same mechanism for the daemon and to pause/restart querying the server as we did for the battery. For the sake of brevity we won’t repeat it here, but if you want to deepen this topic you can take a look at this article or to the GitHub repository.
Ajax Calls
The only thing that our new daemon does, is making an Ajax call and then updating our data in case of success or the field signaling network problems, in case of errors.
    function updateWifiNetworksList () {

      $.ajax(WIFI_SERVICE_URL, {

          dataType: 'json',

          jsonp: false

        })

        .then(function (networks) {

          ractive.set('networksUpdateError', false);

          ractive.set('wifiNetworks', networks);

        }).fail(function () {

          ractive.set('networksUpdateError', true);

        });

    }
We should also check that the JSON file we got is well formatted. We don’t have to worry about script injection, since Ractive.js already escapes the field values before adding them to the DOM.
It’s worth noting that the jQuery.getJSON() method, which would be a shortcut for the $.ajax() method used above, is safe as long as:
1. You don’t include the 'callback=' string in your URL (which would allow the JSON code to be executed).
2. You can trust the server you are calling.
Since we’re not using user provided content for the URL, one would think that it should not be a concern.
However, if our server was to be compromised, then we would have no barrier to protect us from injected code. If an explicit 'dataType' header is not set, then jQuery will try to guess the content from the response, and a response from a malicious server might contain JavaScript code.
Although this possibility is not so common, we can’t rule it out completely. For this reason, it’s not a bad idea adding an extra layer of protection at the price of a little more typing.
Updating the Dashboard
The most relevant add-on for this step will be that we respond to clicks on the list and show details for the selected network:
    expandWifi:   function (event) {

      var selectedNetworkItem = ractive.get('selectedNetworkItem'),

          currentSelection = $(event.node);

      if (selectedNetworkItem && $.isFunction(selectedNetworkItem.toggleClass)) {

        selectedNetworkItem.toggleClass("active");

      }

      currentSelection.toggleClass("active");

      ractive.set('selectedNetworkItem', currentSelection);

      ractive.set('selectedNetwork', event.context);

    },
To do this we define an ad-hoc event handler. As mentioned above, it will be called when we click on any list entry, and then the event associated with the click will carry information about the selected network itself.
Now, if we weren’t using Ractive.js, let’s say we were using jQuery only, we would have to:
- Call a method that would take the selected network’s ID;
- Use it to find the network object for that ID (likely stored in a dictionary);
- Find the DOM element for the “selected network panel”;
- Remove the old DOM tree inside the panel and iteratively create a new list displaying the key-value associations, mixing a lot of HTML strings inside our JavaScript code.
Ractive.js will take care of all this for us, and it will do it better than we would (on average), changing the smallest possible DOM subtree only.
First, the event object sent to the on-click handler will have a context field that contains the data bound to the DOM element. In other words, we get the network data object “for free”.
Once we have that, the only thing we have to do is using it to update our ractive object, already bound to the template. Ractive.js’ engine will do the rest, updating the DOM and displaying the changes.
Conclusions
Finished! We have our dashboard “pimped”. As I said in the introduction, this is just a starting point.
If you have followed along, you should now be able to easily display lists of complex items, handle item selection, and safely communicate to the server.
You can use these skills for a number of other tasks, not necessarily involving displaying stats for your laptop. From showing a list of restaurants around the user to enumerating home appliances, you can control all through a Web interface or your mobile. The choice is yours, and there is no limit.
If you want to deepen the topics covered in this article, I suggest you to take a look at these good resources:
- Creating a Battery viz Using Node.js: Getting Started and Server
- Interactive tutorial about Ractive.js
- Jquery
$.getJSONmethod - Discussion on Stackoverflow about
jQuery.get()method
Frequently Asked Questions (FAQs) on Building a Wi-Fi Dashboard
What are the prerequisites for building a Wi-Fi dashboard?
To build a Wi-Fi dashboard, you need to have a basic understanding of JavaScript and Node.js. You also need to have Node.js and npm (Node Package Manager) installed on your computer. If you don’t have these installed, you can download them from the official Node.js website. Additionally, you’ll need a text editor to write your code. You can use any text editor of your choice, but some popular ones include Visual Studio Code, Atom, and Sublime Text.
How can I install the node-wifi module?
You can install the node-wifi module using npm, which is a package manager for Node.js. Open your terminal or command prompt and navigate to the directory where you want to install the module. Then, run the command ‘npm install node-wifi’. This will download and install the node-wifi module in your current directory.
How can I connect to a Wi-Fi network using the node-wifi module?
The node-wifi module provides a ‘connect’ function that you can use to connect to a Wi-Fi network. You need to pass an object to this function that contains the SSID and password of the network. Here’s an example:var wifi = require('node-wifi');wifi.connect({ ssid: 'your network name', password: 'your password' }, function(err) {
if (err) {
console.log(err);
}
console.log('Successfully connected to the network');});
How can I scan for available Wi-Fi networks?
The node-wifi module provides a ‘scan’ function that you can use to scan for available Wi-Fi networks. This function returns an array of networks. Each network is an object that contains information such as the SSID, signal strength, and security type. Here’s an example:var wifi = require('node-wifi');wifi.scan(function(err, networks) {
if (err) {
console.log(err);
}
console.log(networks);});
How can I disconnect from a Wi-Fi network?
The node-wifi module provides a ‘disconnect’ function that you can use to disconnect from a Wi-Fi network. You don’t need to pass any arguments to this function. Here’s an example:var wifi = require('node-wifi');wifi.disconnect(function(err) {
if (err) {
console.log(err);
}
console.log('Successfully disconnected from the network');});
How can I get the current Wi-Fi status?
The node-wifi module provides a ‘getCurrentConnections’ function that you can use to get the current Wi-Fi status. This function returns an array of networks that the computer is currently connected to. Here’s an example:var wifi = require('node-wifi');wifi.getCurrentConnections(function(err, currentConnections) {
if (err) {
console.log(err);
}
console.log(currentConnections);});
How can I handle errors in the node-wifi module?
The node-wifi module follows the standard Node.js error handling pattern. All functions take a callback as the last argument. This callback is a function that takes two arguments: an error object and the result. If an error occurs, the error object will contain information about the error. Otherwise, the error object will be null and the result will contain the result of the operation.
Can I use the node-wifi module to manage Wi-Fi networks on all operating systems?
The node-wifi module is designed to work on Windows, macOS, and Linux. However, the functionality may vary slightly between different operating systems due to differences in how they manage Wi-Fi networks.
Can I use the node-wifi module with other Node.js modules?
Yes, you can use the node-wifi module with other Node.js modules. For example, you can use it with the express module to create a web server that displays the available Wi-Fi networks.
How can I contribute to the node-wifi module?
The node-wifi module is an open-source project, and contributions are welcome. You can contribute by reporting bugs, suggesting new features, improving the documentation, or writing code. To contribute, you can fork the project on GitHub, make your changes, and then submit a pull request.