
Key Takeaways
- Google Web Designer (GWD) is a design tool for creating HTML5/CSS3/Javascript banners and advertisements, focusing on projects for Doubleclick and AdWords campaigns.
- GWD is not designed for creating full applications or websites, but rather simple, animated elements such as banners, pop-up ads, and sidebars.
- The tool offers different editing modes, including banner, expandable, interstitial, HTML, HTML with pages, CSS, JavaScript, and XML, with the first three being more specific to Google ads.
- While GWD can create small ads, it creates an entire HTML page, suggesting that the final product may need to be deployed within an iframe or a popup window.
- Despite its limitations, GWD can be useful for creating interactive content and animations, and may be worth exploring for those interested in creating dynamic ads or elements for a website.

Google Web Designer is a graphical design tool for creating HTML5/CSS3/Javascript banners and advertisements using animations and 3D transforms. Using their graphical tools such as drawing, text, and 3D objects, you can animate these objects and events on a timeline using keyframes.
GWD is clearly not designed to create fully-fledged applications or entire websites, but rather banners, popup ads, sidebars, animated buttons even, with a strong focus on projects for Doubleclick and AdWords campaigns.
There doesn’t seem to be a lot of buzz about this tool and I haven’t found many example projects that have made full use of it. Craig Buckler wrote a review of GWD for SitePoint back in October 2013 and it did not get the greatest review.
To be fair though, Craig’s review was written just days after launching the initial beta. The version I am running is 1.1.2.0814 which is still in Beta. The program is now almost a year old. Knowing Google, it might come out of beta by the time we get Firefox version 3076!
Note: When I needed help using or explaining a feature, I stuck almost exclusively to Google’s own Help Center. They also have a Youtube channel with a handful of videos only a few weeks old. I was surprised how little help there is for this program out there, but perhaps the program is simpler than it seems?
The Project
![]()
Because this is a tool for animating, I figured I’d create some kind of simple ad with a “click here” hotspot. I wanted to animate a cursor arrow and make it bounce against the hotspot when they hover the cursor over it.
Sounds simple enough right?
All I have to do is animate a small graphic and have it loop, then create the hotspot and send the user off to some web page when they click. Let’s see how easy it was to create!
First, using some awe-inspiring built-in shapes and brushes from Photoshop CS6, I made this quick mockup ad for you to get a dream vacation.

The idea is to have the white arrow bounce on the button when you hover the cursor over it; and when you click the button, open another page.
I hope you will spend more time on your graphics than I did!
Editing Modes
Every time you create a new file, you can choose which editing mode to work in, here is a very brief explanation of each:
- Banner (Simple ad for specific dimension within an app)
- Expandable (Ad expands when clicked and has a close button to shrink it back)
- Interstitial (Full page ad that appears at some point in your app such as between page transitions, click a close button to continue flow of app)
- HTML (Much simplified HTML starting point, not as focused on Google ad environment and fancy features)
- HTML with Pages (Uses a ‘Page’ construct, allowing your ad to contain multiple pages within itself without browser refreshing)
- CSS (Essentially a very basic text editor with little more than line numbers and color highlighting)
- JavaScript (Same basic editor)
- XML (Same basic editor)
The only thing of note here is that the Banner, Expandable, and Interstitial modes are more specific to Google ads. The initial source of a Banner was 107 lines of HTML and it published 8 files and 1 folder for 70.2KB total size. When opening a simple HTML document which is not focused on Google ads, it had 24 lines in the HTML and published 3 files and 1 folder for 1.57KB in size.
There does not seem to be any difference in the interface itself with each mode, but rather how much initial code and template is created in advance. I chose HTML for my small project as I’m not publishing to DoubleClick.
The simple editors for CSS, JavaScript and XML are pretty much worthless. I’m sure they are there just to show people that the code is editable, but anyone accustomed to a modern IDE will find them seriously under-powered.
For instance, if you edit a CSS file, there are no helpers, context menus, automations, buttons, color selectors or anything. It offers only one feature – the ability to add and remove comments. That’s it.
Creating My Ad
I opened up a new HTML project, gave it a name and location and clicked OK.
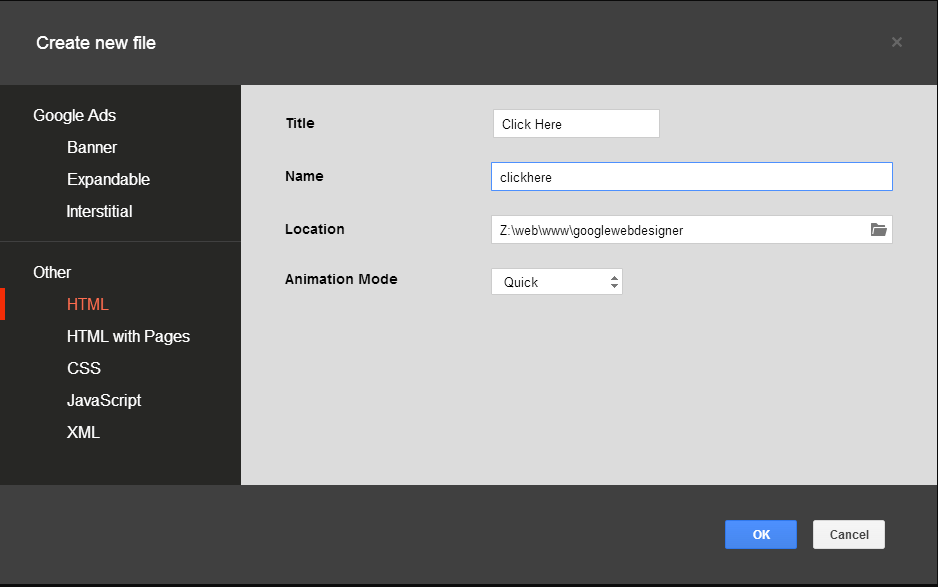
The project opens to Design View and I’m looking at a blank white canvas. I know I need my ad in here somewhere, so I click the ‘Tag Tool‘ button on the left sidebar. With this tool you can draw a div, image, video, or something custom.
You can set the background color and a few basic options here including rounded corners. I drew an image directly on the canvas. It will absolute position the element wherever you draw it. My image was 400×120 pixels but I had to edit that manually after drawing it since you cannot set the dimensions as you draw.
A Note For Newbies
One point worth remembering is, if you want your element to be registered in GWD for selection in events, you must add an ID attribute to it.
I forgot this requirement a few times and couldn’t understand why GWD didn’t seem to be finding my element. If you use a built-in GWD component, the ID is auto-generated, but this doesn’t happen when you use the drawing tools. Classes are also automatically added by GWD.
Size, position, ID, 3D position, margin, padding, style, and the image source are all available in the Properties sidebar panel. I found it is much safer using their panels than trying to edit code or CSS directly. Avoid manually editing code if the interface gives you options there. Things may not work if you don’t!
After setting the properties of my image, it appeared in the canvas.
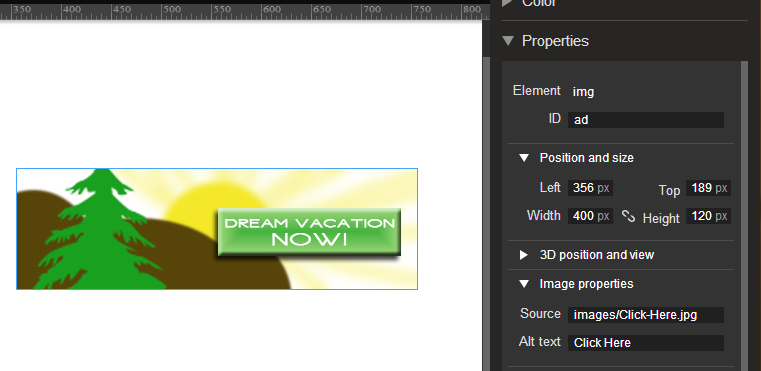
By setting the ID, it is now able to be selected in the Events dialog as well.
I’m getting ahead of myself though.
Next I figured the hotspot area would be the easiest part to create. There is a ‘Tap Area‘ in the Components sidebar so I dragged that onto the canvas, it created at its default size and you’ll need to resize it per your requirements.
Unlike tools on the left pane, you don’t ‘draw’ Components – they must be dragged onto the canvas.
After dropping the Hot Spot and editing the properties of it, the only way to do something with it was to create an event.
-
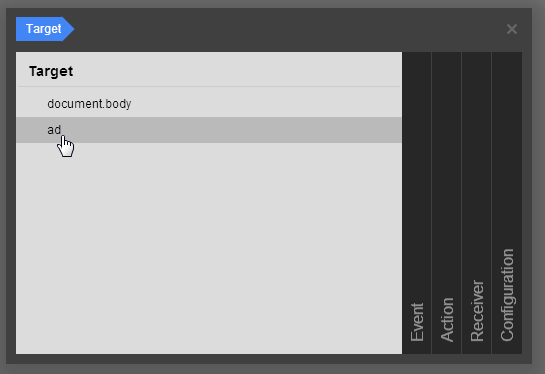
In the Events panel, click the plus icon to add an event, then go through the pages of the dialog.
-
For the Target, click the newly created hotspot (with auto-generated name).
-
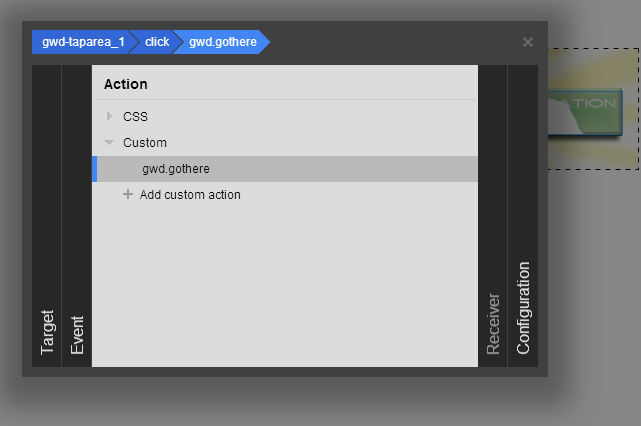
For the Event, we want a Mouse->click.
For the Action, I added a custom action and named the function “gothere” with this one line of Javascript:
window.open("http://www.google.com", "_self");
Now when I preview the document, I can click the hotspot and it opens Google just as expected. So far so good! The project is now made up of one image, one hotspot, and one click Event.
The Animating
Now the fun begins. Let’s animate my arrow and make it bounce when they hover over the hotspot.
I used the Tag Tool again to add another image and placed it where I wanted on the canvas, just barely overlapping the hotspot.
![]()
I gave the arrow image an ID so that it can be selectable as an Event.
The next part was surprisingly easy. I had the ‘simple’ timeline open which automatically had one keyframe ready. All I needed to do was click the big ‘plus’ sign to create a second keyframe, then I moved the arrow image while the second keyframe was selected. After creating a keyframe, you can set easing options, such as the length of time the transition will take.
I then, created a third keyframe and moved the arrow back to its starting position in the same coordinates as the first keyframe. This way the arrow will move away, but then back again. Using the preview ‘play’ button and the loop button, I can preview the arrow animation and see that it does exactly what I want.
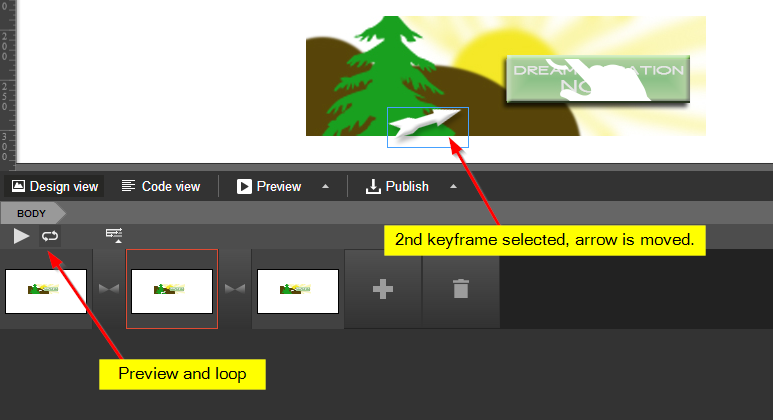
Now the tricky part. I need to set an event so that on a button hover state, the animation loops, but when it loses focus, it stops animating.
I went to the Events panel and created a new event. In the dialog I selected the hotspot from before, to a mouseover event, to a Timeline action of Play. I then created a second action for mouseout to Pause it.
Curiously, they did not offer an onBlur event, but I figured mouseout must do the same thing.
This worked fine except for two problems.
- the animation didn’t loop,
- and the animation started playing as soon as the page loaded.
The loop issue was easily fixed by switching to the Advanced Timeline and clicking the loop button on the track.
[Note: In Craig’s review, he said you couldn’t switch between Simple and Advanced views, now you CAN switch at will]
The second problem was not so easy to solve.
I first took a look at the source code for any obvious switches for autoplay. I didn’t see any, and GWD didn’t have any global project options or settings for this either.
Then I thought I could create an action to pause playback on document load, but no such event existed for selecting ‘on document load’.
Ultimately, the solution was to use the Advanced Timeline again, and on the Events layer I added a new event at the beginning of the timeline.
For this Event, the Target was Document.body. Though I originally assumed it would be the hotspot, I found that didn’t work. For the Event I chose “Timeline->event-1” which is essentially a non-event, since it does not involve a user-action, but rather a timeline action. This essentially translates to “on triggering of the ‘event-1’ timeline”.
The Action was set to Pause, of course. Then the Receiver was the document.body just like the Target.
This effectively made the animation paused from the very first keyframe, accomplishing exactly what I intended.
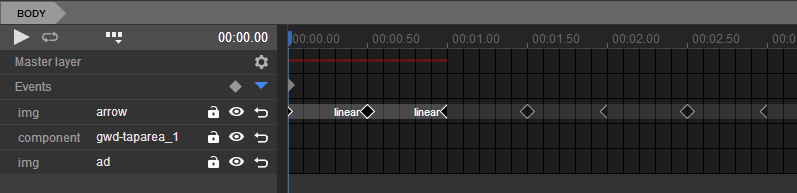
Here is a shot of my finished timeline, which doesn’t really look all that complex.
Clean-up Time
When I originally keyframed the arrow, the program naturally created corresponding keyframes to the other tracks named ‘gwd-taparea1’ and ‘ad’. Since neither of these elements were actually animated, I deleted those keyframes, figuring that should save a little bit of text in the source.
Take note of the grey half-diamond on the Events track. This is the event to pause the animation right from the beginning. And you see three diamonds for my three keyframes. To the right are ghost keyframes due to having loop selected.
I published the product, and set the options to place the code inline and minified. The animation worked in Firefox, Chrome, Internet Explorer, Opera, and Safari. The experience was, for all intents and purposes, identical in each one.
Here is the final product, I took a screencast of it since the project was a bit much for Codepen to handle.
Final Thoughts
As I worked through this project, I saw plenty of opportunities where I could of got fancier with it. For example, you can layer animations so that each parent container has its own timeline. I can see all kinds of parallax animations being used here with layered graphics animating differently.
I could have expanded my graphic to be much nicer, had tiny effects like the mountains moving or a tree swaying back and forth. And I didn’t touch any of the built-in 3D controls here either.
You can have Events on the timeline, which means your animations themselves can trigger events, and events can call named areas of the timeline. This means you can jump around on your timeline based on user events.
As with many automated-coding tools, GWD is prone to spit out a mountain of code, and it certainly did for my project, creating 3 JS files, a CSS file and the HTML file. This weighed in at reasonably hefty 27.8KB in minified form. And even though it created a separate CSS file and JS files, there was still plenty of CSS and JS inline in the HTML source too.
Even though Google Web Designer seems to be designed to create small ads like mine, the fact that they create an entire HTML page – from DOCTYPE to closing tags – leaves me slightly confused as to how they expect me to deploy it in my own project.
I suspect they intend for you to deploy it within an iframe or a popup window, but it would be nice if they could somehow encapsulate everything in a way that lets me embed it right into my own project as an object without any excess code or managing of multiple files.
If that is possible within the GWD framework, I certainly didn’t see it. Perhaps that is for another day and another version. For now, I can only guess that your product needs to be iframed.
This was a fun project and GWD was only somewhat intuitive, it took me maybe 5 hours total time, including reading help files and watching a couple Youtube videos to figure out the quirks (along with writing this article and creating the graphics).
Now that I’m more accustomed to the interface though, I can see myself trying to use this for something bigger and funner. For instance, I’d like to construct a fancy menu with hover and click effects, and I’d love to see what the 3D functions can do, as well as pushing the drawing tools.
- What do you think?
- Would you use a tool like this?
- Are such animations worth the extra overhead it creates?
Frequently Asked Questions (FAQs) about Google Web Designer
What are the key features of Google Web Designer?
Google Web Designer is a powerful tool that offers a variety of features to create engaging, interactive HTML5-based designs and motion graphics. Some of its key features include a visual and code interface, allowing users to create content using a design view or a code view. It also offers a wide range of design tools such as 3D objects, text, images, and videos. Google Web Designer also supports responsive design, allowing your content to adapt to different screen sizes.
Is Google Web Designer free to use?
Yes, Google Web Designer is a free tool provided by Google. It can be downloaded and installed on your computer without any cost. This makes it a cost-effective solution for individuals and businesses looking to create high-quality, interactive content.
Can I use Google Web Designer for creating website layouts?
Google Web Designer is primarily designed for creating interactive content like ads, banners, and other motion graphics. While it does offer some features that can be used for creating website layouts, it may not be as comprehensive as other dedicated web design tools. However, it can be a great tool for creating individual elements that can be incorporated into a website.
Does Google Web Designer require coding knowledge?
While Google Web Designer does offer a code view for more advanced users, it also provides a visual interface that allows you to create content without any coding knowledge. The tool provides a variety of pre-designed components that can be easily added and customized, making it accessible for users of all skill levels.
How does Google Web Designer compare to other design tools?
Google Web Designer stands out for its focus on creating interactive, HTML5-based content. It offers a range of design and animation tools, and its integration with other Google products like Google Drive and Google Ads makes it a convenient choice for many users. However, it may not offer as many features for website design as some other tools, and its interface can take some time to learn.
Can I use Google Web Designer on any operating system?
Google Web Designer is compatible with Windows, Mac, and Linux operating systems. This makes it a versatile tool that can be used on a variety of devices.
Can I preview my designs in Google Web Designer?
Yes, Google Web Designer offers a preview feature that allows you to see how your design will look in different browsers. This can help you ensure that your content will display correctly across different platforms.
Can I use Google Web Designer offline?
Yes, Google Web Designer can be used offline. Once the software is downloaded and installed on your computer, you can use it to create and edit content without an internet connection.
Does Google Web Designer support responsive design?
Yes, Google Web Designer supports responsive design. This means that you can create content that adapts to different screen sizes, ensuring that your designs look great on any device.
Can I export my designs from Google Web Designer?
Yes, Google Web Designer allows you to export your designs in a variety of formats, including HTML, CSS, and JavaScript. This makes it easy to integrate your designs into a website or other platform.