
Key Takeaways
- The git-stash command is a powerful tool for temporarily hiding changes in a dirty working directory, allowing for easy branch swapping without the need for staging or committing changes first.
- The git stash save command allows for descriptions to be added to each stash, aiding in better control and organization of each stash. Using the –patch (-p) flag allows for stashing of specific subsets of changes.
- Git allows for multiple stashes, each with their own identifiers. These can be viewed with the git stash list command, and individual stashes can be shown with the git stash show command.
- Stashes can be applied to branches other than the one they were stashed from, and even to directories that are not clean. After applying a stash, it remains in the stash list and must be manually removed with the git stash drop command. The git stash pop command applies and removes a stash in one step.
 Most Rubyists find themselves using Git on a day-to-day basis. We use it to organize our projects, protect ourselves from errors, and to make changes with the confidence that our code is safe. Its simple command line interface belies its flexibility and depth. Because of this power, it definitely merits deep study and practice.
Today, I want to discuss a few of the techniques that I use to make swapping branches easier, specifically the git-stash command.
git-stash is a wonderful way to temporarily hide changes in a dirty working directory. This allows us to work on a feature branch and quickly swap to other branches without the bother of staging / commiting our changes first.
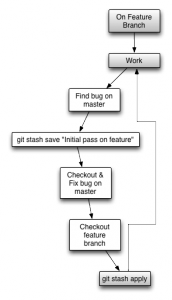
[Typical Stash Workflow]
If you are like most developers, then the extent of your experience with git-stash extends no further than the following two commands:
git stash
and
git stash pop
Often, this is enough for what we need, but git-stash has so much more to offer. Let’s explore some of its myriad abilities.
Saving With a Description
The simplistic approach to stashing is git stash and is analogous (mostly) to git stash save. The latter takes several arguments, most important of which is a description. If you are going to use stash as part of your normal workflow you must use these descriptions to keep better control of each stash. Let’s see how that’d work:
touch gum_drop_mountains.rb   # New feature

git add .                     # git-stash only works on tracked files

                              # unless you pass the --include-untracked flag

                              # to stash save
git stash save "Initial pass on Gum Drop Mountains."

git stash list

stash@{0}: On master: Initial pass on Gum Drop Mountains.
Now when we view the current stash list we see meaningful messages instead of the default description WIP on <branch> <last commit message>.
Stashing In Patches
Sometimes you want to stash a specific subset of changes, for this we can use the --patch (-p) flag. This allows us to interactively specify which changes will be included in this stash.
# edit gum_drop_mountain.rb

git stash save -p "Added GDM tests"
Which will drop you into a prompt like below:
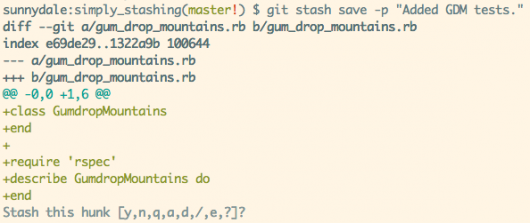
Once you’ve begun the interactive process, you can press ? to see a list of available commands. Upon completion you’ll be able to see your new stash with git stash list. The changes that are left uncommitted (to the stash) will still be in your current directory.
Listing Stashes
The most common way to view your current stashed changes is to type git stash list as we touched on earlier. This will print:
# Unless you are cool and passed a description
stash@{0}: WIP on submit: 6ebd0e2... Initial Commit.

stash@{1}: On master: 9cc0589... Add git-stash
Here, the stashes are specified as stash@{<revision>}. Many of the git-stash commands allow this stash identifier to be explicitly set, making it an important piece of information. git stash list takes any of the options accessible to git log which allows for some customization.
git stash list --pretty=format:'%Cblue%h %Cred* %C(yellow)%s'
Which will output something like:
![]()
You can alias git-log with the above formatting, which is common. Doing so with the git stash list is a prime candidate for this style of optimization, as being able to quickly decipher these descriptions can save you time.
Showing Individual Stashes
Showing stashes can be done with the git stash show command. It accepts an argument for the stash identifier and defaults to stash@{0} (most recent). It will display the diffstat by default.
Applying Stashes
Let’s assume we’ve been working for few hours. During this time we’ve been pulled off several times to work on other branches in the project. As we were pulled away, we’ve stashed our dirty working directories and given them all nice messages so we can cobble it all together later. Now that the bugs are fixed, we get to go back to our features. Our stash list looks like this:
git stash list

stash@{0}: On gum_drop_mountain: Touching up gum drop mountain peaks.

stash@{1}: On candy_cane_lane: Adding some tinsel to candy cane lane

stash@{2}: On master: First pass on gum drop mountains.
We want to go back to the candy_cane_lane feature branch and apply our stashed changes there. To do so, we are going to use the git stash apply command.
git checkout candy_cane_lane

git stash apply stash@{1}    # Specified stash or most recent (stash@{0})
Once we’ve done that, our changes are back in their proper place and we can resume work.
Git is smart here, in that you can apply these changes to branches other than the branch from which they were stashed. Furthermore, the branch you apply the changes to doesn’t have to be a clean directory! Git will throw a merge conflict to be manually resolved if the stash no longer applies cleanly[1].
Removing Stashes
Just for funzies, let’s check the stash list before moving on.
git stash list

stash@{0}: On gum_drop_mountain: Touching up gum drop mountain peaks.

stash@{1}: On candy_cane_lane: Adding some tinsel to candy cane lane

stash@{2}: On master: First pass on gum drop mountains.
What? Our stash is still present in our list even after applying it. That’s because apply doesn’t automatically clean up after itself, we have to use the following command to remove the stash
git stash drop stash@{1}
Which will drop just the stash we applied. Had we not given it a stash identfier it would have assumed we meant to drop stash@{0} (most recent). If we want to be rid of all stashed changes we can run git stash clear. Beware of clearing stashes (with either drop or clear) as they are impossible to recover.
The Oh-So Convenient Pop
After applying a stash of changes to a branch, it is quite frequently a good idea to remove that stash from the list (like above). Luckily, Git provides us with a convenient method that wraps this workflow. Assume we want to apply stash@{1} and remove it from the stash list. We can run the following command:
git stash pop stash@{1}
If we provide no stash identifier, it would assume most recent (like most git-stash commands). The git-stash man page provides a good way of thinking about this command. That it does the inverse of git stash save.
Branching a Stash
Sometimes you’ll find yourself in a situation where you’ve begun changes on the wrong branch (master for example) and want to take your current dirty directory to its own branch. Well you are in luck! Normally you’d have to do something like this:
git stash

git checkout -b new_feature

git stash pop
But git-stash has a convenience method to do just this. Simply:
git stash

git stash branch new_feature
This will create and checkout a new branch new_feature and apply stash@{0} to it.
To Stash or Not To Stash
Determining when to stash versus when to commit and squash later is a matter of taste. As long as you write descriptive messages about the stash and be sure to keep your stash list clean, then stashing is a great way to quickly get to a clean directory. If, on the other hand, you don’t take care, you’ll find yourself painfully wasting time figuring out which stash is which.
Warnings aside, stashing is a powerful ability that Git provides and with a little practice it can help you navigate your code more quickly and safely. Happy hacking!
Resources
Frequently Asked Questions (FAQs) about Git Stashing
What is the main purpose of Git Stash?
Git Stash is a powerful feature in Git that allows you to temporarily save changes that you have made to your working directory but do not want to commit yet. This is particularly useful when you are in the middle of a task and need to switch context to work on something else. By stashing your changes, you can revert your working directory to the last commit, work on a new task, and then come back to your original task and reapply your stashed changes.
How do I use Git Stash?
To use Git Stash, you first need to make sure that you have changes in your working directory that are not yet committed. Then, you can use the command git stash to stash your changes. This will save your changes in a new stash, and revert your working directory to the last commit. When you are ready to reapply your stashed changes, you can use the command git stash apply.
Can I have multiple stashes in Git?
Yes, you can have multiple stashes in Git. Each time you use the git stash command, a new stash is created and added to the stack of stashes. You can view all your stashes using the command git stash list. To apply a specific stash, you can use the command git stash apply followed by the name of the stash.
What happens when I apply a stash in Git?
When you apply a stash in Git, the changes saved in the stash are reapplied to your working directory. However, the stash is not deleted – it remains in your stash list. If you want to reapply the changes and delete the stash, you can use the command git stash pop.
Can I delete a stash in Git?
Yes, you can delete a stash in Git. To delete a specific stash, you can use the command git stash drop followed by the name of the stash. If you want to delete all your stashes, you can use the command git stash clear.
Can I create a new branch from a stash in Git?
Yes, you can create a new branch from a stash in Git. This is useful when the changes in your stash are substantial and deserve their own branch. To create a new branch and apply your stash to it, you can use the command git stash branch followed by the name of the new branch and the name of the stash.
What is the difference between Git Stash and Git Commit?
Git Stash and Git Commit are both used to save changes in Git, but they are used in different scenarios. Git Commit is used to save changes that you are ready to record in your repository. On the other hand, Git Stash is used to temporarily save changes that you are not ready to commit yet. These changes can be reapplied later when you are ready to continue your work.
Can I stash untracked files in Git?
Yes, you can stash untracked files in Git. By default, the git stash command only stashes changes made to tracked files. However, if you want to include untracked files, you can use the command git stash -u or git stash --include-untracked.
Can I stash ignored files in Git?
No, by default, ignored files are not included when you stash changes in Git. However, if you want to include ignored files, you can use the command git stash -a or git stash --all. This will stash changes made to tracked files, untracked files, and ignored files.
Can I name my stashes in Git?
Yes, you can name your stashes in Git. By default, stashes are named with the branch name and the commit where the stash was created. However, you can provide a custom message to your stash using the command git stash save "your message". This can be useful to remember what the stash contains.