Yesterday was the big launch day of Adobe’s Creative Suite 5 and if you haven’t already seen some of the new features, you can check them out on the CS5 Launch Site. One of the new features mentioned in CS5 are the powerful new painting tools. However, for us mere mortals who will continue to use “old” Photoshop for a while longer, here’s a way to create a painterly effect that has been in a part of Photoshop since version 5.5.
The Art History Brush lets you apply paint styles to your image using a history state or snapshot as the source. There are several options available for the tool which will affect how the pixels will look, these include various blending modes, opacity, paint stroke style, fidelity, area, and tolerance. This tool will probably not fool anyone into thinking you have created a watercolor in the traditional way, but it’s fun to use and can create nice images.
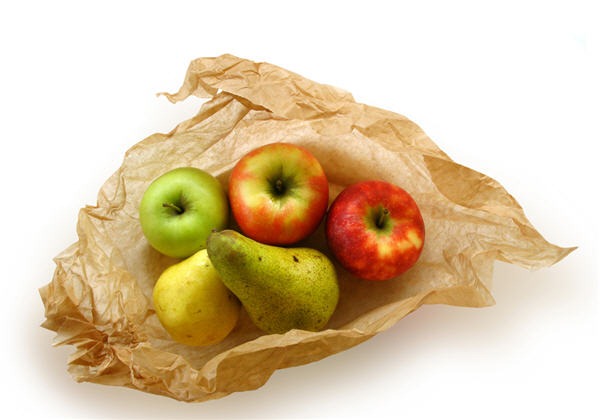
1. Open an image that you want to “paint”. I’m using this image of fruit which is free to down load from Stock Xchng. Thanks to photographer NKS for the high res image. This image is 2800 x 2100 pixels at 300ppi. For the purposes of this post, I’ve reduced it down to 1000 x 680 pixels at 72. Just mentioning that in case you’re wondering why I’m using various brush sizes.
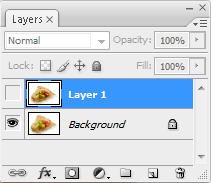
 2. Make a duplicate of the image in the Layers Palette by pressing Ctrl + J or Cmd +J (Mac). Now turn off this duplicate layer and select the background layer.
 2. Select the Art History Brush (Y) from the toolbox. It may be hidden underneath the History Brush, but don’t get the two mixed up.
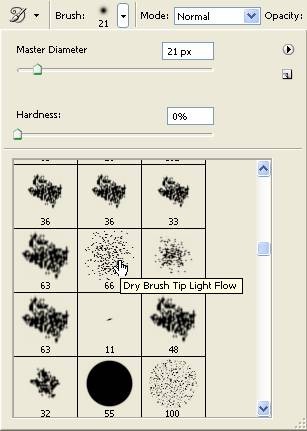
 3. On the tool options bar, click on the Brush options. Choose a “Dry Brush Tip Light Flow” brush from the list of brushes available. You may need to vary the size of the brush tip depending on the size of your image. For this image, I’m going to leave the brush size as 66 pixels. This will make the “painting” look really rough and abstract.
 4. Open the brushes palette and click on the Shape Dynamics under Brush Tip Shape. We’re going to change a few of the brush’s characteristics to help get that painterly effect.
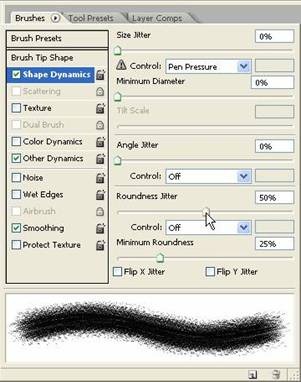 5. Drag the Roundness Jitter to about 50%.
6. Click on the Color Dynamics. Drag the Hue Jitter to about 10%. That’s all the brush adjustments that we need to make.
 7. On the Tool Options bar, set the style of the Art History Brush to Tight Short.
(You may want to try out different styles depending on the effect you want to achieve). Set the area to 50 pixels.
![]() 8. Start painting on the image. It’s a good idea to paint over large areas of similar colour to get a feel for how the art history brush works. As I mentioned, the image will look pretty abstract. You can reduce the brush size or change the brush tip for the more intricate areas. After I painted mine it looked like this:
8. Start painting on the image. It’s a good idea to paint over large areas of similar colour to get a feel for how the art history brush works. As I mentioned, the image will look pretty abstract. You can reduce the brush size or change the brush tip for the more intricate areas. After I painted mine it looked like this:
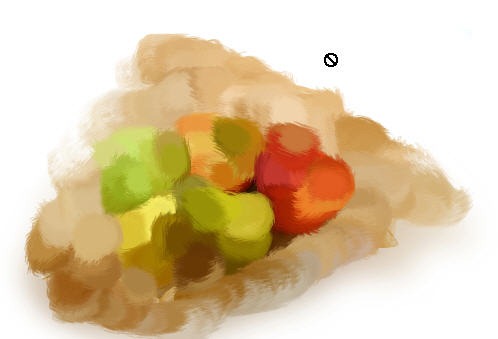 Nice isn’t it?
9. Now we’ll turn back on our duplicate layer. Click on the eye icon in the palette to toggle visibility. This completely hides your abstract painting, so at the top of the Layers palette, click on the blending mode drop down box and change it from Normal to Multiply. You should now see a nice combintion of your original and your abstract painting. Reduce the opacity on the duplicate layer to make it blend more “artistically”.
 I dragged the Opacity down to 60% as I quite liked the effect I got, which is this one:
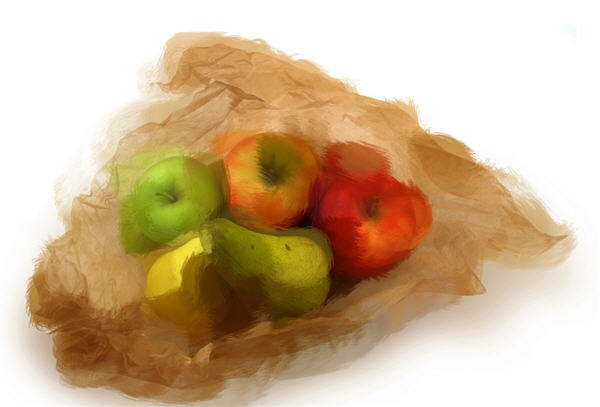 If you wanted to, you could use a layer mask on the top layer and choose to reveal more and less detail in certain areas.
And there you have it. There are lots of options to play around with on the Art History brush and by blending it with your original image you can achieve some really nice effects.
Have you used the Art History brush before? Any tips you’d add for using this tool?
Frequently Asked Questions (FAQs) about the Art History Brush in Photoshop
What is the Art History Brush in Photoshop and how does it work?
The Art History Brush in Photoshop is a unique tool that allows you to create painterly effects by painting with stylized strokes. It uses the source data from your history palette to create these effects. This means that it takes into account the different changes you’ve made to your image, such as filters, color adjustments, and more, and uses this information to create unique brush strokes.
How can I access the Art History Brush in Photoshop?
To access the Art History Brush, you need to go to the toolbar on the left side of your Photoshop interface. It’s located in the same spot as the History Brush, so you might need to click and hold the History Brush icon to reveal the Art History Brush.
What are the different settings I can adjust for the Art History Brush?
There are several settings you can adjust for the Art History Brush. These include the brush size, shape, and hardness, as well as the blending mode, opacity, and flow. You can also adjust the style of the brush strokes, the area the brush covers, and the tolerance, which determines how closely the brush follows the original colors of the image.
How can I use the Art History Brush to create a painterly effect?
To create a painterly effect with the Art History Brush, you first need to create a new layer and fill it with a solid color. Then, select the Art History Brush and choose your desired settings. Start painting over your image, and you’ll see that the brush creates unique, artistic strokes that mimic the look of traditional painting techniques.
Can I use the Art History Brush on any image?
Yes, you can use the Art History Brush on any image. However, it works best on images with a lot of detail and color variation, as it uses this information to create its brush strokes.
What are some creative ways to use the Art History Brush?
There are many creative ways to use the Art History Brush. For example, you can use it to turn a photo into a painting, create abstract art, or add texture to a digital painting. You can also use it to create unique backgrounds or to add artistic effects to your designs.
Can I use the Art History Brush with other Photoshop tools?
Yes, you can use the Art History Brush in combination with other Photoshop tools. For example, you can use it with the Eraser tool to create interesting effects, or with the Smudge tool to blend the brush strokes.
How can I improve my skills with the Art History Brush?
The best way to improve your skills with the Art History Brush is to practice. Try using it on different types of images and with different settings to see what effects you can create. You can also watch tutorials or take online courses to learn more advanced techniques.
Why can’t I see the Art History Brush in my Photoshop toolbar?
If you can’t see the Art History Brush in your Photoshop toolbar, it might be hidden under the History Brush. Click and hold the History Brush icon to reveal the Art History Brush. If it’s still not there, you might need to reset your toolbar by going to Edit > Toolbar and clicking on the “Restore Defaults” button.
Can I use the Art History Brush in older versions of Photoshop?
Yes, the Art History Brush is available in most versions of Photoshop. However, the exact location and settings might vary slightly depending on the version you’re using.
Jennifer Farley is a designer, illustrator and design instructor based in Ireland. She writes about design and illustration on her blog at Laughing Lion Design.


