
Tired of the same old URL shorteners like TinyURL, tr.im or bit.ly? Ever wished you could run your very own URL shortener? In ColdFusion, it’s probably easier than you think. To demonstrate just how powerful and easy to use ColdFusion is, we’re going to build our own simple URL shortener from scratch. In this article, we’ll start out with a basic set of functions – creating shortened links, and expanding them. Don’t forget to try the quiz when you’ve finished reading!
To follow along, you’ll need to download and install the ColdFusion 9 and ColdFusion Builder betas and install them on your development machine. ColdFusion 9 is also available for Linux, and it is possible (with some tweaking) to install ColdFusion Builder – see this tutorial at Compound Theory for details. You’ll also need to grab the code archive for this tutorial.
Key Takeaways
- ColdFusion simplifies the creation of a custom URL shortener, allowing users to manage and condense URLs efficiently.
- The tutorial uses ColdFusion 9 and ColdFusion Builder, demonstrating the setup on a local development server with detailed steps for configuring the server and database.
- Apache Derby, an embedded database included with ColdFusion, is utilized for storing URL data, emphasizing ease of setup without the need for external database servers.
- The application includes features for generating unique short URLs and inserting them into a database, ensuring that each short URL is distinct.
- Error handling is incorporated to manage duplicate short URLs, with the system designed to attempt new entries until a unique URL is successfully created and stored.
Before we start
This tutorial assumes that you have ColdFusion 9 beta running on localhost, on port 8500, using the stand-alone, built-in development server. If you’ve installed ColdFusion on a machine other than localhost, or are using IIS or Apache instead of the stand-alone development server, or are using a J2EE server configuration, you’re going to need to change the server paths mentioned in the code listings.
We’re also going to assume that you have ColdFusion Builder installed on the same localhost machine. If you already have the Eclipse IDE on your machine (including Flash Builder or Flex Builder) and have installed ColdFusion Builder as a plugin, you’ll need to make sure you’re in the ColdFusion perspective: from the Window menu, select Open Perspective > Other > ColdFusion.
Before we start coding, we’re going to tell ColdFusion Builder which ColdFusion server we will be working with. We’ll configure this using the Servers tab at the bottom of the ColdFusion Builder window. There are quite a few steps to follow here, which I’ve broken down for you below:
- Click on the Add Server icon – there’s a little yellow plus sign on it.
- Select ColdFusion as the server type, and click Next.
- Enter a name for the server – this is so it’s recognizable to you. I’ve entered localhost.
- Enter the hostname – if you’re running the default setup, it’s localhost too.
- Enter the port – the default for the built in development setup is port 8500.
- Enter the RDS User Name, which is always admin, unless you specified a different username when you installed the server (this is usually only the case if you’re running on a J2EE server configuration).
- Enter the RDS password you specified when installing ColdFusion. Click Next.
- Browse for your Server Home. This is the directory where ColdFusion was installed – on Windows, it will probably be C:ColdFusion9; on the Mac, /Applications/ColdFusion 9.
- You might also need to browse for your Document Root. This is your web root – on a default Windows installation, it will probably be C:ColdFusion9wwwroot; on the Mac, it’s at /Applications/ColdFusion9/wwwroot.
- Select the version of ColdFusion installed from the drop down box – 9.0.x.
- Click Finish.
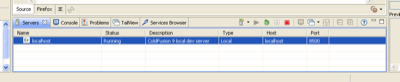
ColdFusion Builder will verify these details and connect to the server. If all went well, you should see the server in the Servers tab. You can start and stop the server and access its ColdFusion Administrator panel from this tab.
ColdFusion Builder works with projects. We could create a new project now, and associate it with our development server, but to make things easier for you we’ve included all the code in a downloadable project which we’re now going to import.
- Download the sample zip file and extract the folder into your ColdFusion web root. Change the name of the folder to URLS now, if needed.
- The navigator panel on the left hand side of the screen shows the files in your current project. Right-click in the Navigator and select Import.
- From the Import wizard, drill down to ColdFusion -> Import Existing Projects, and click Next.
- Browse for the folder you just extracted.
ColdFusion Builder will scan the folder and look for any project files, which will then be listed in the Project List below. Check the box next to our URLs project, and then click Finish.

The project will now be listed in your Navigator panel. The last step is to associate the project with our server.
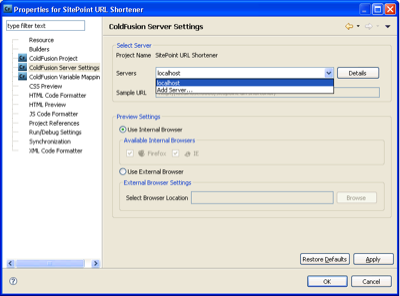
- Right click on the project name and select Properties.
- Select ColdFusion Server Settings from the left hand side of the dialog.
- Select your local development server from the drop-down box of servers, and click OK.
Setting up the database
Our URL shortener application will need a database. Apache Derby is an open source database with some fairly heavy-duty features, and it’s built right in to ColdFusion 8 and later. For our purposes, it’s perfect, because although Derby has no client and no user interface, setting up databases is very simple and there’s no need to install MSSQL, MySQL, or other database server.
ColdFusion uses data source names to store database connections. Data source names are set up in the ColdFusion Administrator, which is the command central for your ColdFusion Server. To access the ColdFusion Administrator for your local development server, right-click on the server name in the Servers tab (remember, it’s down the bottom of the screen) and select Launch Admin Page.
The ColdFusion Administrator launches in a new Eclipse tab and prompts you for your administrator password (which is the one you chose during installation).
Once you’ve logged in, select Data Sources from the left hand menu. At the top of the screen there’s a form for creating a new data source. Enter “URLShortener” as the data source name, select Apache Derby Embedded from the driver dropdown and click Add.
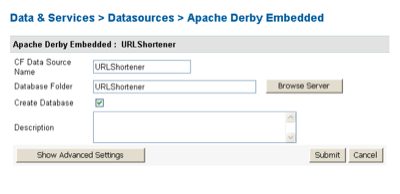
You’re nearly there! In the form that you are now shown, type “URLShortener” in the Database Folder (same as the data source name), and tick the Create Database checkbox. Hit Submit, and your Derby embedded database is created at the same time as your ColdFusion data source name.
Overview of the problem
Are you still with me? Now that we have a development environment and a database, we’re ready to think about how we’ll develop our URL shortener.
URL shortening applications are all over the Internet these days. URL shorteners aim to solve the problem encountered when trying to use long URLs in an instant message, a Twitter message, or any other form of communication with limited characters. The basic premise of a URL shortener is to give you a unique short URL to their site, which, when clicked will redirect the user to the longer URL.
For example, to link to this SitePoint article “What’s New in ColdFusion 9”, with the following URL:
https://www.sitepoint.com/article/whats-new-coldfusion-9/4/
The service TweetBurner will give you this shorter URL:
At just 22 characters, the shortened URL is less than half the length of the original 58 character link. And with longer URLs, the benefits are even more obvious.
Adding tables to the database
To create our URL shortening application, we’re going to need to create a table in our Derby database. We’ll call our table content and give it the following columns:
| Column | Data type | Description |
|---|---|---|
| id | integer | Data |
| label | character(100) | – |
| text | text | – |
| link | text | The URL we are linking to |
| shortlink | character(20) | The short code that will identify our URL |
There are some fields in this database that are not strictly necessary for a simple URL shortener, but we’re going to use them in a follow-up article to this tutorial, so we might as well add them now.
As we mentioned before, there’s no client or user interface for the embedded version of the Apache Derby database, so to create our tables we’re going to run a SQL script in ColdFusion. Open the file db.cfm in the web root of our ColdFusion Builder Project. It contains the following code:
Creating database...

<cfquery datasource="URLShortener" result="return">
  CREATE TABLE content
  (
    id INTEGER NOT NULL GENERATED ALWAYS
       AS IDENTITY (START WITH 1, INCREMENT BY 1),
    label VARCHAR(100),
    text VARCHAR(500),
    link VARCHAR(500) NOT NULL,
    shortlink VARCHAR(20) NOT NULL,
    CONSTRAINT shortlink_uc UNIQUE(shortlink)
  )
</cfquery>

<cfdump var="#return#">
You can execute this code by clicking the Run icon in the toolbar – it’s a white arrow in a green circle. This will launch the script in your default browser. It is also possible to launch the browser inside of ColdFusion Builder by switching to a tab at the bottom of the editing window. There will be a tab for every browser that has been detected on your computer.
After executing, you’ll see the result of the query operation that we ran:
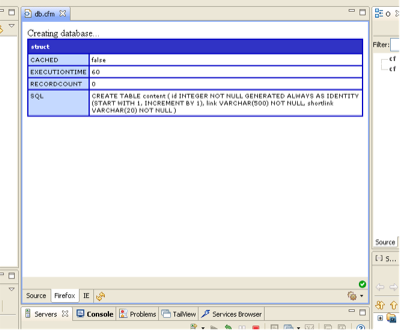
While there’s nothing to specifically state that the operation was successful, it indicates that there were no errors, and shows the execution time and generated SQL code that was run, so we can safely assume that all is okay.
The application code
Take a look inside the ColdFusion Builder project and you’ll see a couple of other .cfm files, and several .cfc files – one on the root directory, and one inside the /com subdirectory. Files ending in .cfm are regular ColdFusion template files. The .cfm extension tells the web server to pass them through the ColdFusion application server before serving them to the end user’s browser. A file with the .cfc extension is a ColdFusion component. This is ColdFusion’s equivalent to what is often called a class in other languages.
Application.cfc
The Application.cfc file in the root directory is a special kind of component which is run before each page request. It holds application-wide settings and has a set of special functions that are run when the application first fires up, before and after each request, when a user session is started or ended, and when an error occurs.
There is an Application.cfc file in the root folder of our ColdFusion Builder project. Open it up and you’ll see it sets a couple of variables – the application name, and a timeout value – and has one function, onApplicationStart:
<cfcomponent output="false">

  <cfset this.Name="URLShortener">
  <cfset this.ApplicationTimeout=CreateTimeSpan(0,0,5,0)>

  <cffunction name="OnApplicationStart" access="public"
      returntype="boolean" output="false"
      hint="Fires when the application is first created">
    <!--- delete and recreate the content cfc
          stored in the application scope --->
    <cfset StructDelete(application,"oContent")>
    <cfset application.oContent=CreateObject("component","com.content")>
     <cfreturn true>
  </cffunction>

</cfcomponent>
As we will have multiple files in our URL Shortener application, and they are all going to need to use functions in content.cfc, we’re going to load that component into the application scope when the application starts. This means that on any page request, we’ll be able to reference any of the functions inside content.cfc by prefixing them with application.oContent.
First, the form
Enough housekeeping – let’s jump into some code. To allow our users to enter their URLs to shorten, we’ll need a form. Open up add.cfm in the ColdFusion Builder project root, and you’ll see a basic form.
At the top of the form is some code that is run when a variable called form.action is defined. Essentially, a function from our content CFC is run inside a loop until the loop’s exit condition – the shortlink variable is not zero length – happens. We’ll examine what’s actually going on here in a moment. Skip down in the file and you’ll see a standard HTML template with a little bit of ColdFusion conditional display code – checking for a variable’s existence and if it is found, displaying it – and a HTML form to enter our URL to shorten. Fairly simple stuff.
<!--- display the add form --->
<form action="add.cfm" method="post">
  <label for="link">URL to shorten</label>
  <input type="text" name="link" id="link" size="100"><br>
  <input type="submit" name="action" value="Submit">
</form>
The heavy lifting: generating the short link code
To generate our short URL, we’re going to create a function which returns a random string of a predefined length from a pool of acceptable characters. I’ve added 63 possible characters – uppercase characters A-Z, lowercase characters a-z, digits 0-9 and the dash character (-). A six-character string made up of these characters yields 636 possible combinations: that’s 62,523,502,209 URLs, which should be enough to keep us going for quite a while!
Open up Content.cfc in the /com directory under our project root to see this function (it’s the very first one listed). You’ll see that the function generateShowLink takes one argument, length, which is required but has a default value of 6, should it not be supplied:
<cffunction name="generateShortLink" returntype="string">

<cfargument name="length" type="Numeric" required="true" default="6">
  <cfset var local=StructNew()>
This is the number of characters that will be generated for the shortcode. Should you wish to use more or fewer characters, you could simply pass a value for length into the function when it’s called. In this code snippet we’re also setting up a variable structure called local to store local variables.
First we set up a list of all allowable characters, then define our radix – that is, the total number of possible characters:
<!--- create a list of all allowable characters for our short URL link --->
  <cfset local.chars="A,B,C,D,E,F,G,H,I,J,K,L,M,N,O,P,Q,R,S,
        T,U,V,W,X,Y,Z,a,b,c,d,e,f,g,h,i,j,k,l,m,n,
        o,p,q,r,s,t,u,v,w,x,y,z,0,1,2,3,4,5,6,7,8,9,-">
  <!--- our radix is the total number of possible characters --->
  <cfset local.radix=listlen(local.chars)>

Then, after setting our return variable to an empty string, we're going to add random characters from that list in a loop:
<!--- initialise our return variable --->
<cfset local.shortlink="">
<!--- loop from 1 until the number of characters our URL should be,
      adding a random character from our master list on each iteration  --->
<cfloop from="1" to="#arguments.length#" index="i">

  <!--- generate a random number in the range of 1
        to the total number of possible characters we have defined --->
  <cfset local.randnum=RandRange(1,local.radix)>

  <!--- add the character from a random position in our list to our short link --->
  <cfset local.shortlink=local.shortlink
   & listGetAt(local.chars,local.randnum)>

</cfloop>
Finally, return the newly generated short link to the calling code:
<!--- return the generated random short link --->
  <cfreturn local.shortlink>

</cffunction>
When we insert our link and short URL code into the database, we need to make sure that the short link value is unique in the database. To help with this, we made the shortlink column in the database unique, so if we attempted to insert a duplicate value, the database would throw an error. We’re going to use this to our advantage.
The function in content.cfc that actually handles the insertion of data into the database is called insertContent. It takes one argument, link – the URL that we wish to shorten – defined at the top, and then initialises a local structure that will hold variables that we need to use locally in this function:
<cffunction name="insertContent" returntype="string">
<cfargument name="link" type="String" required="true">
<cfset var result=StructNew()>
Next, inside an error-catching cftry block, we’re going to attempt to insert the link and a short link code generated by our generateShortlink function. If the shortlink value is unique, the insert will be successful, and our insertContent function will return the new value to display to the end user.
<!--- begin our error-catching block --->
<cftry>

  <!--- try to insert the new link into the database --->
  <cfquery datasource="#variables.dsn#" name="result.qry" result="result.stats">
    INSERT INTO
      content(
        link,
        shortlink
        )
    VALUES(
      <cfqueryparam cfsqltype="cf_sql_varchar" value="#arguments.link#">,
      <cfqueryparam cfsqltype="cf_sql_varchar" value="#generateShortLink()#">
        )
  </cfquery>
  <!--- try to return the new shortlink value,
        referencing the last returned identifier --->
  <cfquery datasource="#variables.dsn#" name="result.inserted">
    SELECT
      shortlink
    FROM
      content
    WHERE
      id = <cfqueryparam cfsqltype="cf_sql_integer" value="#result.stats.IDENTITYCOL#">
  </cfquery>
What if the generated shortcode just happens to be one that’s already been used? The function will hit the error-catching cfcatch block, where the result is instead set to an empty string:
  <cfcatch>
      <!--- insert was not successful - the shortlink generated
            was not unique, so set the return variable to an
            empty string --->
      <cfset result.inserted.shortlink="">
  </cfcatch>

</cftry>
The last thing the function does is return either the newly inserted short link, or an empty string:
<!--- return either the newly created shortlink,
            or an empty string if an error occurred --->
<cfreturn result.inserted.shortlink>
</cffunction>
In our add.cfm component, we are calling the insertContent function inside a condition loop:
<cfloop condition="len(shortlink) EQ 0">
<cfset shortlink=application.oContent.insertContent(link)>
</cfloop>
This loop will continue to run, generating new values and trying to insert them into the database, until it is successful and the value returned is not an empty string.
The add.cfm template then sets the message variable to hold the newly generated short URL:
<cfset message="Your new short URL is http://#cgi.server_name#:#cgi.server_port#/URLS/?#shortlink#">The message variable is displayed to the end user just above the form:
<!--- if there is a variable defined called "message", display it --->
<cfif isDefined("message")>
  <cfoutput><p>#message#</p></cfoutput>
</cfif>
The last step – handling shortened URLs
The final piece of the puzzle is the code that actually accepts our shortened URL and redirects the end user to the real link. This code is inside index.cfm.
First, we use the built-in cgi variable to read the contents of the current request’s query string, and the Replace function to remove the question mark at the beginning of the query string.
<!--- remove the question mark from the beginning of the URL --->
<cfset shortlink=Replace(cgi.query_string,'?','')>
Because we’re using the built-in development server, which is very basic, it’s hard for us to generate cleaner short URLs – that is, URLs without a question mark in them. If you were building a URL shortening application that was going to be deployed on ColdFusion running on an Apache or IIS server, you would be able to remove the question mark from the equation.
Next, we retrieve the full link record from the database using the getLink function from inside the content.cfc:
<!--- retrieve the full URL --->
<cfset link=application.oContent.getLink(shortlink)>
Jumping back over to content.cfc, this getLink function performs a simple database lookup on the one required argument, shortlink, and returns the original link value:
<cffunction name="getLink" returntype="string">
  <cfargument name="shortlink" type="string" required="true">
  <cfset var result="">
  <cfquery datasource="#variables.dsn#" name="result">
    SELECT
      Link
    FROM
      content
    WHERE
      shortlink = <cfqueryparam cfsqltype="cf_sql_varchar" value="#arguments.shortlink#">
  </cfquery>
  <cfreturn result.link>
</cffunction>
Finally, we take the link value returned from the database. If there’s a valid URL there, we use a cflocation tag to redirect the user to this link. However, if nothing is returned – the value of link has zero length – then we’re going to display an error message.
<!--- if a URL is returned, relocate to it; otherwise show an error message --->
<cfif len(link) GT 0>
  <cflocation url="#link#">
<cfelse>
  <p>Link not found.</p>
</cfif>
Improvements
This example is very simple and there are a lot of ways you could improve it, should you wish. As a starting point, there is no validation of the input variable – it would be nice if the URL add form displayed a message if the entered URL was not valid. I’m sure there’s much more you could think of too!
Stay tuned for a follow-up to this tutorial, where we’ll expand on our URL shortener to include a rating widget. For now, try your skills at our ColdFusion quiz, proudly sponsored by Adobe, to check how much of this tutorial you’ve absorbed.
Frequently Asked Questions (FAQs) about URL Shortening and Trimming
What is URL shortening and why is it important?
URL shortening is a technique used on the internet where a Uniform Resource Locator (URL) is made substantially shorter but still directs to the required page. This is achieved by using a redirect on a domain name that is short, which links to the web page that has a long URL. This technique is especially useful in messaging technologies that limit the number of characters in a message (like Twitter), for reducing the amount of typing required if the reader is copying a URL from a print source, for making it easier for web users to remember, or for tracking clicks by web analytics.
How does a URL trimmer work?
A URL trimmer works by taking a long URL and converting it into a shorter one. This is done by using a hash function, which takes an input (or ‘message’) and returns a fixed-size string of bytes. The output is unique to each unique input, meaning that even a small change in the input will produce such a drastic change in output that the new hash value appears uncorrelated with the old hash value.
Are shortened URLs safe to use?
Yes, shortened URLs are safe to use. However, like any tool on the internet, they can be misused. Some people might use URL shorteners to mask the underlying address of a malicious site. Therefore, it’s always a good idea to check the validity of a shortened URL before clicking on it. There are several online tools available that can help you check the safety of a shortened URL.
Can I customize my shortened URL?
Yes, many URL shortening services allow you to customize your shortened URL. This can be useful for branding purposes, or to make the URL easier to remember. However, keep in mind that the availability of custom URLs will depend on the specific service you’re using.
What are the benefits of using a URL trimmer?
Using a URL trimmer can have several benefits. Firstly, it can make long, unwieldy URLs more manageable and easier to share. This can be particularly useful on social media platforms that have character limits. Secondly, many URL trimmers also provide analytics services, allowing you to track how many people are clicking on your links. This can provide valuable insights into your audience and their behavior.
Can I track the performance of my shortened URL?
Yes, many URL shortening services provide analytics tools that allow you to track the performance of your shortened URLs. These tools can provide information such as the number of clicks, the geographical location of the users, the referral sources, and more.
Can shortened URLs expire?
The expiration of shortened URLs depends on the specific service you’re using. Some URL shortening services allow you to set an expiration date for your shortened URLs, while others keep them active indefinitely. It’s always a good idea to check the terms of service of the URL shortening service you’re using.
Can I use a URL trimmer for free?
Yes, many URL trimming services are available for free. However, some services may offer additional features, such as analytics or custom URLs, for a fee.
Can I use a URL trimmer on any website?
Yes, you can use a URL trimmer on any website. However, keep in mind that some websites may have policies against the use of URL shorteners, particularly if they’re being used to mask the underlying address of a malicious site.
Can I undo a URL shortening?
Once a URL has been shortened, it cannot be undone. However, you can always create a new shortened URL that points to the original long URL.