Ruby has a very vibrant ecosystem that provides solutions for almost all common problems. But one particularly lagging area is barcode generation. Ruby only has solutions for generating QR Codes, which are undoubtedly popular, but do not enjoy mass acceptance in industry segments. Older barcode symbologies, such as Code 128, DataMatrix, and PDF417, enjoy more acceptance in business applications than QR Codes. What should we do if need to generate a Code 128 in a Ruby/Rails application?
Fortunately we have a solution: JRuby. JRuby allows us to leverage excellent Java libraries and use them in Ruby applications. One such library is Barcode4J which is popular in the Java world for generating barcodes. Today, we will learn how to integrate and use Barcode4J in Ruby. So, let’s get started.
Basic Rails appliation
We will create a basic Rails application. The application will use JRuby, Rails 4.2, and SQLite as thedatabase to keep things simple. First of all, install JRuby with RVM or rbenv.
Switch to JRuby and gem install the latest Rails gem. Now create a new Rails application, like so:
rails new barcode4j_rails -T
After the application is generated, switch to the application directory and check out how it’s working:
rails s
Point your favorite browser to http://localhost:3000 and we should see the default Rails page.
Integrating Barcode4J
We will now integrate Barcode4J into our Rails app. First, download the Barcode4J files from theBarcode4J Project Page page. We will be using the 2.1.0 version. Download barcode4j-2.1.0-bin.zip and unzip the file. Copy barcode4j.jar from the build folder into lib/barcode4j in our application directory. Also, copy all files from the lib folder into lib/barcode4j.
Finally, our directory structure should look as follows:
barcode4j_rails
  - app
  ...
  - lib
    - barcode4j
      - barcode4j.jar
      ...
Now that we have all required files in place, create a class named barcode_generator.rb in lib directory with following code:
# Load all Java libraries related to Barcode4J
Dir.entries("#{Rails.root}/lib/barcode4j").each do |lib|
  require "barcode4j/#{lib}" if lib =~ /\.jar$/
end

require 'java'

# Load all class references
java_import Java::java.io.ByteArrayOutputStream
java_import Java::java.awt.image.BufferedImage
java_import Java::org.krysalis.barcode4j.impl.code128.Code128Bean
java_import Java::org.krysalis.barcode4j.impl.datamatrix.DataMatrixBean
java_import Java::org.krysalis.barcode4j.impl.code39.Code39Bean
java_import Java::org.krysalis.barcode4j.impl.pdf417.PDF417Bean
java_import Java::org.krysalis.barcode4j.output.bitmap.BitmapCanvasProvider
java_import Java::org.krysalis.barcode4j.tools.UnitConv

class BarcodeGenerator
  def self.generate(symbology, data)
    # Create a ByteArrayOutputStream object for storing the image
    bos = ByteArrayOutputStream.new

    # Set DPI
    dpi = 160

    bean = nil

    # Set the Canvas object for barcode rendering
    canvas = BitmapCanvasProvider.new(bos, "image/x-png", dpi, BufferedImage::TYPE_BYTE_BINARY, false, 0)

    # Set barcode symbology
    case symbology
    when "code128"
      bean = Code128Bean.new
    when "datamatrix"
      bean = DataMatrixBean.new
    when "code39"
      bean = Code39Bean.new
    when "pdf417"
      bean = PDF417Bean.new
    end

    # Configure the barcode generator
    bean.set_module_width(UnitConv.in2mm(2.8 / dpi))
    bean.do_quiet_zone(true)

    # Generate barcode
    bean.generateBarcode(canvas, data)
    canvas.finish()

    # Convert image to byte array for streaming
    bytes = bos.toByteArray
    bos.close

    return String.from_java_bytes(bytes)
  end
end
We have created a simple utility class that can generate four types of barcodes, sending send back an image file in PNG format. All we have to pass is the symbology and data for the barcode. Let’s break down the inner workings of the class.
First, we load all .jar files into the classpath:
Dir.entries("#{Rails.root}/lib/barcode4j").each do |lib|
  require "barcode4j/#{lib}" if lib =~ /\.jar$/
end
Then, import all required references:
java_import Java::java.io.ByteArrayOutputStream
java_import Java::java.awt.image.BufferedImage
java_import Java::org.krysalis.barcode4j.impl.code128.Code128Bean
java_import Java::org.krysalis.barcode4j.impl.datamatrix.DataMatrixBean
java_import Java::org.krysalis.barcode4j.impl.code39.Code39Bean
java_import Java::org.krysalis.barcode4j.impl.pdf417.PDF417Bean
java_import Java::org.krysalis.barcode4j.output.bitmap.BitmapCanvasProvider
java_import Java::org.krysalis.barcode4j.tools.UnitConv
Next, set the DPI for the barcode image and create a ByteArrayOutputStream object to hold the rendered image. Then, create a BitmapCanvas on which to actually draw the barcode. Like so:
# Create a ByteArrayOutputStream object for storing the image
bos = ByteArrayOutputStream.new

# Set DPI
dpi = 160

bean = nil

# Set the Canvas object for barcode rendering
canvas = BitmapCanvasProvider.new(bos, "image/x-png", dpi, BufferedImage::TYPE_BYTE_BINARY, false, 0)
Initialize the barcode symbology as provided:
# Set barcode symbology
case symbology
when "code128"
  bean = Code128Bean.new
when "datamatrix"
  bean = DataMatrixBean.new
when "code39"
  bean = Code39Bean.new
when "pdf417"
  bean = PDF417Bean.new
end
Configure the barcode generator for settings such as quiet zone and module width:
# Configure the barcode generator
bean.set_module_width(UnitConv.in2mm(2.8 / dpi))
bean.do_quiet_zone(true)
Next, invoke the actual barcode generation method:
# Generate barcode
bean.generateBarcode(canvas, data)
canvas.finish()
Lastly, convert the barcode image into byte stream and return the image:
# Convert image to byte array for streaming
bytes = bos.toByteArray
bos.close

return String.from_java_bytes(bytes)
Now we have our barcode generator in place. Let’s create an initializer in config/initializers/barcode.rb to load the class in Rails:
require 'barcode_generator'
Testing the Barcode Generator
Now we will create a BarcodesController class in app/controllers with the following code:
class BarcodesController < ApplicationController
  def index
  end

  def generate
    send_data BarcodeGenerator.generate(params[:symbology], params[:data]), :type => :png, :disposition => 'inline'
  end
end
We defined two actions here. First, an index action to render the actual page of the Barcode Generator, which we will create shortly. Second, a generate action to call and render the barcode image. The generate action invokes the BarcodeGenerate.generate method with the symbology and data parameters from the URL. Then, generate uses the send_data method to stream the image to browser.
Now update config/routes.rb to add routes to those actions:
Rails.application.routes.draw do
  root 'barcodes#index'
  get '/barcodes/:symbology' => 'barcodes#generate'
end
the last thing to do is to create the actual UI for the Barcode Generator. Create a view in app/views/barcodes/index.html.erb with the following code:
<table border="0">
  <tr>
    <td colspan="2"><h2>Barcode Generator</h2></td>
  </tr>
  <tr>
    <td><strong>Data:</strong></td>
    <td><input name="data" id="data" value="Hello World" /></td>
  </tr>
  <tr>
    <td><strong>Symbology:</strong></td>
    <td>
      <select name="symbology" id="symbology">
        <option value="code128">Code 128</option>
        <option value="datamatrix">Datamatrix</option>
        <option value="code39">Code 39</option>
        <option value="pdf417">PDF 417</option>
      </select>
    </td>
  </tr>
  <tr>
    <td colspan="2" align="center"><button name="submit" id="submit">Generate Barcode</button></td>
  </tr>
  <tr>
    <td colspan="2" align="center"><img src="" id="barcode_image"></td>
  </tr>
</table>

<script type="text/javascript">
  $(document).ready(function() {
    $('button#submit').on('click', function() {
      $('img#barcode_image').attr('src', '/barcodes/' + $('select#symbology').val() + '?data=' + $('input#data').val());
    })
  });
</script>
We simply create a form with a field for entering data and another for selecting the barcode symbology. When we click the ‘Generate Barcode’ button, we simply update the img tag’s src attribute with the relevent URL to generate our barcode image.
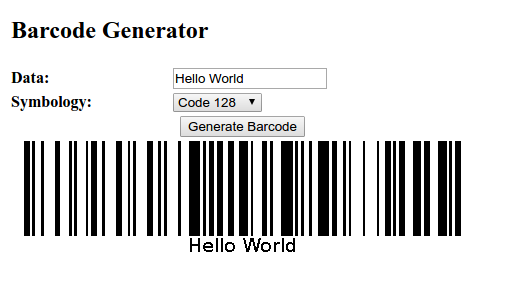
Now, let’s take it for a spin. Start (or restart) the server with rails s and visit http://localhost:3000. We should see the form with Hello World already in the ‘Data’ field. Click the ‘Generate Barcode’ button and you’ll receive a freshly mintedl Code 128 barcode!

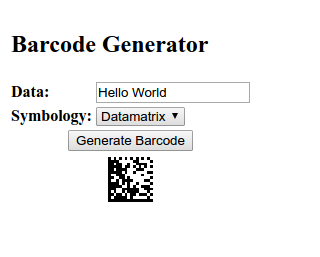
Change the symbology to ‘Datamatrix’ and click ‘Generate Barcode’ again. Now we should see a Datamatrix barcode. Here’s what it looks like:

Wrapping Up
Today we learned how to integrate and generate various types of barcodes using Barcode4J. We can improve the generator class by including more symbology specific parameters or more symbologies as well. But that I leave this as an exercise for you. I sincerely hope you liked the tutorial.
Comments and suggestions welcome, as always.
Frequently Asked Questions about Generating Barcodes with JRuby and Barcodes4J
What is JRuby and why is it used in generating barcodes?
JRuby is a high-performance, fully threaded Java implementation of the Ruby programming language. It is used in generating barcodes because it combines Ruby’s simplicity and ease of use with Java’s power and flexibility. JRuby allows developers to create and manipulate barcodes in a more efficient and streamlined manner, making it an ideal choice for this purpose.
How does Barcodes4J work in generating barcodes?
Barcodes4J is a flexible generator for barcodes written in Java. It works by converting data into a format that can be easily read by barcode scanners. This is done by encoding the data into a series of bars and spaces that represent different alphanumeric characters or operational instructions for the scanner. Barcodes4J supports a wide range of barcode formats, making it a versatile tool for barcode generation.
Can I generate different types of barcodes using JRuby and Barcodes4J?
Yes, you can generate a wide variety of barcodes using JRuby and Barcodes4J. These include linear barcodes such as Code 39, Code 128, EAN-13, and UPC-A, as well as 2D barcodes like QR Code and Data Matrix. This makes JRuby and Barcodes4J a versatile solution for a wide range of barcode generation needs.
How can I customize the appearance of my barcodes using JRuby and Barcodes4J?
JRuby and Barcodes4J offer a range of customization options for your barcodes. You can adjust the size, color, and orientation of your barcodes, as well as add text or images. This allows you to create barcodes that are tailored to your specific needs and preferences.
What are the system requirements for using JRuby and Barcodes4J?
To use JRuby and Barcodes4J, you will need a system with Java installed. JRuby requires Java 7 or higher, while Barcodes4J requires Java 5 or higher. Additionally, you will need a suitable development environment for Ruby, such as JRubyArt or JRubyFX.
Can I use JRuby and Barcodes4J on different operating systems?
Yes, JRuby and Barcodes4J are platform-independent, meaning they can be used on any operating system that supports Java. This includes Windows, macOS, Linux, and others.
How can I troubleshoot issues with barcode generation using JRuby and Barcodes4J?
If you encounter issues with barcode generation using JRuby and Barcodes4J, you can consult the documentation for both tools, which provide detailed instructions and troubleshooting tips. Additionally, you can seek help from the community of developers who use these tools, through forums, mailing lists, and other online resources.
Are there any limitations to using JRuby and Barcodes4J for barcode generation?
While JRuby and Barcodes4J are powerful tools for barcode generation, they may not be suitable for all use cases. For example, they may not support certain specialized or proprietary barcode formats. Additionally, while they offer many customization options, there may be limits to the degree of customization possible.
Can I integrate JRuby and Barcodes4J with other software or systems?
Yes, JRuby and Barcodes4J can be integrated with other software or systems. This is facilitated by their Java-based nature, which allows them to interoperate with a wide range of other Java software. This makes them a flexible solution for a variety of barcode generation needs.
Is there a cost associated with using JRuby and Barcodes4J?
Both JRuby and Barcodes4J are open-source software, which means they are free to use. However, if you require additional support or features, there may be costs associated with these. It’s always best to check the official websites for the most up-to-date information.
Devdatta Kane is a software developer and designer based in Pune, India. He works with Radinik Technologies building traceability solutions for a variety of industries. He is also the lead developer of refers2, a CRM for small businesses. He works in Ruby on Rails, but likes to dabble with various new technologies as well. An aspiring photographer and passionate traveler, he loves traveling on his motorcycle, capturing experiences through camera.


