
There are no two ways about it: Flash MX 2004 is a powerful development environment for creating fun and engaging applications. Yet, there comes a time when you may need a little more control of system-related functions such as being able to detect the operating system the user is using, launching external programs, detecting default file handling applications and controlling system windows — especially when creating distributed applications.
When you are looking to create educational reference material, presentations, CD-ROMs or complicated applications, Flash will (depending on the complexity of the project) usually fulfil the needs of the brief. But there are times when Flash on its own just doesn’t cut the mustard, and needs a little more horsepower to accomplish the desired effect.
In this article, we’ll look at how, by integrating Flash and Director, we can query the operating system on which the application runs, return information and make decisions based on that data.
The information presented in this article should give you the inspiration to explore the possibilities of Flash and Director integration, and give you a taste of what you can achieve with a little imagination and flair. The article source files can be downloaded by clicking here.
Key Takeaways
- Flash MX 2004 excels in creating engaging applications but may require integration with Director MX 2004 for enhanced system-related functions.
- Integrating Flash and Director allows for advanced file handling, such as detecting and opening files with specific applications, which Flash alone struggles with.
- Director MX 2004, using the Buddy API Xtra, can perform over 140 functions that interface with system APIs, enhancing the capabilities of Flash projects.
- The integration process involves using Flash to design the interface and Director to handle complex system interactions, creating a seamless user experience.
- Practical examples include creating a Director projector that can check for file handler presence and open files, enhancing the functionality of Flash applications.
- This integration strategy is ideal for projects requiring robust multimedia features, like educational materials and CD-ROM applications, providing a versatile platform for developers.
Example Scenario
You are building an application in Flash that needs to open several different file types (spreadsheets, PDFs, presentations, executables etc), but in order to make the application as smooth as possible, you need to check for the existence of applications that handle the types of files you are trying to open, and act accordingly.
Using Flash to check whether there is a registered file-handling application for a given file that you’re trying to open is, to my mind, extremely difficult — if not impossible — without third party or bespoke integration tools.
…Enter Stage Left: Director MX /MX 2004!
I was recently working on a project for a CD-ROM application, and decided to create the interface in Flash. There were several sections of the application that needed to open PDF files, and I included a link to the Adobe Acrobat Reader that was included on the CD-ROM. Everything was working fine, until the client decided to add features to the project, which included opening multiple document types.
Of course, this presented a new problem: I needed to know and inform the user of whether they had installed the application required to open the document they’d selected, and Flash just wasn’t up to the job on its own.
Rather than scrapping what I’d already written, I decided to investigate other methods by which I might retrieve this information, and found Director MX 2004 to be the prime candidate for the job.
How It Fits Together
The solution that I came up with was a meld of Flash and Director, where I used Flash to create the interface and act as the ‘stub’ to call functions within the Director application, which, in turn, was using an Xtra to perform a series of functions.
While I researched alternative methods for retrieving the information, I came across a Director Xtra called ‘Buddy API’, which contains over 140 functions for interfacing with the Windows API and Macintosh Toolbox.
This was the perfect Xtra for the job and, although it is a commercial Xtra, the unregistered free version includes two free functions. The Xtra contains many functions, some more useful than others. Click here for more details.
Luckily, I could use the unregistered version, as I only needed two functions from the Xtra:
- FindApp: Finds the application associated with a file type
- OpenFile: Opens a file using its associated program
Essentially, the Flash movie is embedded within a director application, and, rather than producing a Flash projector, we produce a Director Projector that interfaces with the operating system via the Director Xtra to check certain criteria, then carry out specific functions.
The flow of information from the Flash interface through Director projector for this example is outlined in the diagram below; while it’s simple, let’s take a quick look at the steps involved and how the two applications communicate.
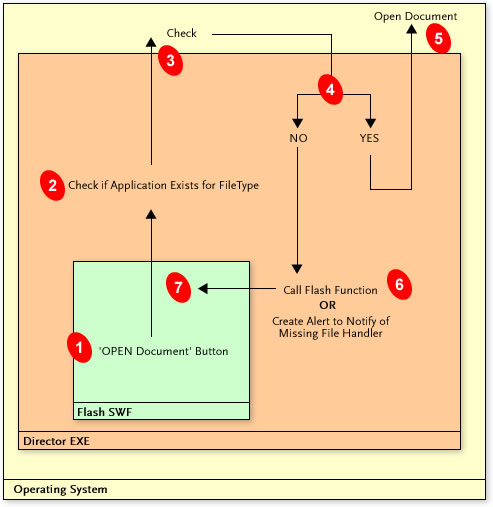
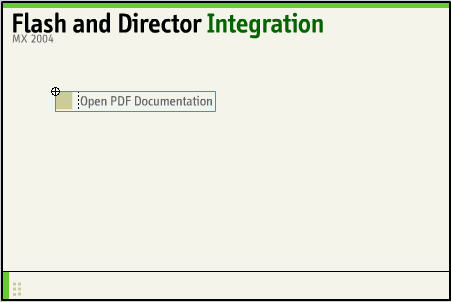
Step 1 In the embedded Flash interface, the user clicks a button (in the example shown below, it’s named openPDFDoco) which calls a defined function within the Director application in the following format:
openPDFDoco.onRelease = function() {

  getURL('lingo:FunctionHandler.FunctionName(Parameters)');

};
Step 2 The parameters of the file (name, extension, type) are passed to the Director movie and a custom function is called, which checks via the Buddy API Xtra whether a file handler is present for the file we wish to open.
Step 3 The Buddy API Xtra checks to see if a file handler is present using the FindApp("file type") function and returns a true or false value to the Director Projector.
Step 4 Based upon whether a file handler is present, the file is opened using the OpenFile(filename, windowSize) function of Buddy API (step 5).
Step 5 The file handler is verified and the file is opened in the relevant application.
Step 6 If the File Handler is not found for the file we are trying to open, we can either trigger an alert within the Director projector to inform the user, or we can call a function in Flash.
Step 7 We call the function to be executed at a specific frame in Flash; this could be as simple as moving the playhead to a specific frame to inform the user of the missing application for the file they’re trying to open.
By planning the behavior and integration of both the Flash SWF and the Director Projector, we can have the best of both worlds — an easy-to-maintain application with a powerful interface that’s capable of many different tasks.
In the example shown below, I’ve implemented this methodology to create a distributable Director projector. This serves as an installer for an application — both as a Macromedia Extension Manager file (*.mxp) and as PDF documentation (*.pdf) — but the basic idea outlined here can be used for any number of different projects when you need expand the capabilities of Flash.
We’ve now discussed how the application works from a process flow point of view, so let’s build the application and see how it all gels together.
Creating a Scalable Directory Structure
As with any development project that uses multiple sources of information, we need to establish a working directory structure that we can understand easily and use with the minimum of confusion; in this case, we’re using Flash FLA / SWF / .as files, as well as Director Movies / Projectors and PDFs.
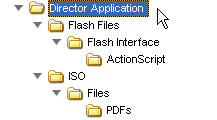
Create a suitable working directory structure as shown below:
It’s simple, really, but, without the basic groundwork here, we could easily get in a mess later when we edit multiple files.
From the root folder for the application (‘Director Application’), we have two folders (‘Flash Files’ and ‘ISO’). The Flash Interface and relevant ActionScript files will reside in the ‘Flash Files’ folder. The ‘ISO’ folder contains the Director Movie and Projector files that we’ll create later, as well as the ‘Files’ folder, which will contain the asset files (PDFs) for the application.
Creating the Flash Interface
You can make your Flash interface as complicated or as simple as you like; in this example, we’ll create a simple interface with a single button (just to keep things simple) that will launch the PDF opening process.
Setting the Scene
- With Flash open, create a new Flash document 450 pixels wide by 300 pixels high. Accept the default frame rate and click ‘OK’.
- Rename the default layer
Actionsand add below this two further layers, calledButtonsandInterface. - Select the first frame of the
Interfacelayer and create an interface with a relevant header and other information to match your requirements. - Select the first frame of the
Buttonslayer and create a new button calledlaunchButton. Add the relevant graphic and text garnishes to make the button functional. Once you’re happy with the button, drag an instance from the Library Panel into the first frame of theButtonslayer, naming the instancelaunchButton.
We’re all done for the first phase of setting up the Flash movie. At the moment, there’s no ActionScript to control the behavior of the button; we’ll add this later, once we’ve set up the Director project, imported the SWF, and set up the roundtrip environment.
- Save your Flash document as
Flash Interface.flato the ‘Flash Interface’ folder you created earlier, and export your SWF (File > Export > Export Movie) asFlash Inteface.swf.
Importing the Flash Interface into Director
Now that we’ve created the basic interface, we need to import it into Director and set up a few parameters.
Setting the Scene
- Within Director, create a new Movie (File > New Movie). From the ‘Movie’ tab of the Property Inspector, set the Stage Size to 450 x 300.
- Select File > Import and locate the
Flash Interface.swfthat you have just exported from Flash. Click ‘Add’ to add it to the import list and click ‘Import’. - If the Cast window isn’t already visible, select Window > Cast to show the window and arrange it to your liking.
- Select the Flash movie, and select the ‘Member’ tab of the Property Inspector. Change the ‘Name’ of the movie to test. Within the same tab, click the ‘Edit’ button and locate the source FLA for the SWF file (
Flash Interface.fla). - Drag an instance of the imported SWF to the stage and, with the Flash movie selected on the stage, edit the ‘L’ (Left) and ‘T’ (Top) parameters within the ‘Sprite’ tab of the Property Inspector to L:0, T:0.
- Save your Director Movie within the Director Application/ISO directory that you created earlier.
You should now see the imported Flash movie within the internal cast window.
This now allows us easily to edit the Flash SWF file via the roundtrip methodology from within Director.
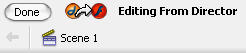
If you now double click the Flash Movie on the stage, it will automatically launch Flash for editing. When the file is open within Flash, clicking the ‘Done’ button at the top left of the timeline automatically updates the embedded SWF within Director.
This makes life a lot easier; making updates becomes seamless, and reduces the chance of Flash SWF edits being lost or overwritten.
Installing the Buddy API Director Xtra
In order to make full use of what we’re working to accomplish here, you’ll need to install the Buddy API 3.6 Director Xtra. This Xtra is downloadable here.
Once it’s downloaded, extract the contents of the .zip or .hqx file and copy the budapi.x32 file to your Director Xtras folder, which, in Windows and Macintosh, will look something like this:
Windows - c:windowsprogram filesmacromediadirector mx 2004configurationxtras


Mac OS X - /Users/~USERNAME/Library/Application Support/Macromedia/Director MX 2004/Configuration/Xtras
Adding the Lingo
If you were to try and publish your Director Projector now, things would look a little odd — the projector would successfully be created but, when you tried to load it, it would open for about a second, then close.
Why?…Well, there’s no Lingo or JavaScript code that has been added within Director. Although it may preview internally within Director without any problems, as soon as it’s exported into a projector, the playback head hits the last frame of the Flash movie and quits.
We need to start adding within Director the code to control this — a simple score script.
Note: If the Score window is not open make sure it is be selecting Window > Score.
- Select the first frame of the behavior channel, right click and select ‘Frame Script’.
- When the script window opens, name the cast member
pauseMovieand add the following code:
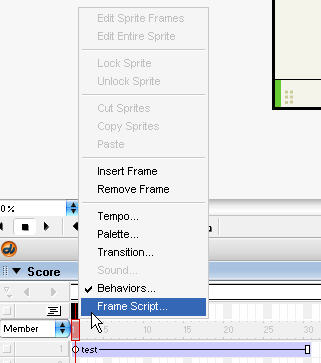
on exitFrame

  go to the frame

end
This script simply pauses the movie and gets rid of the annoying exiting behavior within the projector.
If you now preview your projector (File > Publish) you’ll see that the projector window stays open, and we can move on to add more of the control code.
Add the BuddyAPI Director Xtra to the Project
In order for the code to function correctly, we need to add the BuddyAPI 3.6 Xtra into the project; it will be included in the Director Projector when it’s published.
With the project open, select Modify > Movie > Xtras, and click ‘Add’. Locate the budapi.x32 file from the Xtras folder and click ‘OK’.
We can now insert the code to control the Xtra we just added.
Creating the Document Handling Functions
Our next task is to add the control functions that allow us to accept incoming function requests from Flash and, believe it or not, it’s not as difficult as you might think.
If we look at the internal cast of the Director movie, we see that, in position 1, we have the imported SWF file that we created earlier and, in position 2, we have the script that we added.
We’re now going to add to positions 3 and 4, 2 further scripts that facilitate communication between Flash and Director.
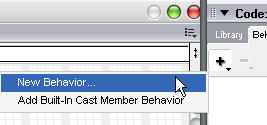
- With the Cast window (Window > Cast) and Behavior Inspector open (Window > Behavior Inspector), select position number 3. From the Behavior Inspector, click the ‘+’ button and select ‘New Behavior’.
- Name the behavior
prepareMovieand click ‘OK’. Click the ‘Script Window’ icon and add the following code: - Close the Script Window.
- With the
prepareMoviescript selected in the cast, from the ‘Script’ tab of the Property Inspector, change the type fromBehaviortoMovie. - With the Cast window open (Window > Cast) and Behavior Inspector open (Window > Behavior Inspector) select position number 4. From the Behavior Inspector click the ‘+’ button and select ‘New Behavior’.
- Name the behavior
DMXDocHandlerClassand change the ‘Type’ within the Property Inspector toParent. Click the ‘Script Window’ icon and add the following code: - Close the Script Window.
global DMXDocHandler

on prepareMovie

  DMXDocHandler = new ( script "DMXDocHandlerClass" )

end prepareMovieWhat we are doing here is using the prepareMovie event handler to create a new instance of a script we’re about to add, called DMXDocHandlerClass.
property pDefaultDocDir


on new (me)

    pDefaultDocDir = "Files"

  return me

end


on OpenFile me , p_FileType , p_Dir , p_FileName

  set FileToOpen = the moviePath & pDefaultDocDir  & "" &  p_Dir & "" & p_FileName

  -- Open the FileType

  if (p_FileType = "PDF") then

    me.StartAcrobat ( FileToOpen )

  end if

end OpenFile


--Acrobat File opening

on StartAcrobat me, p_PDFFile

   if ( baFileExists( p_PDFFile ) = 1 )  then -- check if file exists

    set AcroExe = baFindApp( "pdf" ) -- see if acrobat is installed

    if AcroExe <> "" then -- if they have acrobat and the file exists

      baOpenFile(  p_PDFFile , "Maximised" ) -- open the file

    else --

      alert("You do not have Adobe Acrobat installed")

    end if

  end if

end StartAcrobatLet’s examine the code to see what’s happening and how the function works.
First of all, we declare pDefaultDocDir to make it accessible later. This is the default location for the files, and can be referenced within the directory structure that we created earlier.
When the new instance of the script is created, we populate the value of pDefaultDocDir with the name of the directory in which the files are stored, in this case, ‘Files’.
on new (me)

    pDefaultDocDir = "Files"

  return me

end
We then have a new function, which accepts the following parameters:
p_FileType:The filetype (PDF, XLS, DOC, MXP etc)
p_Dir:The directory in which the file is located
p_FileName:The name of the fileThese parameters are passed from the Flash movie to the Director projector when the button is pressed in the Flash movie. We will add this code within Flash in a moment.
on OpenFile me , p_FileType , p_Dir , p_FileName

  set FileToOpen = the moviePath & pDefaultDocDir  & "" &  p_Dir & "" & p_FileName

  -- Open the FileType

  if (p_FileType = "PDF") then

    me.StartAcrobat ( FileToOpen )

  end if

end OpenFile
The parameters are then concatenated into a new variable, called FileToOpen, which is the full path to the file that we’re trying to open.
If the p_FileType is found to the ‘PDF’, we call the StartAcrobat() function, passing the name of the file.
Note: You can create as many different functions for detecting different filetypes as you wish, not just PDFs, as in this example.
We then get into the guts of the Director Xtra that we’ve just added.
As the full path to the file is passed to the StartAcrobat() function, we use the baFindApp(filetype) function of the BuddyAPI Xtra to detect whether Adobe Acrobat is installed. We then open the file using the baOpenFile(filename, windowSize) function.
If there is no file handler for the PDF file (i.e. Adobe Acrobat is not installed), we can trigger a simple alert to inform the user.
on StartAcrobat me, p_PDFFile

      set AcroExe = baFindApp( "pdf" ) – Is Acrobat installed?

    if AcroExe <> "" then – Acrobat is installed, enter condition

      baOpenFile(  p_PDFFile , "Maximised" ) -- open the file

    else

      alert("You do not have Adobe Acrobat installed")

    end if

  end StartAcrobat
It’s as simple as that! Of course, you could take the user to a frame within your Flash movie and allow them to install the Acrobat Reader by substituting:
alert()


for:


sprite(1).callFrame(frameNumber)
This is a simple modification, as it allows us to call a function on a specific frame within Flash by referencing the relevant sprite within the Internal Cast (in this case, the imported Flash movie is at position 1).
The only thing we have to do now, is to add the code within Flash to call the DMXDocHandlerClass lingo script.
Returning to Flash to Add Communication Code to Director
Before we add the code to reference the PDF file we wish to open, add a PDF into the ISO / Files / PDFs folder so that we can check that it works.
This article’s source files already include one, but you can easily add your own PDF files; if you do, don’t forget to change the filename and/or file type in the function below.
- Double click the imported SWF file on the stage to automatically edit the FLA within Flash.
- Select the first frame of the Actions layer and add the following code:
- Click the ‘Done’ button at the top left of the timeline to return to Director.
//==========================Load Documents Via Director

launchButton.onRelease = function() {

  getURL('lingo:DMXDocHandler.OpenFile("PDF","PDFs","SmartTabs QuickStart Guide.pdf")');

};
Note: In the source FLA for this article, I have externalised the ActionScript into an .as file for greater scalability and usability.
We use the getURL() function to talk to the Director Projector, while the OpenFile() lingo script passes in the parameters that are needed (p_FileType, p_Dir and p_FileName).
In this manner, we have a high degree of control over the files we open, and their locations. This is essential for larger projects with many different filetypes, where the assets that the user wants to open are in different locations.
We’re all done in Flash! Now it’s time to move back into Director to publish and test the application.
Testing the Application
It’s time to test the application. Select File > Publish.
You should now be presented with a Director Projector. Click the button and see what happens – if all has gone well, you should successfully open the PDF that is included in the article source files (or the custom file that you added if you have the reader installed).
To burn your project onto CD, simply copy the contents of the ISO/ folder (removing the Director Movie *.dir). Add an autorun file if you want the CD to run automatically when placed in the drive.
The application works well, and will scale easily by creating new handling functions to access any file type that you wish to open. It allows you to check for the existence of an appropriate program to open the file and perform graceful actions, rather than giving non-informative error messages.
You can use this application as the basis for creating complex installation routines, fancy front ends for CDs or even a snazzy Curriculum Vitae!
Also, we’ve only brushed the surface of the BuddyAPI Director Xtra, due to the limitations of the trial version, but, if you wish to use more of the functionality, go ahead and purchase it, and explore the extra power of Director and Flash in unison.
Now that you have the basics of Flash and Director integration under your belt, experiment and see what you can accomplish. I’m sure the SitePoint community would love to see your creations!
Frequently Asked Questions about Flash Director MX 2004
What is the main difference between Flash Director MX 2004 and Adobe Dreamweaver?
Flash Director MX 2004 and Adobe Dreamweaver are both powerful tools for creating interactive content. However, they serve different purposes. Flash Director MX 2004 is primarily used for creating rich multimedia content such as games, simulations, and e-learning applications. It allows for more advanced scripting and interactivity compared to Adobe Dreamweaver. On the other hand, Adobe Dreamweaver is a web development tool used for designing, coding, and managing websites and web applications. It supports a range of scripting languages and frameworks, making it a versatile tool for web developers.
How can I download and install Flash Director MX 2004?
Flash Director MX 2004 is no longer available for download from the official Adobe website due to its discontinuation. However, you may find it on some third-party websites or online marketplaces. Please be cautious when downloading software from unofficial sources, as it may contain malware or other security risks. Always ensure your source is trustworthy and scan any downloaded files for viruses.
Can Flash Director MX 2004 integrate with other software?
Yes, Flash Director MX 2004 can integrate with other software. It supports a wide range of file formats and can import content from other Adobe products such as Photoshop and Illustrator. This allows for seamless workflow between different software, making it easier to create complex multimedia projects.
What is the significance of Flash Director MX 2004 in the archive.org collection?
The inclusion of Flash Director MX 2004 in the archive.org collection signifies its historical importance in the field of multimedia content creation. It serves as a digital preservation of the software, allowing future generations to study and understand its impact on the industry.
How does Flash Director MX 2004 compare to modern flash memory integration?
Flash Director MX 2004 and modern flash memory integration serve different purposes. Flash Director MX 2004 is a software tool for creating interactive multimedia content, while flash memory integration refers to the process of incorporating flash memory into a device or system. Flash memory is a type of non-volatile storage that can be electrically erased and reprogrammed, making it essential for many modern electronic devices.