Use Webmin for Linux Administration, Parts 1 and 2

Key Takeaways
- Webmin is a comprehensive web-based interface for Linux and Unix server administration, offering control over applications like FTP, SSH, and email services.
- Installation is straightforward, with options for both RPM-based systems and source code setups, ensuring compatibility across various Unix variants including OS X.
- The modular nature of Webmin allows for significant customization and expansion through third-party modules, enhancing its functionality beyond the core system.
- Webmin provides a high level of access control, including a user-based package for clients to manage their domains and emails within predefined limits.
- The system supports SSL for secure operation and includes a built-in module for checking and implementing updates automatically.
- Webmin’s interface facilitates a wide range of server management tasks from system startup settings to user and group management, making it a powerful tool for efficient server administration.
Administering Linux and Unix-based servers does not need to be the scourge of your work day. With a handy tool called Webmin as part of your arsenal, you can regain complete control of your servers via the Web browser.
This is a two-part series. In this, Part 1, we’ll review the scope of Webmin and the way in which it can assist the Web developer in server administration for domain management. In Part 2, which starts here, we’ll look at several additional features of Webmin for server maintenance, and some techniques for its use.
Skip straight to Part 2, or continue reading Part 1…
Webmin, developed by Jamie Cameron, acts as a comprehensive interface to the underlying applications on servers, including support for configuring applications like ftp, ssh, mail, Web, databases and more. Differing from other control panels, the core Webmin interface is intended for system administrators with root access to their servers, and includes a user-based package to enable your users (or clients) to access their own domains, email, and more, within a limited scope. Webmin supports running under SSL.
The application runs on its own mini-Web server so as to be available even when your primary Web server software is not running (i.e. Apache, etc.), and is powered by a number of Perl-based applications that directly interface with your system configuration files. According to Webmin, the entire solution is built on Perl 5 and uses no non-standard Perl modules.
The beauty of open source in practice is exemplified within Webmin’s module system. While the core system was built by Mr. Cameron, numerous individuals have contributed patches, non-English translations, and vast array of third-party modules, in addition to the base set included with Webmin. These extra modules can be found at http://webmin.thirdpartymodules.com.
Getting Started
To get started, drop by www.webmin.com and download the latest release. You can use rpms for Red Hat and related systems that support binary installations, or you can build Webmin from source. Webmin supports a large number of Unix variants, including OS X. To install the rpm, simply open a terminal session, and type in rpm –ivh webmin* (as root user) in the directory in which Webmin was downloaded.
Installation From Source
If you’re working from the source file, select tar.gz from the download link on the Webmin home page. Once this has downloaded, open a Terminal session and run the following:
Shell prompt # gunzip webmin-1.130.tar.gz

Shell prompt # tar -xvf webmin-1.130.tar

Shell prompt # cd webmin-1.130
You can customize the installation process by adding options to the setup.sh script included in this directory, then selecting your settings as the script executes. To select a specific directory (I would recommend something under /usr or /var), use:
Shell prompt /webmin-1.130]# ./setup.sh /var/webminYou will be asked to choose the following settings (you can accept the defaults presented or enter changes for each option):
- Webmin configuration directory
- The location at which Webmin will store logs
- Path to Perl
- Your server OS (Webmin does a good job of auto-detecting and will ask)
- The port that Webmin will run on (defaults to 10000)
- The user name and password to login to Webmin
- Your server’s hostname — again, Webmin tries to detect this
- Use SSL — should only prompt if Perl’s SSL libraries are installed (this author has not run Webmin under SSL)
- Whether you want Webmin to start with system boot (highly recommended)
Logging In to Webmin
Once Webmin’s installed, point your browser to the server on which Webmin is now running. This can be either a local or remote server, of course. Simply supply the hostname and port you selected, i.e. http://hostname:10000. You will be prompted for the login that you just set up.
Once you’re in, you’ll see Webmin’s welcome screen and application control menus. This first set of options allows you to set up access and security rights within Webmin. The Webmin configuration option gives you comprehensive, granular control over how Webmin will operate in your environment.
Webmin includes a built-in module that checks for updates to the system (from the Webmin site or one of your choice), and automatically carries out these installs when executed.
Usermin
Also on this welcome screen, you’ll see an option called Usermin. If you elect to initialize Usermin, your users (clients) will have browser-based access to their account on the server. If Usermin is not installed, Webmin will prompt you, and install it for you. It’ll set the port that’s to be accessed by the Web browser to 20000 (i.e. http://hostname:20000).
You determine the level of access you’ll provide, and this includes enabling and/or disabling the modules available to your users, such as:
- Access to a simple Webmail interface, and access to set up Fetchmail
- Modifying Login options, including passwords, command shell, login scripts and more
- Application access to a limited view of MySQL, Apache htaccess files, GnuPG and the ability to upload and download from the user’s account directory
- Miscellaneous options such as a Java-based File Manager in the browser, access to help docs on the system, and access to cron under the visitor’s username.
Also under the Webmin screen, you’ll find the ability to link to multiple servers running Webmin on your network. In conjunction with clustering tools, this facility enables you to distribute settings across multiple servers from one interface.
Accessing Your System
The power of Webmin is evident when you access the System tab, as seen below.
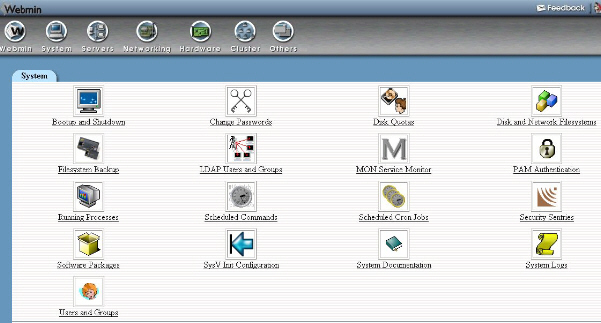
You have control over what daemons start and stop during system startup and shutdown, access to all run levels, and the ability to add custom applications to startup and shutdown.
In addition, you have access to controls for password resets for any user on the system, cron jobs, a graphical view of running processes and the facilities to back up the file system. For those on RPM-based systems, access to Software Packages will be a time saver. Here, you can perform searches for software installed on the system, search for rpms to install on the system, and even set up the Red Hat Network to implement critical updates on a schedule.
System logs can be configured and viewed in this portion of Webmin. They provide a graphical view of the grep and tail commands used in the Terminal to view logs such as those for boot, mail and users.
Finally, the ability to add and remove users and groups, including bulk imports of multiple users, should be a great timesaver. We’ll cover this in the example domain setup later in this article.
Taming the Daemons
What truly makes Webmin priceless for Web developers is the Servers tab. Here, as seen in the image below, your controls include those for:
- Apache
- BIND
- CVS
- FTP (ProFTPD and Wu-FTPD)
- Mail (Postfix, QMail and Sendmail, as well as Fetchmail, Procmail and Spam Assassin)
- MySQL and PostgreSQL database servers
- Majordomo Mailing List Manager
- SSH Server
- Webalizer for Web traffic analysis
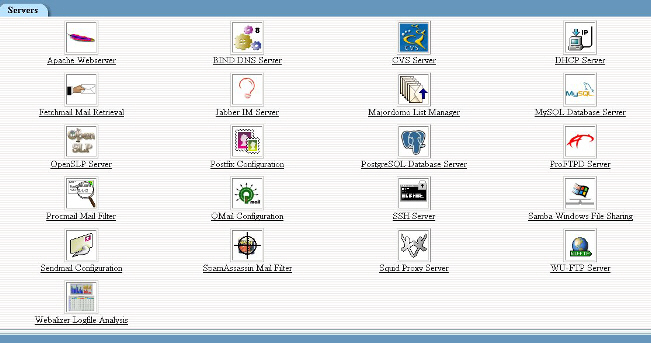
The level of control is substantial, including complete access to all configuration files for each of these servers, which can save substantial time on the command line.
Adding a New Domain
To put Webmin to practice, we’ll walk through the process of adding a new domain to the server. This section assumes you use name-based hosting (one IP for many domains). If you’re adding a new IP address, hang in there – we’ll cover that in Part 2 of this series.
Adding the User
For starters, we access the System tab and add a new user by going to Users and Groups. Here, we select Create a New User. The new screen gives you complete control over the user name, password, home directory, and the groups in which the user will belong (i.e. Users, Mail, FTP and so on).
A common practice when setting up a new domain is to create a user name for the base home directory of the domain. For example, all sites go into /home/sites, so the user is newdomain, and the path is /home/sites/newdomain.com. This username would be used for ftp access to the domain.
Upon creation, you can return to the Users and Groups screen and add users who will have email accounts. Alternatively, as we will see in a moment, you can also simply use Sendmail to alias all the email sent to this new domain to an external email account, if the domain will not require individual POP accounts.
Adding the Domain to Apache
Under the Servers tab, click on Apache (as shown below) to add the domain into the httpd.conf file and set up standard or custom options.
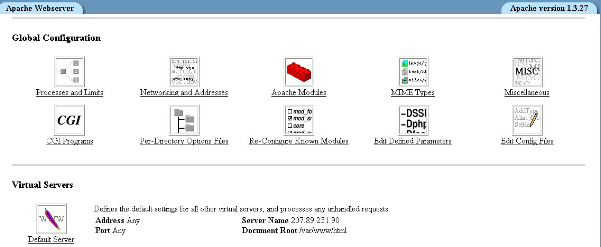
You are provided with a fill-in-the-blanks form to add your new domain. Once it’s completed, you can click directly on the domain name in the list to edit specific directives such as custom log file paths, cgi directories and other options specific to this domain.
Once you’re finished, simply click on Apply Changes from the main Apache screen and the Web server is gracefully restarted.
Adding a MySQL Database
Perhaps your new domain will require database services. In this example, we can add the new database “newdomain_db” to MySQL Server and ensure that the user newdomain has rights to this database. Under the Servers tab, simply click on MySQL to access the MySQL administration tools.
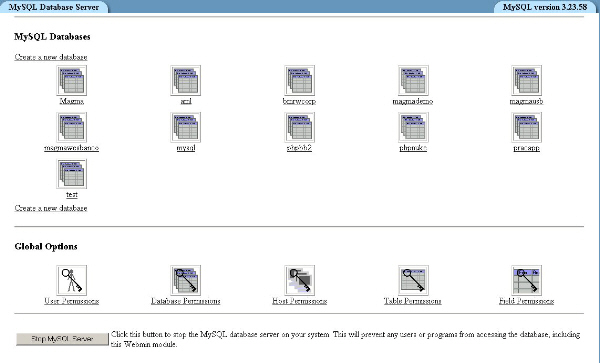
Follow the on-screen prompts to create a new database; additionally, access the User Permissions section to ensure you limit the rights of newdomain to the newdomain_db database.
Finishing with Sendmail
Having graphical access can be very helpful, especially for new administrators. To add our new domain in Sendmail (menus show below), we simply need to add newdomain.com to Local Domains and Spam Control, and add the users into the Address Mappings section.
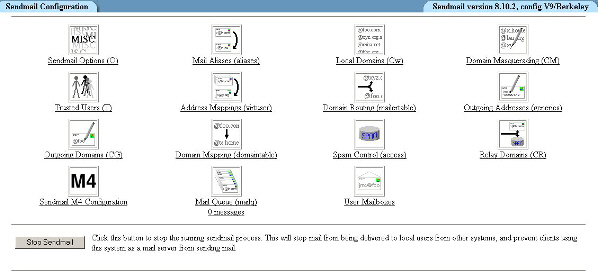
The Address Mappings section allows us to do two things:
- Ensure all mail sent to newuser@newdomain.com is delivered to newuser on the server.
- Allow a user to have mail sent to multiple email addresses (newuser, sales, support, info @newdomain.com) all forwarded to one user name, in this case, newuser.
Sendmail will need to be restarted after you enter all these changes — simply go to the main Sendmail screen, and stop and start the server.
As you can see, Webmin offers extensive graphical access to your server and can reduce the stress and time it takes to administer your day-to-day tasks. In Part 2 of this series, which starts on the next page, we will continue by looking at server configuration and maintenance with Webmin and more.
Part 2
Webmin serves as a powerful graphical user interface for root access, configuration and management of *Nix servers. As we discussed in Part 1 of this series, Webmin can be very useful to the Web developer who needs to manage sysadmin tasks such as setting up domains and providing clients limited access to server(s) on demand.
In this follow up, we will dig down into several areas of system administration, including the use of Webmin during server migration, and fine-tuning the control you have over your systems security and resources. We’ll also discuss some additional tips and techniques for getting the most out of Webmin.
Working with Your Server
Tuning Your Web Server
One of the benefits of using a graphical interface to administer a system is efficiency. However, one pitfall that’s often cited is the disconnection between the GUI (graphical user interface) and the underlying configuration files and root-level access.
When logging into Webmin as root, you enjoy the best of both worlds. As a real world example, let’s look at tuning your server for optimized performance. Obviously, the initial build of your machine is the first key to tuning a Web server. However, it may well be that you’re using a dedicated server that was built and deployed on your behalf, without intervention on your part. In this case, unnecessary services may be running on the server that may chip away at memory and processor resources.
Upon logging into Webmin, and selecting the System icon, you’ll see a Bootup and Shutdown menu. Within this section, you can review all the services known to be installed on your server that may be slated for start at boot. By going one click further and selecting one of the services listed, you’ll realize just how granular is the control within Webmin. Under each item in the Bootup and Shutdown menu, you’re given root-level control over the option to start when the server boots, as well as complete control over the startup script for each service.
Select only those services that are needed to ensure your Web server runs properly, and you’ll free up additional system resources — and, possibly, improve the overall performance of the system. For example, turning off the daemons for printing, Samba, and NFS, which may not be relevant to your web hosting needs, will reduce the number of services that run while your server is in production.
Adding New Modules to Webmin
Aside from the default modules included with your Webmin installation, there are numerous third-party modules available to accommodate custom applications and services on Linux servers.
These module add-ons can be found here at Sourceforge; these include more than 270 modules and numerous themes.
Once you have downloaded a new module as a .wbm file, click on the Webmin icon, and Webmin Configuration to access Webmin Modules. Then, use the form at the top of the page to install the module either from the local filesystem of the server on which Webmin is running, or uploaded from the client on which your browser runs.
If you absolutely cannot find a module that meets your needs, you can either build your own module, or, you can contract custom development directly from the Webmin group.
Time and Date on Your Server
A neat little time and date utility allows you to ensure that your hardware and system time are synchronized on your server. It also provides you the ability to add a Network Time Server — a known, accurate source for time to which you can synch your system.
Setting this up is easy — access the Hardware icon and select System Time. The menu is self-explanatory. The time server can be entered as an IP address or a fully-qualified domain name.
Perl Modules
The addition of new features or functionality to your server will frequently involve the application of a Perl module that’s not included in the standard Perl install. Through Webmin’s Others icon, you can access a Perl Modules option. This not only allows you to see the non-standard modules that are already on your system, it also lets you:
- Search and install modules from CPAN.org
- Install a module from a remote url
- Upload and install a module
- Install a module that resides on the system
Multiple IPs on Your Server
The Network icon gives you powerful control over the local and wide area networking capabilities your server may provide. This icon allows you to control the Linux firewall (iptables) as well as the options for DSL, VPNs, and working with your ethernet configuration.
Under Network Configuration, you can add virtual interfaces to the primary IP on your system. This is useful if you have hosts on independent IP addresses (perhaps they’re using anonymous FTP or SSL). Adding the TCP/IP configuration is easy — click on Network Configuration, then Network Interfaces. Click on Add an Interface and fill in the form provided. Remember that virtual interfaces are built from your primary physical interface (generally eth0), so this first, new virtual interface will be named eth0:1. Be sure you have the correct IP, subnet mask, and broadcast address before you proceed.
Webmin can restart your network services gracefully and initialize the new interface immediately.
Managing Cron
A powerful tool that’s simplified within Webmin is the management of cron. Cron is an automation daemon that can run commands, scripts, and programs at slated times. Under the System icon, within Scheduled Cron Jobs, you can administer cron jobs, create and delete cron tasks, and control user-level access to cron.
Spam Assassin and Procmail
If you’re using either of these tools on your server, Webmin again provides control over your spam and general mail filtering facilities with gui-based access to administration.
More information on Spam Assassin is available here.
Procmail, as you may already know, is a mail processing tool that can filter mail based on the sender, subject line, the length of the message, the keywords in the message, etc. More information on procmail can be found at its official home page.
Working with Users on Your Server
Multiple Administrators & Logging Webmin Activity
Those with multiple servers or multiple administrators will gain real benefit from some of the useful features that log the actions carried out in Webmin, and the ability to set up administrators with limited rights with Webmin’s configuration.
By default, basic logging is enabled in Webmin. To modify logging options, go to the Webmin icon and the Webmin Configuration module. Select Logging and turn on the “Log changes made to files by each action” option. By enabling detailed logging, you will be able to review each and every action you take on the system via the Webmin Actions Log module.
The Webmin Users option located under the Webmin icon allows you to allocate individual Webmin users specific module rights. For instance, you might set up a Webmaster with Apache, FTP, Sendmail and System Logs access, leaving the remainder of Webmin’s modules available to the Systems Administrator.
Webmin also gives you the option to synchronize all *Nix users on the system. In the event that you take this option, I’d recommend that you specify Webmin groups — this will allow you to establish permissions for various types of users, from end-users, to administrators, to root-access users.
Adding Multiple Users and Groups
In Part 1 of Administering Linux with Webmin (link to first article) we covered the manual addition of a user as part of the process of adding a domain. Here, I want to discuss a tip for adding, editing, or deleting in bulk through the Webmin interface.
Click on the System icon, then select Users and Groups, and you’ll be presented with the option to batch process your users. These instructions are also found on the batch user-processing page within Webmin.
This form allows you to create, modify or delete multiple users simultaneously from an uploaded or local text file. Each line in the file specifies a single action, depending on its first field. The line formats are as follows:
create:username:passwd:uid:gid:realname:homedir:shell:min:max:warn:inactive:expiremodify:oldusername:username:passwd:uid:gid:realname:homedir:shell:min:max:warn:inactive:expiredelete:usernameIf the uid field is left empty in create lines, Webmin will assign a UID automatically. If the gid field is empty, Webmin will create a new group that has the same name as the user. The username, homedir and shell fields must be supplied for every user, but all other fields are allowed to be empty. If the passwd field is blank, no password will be assigned to the user. If it contains just the letter x, the account will be locked. Otherwise, the text in the field will be taken as the cleartext password and encrypted.
In modify lines, an empty field is taken to mean that the corresponding user attribute is not to be modified.
Generating SSH Keys for Users
If your server is used for or allows shell accounts, you may find this little feature within the Servers icon under SSH Server helpful.
As you may already know, enabling ssh access without the requisite password interaction requires the generation of an ssh key. This key enables the secure handshake between client and server to occur automatically, and is particularly helpful if you have shell accounts that need to drop data files to your server on a fixed schedule.
This configuration page allows you to configure the automatic setup of SSH for new users who are added to your server. Once it’s configured, new users will not have to run ssh-keygen before they use SSH.
Synching Users and MySQL Users
If you provide MySQL databases for each domain or user who’s added to your system(s), you might make use of an easy-to-use feature under the Servers icon and MySQL Database Server that enables you to set up user synchronization.
Under User Permissions, you can configure Webmin to generate MySQL users with specific database and host permissions automatically as users are created in Webmin under System: Users and Groups (adding Linux users to the system).
Exploring Webmin Further
As we have seen in this two-part series, Webmin is a powerful Linux administration tool. To learn more about Webmin, you can, of course, read through the Webmin site at www.webmin.com. Here are some additional links you may want to visit as well:
The Book of Webmin
Joe Cooper has written an in-depth guide to using Webmin that’s appropriately named the Book of Webmin, and is available here. You’ll also find a link to a PDF download with Webmin information there.
Webmin Mailing Lists
There are several Webmin mailing lists available to users, including announcements, developers and more. Stop by Webmin.com. Also see the Webmin Forums at http://webmin.us/phpBB2.
Frequently Asked Questions about Webmin Linux Administration
What is Webmin and why is it important for Linux administration?
Webmin is a web-based interface for system administration for Unix and Linux systems. It simplifies the process of managing and maintaining servers. With Webmin, you can set up user accounts, configure DNS settings, manage files, and much more, all from a user-friendly web interface. This eliminates the need for command-line interactions, making it easier for beginners or those unfamiliar with Linux commands.
How do I install Webmin on my Linux system?
The installation process for Webmin varies depending on your Linux distribution. However, the general process involves downloading the Webmin package from the official website, extracting the package, and then running the installation script. Detailed instructions for different distributions can be found on the Webmin website.
Is Webmin secure to use?
Yes, Webmin is secure to use. It uses SSL for encrypted communications between the server and client. However, like any other software, it’s important to keep it updated to the latest version to ensure you have the latest security patches.
Can I use Webmin to manage multiple servers?
Yes, you can use Webmin to manage multiple servers. You can add as many servers as you want to your Webmin server list and manage them from a single interface. This makes it a powerful tool for system administrators managing multiple servers.
What are some alternatives to Webmin?
There are several alternatives to Webmin, including cPanel, Plesk, and DirectAdmin. These all offer similar features but may have different user interfaces or pricing structures. It’s important to choose the one that best fits your needs and budget.
How do I troubleshoot issues with Webmin?
Webmin has a comprehensive documentation and user forum where you can find solutions to common problems. If you can’t find a solution there, you can also contact the Webmin support team for assistance.
Can I customize the Webmin interface?
Yes, you can customize the Webmin interface. You can change the theme, layout, and even add custom modules to suit your needs.
What are the system requirements for Webmin?
Webmin can run on any Unix or Linux system. It requires Perl 5 or higher and a web browser for access. The exact system requirements will depend on the size and complexity of your server environment.
Can I use Webmin with a firewall?
Yes, you can use Webmin with a firewall. Webmin has built-in support for many popular firewall tools, allowing you to manage your firewall settings directly from the Webmin interface.
Is Webmin free to use?
Yes, Webmin is free to use. It’s open-source software, which means you can download, use, and modify it for free. However, if you need additional features or support, there are paid options available.