At the risk of repeating myself to those who read the Design View, I thought I’d post this little idea from yesterday’s issue.
This week, we were handed a small challenge in an otherwise elegant little site design — the presentation called for the all the ‘content images’ to have rounded corners.
In the past, there wasn’t much choice. You made a nice framing template in Photoshop or Fireworks, dropped your picture behind it and exported your new image.
The problem with that method is that, although the image itself is considered ‘content’, the rounded corners are a ‘design whim’ that is only relevant to the current look and feel. If the client decided that the next redesign should be a little more slick and hard-edged, we would need to either re-author every image, or just grin and bear it — not good choices.
So, what are the alternatives? As it turns out, not even CSS3 or Mozilla specific styles can offer us much help. Moz can do borders that curve behind the corners — a nice enough look, but not what we’re after here. Safari can hold multiple backgrounds but that’s not much use elsewhere. The only viable solution appeared to me to be a touch of ‘DOM-foolery’.
 Firstly, we’ll need to work out a repeatable method to get the effect, forgetting (for now) about sound markup technique.
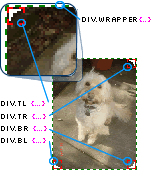
Since images are foreground elements, we’re going to need to levitate our ‘corner graphics’ over the image. That means we’ll need to wrap each image with it’s own ‘relatively-positioned’ DIV and then use that ‘wrapper’ to position our ‘absolutely-positioned’ corners.
As you can see in the diagram, the wrapping DIV is called ‘.wrapper’ and needs to positioned relatively, and floated either left or right, to force it to tightly enclose our image.
div.wrapper {
  position:relative;
  float:left;
}
Our four inner DIVs are then set to ‘position:absolute‘, which automatically brings them to the front of our image. Each has the same width and height (7x7px — the dimensions of the corner GIFs), but different positions and background graphics. Something like this:
div.wrapper div{    /* set all the inner DIVs */
    position:absolute;
    width: 7px;
    height: 7px;
}
div.wrapper div.tl{
    background:transparent url(tl.gif) top left no-repeat;
    left:0;
    top:0
}
div.wrapper div.tr{
    background:transparent url(tr.gif) top right no-repeat;
    right:0;
    top:0
}

div.wrapper div.bl{
    background:transparent url(bl.gif) bottom left no-repeat;
    left:0;
    bottom:0
}
div.wrapper div.br{
    background:transparent url(br.gif) bottom right no-repeat;
    right:0;
    bottom:0
}
Combine the markup with the CSS, and it hangs together nicely.
Ok, now, that’s all very nice’n’all but obviously we can’t go around delicately wrapping each new image by hand, like little ‘virtual sushi rolls’. We need a nice little function can do the dirty work for us.
In our case we’ve decided to target only images within a specified ‘DIV#content‘ — the editable content area of the CMS. However it wouldn’t be hard to alter the script to target all images, or only those images with a certain class if required.
I’ll run through the script quickly but the example is well-commented if you’re interested
To start, we’ll declare a new function (roundedImages), grab all the elements inside #content, then filter out everything but the images. They’re waiting for us to use in an ‘imgs[]’ array.
function roundedImages() {
var content = document.getElementById ('content');
var imgs = content.getElementsByTagName ('img');
Next, we start a loop to process our list of images. We create a brand new DIV, attach the ‘wrapper’ class to it, select the first image, and replace it (for now) with our new DIV.
for (var i = 0; i < imgs.length; i++) {
var wrapper =
document.createElement('div');
wrapper.className = 'wrapper';

var original = imgs[i];
original.parentNode.replaceChild
(wrapper, original);
Now we'll need to inject our four corner DIVs into the document and attach the appropriate classes to each. The code is fairly straight-forward.
var tl = document.createElement('div');
   tl.className ='tl';
   var br = document.createElement('div');
   br.className ='br';
   var tr = document.createElement('div');
   tr.className ='tr';
   var bl = document.createElement('div');
   bl.className ='bl';
Ok, we have our corner DIVs but they aren't actually in the document. We can use 'appendChild' to glue them into our wrapper DIV. To complete the loop, we glue our original image back into the wrapper; then we're ready to grab the next image.
  wrapper.appendChild(tl);
  wrapper.appendChild(tr);
  wrapper.appendChild(bl);
  wrapper.appendChild(br);

   wrapper.appendChild(original);
  }
}
Lastly, we run the function on page load.
window.onload = roundedImages;
And that's it. Pop the script into your <head> with your CSS, and you're rounding corners like an INDY500 driver. You can see it in action here.
To my knowledge it runs like a charm in IE5+, Moz1+, Safari and Opera 8.0. There seems to be a bug in Opera 7 I haven't figured yet.
This is, of course, a first generation experiment and has some limitations. 'DIV.wrapper' needs to be floated to tightly enclose the image, which means your images will always appear to be floated too. However it would be quite possible to remove this requirement by having the script pull out the dimensions of each image, and then use them to manually size the wrapper.
It would also be nice if the script was able to pass any style information attached to the image (particularly alignment data) up to the wrapper, allowing users the choice to float their images left or right. For now, we're requiring the client to have right-floated images in their content.
There also seems to be a wacky bug in IE6 (No! Never!) that causes a 1px mis-alignment on the right and bottom sides of images with odd widths and heights. Totally bizarre. It appears to be a rounding error (no pun intended) and, at the moment, the best solution I can proffer is to use even-numbered image dimensions. If you have some better IE voodoo, we'd certainly love to hear it.
Otherwise, it seems to be quite solid. Certainly it's fast, degrades elegantly and there are endless potential variations on this simplest of themes.
I've got some ideas for some variations which I might take on in a later post, but let me know if you find it useful.
PostScript
With some excellent suggestions from Joshua Paine, we've made a few minor improvements to this script.
- Firstly, a rounding error in IE made the corners positioned with '
right:o' creep 1 pixel out of alignment depending on the browser width). The fix is allow the top-right and bottom-right corners to stretch the full width of the wrapper, and to align their background-image to the right side instead. To do this we need to use the DOM to 'forcibly set' the width of each wrapper to the width of it's contained image -- originally we didn't specify it's width - It's quite common to want to link the images. This causes a 'reordering of the tree' and stuff is no longer where it's expects it to be cuasing errors. We've added a line to make the script step up and over the link.
Both of these suggestions have now been incorporated into the example. Thanks Joshua.
 Alex Walker
Alex has been doing cruel and unusual things to CSS since 2001. He is the lead front-end design and dev for SitePoint and one-time SitePoint's Design and UX editor with over 150+ newsletter written. Co-author of The Principles of Beautiful Web Design. Now Alex is involved in the planning, development, production, and marketing of a huge range of printed and online products and references. He has designed over 60+ of SitePoint's book covers.