

User interface has become more and more important as mobile applications become more and more advanced. Android as a platform provides a great GUI toolkit for Android developers to use to design intuitive interfaces. Many app developers try to make new, unprecedented, innovative interfaces, but more often than not, the best method for making your app easy to use is to stick with familiar frameworks. This usually means that it’s best to stick with standard interface elements from widely-used toolkits.
Like all good GUI toolkits, Android also provides some basic widgets like buttons, labels, etc., which any Android developer can use to create the UI for his application. Here is an overview of the most common Android interface elements.
Key Takeaways
- Utilize Android’s GUI toolkit for designing user interfaces with standard widgets such as TextViews, Buttons, and EditTexts to ensure familiarity and ease of use.
- TextViews can be added either through XML layout files or programmatically in code, offering flexibility depending on the developer’s needs and the specific requirements of the app.
- EditText widgets are essential for input fields in Android applications and can also be implemented either statically in XML or dynamically in code.
- Buttons in Android can be configured to trigger events using the android:onClick attribute in XML or by setting an OnClickListener in code, providing interactive elements for user engagement.
- Images and other media can be displayed using the ImageView widget, which can be added to the app’s layout through XML or programmatically, allowing for dynamic content presentation based on runtime conditions.
Labels (TextView)
One of the most basic widgets provided by Android is the TextView (label), which is used to display a small amount of text on screen. TextView in general is used to display contextual information to the user or to name other elements on the screen.
TextView can be added to your app’s interface using two different methods
- Adding TextView through layout.xml
- Adding TextView through code.
Adding Labels through Layout.xml
One of the ways to add a TextView is through the layout.xml file. In layout.xml, you can add a TextView by simply adding the <TextView> tag. The code to add a TextView is as follows:
<LinearLayout xmlns:android="http://schemas.android.com/apk/res/android"

android:orientation="vertical"

android:layout_width="fill_parent"

android:layout_height="fill_parent"

android:id="@+id/info"

>

<TextView

android:layout_width="fill_parent"

android:layout_height="wrap_content"

android:text="@string/hello"

/>

</LinearLayout>
In the TextView node above, you can add different properties (e.g:- android:text) as properties of the XML Tag.
Adding Labels through Code
Adding TextView through XML is an easy way to add a TextView to the interface, but sometimes it might be necessary to add the TextView programmatically.
The following is the code to add a TextView using more standard programming techniques.
public class TextViewDemo extends Activity {

    /** Called when the activity is first created. */

    @Override

    public void onCreate(Bundle savedInstanceState) {

        super.onCreate(savedInstanceState);

        setContentView(R.layout.main);

        View linearLayout = findViewById(R.id.info);
        TextView ProgramaticallyTV = new TextView(this);

        ProgramaticallyTV.setText("Text View Added Programatically");
        ((LinearLayout) linearLayout).addView(ProgramaticallyTV);
    }
}
In this, we get the layout using the function findViewById and then create a new Instance of TextView. Then, we set the text of the TextView using the function setText, and finally, we add the TextView to the layout using the addView function.
Now, if we run the application by adding these two TextView it will appear as follows.

EditText
EditText is a basic widget in the Android toolkit to let users enter text for different processing. The EditText can also be added via the XML and even through code.
Adding EditText through Layout.xml
To add EditText through XML, you need to add the tag <EditText> into your layout.xml file.
The code for it is as follows:
<LinearLayout xmlns:android="http://schemas.android.com/apk/res/android"

android:orientation="vertical"

android:layout_width="fill_parent"

android:layout_height="fill_parent"

android:id="@+id/info"

>

<TextView

android:layout_width="fill_parent"

android:layout_height="wrap_content"

android:text="UserName"
/>

<EditText

android:id="@+id/username"

android:layout_width="fill_parent"

android:layout_height="wrap_content"/>

</LinearLayout>
The EditText widgets has many properties, like android:text, which can be used to set it Text or android:password to make the EditText a password field.
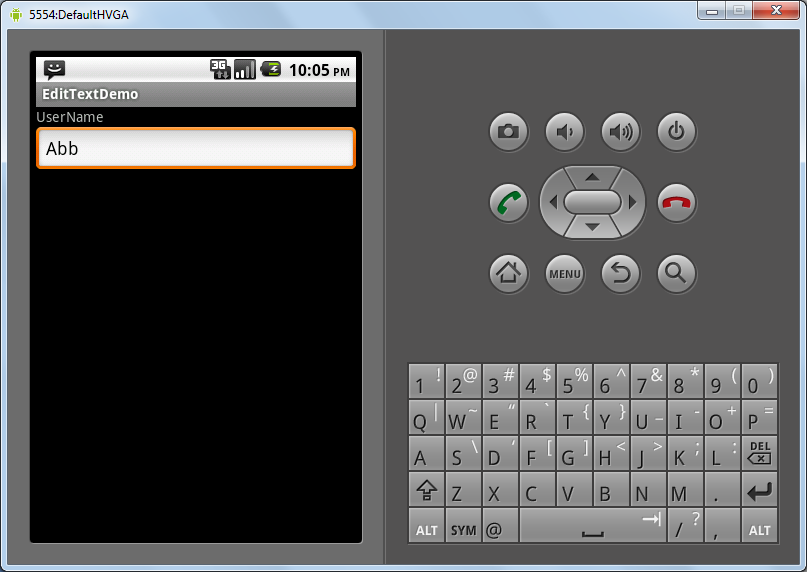
If we run the application now, the screen will be seen as follows:
Adding the EditText via Code
The EditText can be added via code if the user wants to add an EditText on the fly or based on some condition.
The following is the code that adds an EditText for password and then converts it to a password EditText by using the method setTransformationMethod.
public void onCreate(Bundle savedInstanceState) {

   super.onCreate(savedInstanceState);

   setContentView(R.layout.main);
   View linearLayout =
   TextView tvPassword = new TextView(this);

   tvPassword.setText("PassWord");

   ((LinearLayout) linearLayout).addView(tvPassword);
   EditText etPassword = new EditText(this);

   etPassword.setTransformationMethod(new PasswordTransformationMethod()
);
   ((LinearLayout) linearLayout).addView(etPassword);
}
Above, we create an instance of EditText, and then to make the EditText as password, we use the setTransformationMethod.
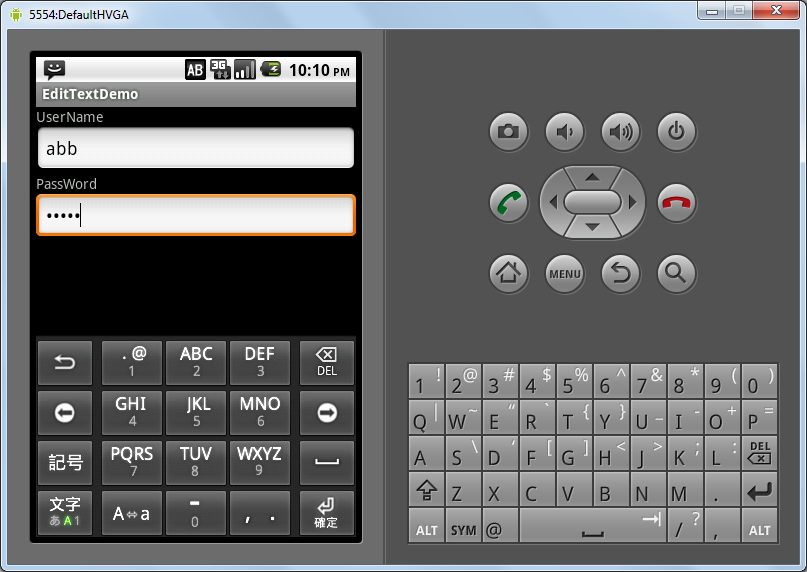
If we run the application now, the screen will look as follows:
Buttons
Buttons are another very basic and very handy widget provided by the Android Toolkit. You can add buttons to your UI and then respond to the clicks on each button.
A button can also be added through the XML layout or through code, just like a TextView.
Adding A Button Through Layout.xml
To add a button through the layout.xml file, you need to specify the <button> tag within layout.xml.
Like a TextView, you can specify other properties of the button as attributes to that XML tag e.g. android:text.
<LinearLayout xmlns:android="http://schemas.android.com/apk/res/android"

android:orientation="vertical"

android:layout_width="fill_parent"

android:layout_height="fill_parent"

android:id="@+id/mainlayout"

>

<TextView

android:layout_width="fill_parent"

android:layout_height="wrap_content"

android:text="@string/hello"

/>

<Button android:id="@+id/xmlbutton"

android:layout_width="fill_parent"

android:layout_height="wrap_content"

android:text="Button Added via xml"

android:onClick="xmlButtonClick"

/>

</LinearLayout>
The button also has a property called as android:onClick, which allows you to specify the click handler (the function to be called when button is clicked).
To handle the button click via code, we will need to create a method as follows:
public void xmlButtonClick(View v) {
   Toast.makeText(getApplicationContext(), "Button Added VIA XML

Clicked", Toast.LENGTH_SHORT).show();
}
This method just displays a toast on screen as soon as the button is clicked.
Adding the Button Through Code
We can also add a button through code and attach the click handler to handle when the button is clicked. The following is the code to add the button and handle its click.
public void onCreate(Bundle savedInstanceState) {

   super.onCreate(savedInstanceState);
   setContentView(R.layout.main);
   View linearLayout =
   Button buyButton = new Button(this);

   buyButton.setText("Button Added Programatically");
   buyButton.setOnClickListener(new Button.OnClickListener() {

      public void onClick(View v) {

       Toast.makeText(getApplicationContext(), "Button Added

Prgramatically Clicked", Toast.LENGTH_SHORT).show();

       }

      });
   ((LinearLayout) linearLayout).addView(buyButton);
}
In this example, we get the layout using the findViewById function, and then we create a new instance of the button. We add the text to the button using the setText method on the button, and then we set a clickhandler using the setOnClickListener to display a toast when the button is clicked.
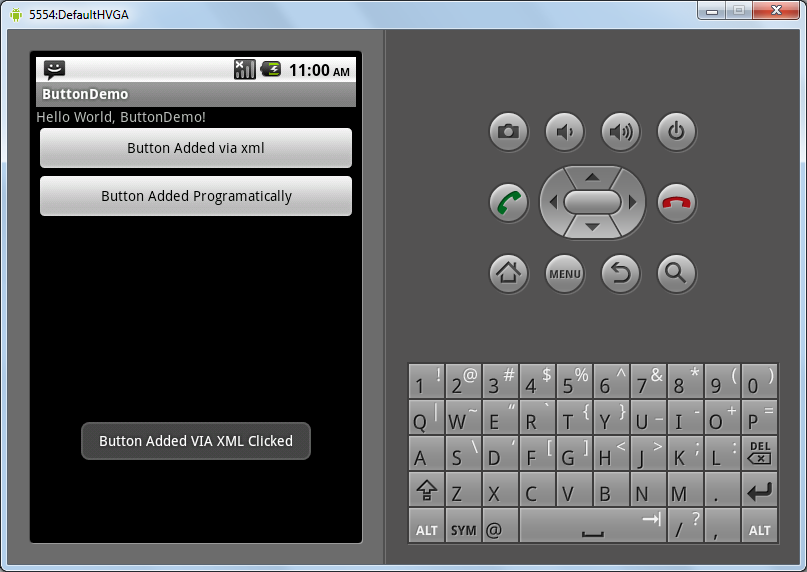
When we run the program and click on the button, the Toast will appear as follows.

Images
The ImageView widget provided by Android is used to display images on the android screen. To use it, you need to add the image in the res/drawable folder.
Like the other widgets, the ImageView can be added through the layout.xml file or through code.
Adding ImageView Through Layout.xml
To add ImageView through layout.xml we will need to add the <ImageView> tag in the layout.xml file.
The code to add the ImageView is as follows:
<LinearLayout xmlns:android="http://schemas.android.com/apk/res/android"

android:orientation="vertical"

android:layout_width="fill_parent"

android:layout_height="fill_parent"

android:id="@+id/info"

>
<TextView

android:layout_width="fill_parent"

android:layout_height="wrap_content"

android:text="@string/hello"

/>

<ImageView xmlns:android="http://schemas.android.com/apk/res/android"

android:id="@+id/flower1"

android:layout_width="fill_parent"

android:layout_height="fill_parent"

android:adjustViewBounds="true"

android:src="@drawable/flower1"

/>

</LinearLayout>
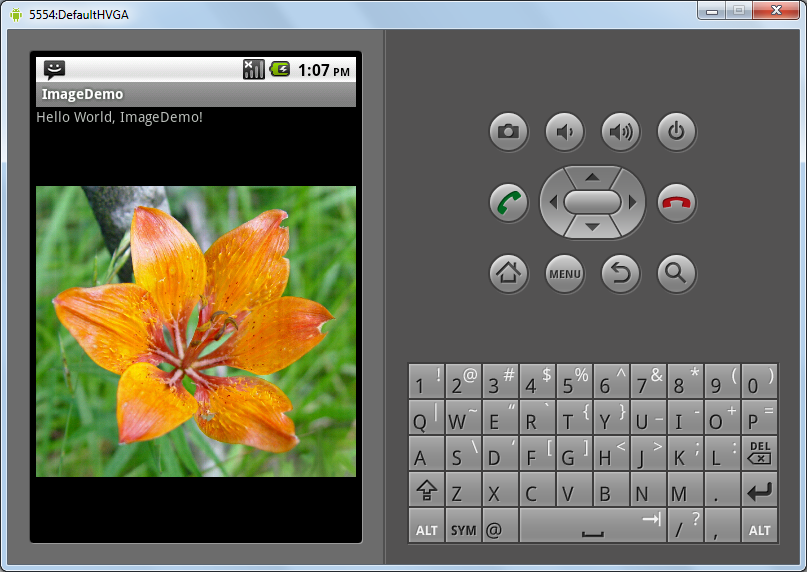
In the layout.xml file, you can use the attribute android:src to specify the name of the image which is to be displayed. In this example, I have used flower1 which is kept at the location res/drawable/flower1.jpg.
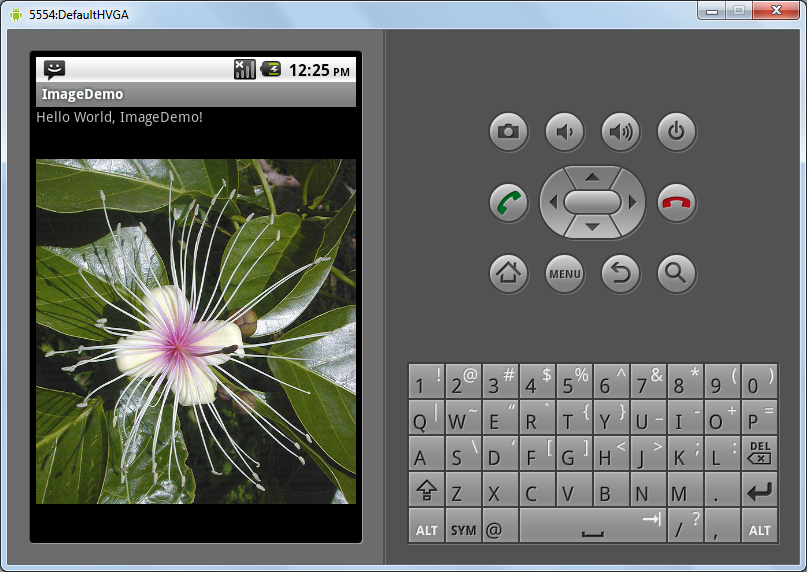
If we run the program now, the screen will look like the following:
Adding ImageView Through Code
Sometimes, it might be handy to add an ImageView through code. For example, you might want to display an image only if a certain programming condition is fulfilled.
The following is the code to add an ImageView through code:
public void onCreate(Bundle savedInstanceState) {

   super.onCreate(savedInstanceState);

   setContentView(R.layout.main);
      View linearLayout = findViewById(R.id.info);

      ImageView Flower2Image = new ImageView(this);

      Flower2Image.setImageResource(R.drawable.flower2);

      ((LinearLayout) linearLayout).addView(Flower2Image);
}
In this example, we first we find the layout using the function findViewById. Then, we create a new ImageView instance. Then, we set the image on the new ImageView instance using the function setImageResource, and finally, we pass the ID for the image to be displayed.
Lastly, we add the ImageView instance to the layout using the addView function.
If we run the program now, the following will be the output:
Checkbox
User interfaces generally consists of different options that the user can either select or deselect. Checkboxes are really useful for creating such options. Android’s UI toolkit also provides us with a Checkbox widget, which can help us create options for user to select or deselect.
Like the other widgets, the Checkbox can be added through the layout.xml or through code.
Adding CheckBox Through Layout.xml
To add CheckBox through layout.xml file, we will need to add the <CheckBox> tag within layout.xml.
The code to add the CheckBox is as follows:
<LinearLayout xmlns:android="http://schemas.android.com/apk/res/android"

android:orientation="vertical"
android:layout_width="fill_parent"

android:layout_height="fill_parent"

android:id="@+id/info"

>

<TextView

android:layout_width="fill_parent"

android:layout_height="wrap_content"

android:text="@string/develop"

/>
<CheckBox xmlns:android="http://schemas.android.com/apk/res/android"

android:id="@+id/windows"

android:layout_width="wrap_content"

android:layout_height="wrap_content"

android:checked="true"

android:text="Windows" />
<CheckBox xmlns:android="http://schemas.android.com/apk/res/android"

android:id="@+id/linux"

android:layout_width="wrap_content"

android:layout_height="wrap_content"

android:text="Linux" />
<CheckBox xmlns:android="http://schemas.android.com/apk/res/android"

android:id="@+id/mac"

android:layout_width="wrap_content"

android:layout_height="wrap_content"

android:text="Mac" />

</LinearLayout>
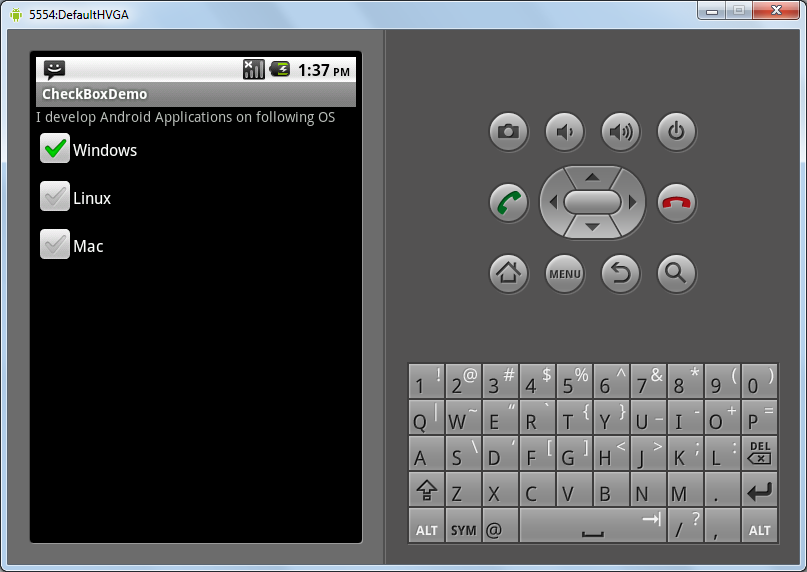
If we run the application now, it will be seen as below:
The user will be able to select or deselect the different options on the screen.
Adding CheckBox Through Code
Sometimes, we might want to add checkboxes only under specific conditions.For such cases, Checkboxes can be added through code.
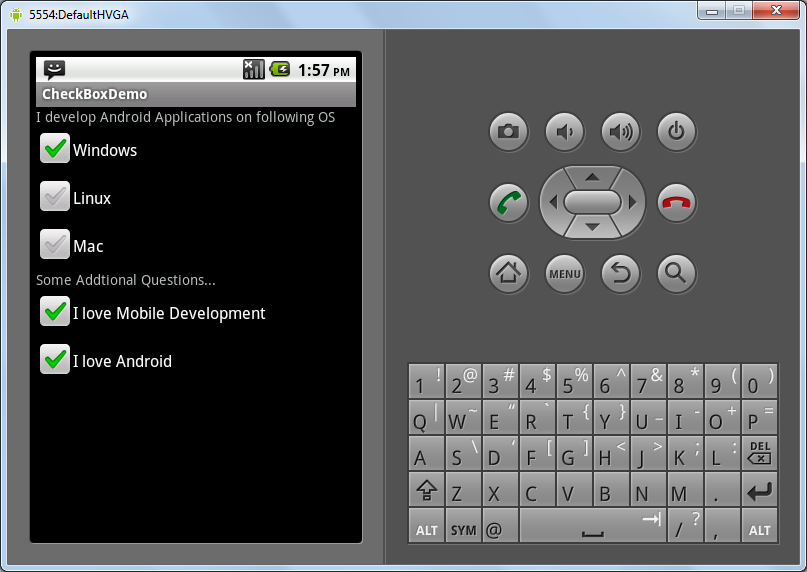
The following is the code that will dynamically add one TextView and two more CheckBox to the previous screen.
public void onCreate(Bundle savedInstanceState) {

   super.onCreate(savedInstanceState);

   setContentView(R.layout.main);
   View linearLayout =
   TextView tvAdditionalQuestions = new TextView(this);

   tvAdditionalQuestions.setText("Some Addtional Questions...");

   ((LinearLayout) linearLayout).addView(tvAdditionalQuestions);
   CheckBox cbMobileDevelopment = new CheckBox(this);

   cbMobileDevelopment.setText("I love Mobile Development");
   findViewById(R.id.info);
   ((LinearLayout) linearLayout).addView(cbMobileDevelopment);
CheckBox cbLoveAndroid = new CheckBox(this);

cbLoveAndroid.setText("I love Android");

   ((LinearLayout) linearLayout).addView(cbLoveAndroid);
}
Here, we create an instance of the checkbox and set the text for it using the setText method.
If we run the application now, the screen will be as follows:
Radio Button
Radio buttons are similar to checkboxes in that they also enable users users to select options. The one major difference is that from a group of radio buttons, only one can be selected at a time.
To make a radio button part of one group you have to add it to a RadioGroup.
Adding Radio Button Through Layout.xml
To add the tadio buttons through the XML file, you have to first create a <RadioGroup> tag and then add <RadioButton> tags within it.
The following is the code to add three radio buttons via XML
<LinearLayout xmlns:android="http://schemas.android.com/apk/res/android"

android:orientation="vertical"

android:layout_width="fill_parent"

android:layout_height="fill_parent"

android:id="@+id/info"

>

<TextView

android:layout_width="fill_parent"

android:layout_height="wrap_content"

android:text="Which is your favourite platorm for Android development"

/>
<RadioGroup

xmlns:android="http://schemas.android.com/apk/res/android"

android:orientation="vertical"

android:layout_width="fill_parent"

android:layout_height="fill_parent"

>

<RadioButton android:id="@+id/windows"

android:layout_width="wrap_content"

android:layout_height="wrap_content"

android:text="Windows" />
<RadioButton android:id="@+id/linux"

android:layout_width="wrap_content"

android:layout_height="wrap_content"

android:text="Linux" />
<RadioButton android:id="@+id/mac"

android:layout_width="wrap_content"

android:layout_height="wrap_content"

android:text="Mac" />

</RadioGroup>

</LinearLayout>
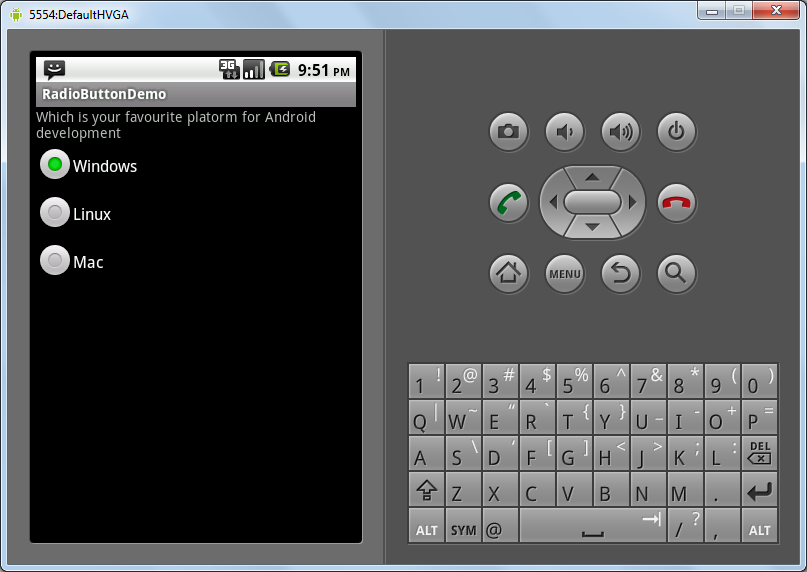
Here, we add the radio button tags for the options we want to display to the user.
If we run the program now, the screen will appear as follows:
Adding Radio Button Through Code
Like the other widgets, even the Radio button can be added through code. Just like we did in the XML file, first we will need to create a radio group. Then, we will create instances of the radio button and then finally, we’ll add these instances to the radio group.
Once this is done, we can add the radio group to the layout.
The following is the code to add two radio buttons:
public void onCreate(Bundle savedInstanceState) {
super.onCreate(savedInstanceState);
setContentView(R.layout.main);
View linearLayout =
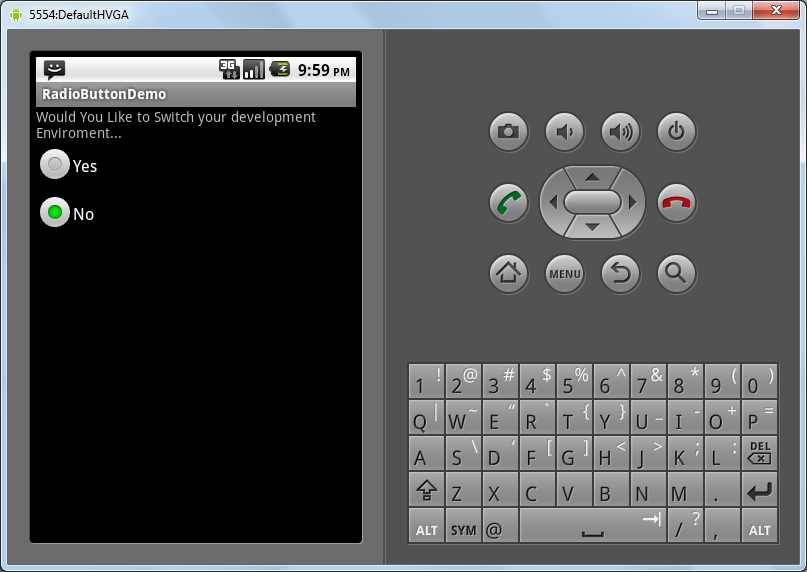
TextView tvAdditionalQuestions = new TextView(this);
tvAdditionalQuestions.setText("Would You Like to Switch your
development Enviroment...");
((LinearLayout) linearLayout).addView(tvAdditionalQuestions);
RadioGroup rgAddtionalQuestion = new RadioGroup(this);
rgAddtionalQuestion.setOrientation(RadioGroup.VERTICAL);
RadioButton rbYes = new RadioButton(this);
rbYes.setText("Yes");
rgAddtionalQuestion.addView(rbYes);
RadioButton rbNo = new RadioButton(this);
rbNo.setText("No");
rgAddtionalQuestion.addView(rbNo);
((LinearLayout) linearLayout).addView(rgAddtionalQuestion);
}
If we run the application now, the screen will be as follows:
Conclusion
Android has a strong support to create a sensible, intuitive user interface. Android’s GUI toolkit provides a good variety of widgets, all of which can be used in different combinations to create the ideal UI for your applications. So, have fun creating your Android apps.
Frequently Asked Questions (FAQs) about Designing Your App’s User Interface Using Basic Widgets in Android’s GUI Toolkit
What are the basic widgets available in Android’s GUI toolkit?
Android’s GUI toolkit offers a variety of basic widgets that developers can use to design the user interface of their apps. These include TextView for displaying text, ImageView for images, Button for user interactions, EditText for user input, CheckBox and RadioButton for selecting options, ProgressBar for showing progress, and many more. Each widget has its own properties and methods that can be customized to fit the design and functionality of your app.
How can I customize the properties of a widget in Android’s GUI toolkit?
You can customize the properties of a widget in Android’s GUI toolkit either programmatically or through XML. For instance, you can set the text, color, size, and other properties of a TextView widget using the setText(), setTextColor(), setTextSize(), and other methods in your Java or Kotlin code. Alternatively, you can define these properties in your XML layout file using attributes like android:text, android:textColor, android:textSize, etc.
How can I handle user interactions with widgets in Android’s GUI toolkit?
You can handle user interactions with widgets in Android’s GUI toolkit by setting event listeners on the widgets. For example, you can set an OnClickListener on a Button widget to perform an action when the button is clicked. Inside the onClick() method of the OnClickListener, you can write the code for the action to be performed.
How can I arrange widgets in a layout in Android’s GUI toolkit?
Android’s GUI toolkit provides several types of layouts that you can use to arrange widgets, such as LinearLayout, RelativeLayout, FrameLayout, and ConstraintLayout. Each layout has its own properties and rules for arranging widgets. You can nest layouts within other layouts to create complex user interfaces.
How can I create a responsive user interface with Android’s GUI toolkit?
To create a responsive user interface with Android’s GUI toolkit, you need to use different types of layouts and widgets that adapt to different screen sizes and orientations. You can also use the resources system to provide different resources for different screen configurations. For example, you can create separate layout files for portrait and landscape orientations, and the system will automatically use the appropriate layout based on the current screen orientation.
How can I test the user interface of my app designed with Android’s GUI toolkit?
You can test the user interface of your app designed with Android’s GUI toolkit using the Android Emulator or a real device. The Android Studio IDE provides tools for running your app and inspecting its user interface. You can also use the Espresso testing framework to write UI tests that simulate user interactions and check the UI state.
How can I improve the performance of my app’s user interface designed with Android’s GUI toolkit?
To improve the performance of your app’s user interface designed with Android’s GUI toolkit, you should optimize your layouts and avoid overdraw. You should use the simplest possible hierarchy of layouts and widgets, and avoid drawing views that are covered by other views. The Android Studio IDE provides tools for analyzing and optimizing your layouts.
How can I make my app’s user interface accessible with Android’s GUI toolkit?
To make your app’s user interface accessible with Android’s GUI toolkit, you should provide alternative text for images, ensure sufficient color contrast, and support navigation with a keyboard or a screen reader. The Android framework provides APIs for accessibility features, and the Android Studio IDE provides tools for checking accessibility issues.
How can I animate widgets in Android’s GUI toolkit?
You can animate widgets in Android’s GUI toolkit using the animation and transition APIs. For example, you can use the ObjectAnimator class to animate properties like position, size, rotation, and transparency of a widget. You can also use the TransitionManager class to animate changes between different states of your user interface.
How can I style widgets in Android’s GUI toolkit?
You can style widgets in Android’s GUI toolkit using themes and styles. A theme is a collection of style attributes that apply to an entire app, activity, or view hierarchy. A style is a collection of style attributes that apply to a single type of widget. You can define your own themes and styles in XML and apply them to your widgets using the android:theme and style attributes.

