Define Your Own WordPress Widgets
Widgets are small pieces of content that can be placed in one of the widgetized regions of your WordPress theme. A widget may contain some simple static content like a newsletter subscription form, introductory text, advertisements or some dynamic content such as a list of recent tweets from your Twitter account.
In this article you will learn:
- How to create simple widgets without coding using the Text widget.
- How to create dynamic data-driven widgets created through a WordPress plugin.
Key Takeaways
- Learn to create static widgets in WordPress using the Text widget for simple content like text and HTML without any coding required.
- Discover how to build dynamic, data-driven widgets by developing a custom WordPress plugin, exemplified through a Twitter Feed widget.
- Understand the optional nature of the widget options panel; not all widgets need user configurations and can operate with default settings.
- Gain insights into the widget lifecycle, including creation, configuration through an options panel, and the importance of caching to optimize performance.
- Explore the process of registering custom widgets with WordPress, ensuring they are recognized and functional within the WordPress ecosystem.
Static Widgets
Static widgets can be used to place some unchanging text or HTML code in a region. These are very easy to create and they will be sufficient for most content you will need to add to your blog’s sidebars.
Creating Static Widgets
In this example we will create a widget that will show a subscription form to an email newsletter in the sidebar of the blog. Follow the steps below having logged into the WordPress administration panel.
Drag and drop the Text widget to a region in the sidebar as shown in the image below:

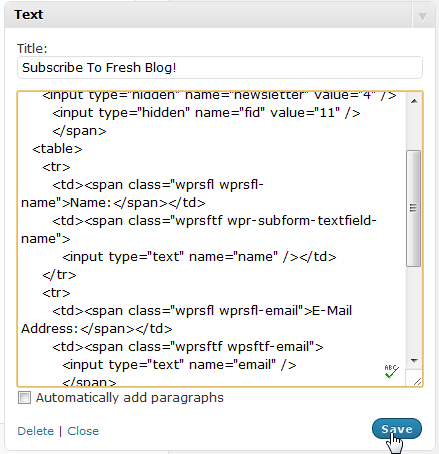
Expand the menu and paste the needed text or HTML code:

Click on the Save button. The widget with its content will appear in the front end of the website in the sidebar as shown in the image below:

Dynamic Widgets
In this tutorial we will create a widget for showing a Twitter feed in the sidebar. I will illustrate this example by creating a plugin that adds a new Widget called “Twitter Feed” to the Widgets interface. To accomplish the same with the theme, place the entire code in the functions.php file of your WordPress theme.
Creating A WordPress Plugin
Before starting the definition of the Widget we must first create the plugin that will contain the definition.
Step 1. Create Plugin File
Create a file named tweet_feed.php in the wp-content/plugins/ directory under your WordPress installation directory.
Step 2: Add The Plugin Declaration Comments
<?php

/*
Plugin Name: Twitter Feed Widget
Author: Raj Sekharan
Author URI: http://www.nodesman.com
Description: Add a twitter feed to your sidebar.
*/
Open a PHP code section and then place the comment section. WordPress looks for the above comments in the first few line of a PHP file to identify it as a wordpress plugin file. The information in this comment section will be used to show the plugin in the plugins administration page.
Step 3: Create A Sub Class Of WP_Widget
Create a sub class of the predefined class WP_Widget with a descriptive name. I will use Twitter_Feed_Widget in this case. The sub class should have four methods:
widget()update()form()Twitter_Feed_Widget()(or whatever the name of your widget class is)
Even if your server is running PHP5 it is necessary to define a function with the same name as the class name.
class Twitter_Feed_Widget extends WP_Widget
{
    function  widget($args,$instance)
    {

    }

   function Twitter_Feed_Widget()
   {

   }

   function  update($new_instance,$old_instance)
   {

   }

   function form($instance)
   {

   }
}
This forms the framework in which the entire definition of the widget will be placed. In the above set of functions only the Twitter_Feed_Widget() and widget() functions are mandatory.
The Widget Options Panel is Optional
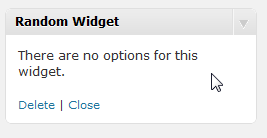
Defining the form() and update() functions is optional. They are necessary only if your widget needs some configuration input from the user. You can leave them out if you don’t want to provide any widget options. In that case the options panel will shown as given in the image below.

Step 4: Define the Options Panel Interface
WordPress expects the form() function defined above to output the input fields to the receive input from the user. In the case of the Twitter Feed widget we will provide the following options:
- Title of the Widget
- Username of Twitter user
- Number of tweets to show.
Below is the definition of the form() function for the Twitter feed widget:
function form($config)
{
?>
    <label for="<?php echo $this->get_field_id("title");  ?>">
    <p>Title: <input type="text"  value="<?php echo $config['title']; ?>" name="<?php  echo $this->get_field_name("title"); ?>" id="<?php  echo $this->get_field_id("title") ?>"></p>
    </label>

    <label for="<?php echo $this->get_field_id("username");  ?>">
    <p>Twitter Username: <input  type="text" value="<?php echo $config['username'];  ?>" name="<?php echo  $this->get_field_name("username"); ?>" id="<?php  echo $this->get_field_id("username") ?>"></p>
    </label>

    <label for="<?php echo  $this->get_field_id("num"); ?>">
    <p>Number Of Tweets: <input  type="text" size="3" value="<?php echo  $config['num']; ?>" name="<?php echo  $this->get_field_name("num"); ?>" id="<?php echo  $this->get_field_id("num") ?>"></p>
    </label>
<?php
}
The form() Function Explained
- The function takes one argument –
$config. This variable contains the configuration values for this widget. - The fields in the options are placed within a
<form>tag that is submitted via an AJAX request. Which means a form tag shouldn’t be added in the definition above. WordPress handles the saving of the widget data for you. - The
$this->get_field_name()and$this->get_field_id()functions are used to generate names for the form fields so that there are no conflicts in names with the input fields on the Widget options page.
Step 5: Save Options Panel Settings
The business logic that saves the settings selected in the options panel above should be placed in the save() function. In the case of our Twitter feed:
function update($newinstance,$oldinstance)
{
    $instance =  $oldinstance;
    //update the username
    $instance['username']=  $newinstance['username'];
    $instance['title'] =  $newinstance['title'];
    $num = (int)$newinstance['num'];
    $num = intval($num);
    $num = ($num>1)?$num:1;
    $instance['url'] = "http://api.twitter.com/1/statuses/user_timeline.json?screen_name={$newinstance['username']}&count={$num}";
    $instance['num'] = $num;
    return $instance;
}
The update() Function Explained
- The function takes two arguments :
- The first argument –
$newinstancesin this case – has the configuration information of the widget as it was entered in the options panel. WordPress automatically detects all the form elements and uses their names for array elements. - The second argument –
$oldinstancein this case – has the configuration information of the Widget prior to changing the settings.
Options Panel Doesn’t Support File Uploads
You cannot add a file field in the options panel of a widget. If your configurable widget takes file inputs from the user then you must create a separate administration screen for the widget’s options and add a URL field in the widget configuration form.
Step 6: Define the Widget
Now we are going to define the widget itself. WordPress expects the HTML of the widget to be generated by a function named widget(). Shown below is the definition of the Twitter Widget:
function widget($args,$instance)
{
     extract($args,EXTR_SKIP);
     if (empty($instance['url']) || empty($instance['username']))
    	  return;
     $title =  ($instance['title'])?$instance['title']:"Latest Tweets";

     $tweets =  $this->get_tweets($instance['url'],$instance['username'],$instance['num']);
     $max = $instance['num'];
     echo $before_widget;
?>
<div class="twitter-feed-widget">
<php echo $before_title; ?>
<strong><?php echo $title; ?></strong>
<php echo $after_title; ?>
<?php
$count=0;
foreach ($tweets as $tweet)
{
    $text = $tweet['tweet'];
?>
<div class="tfw-tweet"><a href="<?php echo $tweet['url'] ?>"><?php echo $text;  ?></a></div><br/>
<?php
    $count++;
    if ($count == $num)
     break;
}
?>
</div>
<?php
echo $after_widget;
}
The widget() Function Explained
The widget function takes two parameters: $args and $instance.
- The $args variable contains a few theme relaetd variables:
before_widget– The HTML to be printed before the widget body.- >after_widget – The HTML to be printed after the widget body.
before_title– The HTML to be printed before the title of the widget.after_title– The HTML to be printed after the title fo the widget.
- The above mentioned variables are set in the WordPress theme by the Theme author in the declaration of the theme sidebar in the
functions.phpfile. - The variable
$instancehas the configuration information for this widget instance that was saved in theupdate()function in the previous step. - The
get_tweets()function above will fetch tweets of the twitter user passed in the variable$username. The tweets are returned as an associative array. The implementation of the function is as below:function get_tweets($feed_url,$username, $num=10) { //check if the feed is in the list of feeds $feeds = get_option("_tfw_feeds"); $hash = md5($feed_url); $tweets = array(); if (isset($feeds[$hash])) { $timeOfLastFetch = intval(@$feeds[$hash]["last_update"]); if ($timeOfLastFetch-time() >300) //update the tweets every 5 minutes { $whetherUpdateTweets = true; } else { if (is_array($feeds[$hash]['tweets']) && count($feeds[$hash]['tweets'] >= $num)) { return $feeds[$hash]['tweets']; } else { $whetherUpdateTweets=true; } } } else $whetherUpdateTweets = true; if ($whetherUpdateTweets) { if ($tweetsList = file_get_contents($feed_url)) { $tweetsList = json_decode($tweetsList); foreach ($tweetsList as $tweet) { $tweets[] = array("tweet"=>$tweet->text,"url"=>"https://twitter.com/#!/{$username}/status/{$tweet->id_str}"); } } $hash = md5($feed_url); $feeds = get_option("_tfw_feeds"); $feeds[$hash] = array("last_update"=>time(),"tweets"=>$tweets); update_option("_tfw_feeds",$feeds); } return $tweets; } - The first line of the calls the
extract()function. The function takes an associative array. It creates variables named after the keys of the array and sets them to the value corresponding to those keys. - The second line ensures that the widget is not shown at all if the user doesn’t save their username.
- The fourth line ensures that the
$titlevariable is always set to a usable string. - The next four lines print the content of the above mentioned theme related variables.
- The
get_tweets()function retrieves a list of tweets of the twitter user. The RSS filename that was saved in the update step is passed to this function as a parameter. It returns an array of associative arrays each of which have the tweet text and the URL to the tweet as elements. - The
foreachloop prints the tweets.
Step 7: Define The Widget Class Constructor
The widget class’s constructor gives WordPress some information on the widget. The name of the widget, the dimensions of the widget’s options panel, the description to be shown under the widget’s name in the Widgets administration page are all configured in this function. This constructor defines two arrays and then passes them to the WP_Widget parent class.
function Twitter_Feed_Widget()
{
   $widget_options = array(
      'classname'=>'widget-tweet',
      'description'=>__('This widget shows the twitter feed for the selected user.')
   );
   $control_options = array(
      'height'=>300,
      'width' =>300
   );
   $this->WP_Widget('twitter_feed_widget','Twitter Feed Widget',$widget_options,$control_options);
}
The Constructor Explained
- The first argument to the parent class constructor is a unique identified for the widget defined by this class. The widget’s content will be enclosed in a
<div>element. This element’s class attribute will be set to this value. - The second argument is the name of the widget as it will be shown to the user in the Widgets administration page.
- The third argument is an associative array with the following keys:
- classname – The entire widget along with the title will be placed within a
<li>element. This element’s class name will be set to this value. - description – The description of the widget as it will be shown in the Widgets Administration section.
- classname – The entire widget along with the title will be placed within a
- The fourth argument is an associative array with the following keys:
- height – Height of the widget’s options panel.
- width – Width of the widget’s options panel.
Step 8: Register the Widget with WordPress
Having defined the Widget class we have to get WordPress to treat this class as a widget definition.
First, we add a function that attaches to the widget_init hook:
add_action("widgets_init","myplugin_widget_init");
WordPress expects all plugins and themes that want to register widgets to hook onto the widgets_init hook. The above line of code registers the myplugin_widget_init() function with the widgets_init hook. We then register the widget in the function body:
function myplugin_widget_init()
{
    register_widget("Twitter_Feed_Widget");
}
The register_widget() function takes one argument – the name of the widget class.
Important Notes on WordPress Widgets
WordPress Widget API Was Changed
Prior to version 2.8, WordPress used a different method of defining widgets. Instead of defining a widget class you had to pass the function names as callbacks to two functions – register_widget_control() and register_sidebar_widget().
These functions are deprecated and will be removed in future versions. Do not use this method to create widgets. However, you will encounter these functions in the source code of existing popular plugins.
Cache Widget Output
Some dynamic widgets consume much bandwidth, CPU and/or other resources to display its content. For example, the Twitter Feed widget relies on the user’s Tweet RSS feed provided by Twitter. Downloading the feed every single time the widget is shown will overload Twitter’s server. This will result in the tweet feed loading unreliably.
Instead if the feed was updated only once every 5 or 10 minutes the Twitter feed will always be available. This will avoid throttling of your WordPress blog’s web server by Twitter’s. The Twitter Feed Widget plugin in the example above has been implemented such that the feeds are fetched only once every 5 minutes.
Add Enclosing Markup and Identifiers
Widgets generated by plugins will be placed in the regions of many different themes. Insanely useful though your widget may be, it will be a blot on the face of a website if it stands out looking out of place.
Enclosing all of the elements that your widget shows in a <div> or <span> element and providing them appropriate class and id attributes can help themers to customize the look and feel of your widget to suit the visual background in which it is placed.
Widgets Make Users’ Lives Easier
WordPress is the world’s most popular blogging platform because of the ease of use. Prior to implementation of widgets, users had to open up the theme files and then insert code at the appropriate location to add new features to the sidebar. That was fine when most bloggers were very tech-savvy.
Whether you are creating plugins for a client or for public release, the Widgets are a way to put control in the hands of bloggers who may not be as technically proficient as you and make the experience of using your software a lot better. Widgets help users get the most out of your plugin without risky and daunting edits to their WordPress theme.
Frequently Asked Questions about WordPress Widgets
How can I add a new widget to my WordPress site?
Adding a new widget to your WordPress site is a simple process. First, navigate to your WordPress dashboard and click on ‘Appearance’, then ‘Widgets’. You will see a list of available widgets on the left side of the screen. Simply drag and drop the widget you want to add into the desired widget area on the right side of the screen. Click on the widget to configure its settings, then click ‘Save’ to apply the changes.
Can I create my own custom widgets in WordPress?
Yes, you can create your own custom widgets in WordPress. This requires some knowledge of PHP and WordPress’s widget API. You’ll need to create a new PHP file in your theme’s directory, define a new widget class, and register it with WordPress. Our article provides a detailed guide on how to do this.
How can I remove a widget from my WordPress site?
To remove a widget from your WordPress site, go to ‘Appearance’ > ‘Widgets’ in your WordPress dashboard. Find the widget you want to remove in the widget area on the right side of the screen, click on it, and then click ‘Delete’.
Can I use widgets without any coding knowledge?
Absolutely! WordPress provides a wide range of pre-built widgets that you can use without any coding knowledge. These include widgets for adding text, images, navigation menus, and more to your site. You can add these widgets to your site by simply dragging and dropping them into your desired widget area.
How can I change the order of my widgets?
You can change the order of your widgets by dragging and dropping them into your desired position in the widget area. The changes will be saved automatically.
Can I display a widget on a specific page only?
Yes, you can display a widget on a specific page only by using a plugin like ‘Widget Logic’ or ‘Display Widgets’. These plugins allow you to control where your widgets are displayed based on conditions that you set.
What are some popular plugins for enhancing widget functionality?
Some popular plugins for enhancing widget functionality include ‘Widget Logic’, ‘Display Widgets’, ‘SiteOrigin Widgets Bundle’, and ‘Enhanced Text Widget’. These plugins provide additional features like conditional widget display, additional widget types, and more.
How can I style my widgets?
You can style your widgets by adding custom CSS to your theme. This requires some knowledge of CSS. You can add your custom CSS in the ‘Additional CSS’ section of the ‘Customize’ screen in your WordPress dashboard.
Can I use widgets in my posts or pages?
Yes, you can use widgets in your posts or pages by using a plugin like ‘Widgets on Pages’. This plugin allows you to create widget areas that can be inserted into your posts or pages using shortcodes.
What should I do if my widget is not displaying correctly?
If your widget is not displaying correctly, first check to make sure it is configured correctly. If it is, the issue may be caused by a conflict with your theme or another plugin. Try switching to a default WordPress theme and deactivating all other plugins to see if this resolves the issue. If it does, reactivate your theme and plugins one by one to identify the source of the conflict.
Raj is a freelance web developer who specializes in developing and customizing WordPress blogs. He is the creator of the WP Responder WordPress plugin.


