
Key Takeaways
- Seamless textures are becoming increasingly popular in web design due to the support of multiple backgrounds on a single element by current browsers. These textures can be created without installing any software or even leaving the browser using online tools such as the Aviary suite.
- The Aviary suite allows users to crop images, apply effects, and create seamless tiles from textures. This can be achieved by adjusting the horizontal and vertical blends and offsets to move the seams to the center of the canvas, and then gradually sliding the blend settings to remove the seams.
- Once the seamless tile is created, it can be downloaded and saved to an Aviary account. The final result can be used in various applications, such as creating large surfaces like walls, floors, and landscapes in 3D models.
- The Aviary suite, while useful for creating seamless tiles, also offers a range of other features for mixing and matching photographic source files, generated fractal patterns, procedural textures, lens effects, and filters. This makes it a versatile tool for creating almost any surface.

somewhat ol' school approach to tiled backgrounds
Last week someone pointed me to the Yale University School of Art and their .. well .. interesting and arguably ironic use of tiled backgrounds. Depending on your vintage, you may have flashbacks to MySpace, Angelfire or even the recently-departed Geocities, but it got me thinking.
Tiling backgrounds are like the crocodiles of the web design world. They first evolved in the ‘Jurassic’ period of the web, outlasting dinosaurs like table-based layouts and font tags. Sure, they can be ugly and scary as hell but, like crocodiles, they’ve stuck around a long time because they work.
Ok, that may have been a conceptual stretch, but I watch a lot of Discovery channel.
Looking forward, we’re only likely to see more tiling backgrounds. Now that all the current browsers (IE9, Chrome, Firefox, Opera, and Safari) are finally supporting the use of multiple backgrounds on a single element, there seem to be some great opportunities to weave different sized tiles together in new and interesting ways. However most of the time you’re going to want your image swatch to tile without visible edges or seams.
So, how do we do that?
The most common method to produce seamless tiles involves using Photoshop’s offset filter to move the joins to inside the image area, and then to manually retouch the joins with either the healing brush or clone tool. Now there is no argument: this gives you a good result but it does require some work and, when complex patterns are involved, often some considerable skill.
There are some excellent commercial seamless tiling tools that are primarily aimed at game developers and 3D modellers (Genetica, Pattern Studio and PhotoSEAM are good examples).
If you see a regular use for these tools, they are great, but arguably overkill for us. There are some paid Photoshop plugins and some raw, homemade apps out there, but I have to say nothing impressed me. What if you could make a quality seamless tile without installing anything, or even leaving your browser? Read on.
-
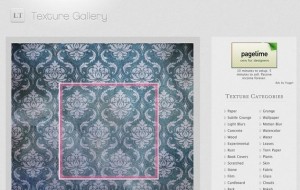
Sampling a wallpaper texture from Lost & Taken Today, we’re going to use some of the Aviary suite of online graphics tools, To play along, you might want to consider installing the Chrome or Firefox extensions that interface your browser directly with their service. It’s not necessary to get a result, but it will streamline your process. It’s your call.
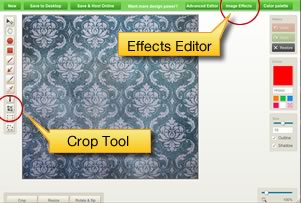
- I’m going to start with an old wallpaper texture from Caleb Kimbrough’s stunning and ever-growing collection at Lost & Taken. When you’ve found a texture you like, use the Aviary extension to screen capture the browser window. It should load straight into Aviary’s Image Markup Editor (aka Talon), where you can use the crop tool to trim your image down to a nice section of texture. You don’t need to be too precious about exactly where you crop your patterns — we can fix that later — but try to select an area that is relatively flatly lit.

Crop your image to a workable size and then transfer it to the effects editor Next, hit the green ‘Image Effects’ button on the top right to transfer our image to Aviary’s Effects Editor (aka Peacock)– this is where the nifty stuff happens. When it is loaded, the workspace should show tile of your texture (labelled ‘Resource’) with an output canvas below it.A connecting arm automatically joins our sample texture to the canvas.
- Now open the ‘Effects’ tab on the left edge and you’ll find a drawer containing around 40 effect types. Rummage around till you find the ‘Seamless’ effect and drag ‘n’ drop it between our texture tile (Resource) and the canvas.
-
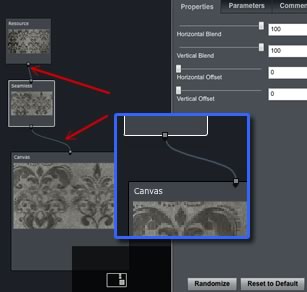
Connect your resource, effect and canvas together We need to ‘wire’ these elements together. If you positioned the seamless effect just right, they may have wired themselves together automatically.
If not, it’s no big deal. Just drag a connecting arm from the tiny handle on the bottom edge of our sample and the handle on the top edge of the Seamless effect tile. Follow the same process to connect the Seamless effect to the Canvas. You should now have a nice daisy-chain of Resource to Seamless to Canvas.
- Select the Seamless effect and you’ll see its properties displayed in the panel on the right. Frankly, the default settings aren’t very useful, so reset the horizontal and vertical blends to zero and the horizontal and vertical offset to 50%. This will move the hard-edged seams to the center of the canvas, making them much easier to work with.
- Now for the magic. Begin gradually sliding the horizontal blend settings and the hard-edged vertical seam should start to evaporate before your eyes. If your original sample texture is an organic texture (paper, grass, marble, etc), almost any blend of around 10% should work fine. Man-made, repeating patterns such as wallpaper and fabric will take a little more fine-tuning on your part, but it’s not super difficult.
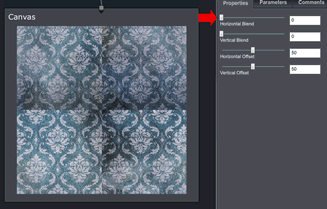
Slide the horizontal blend settings and the vertical seam should start to evaporate - You’ve probably guessed the next step. Use the vertical blend slider to remove the horizontal join.
- When you’re happy with the result, click on your canvas element and check the ‘Adapt Display Size to Input Bitmap’ checkbox in the properties panel. This will automatically crop off any empty image area for you. Voila! You should nowbe looking at a perfect seamless tile.
- Now you just need to download it. In the ‘File’ menu at the top you can use the ‘Export Canvas as Bitmap’ option to download a copy. You can also save a copy to your Aviary account if you have one.


Here’s the finished tile from the example and I’ve created a little demo page to show it in action.

Note: You may notice an Aviary watermark in the bottom corner of your image. This is turned on by default, but can be turned off in your profile settings. You need to have an Aviary account, but it doesn’t cost you anything.
Summary
As you’ve probably already worked out, the Effects Editor does a lot more than just generate seamless tiles. Peacock is a sophisticated tool designed to let you mix and match photographic source files, generated fractal patterns, procedural textures, lens effects and filters to create almost any surface you can conceive of. We’ve barely scratched the surface today, but the seamless tile generator is a great way to get something of value from Aviary while getting your feet wet.

In this demo, I started with one of Caleb’s textures, but if you scour the web, you’ll find great, free, raw materials everywhere. In the past, I’ve sampled textures from commercial tile retailers, specialty paper suppliers, fabric wholesalers and brick manufacturers.
What’s more, most of us carry high-quality ‘texture capturing devices’ in our hip pockets. Just be aware of what your eyes are seeing, grab and stow it away. It shouldn’t be long before you’ve got your own super-useful collection of free raw textures.
Have fun.
Frequently Asked Questions (FAQs) on Creating Seamless Textures
What are the best tools for creating seamless textures online?
There are several online tools that you can use to create seamless textures. Some of the most popular ones include Architextures, ImgOnline, CGDirector, The3rdSequence, and Laurentvw. These tools offer a variety of features such as pattern generators, texture converters, and image editors that can help you create high-quality seamless textures. It’s important to choose a tool that suits your specific needs and skill level.
How can I make a texture seamless in Photoshop?
Making a texture seamless in Photoshop involves a few steps. First, open the texture image in Photoshop. Then, go to Filter > Other > Offset. Adjust the horizontal and vertical settings to half of the image’s width and height. This will shift the seams to the center of the image. Use the Clone Stamp tool to blend the seams and make the texture seamless. Finally, save your new seamless texture.
Can I create seamless textures without using Photoshop?
Yes, you can create seamless textures without using Photoshop. There are several online tools and software that allow you to create seamless textures. These include GIMP, a free and open-source image editor, and various online tools like Architextures and ImgOnline. These tools offer features similar to Photoshop and can be used to create high-quality seamless textures.
How can I use seamless textures in my 3D models?
Seamless textures can be used in 3D models to add detail and realism. To use a seamless texture in a 3D model, you need to apply the texture as a material to the model. This process varies depending on the 3D modeling software you are using. In general, you will need to import the texture, create a new material, and apply the texture to the material. Then, you can apply the material to your 3D model.
What are the benefits of using seamless textures?
Seamless textures offer several benefits. They can add detail and realism to 3D models and digital art. Because they are seamless, they can be tiled without visible seams, making them ideal for creating large surfaces like walls, floors, and landscapes. Seamless textures also save time and resources as you can use the same texture repeatedly without it looking repetitive.
How can I create a seamless pattern in Illustrator?
Creating a seamless pattern in Illustrator involves a few steps. First, create your design elements. Then, go to Object > Pattern > Make. This will open the Pattern Options panel. Adjust the tile type and spacing to make the pattern seamless. Finally, save your new seamless pattern.
Can I create seamless textures from photos?
Yes, you can create seamless textures from photos. This can be done using image editing software like Photoshop or GIMP, or online tools like ImgOnline. The process involves adjusting the image so that it can be tiled without visible seams. This usually involves shifting the seams to the center of the image and blending them to make them seamless.
What is a seamless pattern generator and how does it work?
A seamless pattern generator is a tool that creates seamless patterns from images or designs. It works by repeating the image or design in a way that eliminates visible seams. Some pattern generators also offer features like color adjustment, scaling, and rotation to help you create the perfect seamless pattern.
How can I improve the quality of my seamless textures?
There are several ways to improve the quality of your seamless textures. One way is to start with a high-quality image or design. The higher the resolution of your original image, the better the quality of your seamless texture. Another way is to carefully blend the seams of your texture to make them invisible. This can be done using image editing tools like the Clone Stamp in Photoshop.
Can I use seamless textures in web design?
Yes, seamless textures can be used in web design to add visual interest and depth. They can be used as backgrounds, in buttons, or in other design elements. Because they are seamless, they can be tiled to fill any size area without visible seams. This makes them a versatile and useful tool in web design.