
Key Takeaways
- To create a realistic icy text effect in Photoshop, start by creating a new document and filling the background layer with a light blue color. Select a bold typeface and position it in the middle of your document.
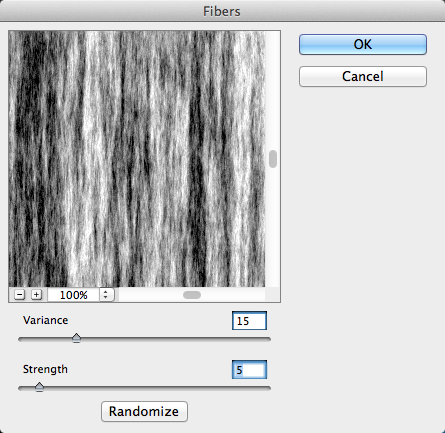
- Duplicate your text layer and create a new layer above the bottom text layer. Go to “Filter” > “Render” > “Fibers” to achieve a vertical fibrous texture. This texture will make the icy effect more realistic.
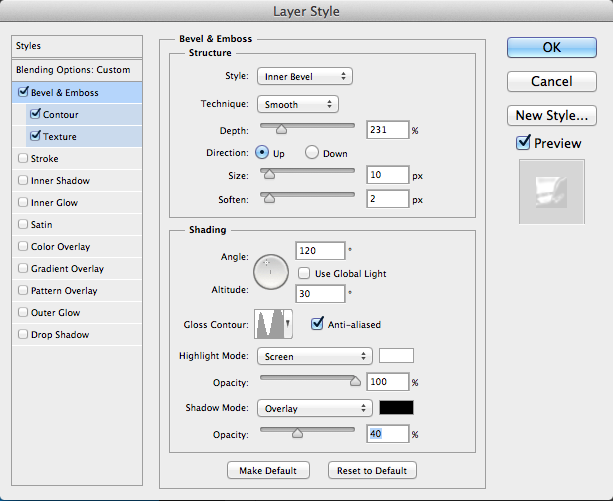
- Lower the fill of the top text layer to 0 and bring up the “Layer Style” Menu. Click “Bevel & Emboss” and choose “Inner Bevel” to create a varied bevel/refraction effect, similar to real ice. Add your own custom texture and an Inner Shadow to make the icy effect more convincing.
- Add Satin, an Outer Glow, and a drop shadow to your text. Finally, add some frost to your text using a customized brush. This will give your text a more natural appearance and create a realistic icy text effect in Photoshop.
Creating realistic effects in Photoshop is an essential skill for any designer. Creating seasonal themes and convincing imagery is something that we do every day. With the right combination of textures and filters, you can simulate just about any surface realistically. Whether you are creating a bold headline for an article or a text effect for for a winter flyer, now is a great time to create an icy text effect in Photoshop to use in your work. Let’s get started!
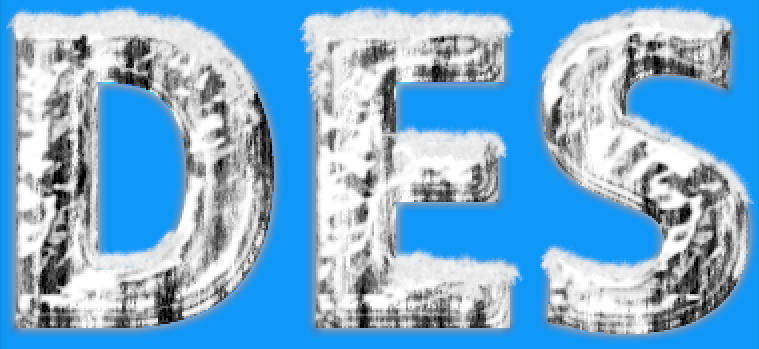
Create a new document in Photoshop. I created a document that is 1024px by 768px. Select a light blue (#008aff) and fill the background layer with this color. Select the text tool and choose a bold typeface. I chose Frutiger LT 87 Extra Black. Center it and position the type in the middle of your document.

We need to duplicate our text layer for use later. Hit Command/Ctrl + “J” to duplicate the text layer. Hide the top text layer for now and create a new layer above the bottom text layer. Hit the “D” key to restore your foreground and background colors to the default black and white. Hit Command/Ctrl + Delete to fill the new blank layer with either black or white. It really doesn’t matter which color you choose. Next Go to “Filter” > “Render” > “Fibers.” Set Variance to 15 and Strength to 5. If this doesn’t give you the effect that you want, you can always click on Randomize. This will generate a new, random variation of fibers based on a mix of the foreground and background colors.
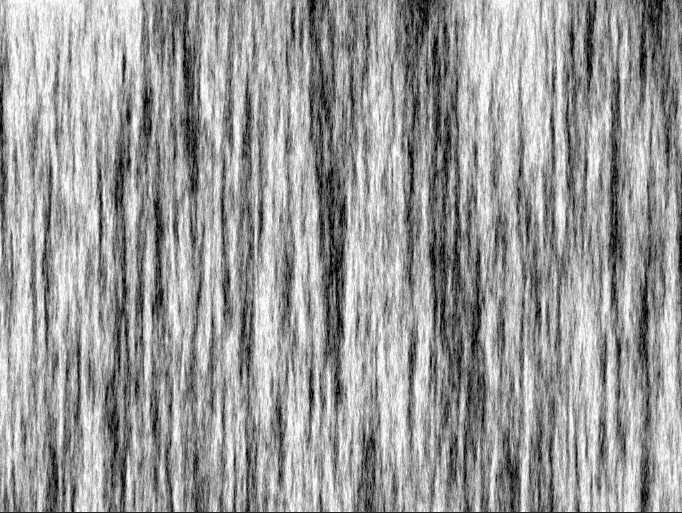
Above, the result is a vertical fibrous texture. The effect is varied, and this is important, because when a texture is randomized or varied, it looks more realistic when applied to objects. Next, hold Alt/Option and click in between the fiber layer and the bottom text layer within the layers panel. This will clip the fiber layer to the shape of the text layer below.


Next, make the top text layer (that we had duplicated and hidden earlier) visible. The type will be solid white again, but we will change this by lowering the fill of our layer to 0. The text should look the same as the example above. The object of our layer styles will be to create a varied bevel/refraction effect, similar to what we would see when looking at real ice.
Double-click the top text layer to bring up the “Layer Style” Menu. Click “Bevel & Emboss” and choose “Inner Bevel.” Choose “Smooth” as the technique, and set the depth very high, to around 225%-230%. Set the size to 10px, and set soften to 2px. You want to add a little softening so the edges won’t be too sharp, just like you would expect with melting ice. Under shading, set the gloss contour to Ring-Double. Set the highlight mode to screen at 100%, and set shadows to overlay at 50%.
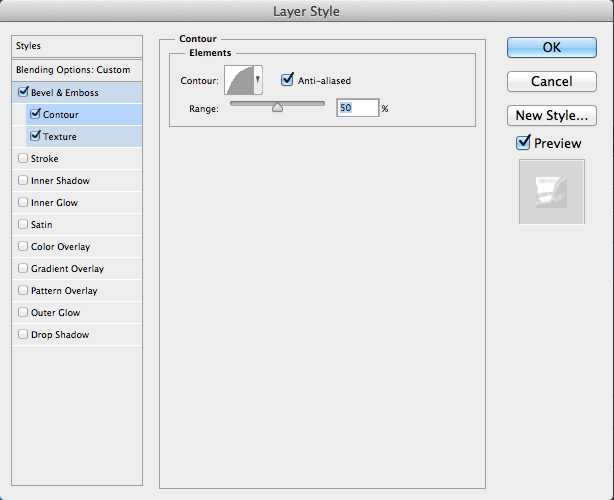
Set Contour to Half Round and set the range to 50%.
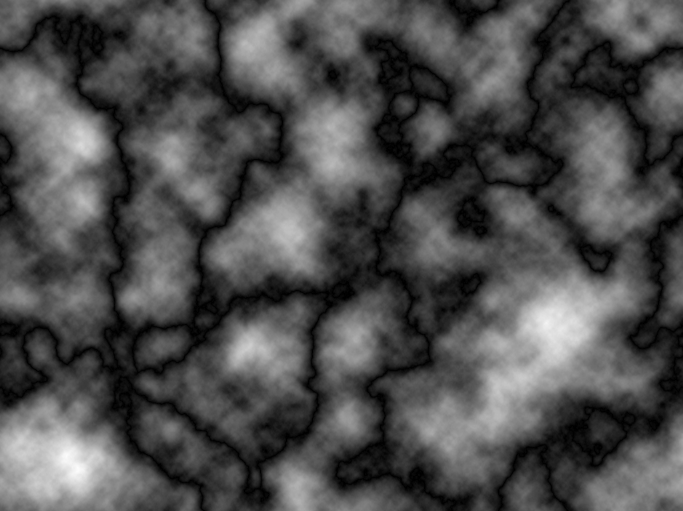
Now, we need to add our own custom texture to make the icy effect more convincing. Create a new document and on the background layer, go to “Filter” > “Render” > “Clouds.” The go to “Filter” > “Render” > “Difference Clouds.” You should end up with something similar to the effect shown below. Select the rectangular marquee tool and, while holding Shift, click and drag to make a square selection. Go to “Edit” > “Define Pattern.” Name it something that you’ll recognize, and then close this document.
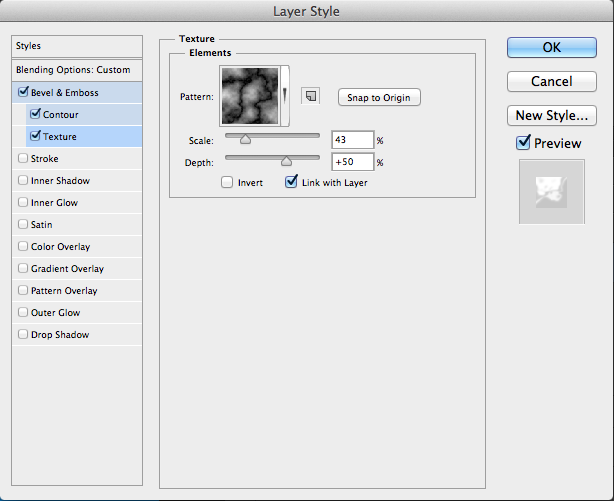
Go back to your original document and in the “Layer Styles” panel, click on “Texture.” Choose the pattern that you just selected, set the scale to somewhere between 40-50, and set the depth to around 50. You may have to adjust this depending on the size and resolution of your document. We have already come a long way with this. Your text should look something like the example below.

Let’s add a slight Inner Shadow. Set the blend mode to “Multiply.” Lower the opacity to roughly 30-40%, Set the distance to around 10, and set the size between 10-15px. This will add a slight shadow on the inside edge, adding to the roundness at the edge.

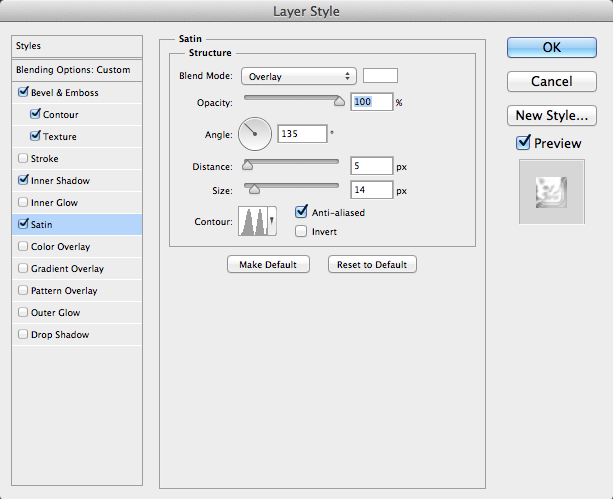
Next, it is time to add Satin to our effect. Set the color to white. Set the distance to 5px, and set the size to around 14px. Set the contour to “Ring-Double.” This effect adds a glossy sheen to our text, which makes the icy effect more convincing.
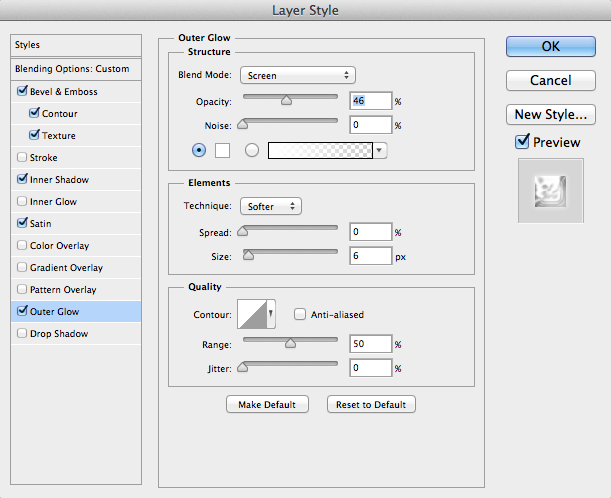
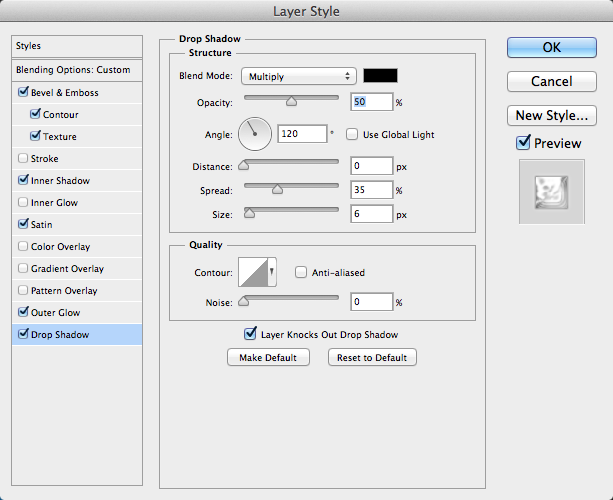
Add an Outer Glow and set it to White. Set the blend mode to “Screen,” and set the size at around 5px. Lower the opacity to around 50%. This will add a little reflective glow on the outside of your text.
Now we will add a drop shadow to our text. Set the distance to 0, because we want to add a little definition to our text effect. Set the spread high (around 35%), because we want the shadow to fade away quickly, creating a very subtle effect.
The result so far is a very nice, textured icy effect. This is close to the reflected and refracted light and color variations that you would see with any block of ice.

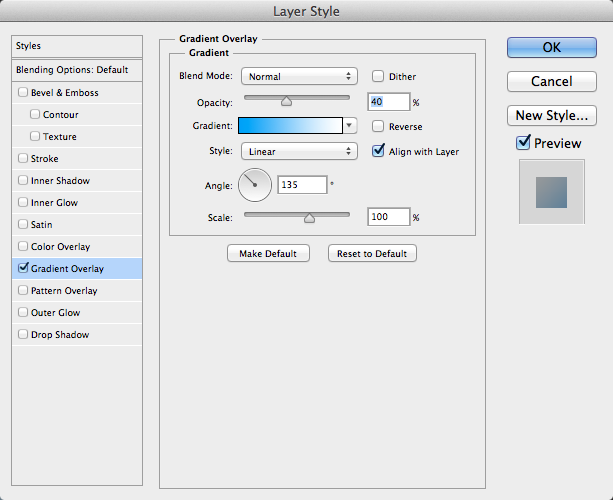
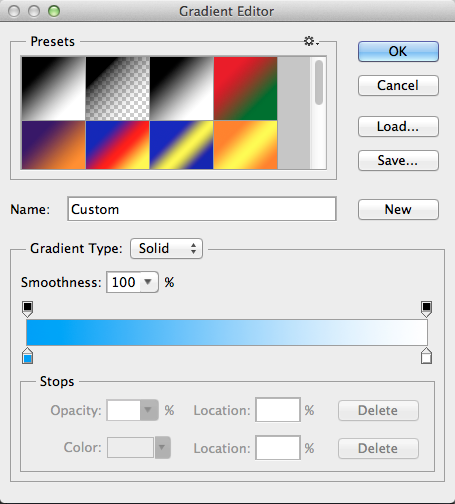
Next, we’ll add a couple of snow banks behind our text. Select the pen tool and create a rounded hill shape, using three anchor points. Make sure that your foreground color is white. Then, within the Paths panel, click the first icon in the bottom, which fills the path with your foreground color. Then, double-click on the layer to bring up the Layer Style panel, and choose “Gradient Overlay.” Instead of black, change the dark color of the gradient to a light blue and leave the other color as white.
The result is shown below. Next, hit Command/Ctrl + “J” to duplicate the layer and then hit Command/Ctrl + “T” to transform the duplicate. Right-click on the transformable object and choose “Flip Horizontal.” Position this layer to overlap the other one, as shown below.

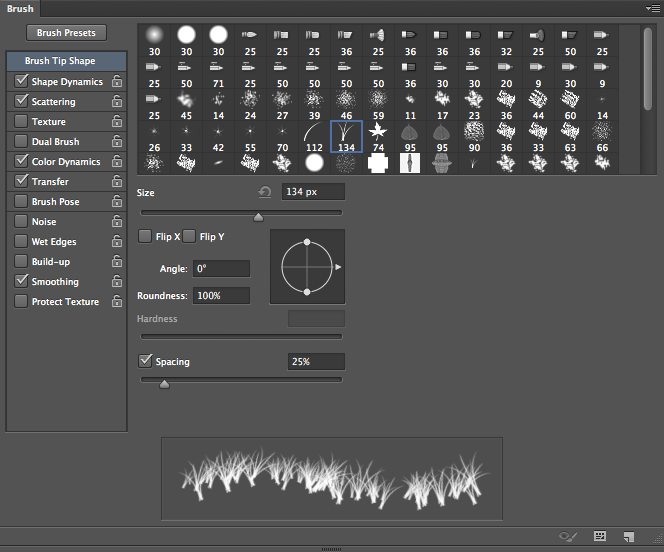
The overall effect is nice, but now we can add a little extra polish to our text effect by adding some frost. We will accomplish this using a customized brush. Select the Brush Tool, go to the brush presets, and choose the grass brush at 134. Next, we’ll go to the Brush Panel and customize it.
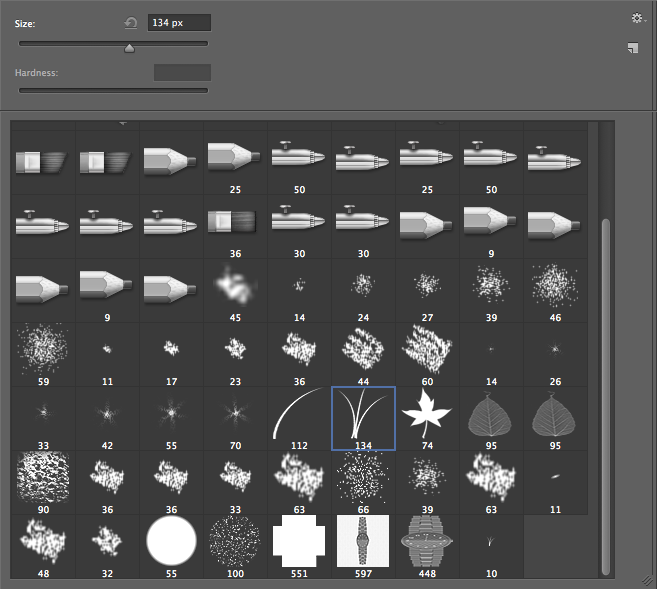
In the brush presets panel, the default window is where to can determine the brush tip shape. The only thing we need to change here is the spacing. Set the spacing to around 25%.
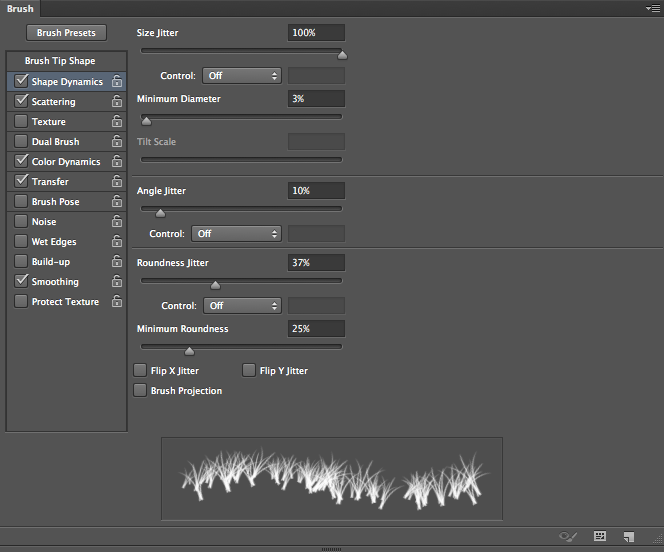
Next, go to “Shape Dynamics” and set the Size Jitter to 100%. Set the Angle Jitter to 10%. This will allow each instance of the brush to rotate slightly as you brush it along for a varied effect. Set the Roundness Jitter to around 35-40%. This will vary the flatness and roundness of your brush. To make sure that the brush isn’t completely flat, you can set the minimum roundness to 25%, so it won’t go any flatter than this value.
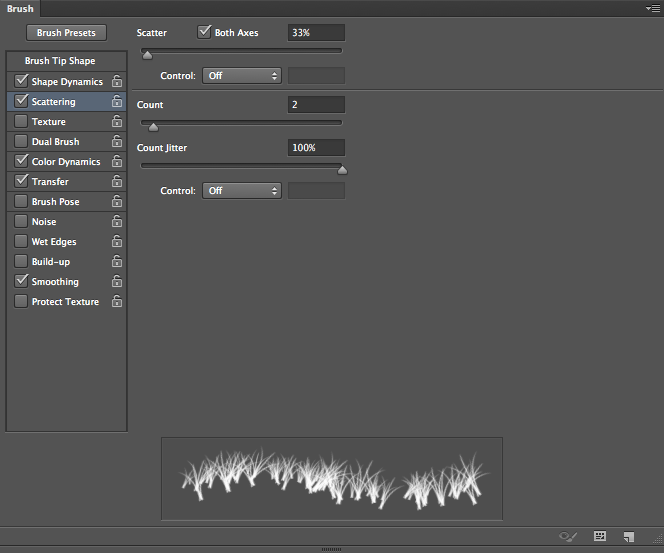
In “Scattering,” set it to both axes, so that it spreads vertically and horizontally. Bump the “Count” value up to 2, but set the Count Jitter to 100%, so that Photoshop will vary how many instances of the brush it places at one time. This will make the brush behave in a less controlled manner and give the frost a more natural appearance.
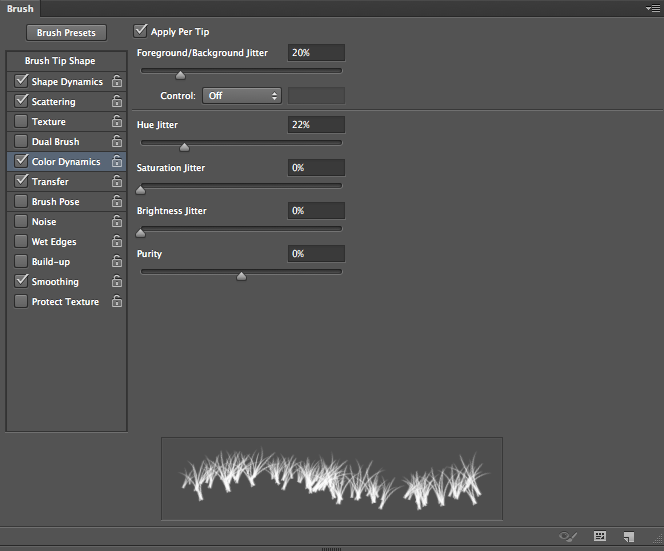
For “Color Dynamics,” Set the Foreground/Background Jitter to 20%. This will alternate values between your foreground and background color by 20%, so the frost won’t be 100% bright white. There will varying degrees of grey mixed in, making the brush look more natural.
Lower the brush size to around 10 and begin painting the top edges of the text, where frost would normally form. Paint around the edges and allow the brush to go slightly over the edge and around the corners to the side. Brush the top edges of each letter until you have added frost to each of them.
The final result is shown below. I lowered the opacity of the fiber layer that we created to around 70%. I waited until now to do this, so it would be easier to see when painting in our frost effect. We still get a good amount of variation within our ice, but the dark parts aren’t so harsh. This creates a more realistic icy text effect in Photoshop.

Conclusion
With the right combination of filters and blend modes, we were able to achieve a realistic icy effect in Photoshop to make our text stand out and form a strong impression. You could use this effect for a bold headline or to illustrate the concept of extreme cold. The randomized fiber texture, combined with the right texture in our bevel and emboss layer style, enabled us to create a realistic varied effect that we needed to create a convincing icy texture. With the right approach, you can recreate any texture or surface in Photoshop.
How did your icy text effect in Photoshop turn out? What application would you use this effect for? Feel free to share your thoughts in the comments section below.
Frequently Asked Questions about Creating an Icy Text Effect in Photoshop
How can I add more realistic ice texture to my text in Photoshop?
To add a more realistic ice texture to your text, you can use the “Bevel and Emboss” feature in Photoshop. This feature allows you to add depth and dimension to your text, making it look more like real ice. You can adjust the depth, size, and direction of the bevel to achieve the desired effect. Additionally, you can use the “Texture” feature to add a specific ice texture to your text. You can find various ice textures online, or you can create your own using Photoshop’s various tools and filters.
Can I animate my icy text effect in Photoshop?
Yes, you can animate your icy text effect in Photoshop using the Timeline panel. You can create a new video timeline, then add keyframes to animate the properties of your text, such as its position, opacity, or style. You can also use the “Tween” feature to automatically generate frames between your keyframes, creating a smooth animation. However, keep in mind that animation in Photoshop is quite basic compared to dedicated animation software.
How can I create a frosted glass effect on my icy text in Photoshop?
To create a frosted glass effect on your icy text, you can use the “Glass” filter in Photoshop. This filter allows you to distort your text as if it’s seen through a glass, adding an extra layer of realism to your icy text effect. You can adjust the distortion, smoothness, and scaling of the glass effect to achieve the desired result. Additionally, you can use the “Frost” texture in the filter to make your text look like it’s covered in frost.
Can I add a reflection to my icy text in Photoshop?
Yes, you can add a reflection to your icy text in Photoshop using the “Transform” tool. You can duplicate your text layer, then flip it vertically to create a reflection. You can then adjust the opacity and blending mode of the reflection layer to make it look more realistic. You can also use the “Distort” feature in the Transform tool to adjust the perspective of the reflection.
How can I add a glow to my icy text in Photoshop?
To add a glow to your icy text, you can use the “Outer Glow” feature in Photoshop. This feature allows you to add a soft glow around your text, making it look like it’s illuminated from within. You can adjust the color, size, and spread of the glow to achieve the desired effect. Additionally, you can use the “Blend Mode” option to control how the glow interacts with the colors of your text.
Can I use custom fonts for my icy text effect in Photoshop?
Yes, you can use custom fonts for your icy text effect in Photoshop. You can import any TrueType or OpenType font into Photoshop, then use it for your text. You can also adjust the size, spacing, and alignment of your text using the Character panel. However, keep in mind that some fonts may not work well with the icy text effect, especially if they have thin or intricate details.
How can I add a background to my icy text in Photoshop?
To add a background to your icy text, you can create a new layer below your text layer, then fill it with a color, gradient, or image. You can also use the “Layer Styles” feature to add effects to your background, such as a drop shadow or a gradient overlay. Additionally, you can use the “Blend Mode” option to control how your background interacts with your text.
Can I save my icy text effect as a preset in Photoshop?
Yes, you can save your icy text effect as a preset in Photoshop. You can save your layer styles as a new style, then apply it to other text layers with a single click. You can also save your entire text effect as a PSD file, then import it into other projects. However, keep in mind that some effects may not transfer perfectly between different text layers or projects.
How can I make my icy text effect look more 3D in Photoshop?
To make your icy text effect look more 3D, you can use the “3D” feature in Photoshop. This feature allows you to extrude your text into 3D space, then adjust its perspective, lighting, and materials to create a realistic 3D effect. You can also use the “Bevel and Emboss” feature to add depth and dimension to your text. However, keep in mind that creating 3D effects in Photoshop requires a good understanding of 3D concepts and tools.
Can I print my icy text effect in high resolution in Photoshop?
Yes, you can print your icy text effect in high resolution in Photoshop. You can adjust the resolution of your document in the Image Size dialog box, then print it using the Print command. You can also adjust the print settings, such as the paper size, orientation, and quality, to achieve the best print results. However, keep in mind that printing in high resolution requires a high-quality printer and paper.