Create a Compelling 300 x 250px Advertisement

Appealing advertisements are critical for any marketing campaign. You can easily win people over with creative and compelling advertisement design, and even the smallest visual improvements can have a dramatic, amplified effect on the bottom line of your ad campaign. A good ad will intrigue your potential customers and inspire curiosity. So, today we are going to create an advertisement for the widely-used 300 x 350x ad size. We will make it bright and exciting, and we’ll use some interesting techniques and blending options. So, let’s get started.
Resources:
Grunge Patterns
Final result: (Download the finished, layered PSD file.)

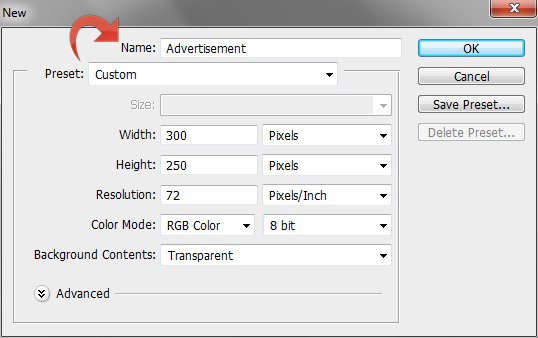
Step 1
Open Photoshop and create a new file with a 300px width and a 250px height.
Step 2
Fill the entire canvas with color #027368 using the paint bucket tool and add the pattern from our resources.


Step 3
Create a new layer, select the pen tool, and create the following shape.

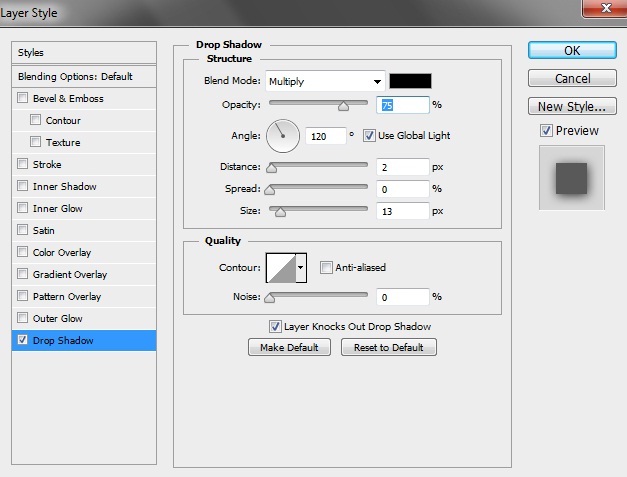
Step 4
Add a drop shadow to the above shape using the following settings.

Step 5
Create a second, similar shape, this time with color #d97014.

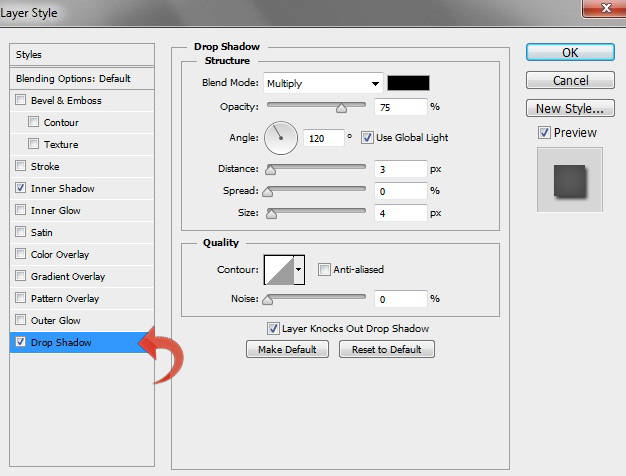
Step 6
Now, click on layer styles and add a drop shadow. Use the settings below.
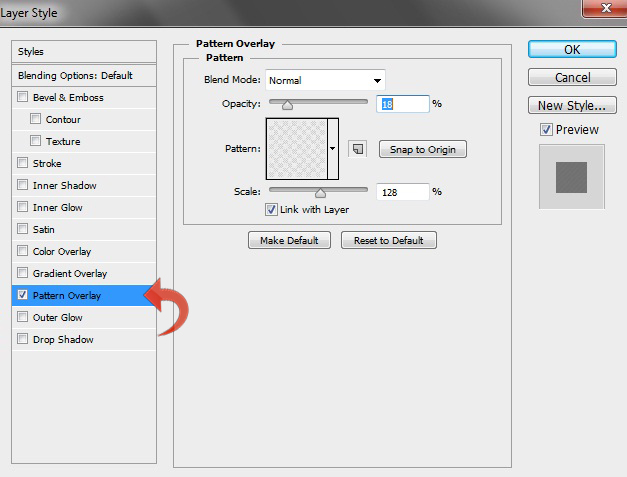
Step 7
Create another shape using color #FFFFFF. Then, add a pattern overlay and a drop shadow using the following settings.


Step 8
Repeat the same process and create two more shapes on the side. Add the same drop shadow used in earlier steps.

Step 9
Select the rectangle tool and add stripes at the bottom of your canvas using colors #d97014 and # 8abf9c.

Step 10
Add another rectanglar stripe using color #FFFFFF and add the following pattern overlay.
Step 11
Now, let’s add the title. Select the type tool and add your desired title using color #d97014. Click on “Layer styles” to add a pattern overlay and a drop shadow using the settings below.


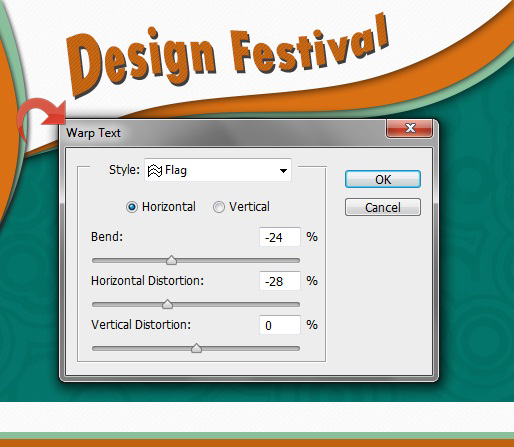
Step 12
Select the “Warp Text” tool and adjust the settings to get the wave effect shown below.
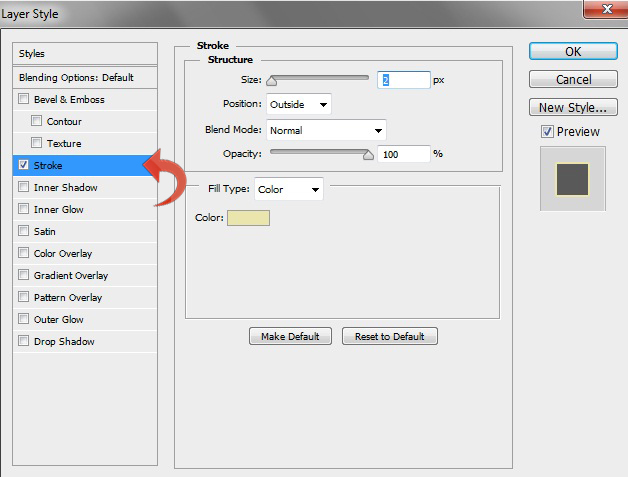
Step 13
Let’s start adding some finer details. Select the ellipse tool and create a small circle using color #d97014. Now, click on “Layer styles” and add a stroke with the following values.
Step 14
Repeat the same process to create bullets. Add some compelling text alongside each bullet to describe the offer that you’re advertising.

Step 15
For the main button, select the rounded rectangle tool and create a “call to action” area using color #d97014.

Step 16
Now, add an inner shadow and a drop shadow using the following settings.

Step 17
Select the type tool to add text to your call to action, then add some drop shadow to this new text.

Step 18
Select the type tool again and add the URL text on the white strip at the bottom.

We are done! Our advertisement design is ready. I hope you guys enjoyed the tutorial. I’ll be back soon, until then, have fun!
Frequently Asked Questions (FAQs) about Creating a Compelling 300 x 250px Advertisement
What are the best practices for creating a 300 x 250px advertisement?
The best practices for creating a 300 x 250px advertisement include maintaining a clear and concise message, using high-quality images, and ensuring that the text is readable. The ad should be designed in a way that it grabs the viewer’s attention and communicates the message effectively. It’s also important to consider the placement of the ad on the webpage. The ad should be placed in a location that is easily visible to the viewer but doesn’t interfere with the user’s experience on the site.
How can I resize an image to 300 x 250px without losing quality?
Resizing an image without losing quality can be achieved by using image editing software like Adobe Photoshop or online tools like compressjpeg.online or img2go.com. These tools allow you to adjust the dimensions of the image while maintaining its aspect ratio, which prevents the image from being distorted. It’s also important to save the image in a format that preserves its quality, such as PNG or JPEG.
How can I make my 300 x 250px ad responsive?
Making a 300 x 250px ad responsive involves using CSS to adjust the size and position of the ad based on the screen size of the device it’s being viewed on. This can be achieved by using the ‘object-position’ property in CSS, which allows you to control the positioning of the ad. You can also use media queries to apply different styles to the ad at different screen sizes.
What is the ‘object-position’ property in CSS and how can it be used in creating a 300 x 250px ad?
The ‘object-position’ property in CSS is used to specify the positioning of an object within its container. This property can be used in creating a 300 x 250px ad by allowing you to control the positioning of the ad within its container. This can be particularly useful when creating responsive ads, as it allows you to adjust the position of the ad based on the screen size of the device it’s being viewed on.
What online tools can I use to resize an image to 300 x 250px?
There are several online tools that you can use to resize an image to 300 x 250px, including compressjpeg.online, compresskaru.com, and img2go.com. These tools allow you to adjust the dimensions of the image while maintaining its aspect ratio, which prevents the image from being distorted. They also provide options for adjusting the quality of the image, which can be useful if you’re trying to reduce the file size of the image.
How can I ensure that my 300 x 250px ad is effective?
Ensuring that your 300 x 250px ad is effective involves several factors, including the design of the ad, the message it conveys, and its placement on the webpage. The ad should be designed in a way that it grabs the viewer’s attention and communicates the message effectively. The message should be clear and concise, and the ad should be placed in a location that is easily visible to the viewer but doesn’t interfere with the user’s experience on the site.
What are the benefits of using a 300 x 250px ad?
The 300 x 250px ad, also known as a medium rectangle, is one of the most popular ad sizes due to its versatility and effectiveness. This ad size is large enough to be noticeable without being intrusive, and it can be used in a variety of placements, including within content, at the end of articles, or in the sidebar. It’s also a standard size for many ad networks, making it easy to implement.
How can I optimize my 300 x 250px ad for mobile devices?
Optimizing a 300 x 250px ad for mobile devices involves making sure that the ad is responsive, meaning that it adjusts its size and position based on the screen size of the device it’s being viewed on. This can be achieved by using CSS to control the size and position of the ad. It’s also important to ensure that the ad is easily visible and readable on smaller screens, and that it doesn’t interfere with the user’s experience on the site.
What are the common mistakes to avoid when creating a 300 x 250px ad?
Common mistakes to avoid when creating a 300 x 250px ad include using low-quality images, having too much text, and not considering the placement of the ad. The images used in the ad should be high-quality and relevant to the message of the ad. The text should be clear and concise, and the ad should be placed in a location that is easily visible to the viewer but doesn’t interfere with the user’s experience on the site.
How can I test the effectiveness of my 300 x 250px ad?
Testing the effectiveness of a 300 x 250px ad can be done through A/B testing, where you create two versions of the ad and see which one performs better. You can also use analytics tools to track the performance of the ad, including the number of clicks it receives and the amount of time viewers spend looking at it. This data can provide valuable insights into how well the ad is performing and what changes might need to be made to improve its effectiveness.
Anum is Web and Graphic designer. Addicted to Photoshop and crazy for pixel perfection. She is also an active blogger, sharing her passions, skills and creative details on her blog Websoulz. She loves to connect with the community, sharing the latest design gossips and rolling her eyes on boring trends.