

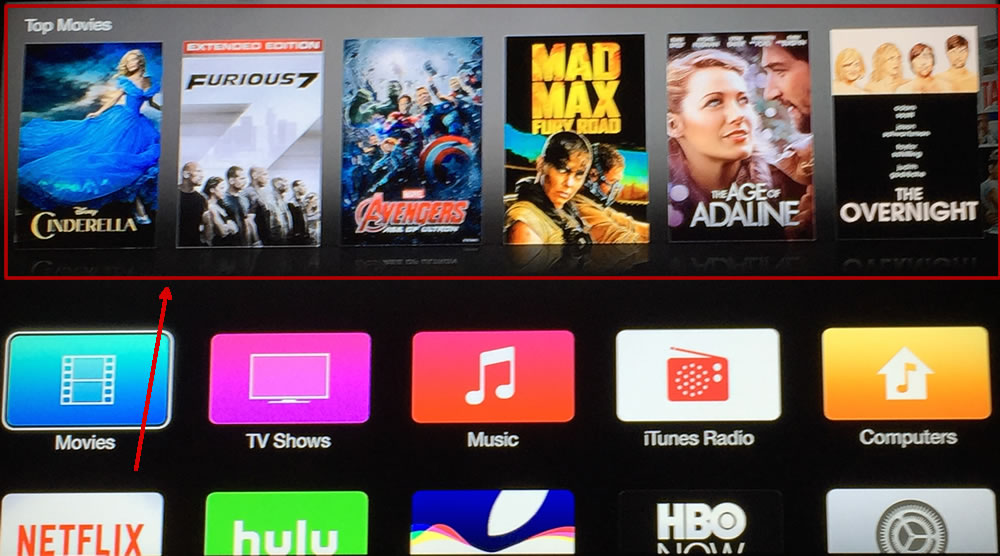
The future of TV is apps!
Is what Tim Cook stated at the recent Apple event in September and this future is already upon us with an increasing amount of TV content streamed through mobile devices and apps.
The newly announced tvOS SDK is something for iOS developers to get excited about. For the first time we will be able to create apps for the new Apple TV and publish them to the App Store. This is a great opportunity to deliver content and great user experience through apps to the big screen in everyone’s living room.
Let’s dive right in and take a look at the tvOS SDK.
We’ll cover the basics of each new framework, identify their purpose and describe what the requirements to make an app. Armed with our newfound knowledge, we will create a simple custom tvOS app step by step.
Key Takeaways
- The Apple tvOS SDK offers exciting opportunities for iOS developers to create applications for the new Apple TV, allowing content delivery directly to users’ living rooms.
- The SDK supports two types of applications: Custom Applications using familiar iOS frameworks, and Client Server Applications which utilize new frameworks like TVML, TVJS, and TVMLKit for web developers.
- Developers must consider tvOS-specific limitations and features, such as the 200MB app size limit, the necessity of using CloudKit for data persistence, and designing for a TV remote-based user interface.
- Setting up the development environment requires Xcode 7.1, and developers can utilize APIs like themoviedb.org to fetch and display data, such as popular TV shows.
- The coding process involves creating a visually appealing UI in a large storyboard, handling JSON data efficiently with SwiftyJSON, and implementing focus-based navigation to enhance the user experience on Apple TV.
- The tvOS SDK includes several frameworks and tools that are crucial for developing big screen apps, including support for the Apple TV remote, game controllers, and creating cinematic user interfaces with TVMLKit.
Overview of the SDK
There are two types of applications for tvOS.
Custom Applications
These apps use the latest iOS frameworks and are similar to traditional iOS applications for the iPhone and iPad. You can use storyboards or code to create user interfaces.
Client Server Applications
These apps use a new set of frameworks unique to tvOS. If you are a web developer you are going to find these frameworks interesting as they provide the ability to create applications using JavaScript and a markup language. Yes, you read that right, this is the first time Apple have provided a JavaScript framework as the means to create applications.
Here is a list of all the new frameworks:
TVML
TVML is Apple’s custom markup language and is used to create interfaces. It has an XML style and if you know HTML you will find it familiar.
Apple has made a set of reusable TVML templates available to help you get started. You can find a detailed description of these templates here.
TVJS
As the name suggests, TVJS a collection of JavaScript APIs used to load TVML pages. It contains the necessary functionality for interacting with the Apple TV hardware. From what I can see, this is standard JavaScript without any special syntax.
More information can be found in the TVJS Framework Reference documentation.
TVMLKit
This is the core framework where everything comes together. TVMLKit provides a way to incorporate TVJS, JavaScript and TVML elements into your app. Think of this framework as container and bridge for delivering code and markup as a native application to the Apple TV.
See the TVMLKit Framework Reference for more details.
TVServices
TVServices is the framework that allows you to add a top shelf extension to your app. The top shelf is an area of the Apple TV home screen dedicated to displaying content from an application that placed in the first row. It provides an opportunity to display content and information to the user when the focus is on the app icon, without the need to launch the app.
See TVServices Framework Reference.
Architecture of the Client Server Apps
All the of the frameworks above form part of the client side of the application. In order for the application to function you will require a server side as well. The server will contain your TVML markup, the JavaScript code and your data. The TVMLKit within your packaged tvOS application will handle the retrieval and display of the data.
I like to think of this architecture as the typical website, where all HTML and JS files reside on a web server and the application responsible for rendering them is similar to the users browser.
Development Considerations
Before jumping into Xcode to create an application it’s important to consider the following limitations:
– Application size is limited to 200MB.
– You cannot persist data to the device, CloudKit is something you need to get familiar with if you require saving user settings.
It’s important to understand that the Apple TV has a new user interface and Apple has defined a set of Human Interface Guidelines specific to the tvOS.
You need to be aware that unlike iOS devices the user has limited touch capabilities, (swipe, click and tap) that affect how they can interact with your application. This is what makes focus important for the Apple TV and given that it’s a new concept I would highly recommend you invest some time learning how to support focus in your application.
Create Your First tvOS Application
Time to have some fun with the tvOS SDK.
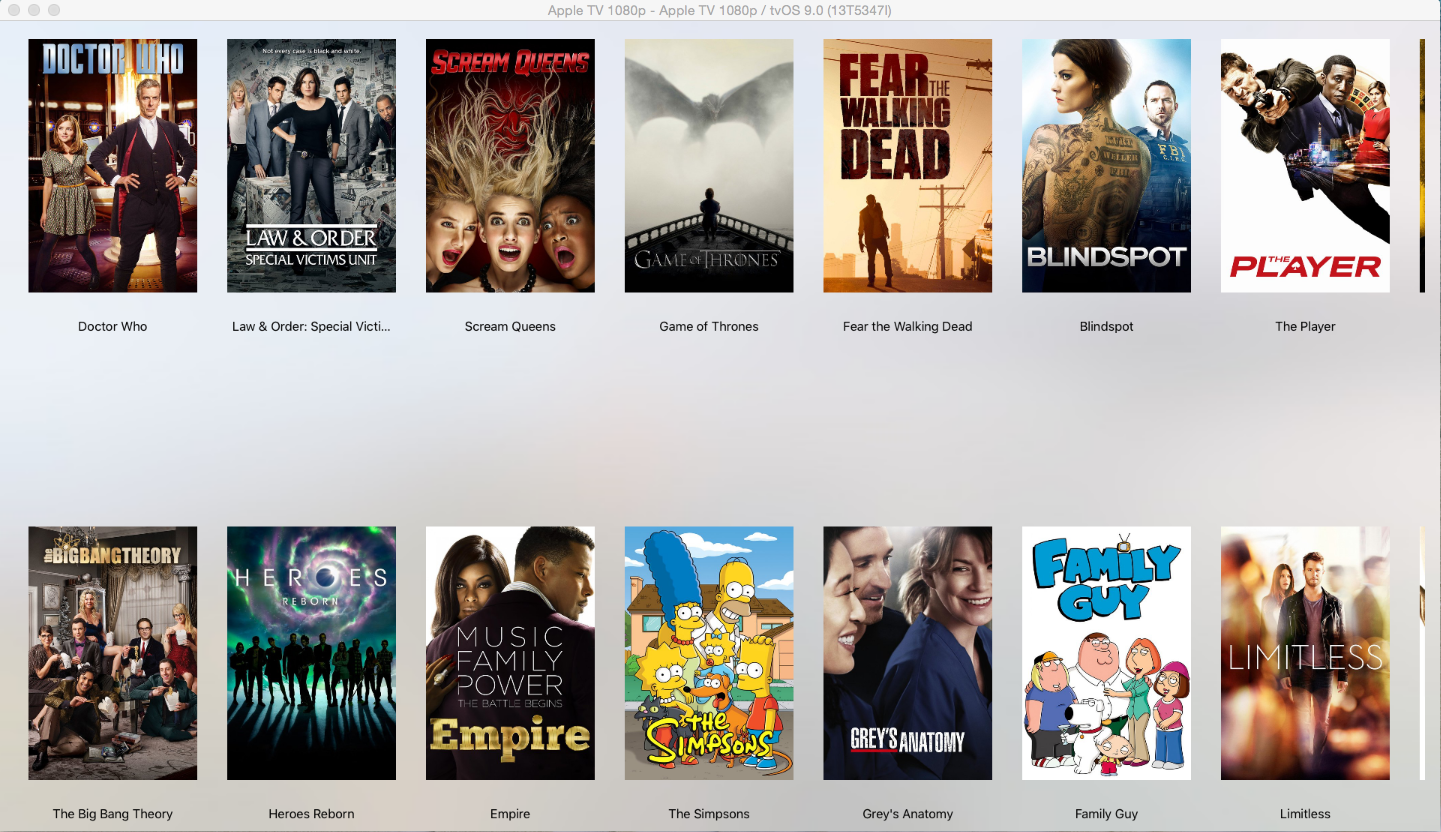
We will create an application that makes a call to a TV database API, retrieves a list of popular TV shows and displays them on our TV application.
By the time we complete this tutorial the application will look like this:
Setting Up Your Development Environment
Development for the Apple TV requires Xcode 7.1 which is still in beta. As with anything under development you may face unexpected crashes and slow performance.
Download Xcode 7.1 from here
We are going to use the themoviedb.org API and specifically the following API request that returns json data containing a list of popular TV shows. You can see the request information here
The API requires a key that you can request for free but you have to register first.
Developing the application
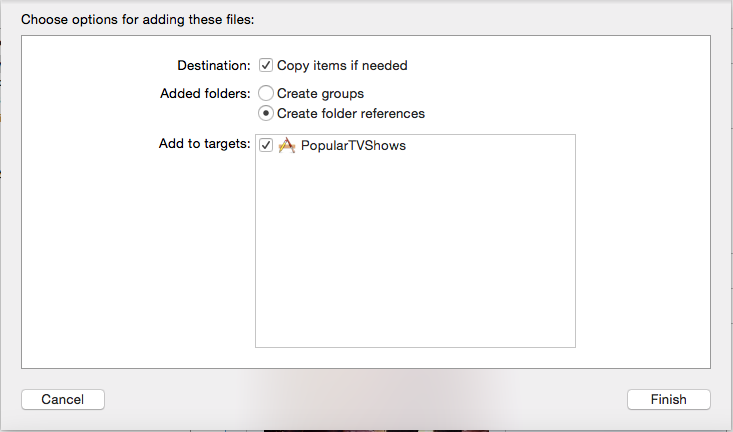
Open Xcode and select a new Single view Application under the tvOS section.
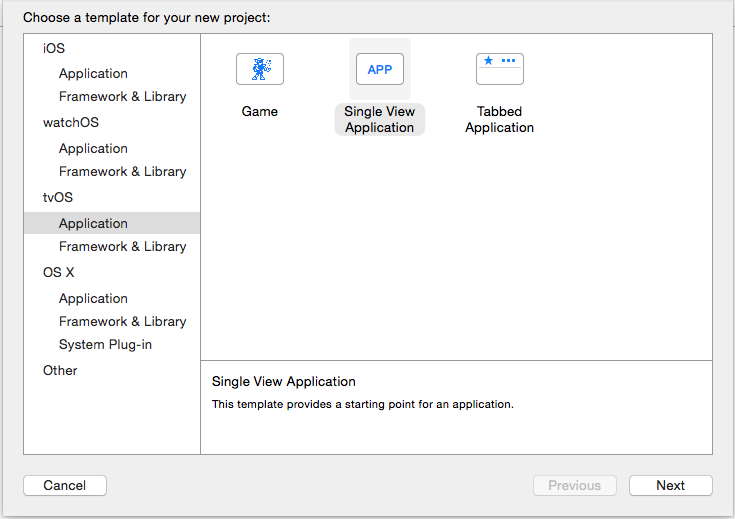
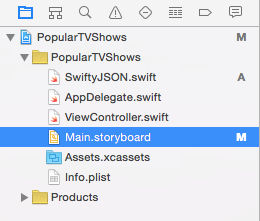
Give the application a name, I named mine PopularTVShows, select a location for the files and click create.

Designing the UI
Select the main storyboard, you will notice that this is very large storyboard area. This is because we now need to create UI for full HD on a TV.
Select the default view, you will notice that by default it’s at 1920 x 1080 resolution.

Apart from that difference, everything else should be familiar.
You will probably want to zoom out to be able to see the complete storyboard.
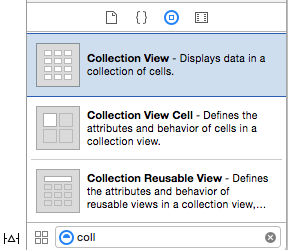
Start by dragging a Collection View to the storyboard, position it to the top left corner and add zero margin constraints on all 4 sides.
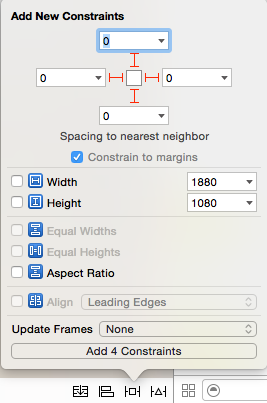
Click on update frames.
The collection view will now take up all the space on the storyboard.
On most iOS devices, scrolling, when there is more data that can fit the screen, is usually implemented vertically. For the Apple TV the recommended scrolling direction is horizontal. Set this in the Collection View.

Next select the Collection View Cell and give it a custom size of 260 by 430.

This cell will contain the TV Show poster and the show name, we gave it a relatively small size to allow for multiple shows to be displayed on the screen.
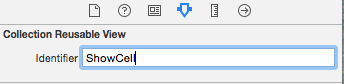
In the attributes inspector assign an identifier of ShowCell.
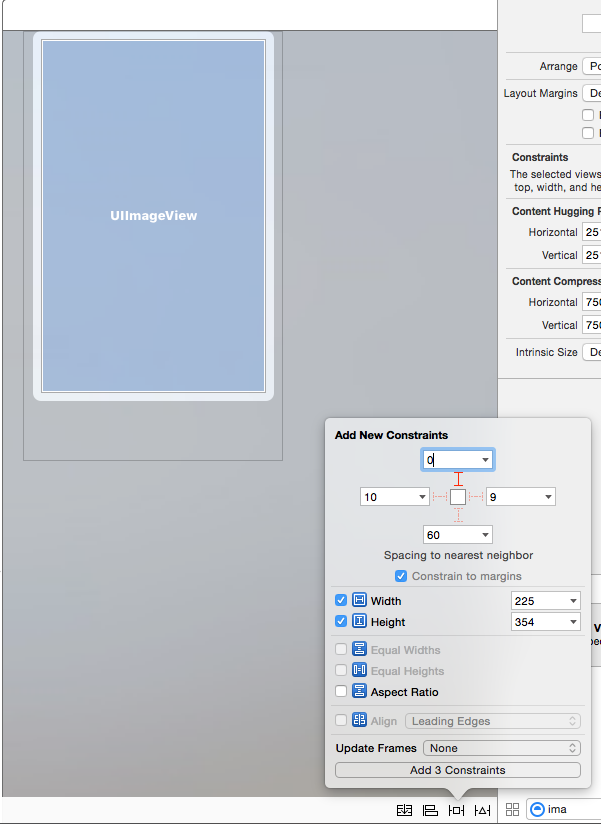
Add an Image View in the cell and name it ShowImg
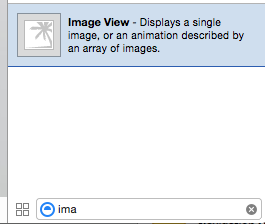
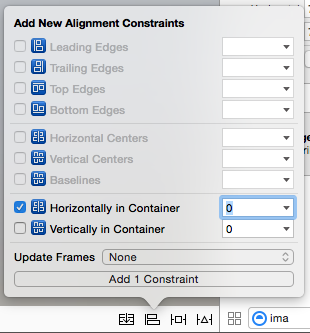
Add the following constraints: top margin 0, width 225, height 354 and align horizontally in the container.
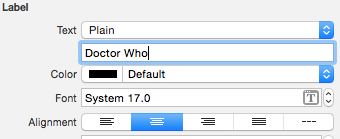
Drag a label underneath the Image view and give it the following constraints: Top margin 20, width 225, height 35
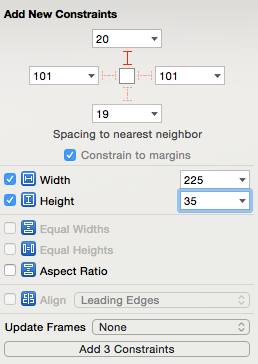
Align horizontally in the container.
Set the text to center alignment and change it to any TV show you like, I set mine to Doctor Who.
Set the image view to use the poster of your choice or the one I used from here
Download the image and drag it into the Assets catalog of your project.
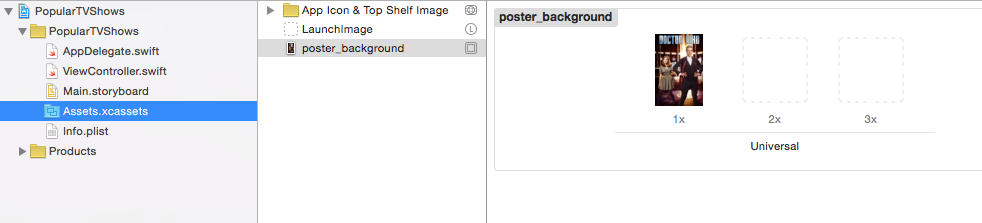
Give it an appropriate name, I named mine posterbackground_.
Return to the storyboard, select the image view and set it as the background in the properties inspector.
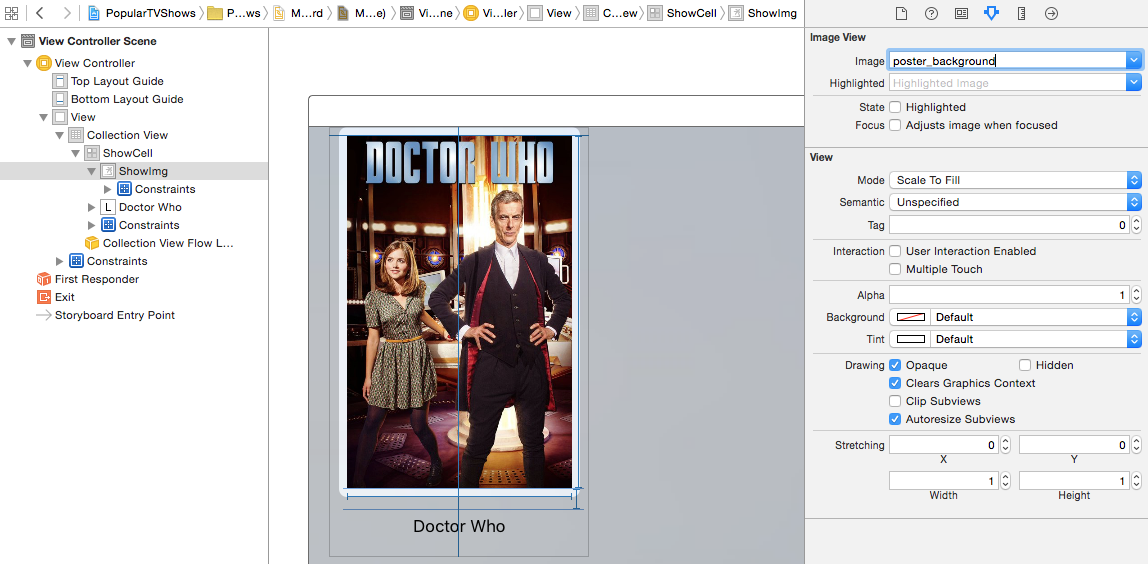
This is all that we need for our UI, if you did not follow along so far or were not able to complete any step, download a copy of the code from the UI branch here
Getting the data
Time to make our API requests and get data in our application.
Serializing and deserializing json with Swift can become time consuming because of the optional values. I like to use a framework called SwiftyJSON. It makes the process of working with json much simpler and provides a wrapper that takes away a lot of code management.
Download a copy of the framework and make sure you are on the Xcode 7 branch.
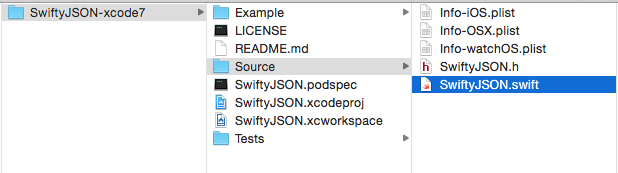
The easiest way to integrate the library into the project is to drag the SwiftyJSON.swif‘ file into the project, selecting the project target.
Great! now we are ready to add some code.
Add a new Swift file to the project and name it ApiService.
class ApiService {

    static let sharedInstance = ApiService()

    func apiGetRequest(path: String, onCompletion: (JSON, NSError?) -> Void) {
        let request = NSMutableURLRequest(URL: NSURL(string: path)!)

        let session = NSURLSession.sharedSession()

        let task = session.dataTaskWithRequest(request, completionHandler: {data, response, error -> Void in
            let json:JSON = JSON(data: data!)
            onCompletion(json, error)
        })
        task.resume()
    }
}
The code has a function that creates a network task with a request, it takes a url as a parameter and returns data if successful or an error if not.
This function is generic and can be used for every API request the application will make.
Let’s look at the API. To access the data we make a GET request to the following URL : ’http://api.themoviedb.org/3/tv/popular?api_key=‘ including the key at the end.
Add the following line of code at the top of the class.
let API_TV_POPULAR_URL = "http://api.themoviedb.org/3/tv/popular?api_key=YourKeyHere"Ensure to replace YourKeyHere with your api key.
Great, now let’s add another function that takes this url and passes it to the generic function we created earlier, it should then return the data or the error from the request.
func getPopularTVShows(onCompletion: (JSON, NSError?) -> Void) {
    apiGetRequest(API_TV_POPULAR_URL, onCompletion: { json, err in
        onCompletion(json as JSON, err as NSError?)
    })
}
Thats all we need for this class. It should now look like this:
import Foundation

let API_TV_POPULAR_URL = "http://api.themoviedb.org/3/tv/popular?api_key=yourKeyHere"

class ApiService {

    static let sharedInstance = ApiService()

    func apiGetRequest(path: String, onCompletion: (JSON, NSError?) -> Void) {
        let request = NSMutableURLRequest(URL: NSURL(string: path)!)

        let session = NSURLSession.sharedSession()

        let task = session.dataTaskWithRequest(request, completionHandler: {data, response, error -> Void in
            let json:JSON = JSON(data: data!)
            onCompletion(json, error)
        })
        task.resume()
    }


    func getPopularTVShows(onCompletion: (JSON, NSError?) -> Void) {
        apiGetRequest(API_TV_POPULAR_URL, onCompletion: { json, err in
            onCompletion(json as JSON, err as NSError?)
        })
    }

}
Let’s create our data objects, these are classes that will contain the data received from the json. We will use these objects to populate the UI elements of the application.
If you open your browser and go to the URL added in the code above, you will receive the json data we will work with. It should look like this.
{
    "page": 1,
    "results": [
        {
            "backdrop_path": "/aKz3lXU71wqdslC1IYRC3yHD6yw.jpg",
            "first_air_date": "2011-04-17",
            "genre_ids": [
                10765,
                18
            ],
            "id": 1399,
            "original_language": "en",
            "original_name": "Game of Thrones",
            "overview": "Seven noble families fight for control of the mythical land of Westeros. Friction between the houses leads to full-scale war. All while a very ancient evil awakens in the farthest north. Amidst the war, a neglected military order of misfits, the Night's Watch, is all that stands between the realms of men and icy horrors beyond.\n\n",
            "origin_country": [
                "US"
            ],
            "poster_path": "/jIhL6mlT7AblhbHJgEoiBIOUVl1.jpg",
            "popularity": 36.072708,
            "name": "Game of Thrones",
            "vote_average": 9.1,
            "vote_count": 273
        },
        {
            "backdrop_path": "/kohPYEYHuQLWX3gjchmrWWOEycD.jpg",
            "first_air_date": "2015-06-12",
            "genre_ids": [
                878
            ],
            "id": 62425,
            "original_language": "en",
            "original_name": "Dark Matter",
            "overview": "The six-person crew of a derelict spaceship awakens from stasis in the farthest reaches of space. Their memories wiped clean, they have no recollection of who they are or how they got on board. The only clue to their identities is a cargo bay full of weaponry and a destination: a remote mining colony that is about to become a war zone. With no idea whose side they are on, they face a deadly decision. Will these amnesiacs turn their backs on history, or will their pasts catch up with them?",
            "origin_country": [
                "CA"
            ],
            "poster_path": "/iDSXueb3hjerXMq5w92rBP16LWY.jpg",
            "popularity": 27.373853,
            "name": "Dark Matter",
            "vote_average": 6.4,
            "vote_count": 4
        }
    ],
    "total_pages": 3089,
    "total_results": 61761
}
Taking a closer look, you can see that we have a structure containing the following at the top level:
– A page number.
– An array of results.
– The number of total pages.
– The total results.
Let’s create a class that will represent this data structure. Add a new Swift file and name it ApiResults.
Add the following code
class ApiResults {

    var page : Int!
    var results : [ApiTVResult]!
    var totalPages : Int!
    var totalResults : Int!


    /**
    * Instantiate the instance using the passed json values to set the properties values
    */
    init(fromJson json: JSON!){
        if json == nil{
            return
        }
        page = json["page"].intValue
        results = [ApiTVResult]()
        let resultsArray = json["results"].arrayValue
        for resultsJson in resultsArray{
            let value = ApiTVResult(fromJson: resultsJson)
            results.append(value)
        }
        totalPages = json["total_pages"].intValue
        totalResults = json["total_results"].intValue
    }

}
This creates the page, totalPages and totalResults variables as integers since they will hold the json numeric values. It also creates an array of results.
The initialization code takes the json data and assigns the values to the appropriate variables.
You probably noticed that we have an ApiTVResult object declared and mapped to the results array. This is going to be our second object that will contain the data of each result, which in this case is the TV show details.
Add a new Swift file and name it ApiTVResult.
Add the following code
let imagesBasePath = "http://image.tmdb.org/t/p/w500"

class ApiTVResult {

    var backdropPath : String!
    var firstAirDate : String!
    var genreIds : [Int]!
    var id : Int!
    var originalLanguage : String!
    var originalName : String!
    var overview : String!
    var originCountry : [Int]!
    var posterPath : String!
    var popularity : Float!
    var name : String!
    var voteAverage : Float!
    var voteCount : Int!


    /**
    * Instantiate the instance using the passed json values to set the properties values
    */
    init(fromJson json: JSON!){
        if json == nil{
            return
        }

        let apiBackDropPath = json["backdrop_path"].stringValue
        backdropPath = "\(imagesBasePath)\(apiBackDropPath)"
        firstAirDate = json["first_air_date"].stringValue
        genreIds = [Int]()
        let genreIdsArray = json["genre_ids"].arrayValue
        for genreIdsJson in genreIdsArray {
            genreIds.append(genreIdsJson.intValue)
        }
        id = json["id"].intValue
        originalLanguage = json["original_language"].stringValue
        originalName = json["original_name"].stringValue
        overview = json["overview"].stringValue
        originCountry = [Int]()
        let originCountryArray = json["origin_country"].arrayValue
        for originCountryJson in originCountryArray {
            originCountry.append(originCountryJson.intValue)
        }
        let apiPosterPath = json["poster_path"].stringValue
        posterPath = "\(imagesBasePath)\(apiPosterPath)"
        popularity = json["popularity"].floatValue
        name = json["name"].stringValue
        voteAverage = json["vote_average"].floatValue
        voteCount = json["vote_count"].intValue
    }

}
The approach here is the same as before, we created the variables that match to json data and added initialization code to populate the object. Looking at the data received, the backdropPath and the posterPath contain only the name of the image. To construct the complete image URL we need to combine the file name with the imagesBasePath like so:
let apiBackDropPath = json["backdrop_path"].stringValue
backdropPath = "\(imagesBasePath)\(apiBackDropPath)"
Wherever we have an array of values like var genreIds : [Int]! we iterate through each value and add it to the array like so:
let genreIdsArray = json["genre_ids"].arrayValue
            for genreIdsJson in genreIdsArray {
                genreIds.append(genreIdsJson.intValue)
            }
This is all we need to do for our data model.
The code above can be found at the Model Branch here
Bringing it all together
Let’s connect the UI to our code and make the API calls to fetch the data.
First, we are going to create a class that will allow us to populate our collection cell. Create a new Swift file and name it ShowCell.
Add the following code
import UIKit

class ShowCell: UICollectionViewCell {

    @IBOutlet weak var showImg: UIImageView!
    @IBOutlet weak var showLbl: UILabel!

    func configureCell(tvShow: ApiTVResult) {

        if let title = tvShow.name {
            showLbl.text = title
        }

        if let path = tvShow.posterPath {
            let url = NSURL(string: path)!

            dispatch_async (dispatch_get_global_queue (DISPATCH_QUEUE_PRIORITY_DEFAULT, 0)) {
                let data = NSData(contentsOfURL: url)!

                dispatch_async(dispatch_get_main_queue()) {
                    let img = UIImage(data: data)
                    self.showImg.image = img
                }

            }
        }
    }
}
This code creates an outlet for the TV show poster and another for the TV show title, named showImg and showLbl accordingly.
It contains a function that takes the ApiTVResult object, assigns the title to the label and uses the poster URL to download the image asynchronously and populates the imageView.
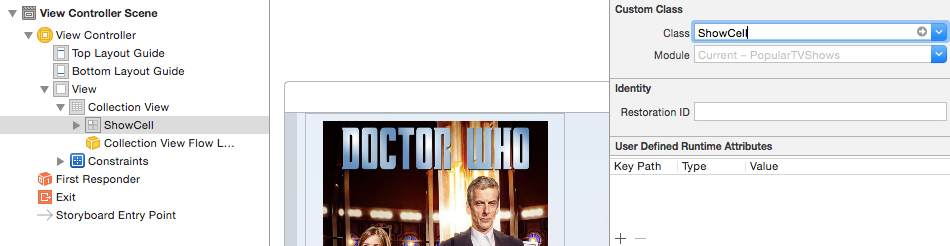
We now need to connect the outlets to the code. Open the storyboard, select the showCell and set the class to the one we just created
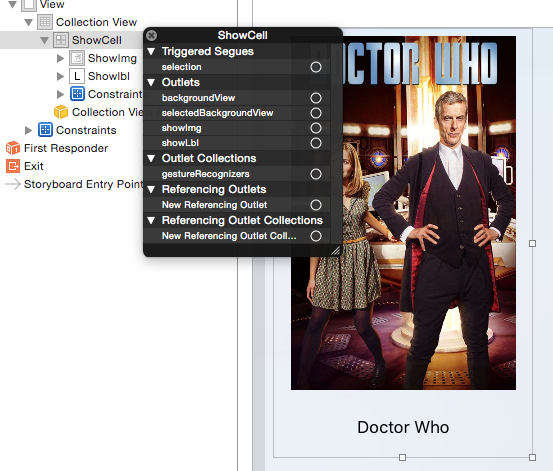
Right click the ShowCell and connect the showImg outlet by selecting the + next the outlet name and dragging to the poster imageView. Repeat the step above to connect the showlbl outlet to the title label.
That is all that is required for ShowCell.
Now lets connect the CollectionView to the ViewController.
Go to the View Controller and add the following code line at the top of the class:
@IBOutlet weak var collectionView: UICollectionView!Return to the storyboard, right click on the collection, select the + next to new referencing outlet and drag to the yellow View Controller icon. Select the viewCollection.
This finalizes all the linking required, so select the ViewController class and replace the following code
class ViewController: UIViewController {with this
class ViewController: UIViewController, UICollectionViewDelegate, UICollectionViewDataSource, UICollectionViewDelegateFlowLayout {We just added a number of protocols to the CollectionView, these are the minimum required implementations to add data and control the layout of the view.
Lets implement them. Start by deleting the following code as we will not be performing any actions with it.
override func didReceiveMemoryWarning() {
    super.didReceiveMemoryWarning()
    // Dispose of any resources that can be recreated.
}
Replace the following code:
    override func viewDidLoad() {
    super.viewDidLoad()
    // Do any additional setup after loading the view, typically from a nib.
}
with:
    override func viewDidLoad() {
    super.viewDidLoad()

    collectionView.delegate = self
    collectionView.dataSource = self
}
We stated that the ViewController will act as the source of data and the delegate for the CollectionView.
Before we implement our protocols, we should create a function that will call the API and populate our objects, this way we can assign the appropriate data to the CollectionView.
The first thing we need is a variable that will contain our data, create it by adding the following code underneath the IBOutlet
var tvShows = [ApiTVResult]()This variable will contain an array of TV Shows.
Create a method to make the API call using the ApiService created earlier.
func downloadData () {
    ApiService.sharedInstance.getPopularTVShows {JSON, NSError in
        if NSError != nil {
            print(NSError!.debugDescription)
        }
        else {
            let apiResults = ApiResults(fromJson: JSON)
            self.tvShows = apiResults.results

            dispatch_async(dispatch_get_main_queue()) {
                self.collectionView.reloadData()
            }
        }
    }
}
In the code above, once the API call has succeed and we have the json data, we populate the ApiResuts objects. Then we assign to the viewController variables the data contained in the results.
Here you can see how the SwiftyJSON library assists with serialization and population of the objects.
Call this method in the viewDidLoad function. Your code should look like this:
 override func viewDidLoad() {
    super.viewDidLoad()

    collectionView.delegate = self
    collectionView.dataSource = self

    downloadData()
}

func downloadData () {
    ApiService.sharedInstance.getPopularTVShows {JSON, NSError in
        if NSError != nil {
            print(NSError!.debugDescription)
        }
        else {
            let apiResults = ApiResults(fromJson: JSON)
            self.tvShows = apiResults.results

            dispatch_async(dispatch_get_main_queue()) {
                self.collectionView.reloadData()
            }
        }
    }
}
Now we can implement the required UICollectionView protocols. Add the following code to your file:
func collectionView(collectionView: UICollectionView, cellForItemAtIndexPath indexPath: NSIndexPath) -> UICollectionViewCell {

    if let cell = collectionView.dequeueReusableCellWithReuseIdentifier("ShowCell", forIndexPath: indexPath) as? ShowCell {

        let tvShow = self.tvShows[indexPath.row]
        cell.configureCell(tvShow)

        return cell
    }
    else {
        return ShowCell()
    }
}

func numberOfSectionsInCollectionView(collectionView: UICollectionView) -> Int {
    return 1
}

func collectionView(collectionView: UICollectionView, numberOfItemsInSection section: Int) -> Int {

    return tvShows.count
}

func collectionView(collectionView: UICollectionView, layout collectionViewLayout: UICollectionViewLayout, sizeForItemAtIndexPath indexPath: NSIndexPath) -> CGSize {

    return CGSizeMake(260, 430)
}
The code here is standard for a protocol implementation.
In the numberOfSectionsInCollectionView we return 1 as we will only have a single category in the UI.
In the numberOfItemsInSection we return a count of the TvShows in the data. Basically we say that we want to display as many items as TVShows returned from the API.
In the layout we set the size of our item to the size of the showcell in the storyboard.
Finally, in what looks as the most complex piece of code in the cellForItemAtIndexPath, we create a cell based on the ShowCell class we created earlier. We select the TVShow from the tvShows array based on its index and execute the configure it to display the required data.
Now for the exciting part… Let’s run the application!
Oops…
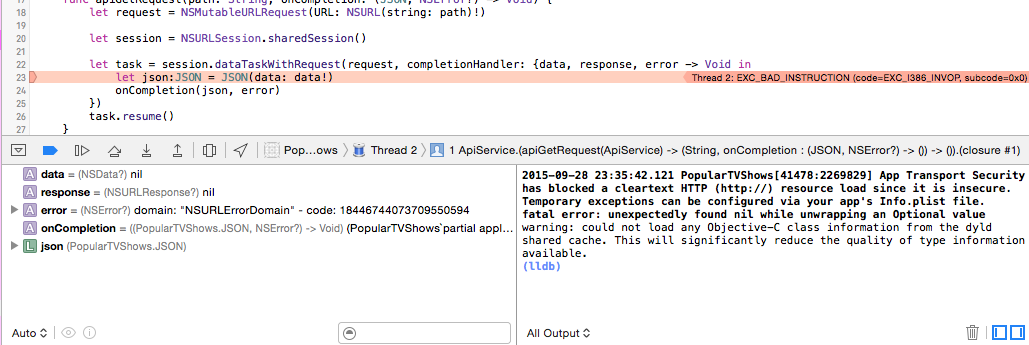
iOS 9 now requires the explicit use of the HTTPS protocol for transferring data in applications. Since our API calls are currently HTTP we need to enable it in the application settings.
Open the Info.plist file and click the + button on the last item. Select the App Transport Security Settings entry
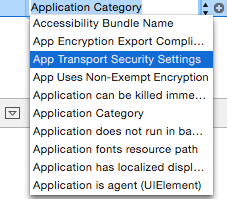
Set Allow Arbitrary Loads to yes.

This will allow all types of connections for the application.
Lets run again…
If you managed to follow along you should now be seeing sucess! The app displays TV Shows with their respective posters and titles.
But there is still something missing.
On Apple TV focus is important, and navigating between elements in the application requires it.
Let’s implement one last function that will help with this.
Add the following code at the top of the ViewController (Underneath the var TVShows)
let originalCellSize = CGSizeMake(225, 354)
let focusCellSize = CGSizeMake(240, 380)
This creates a variable that contains the original size of our cell and one slightly bigger value. Add a function that will change the size of the cell when focused to make the selection visible to the user.
override func didUpdateFocusInContext(context: UIFocusUpdateContext, withAnimationCoordinator coordinator: UIFocusAnimationCoordinator) {
    if let previousItem = context.previouslyFocusedView as? ShowCell {
        UIView.animateWithDuration(0.2, animations: { () -> Void in
            previousItem.showImg.frame.size = self.originalCellSize
        })
    }
    if let nextItem = context.nextFocusedView as? ShowCell {
        UIView.animateWithDuration(0.2, animations: { () -> Void in
            nextItem.showImg.frame.size = self.focusCellSize
        })
    }

}
Run the application again and swipe on the TV Remote, you should be able to see which item is now selected. This completes our application.
A complete copy of the code can be found here
Final Thoughts
Experienced iOS developers will find creating application for tvOS familiar. There’s a small learning curve, especially around the UI design and user interaction, but it’s worth the effort. For those interested in serving media and large content, TVML applications provide an easy way to do so while using familiar web technologies.
For those new to iOS or mobile development there is no better time to jump in. The skills you will acquire developing for custom tvOS apps will be transferable to iOS later.
The Apple TV will provide a new platform for custom applications and it will most likely have it’s own independent App Store. It’s not everyday that an opportunity like this presents itself to developers.
I already have list of applications that I would love to use on the big screen of my TV and I’m looking forward to enjoying the content and experiences you will provide while holding a Siri remote in one hand and some pop corn on the other.
Frequently Asked Questions about Coding for the Big Screen with the Apple tvOS SDK
What is the Apple tvOS SDK and why is it important for developers?
The Apple tvOS Software Development Kit (SDK) is a set of tools provided by Apple to help developers create applications for its tvOS operating system, which powers the Apple TV. This SDK is crucial for developers because it provides the necessary resources, such as libraries, frameworks, and a simulator for testing applications. It also includes an integrated development environment (IDE) called Xcode, which offers a comprehensive suite of software development tools for creating apps for Apple devices.
How does the tvOS SDK differ from the iOS SDK?
While both tvOS SDK and iOS SDK are used for developing applications for Apple devices, they target different platforms. The iOS SDK is used for creating apps for devices like the iPhone and iPad, while the tvOS SDK is specifically designed for developing apps for the Apple TV. The tvOS SDK includes unique features for the big screen, such as support for the Apple TV remote and game controllers, and frameworks for creating cinematic user interfaces.
What are the key features of the tvOS SDK?
The tvOS SDK includes several key features that make it a powerful tool for developers. These include the UIKit framework for creating graphical, event-driven user interfaces, the Game Controller framework for integrating game controllers into your app, and the TVMLKit framework for creating Apple TV app interfaces using a television markup language. It also includes the TVServices framework for creating Top Shelf extensions and the TVUIKit framework for creating user interfaces that follow the tvOS design principles.
How can I start developing apps with the tvOS SDK?
To start developing apps with the tvOS SDK, you first need to download and install Xcode, which is the IDE provided by Apple for developing apps for its devices. Once you have Xcode installed, you can create a new tvOS project and start coding using the provided libraries and frameworks. You can also use the included simulator to test your app on different Apple TV models and screen sizes.
What are the requirements for developing apps with the tvOS SDK?
To develop apps with the tvOS SDK, you need a Mac computer running the latest version of macOS and Xcode. You also need an Apple Developer account to access the SDK and other development resources. Additionally, you should have a basic understanding of programming concepts and be familiar with a programming language supported by the SDK, such as Swift or Objective-C.
Can I use the same codebase for iOS and tvOS apps?
While iOS and tvOS share many frameworks and libraries, they are different platforms and have different user interface requirements. Therefore, while you can reuse some code between iOS and tvOS apps, you will likely need to make some modifications to optimize for the big screen. For example, you may need to adjust the layout and navigation of your app to work with the Apple TV remote.
How can I optimize my app for the Apple TV remote?
The tvOS SDK provides the GameController framework, which you can use to detect and respond to user input from the Apple TV remote. You can use this framework to create a smooth and intuitive navigation experience in your app. For example, you can use the remote’s touch surface to scroll through lists or swipe between screens.
What is TVMLKit and how can I use it in my app?
TVMLKit is a framework included in the tvOS SDK that allows you to create Apple TV app interfaces using a television markup language (TVML). This can be a more efficient way to create user interfaces for tvOS apps, especially for apps that primarily display content from a server. You can use TVMLKit to define the layout and appearance of your app, and then use JavaScript to manage the app’s behavior and respond to user interactions.
How can I test my tvOS app?
The tvOS SDK includes a simulator that you can use to test your app on different Apple TV models and screen sizes. You can use the simulator to test the functionality of your app, as well as its performance and responsiveness. For more thorough testing, you can also install your app on a physical Apple TV device.
How can I distribute my tvOS app?
Once you have developed and tested your tvOS app, you can submit it to the App Store for distribution. You will need to enroll in the Apple Developer Program to submit apps to the App Store. Once your app is approved, it will be available for download by Apple TV users around the world.