
Learn how to create a simple REST API for mobile using Python to feed data to an iOS application.
Today we’ll be building a simple iOS app and API to fetch and display fish names. You could write a REST API with any language that is typically associated with website creation such as PHP, Python or Ruby, and consume the endpoint with your iOS app. Think of them as URLs that provide data (GET request) or a URL where you can submit data to (POST request). If you want to go further into designing these endpoints for your application, follow our 13 Best Practices for building RESTful APIs, otherwise let’s get started!
Key Takeaways
- To build a simple REST API for mobile applications, one can use Python MVC framework Django and djangorestframework, a Python tool specifically designed for exposing data via the REST framework.
- The process involves setting up a Django project, creating an app that houses a model, and then populating the model with relevant data. The djangorestframework is then incorporated into the site to allow data to be exposed via the REST API.
- The API can be tested by running it on a local server and accessing it via a browser. The data will be displayed in a JSON format.
- An iOS mobile app can be created using XCode to consume the data from the API. The app can be designed to display the data in a list format using a Table View Controller.
- The mobile app retrieves the data from the REST API using a NSMutableString object and displays it in the app. The number of rows in the table matches the number of elements in the JSON array retrieved from the API.
Using djangorestframework to build a simple REST api
We will be using Django (Python MVC framework) and djangorestframework. Djangorestframework is built using django (python) specifically for exposing data via the REST framework.
To begin, you will need to have Python v2.7 or later and Django 1.7.4 or later installed. If you do not, install Python and Django now.
You can test your installation by firing up the command line and typing the python command. All being well you should see version information. Continue by typing:
>>> import django

>>> print(django.get_version())

1.7.4
This verifies that you have Django installed on your system. Next, we build the Django project:
$ django-admin.py startproject marine
This is the list of files and folders created.
marine/

manage.py

marine/

__init__.py

settings.py

urls.py

wsgi.py
You can check if everything works as expected by executing:
$ python manage.py runserver
Which starts the Django development webserver for testing. When successful, you will see:
Performing system checks...
0 errors found

February 15, 2015 - 15:50:53

Django version 1.7.4, using settings 'mysite.settings'

Starting development server at http://127.0.0.1:8000/

Quit the server with CONTROL-C.
If you open the URL http://127.0.0.1:8000/ you will see a placeholder website.
Now we have a bare skeleton of the site. Next we will build an app (a container) which houses a model (as in Model-View-Controller). A model is the source of data for your app.
Typing:
$ python manage.py startapp fishesWill result in the following files
fishes/

__init__.py

admin.py

migrations/

__init__.py

models.py

tests.py

views.py
Inside the models.py file, there is the import line from django.db import models. Add the following code to it.
class Fish(models.Model):

name = models.CharField(max_length=255)

created = models.DateTimeField('auto_now_add=True')

active = models.BooleanField()
This creates a class that exposes the name, created date of the fish and if the data row is active or not. You can change the field type by referring to the relevant documentation.
Now add the fishes app to the marine/settings.py file to register it. Do this by under INSTALLED_APPS, adding fishes to the list. Run python manage.py sql fishes to see a preview of the database schema SQL that will run when we activate the app.
BEGIN;

CREATE TABLE "fishes_fish" (

"id" integer NOT NULL PRIMARY KEY,

"name" varchar(255) NOT NULL,

"created" datetime NOT NULL,

"active" bool NOT NULL

)

;
COMMIT;
To confirm creating the relevant tables in the default sqlite database, type python manage.py migrate or python manage.py syncdb on older Django versions. Django will create authentication tables by default and the empty fishes_fish table in a sqlite3 database. The prompt will ask if you want to create a superuser as this is the first time you have run Django.
If for some reason you do not get prompted to create a superuser, at the command prompt, type:
$ python manage.py createsuperuser
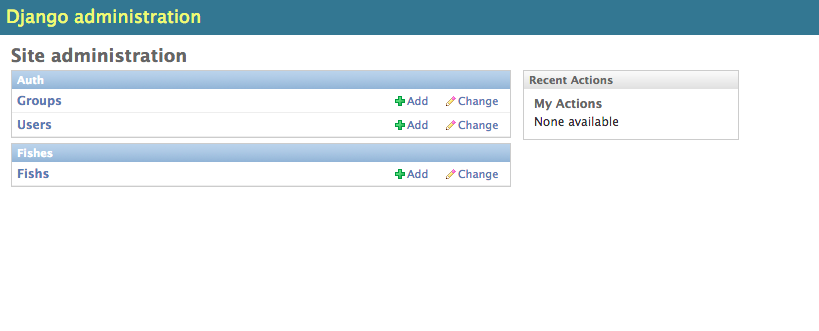
Follow the instructions to create an administrator’s account. Django provides a built-in admin page that lets you insert and modify data. The feature needs to be activated by editing the admin.py file inside the fishes folder. Add the following code after from django.contrib import admin
...

from fishes.models import Fish

admin.site.register(Fish)
We will use the account we created to log into the admin page. Start the development server:
$ python manage.py runserver
Open 127.0.0.1:8000/admin and enter the superuser id and password. You should see a admin page with the Marine list. Click on Fishes to add or modify data. Add some data.
Up to this point, we have built a working, but plain Django website. We will now incorporate the djangorestframework to the site by downloading and installing it. One key thing to remember is to add rest_framework to the INSTALLED_APPS list in marine/settings.py and change urls.py to
from django.contrib import admin

from rest_framework import routers

from fishes import views
router = routers.DefaultRouter()

#makes sure that the API endpoints work

router.register(r'api/fishes', views.FishViewSet)

admin.autodiscover()
urlpatterns = patterns('',

# Examples:

# url(r'^$', 'marine.views.home', name='home'),

# url(r'^blog/', include('blog.urls')),
url(r'^admin/', include(admin.site.urls)),

url(r'^', include(router.urls)),

url(r'^api-auth/', include('rest_framework.urls', namespace='rest_framework'))

)
This code switches on API routing which is crucial to the `djangorestframework and uses regular expression to set the valid URLs of the site.
When we installed djangorestframework, it gave us the ability to use serializers, which flattens the data obtained from the fish model into a string format, either XML or JSON. To create a serializer for the fishes model, we create a file under the fishes folder and call it serializers.py. Here are the contents of that file:
from fishes.models import Fish

from rest_framework import serializers
class FishSerializer(serializers.HyperlinkedModelSerializer):

class Meta:

model = Fish

fields = ('name', 'active', 'created')
In the views.py file, add:
from rest_framework import viewsets

from rest_framework import permissions

from fishes.models import Fish

from fishes.serializers import FishSerializer
# Create your views here.

class FishViewSet(viewsets.ModelViewSet):

# this fetches all the rows of data in the Fish table

queryset = Fish.objects.all()

serializer_class = FishSerializer
Now if you open http://127.0.0.1:8000/api/fishes/ you will see the browsable API.
HTTP 200 OK

Content-Type: application/json

Vary: Accept

Allow: GET, POST, HEAD, OPTIONS
[

{

"name": "Dory",

"created": "2014-06-21T04:23:01.639Z",

},

{

"name": "Angel",

"created": "2014-07-21T04:23:01.639Z",

},

{

"name": "Clown",

"created": "2014-08-21T04:23:01.639Z",

}

]
You can find the source code for the REST API app on GitHub. There is no data so you will need to run python manage.py migrate or python manage.py syncdb on older Django versions after downloading.
The iOS mobile app
Next we will go through the key steps required to create a mobile app that receives data from the API. We are using the UITableView to display our data in a list. In XCode 6.3.1 (the latest version as of writing), create a new project
File > New > Project > iOS Application > Single View Application
- Product Name: Fishes
- Language: Objective-C
- Devices: iPhone (default was Universal, this includes both the iPhone and iPad)
- Not using Core Data for now.
Select a location to save your project and click Create. We will work on the files contained the Fishes folder.
By default, the project has a View Controller. We want to show the data from the REST API as a list, so will use a Table View Controller instead. Create a new set of Objective-C files (File > New > File > iOS Source > Cocoa Touch Class).
- Class:
TableViewController - Subclass of:
UITableViewController - We do not need a XIB file
Save these new files in the Fishes folder.
Open Main.storyboard, go to the Object library and drag the Table View Controller object to the storyboard. Select and delete the default View Controller. Make sure that in the Inspector, the checkbox for Is Initial View Controller for the selected Table View Controller is ticked.
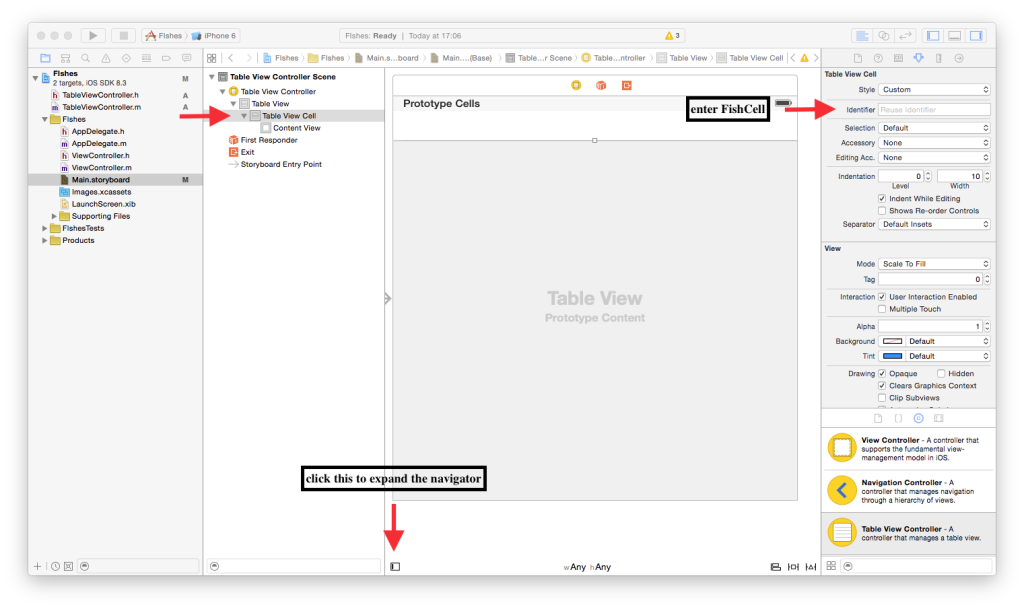
– In Main.storyboard, expand the Table View Controller to expose Table View Cell, select the Attributes Inspector and enter FishCell as the Identifier. This links the cells in the Interface Builder storyboard to the code.
– Change the Style to Subtitle from Basic. This allows us to display the value set by cell.detailTextLabel.
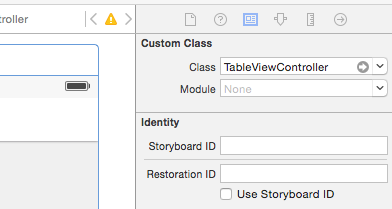
– Select Table View Controller under the Table View Controller Scene, click on the Identity Inspector and enter TableViewController into Custom Class > Class. This links the entire scene to the TableViewController.m file.
Next, we add code that will make this app do something. The code demonstrates the use of a simple NSArray to display data hardcoded in the TableViewController.m. Replace any existing functions with the below.
- (NSInteger)numberOfSectionsInTableView:(UITableView *)tableView {

#warning Potentially incomplete method implementation.

// Return the number of sections.

return 1;

}

- (NSInteger)tableView:(UITableView *)tableView numberOfRowsInSection:(NSInteger)section {

#warning Incomplete method implementation.

// Return the number of rows in the section. I currently have three rows we would like to show

return 3;

}
- (UITableViewCell *)tableView:(UITableView *)tableView cellForRowAtIndexPath:(NSIndexPath *)indexPath {

UITableViewCell *cell = [tableView dequeueReusableCellWithIdentifier:@"FishCell" forIndexPath:indexPath];

//temporary data to demonstrate the structure of a NSDictionary in an NSArray, which is the general structure of a JSON, this can be removed in a later stage

NSArray *fishes = @[

@{@"name": @"Dory", @"created": @"2014-06-21T04:23:01.639Z"},

@{@"name": @"Angel", @"created": @"2014-07-21T04:23:01.639Z"},

@{@"name": @"Clown", @"created": @"2014-08-21T04:23:01.639Z"}

];

if (cell == nil) {

cell = [[UITableViewCell alloc] initWithStyle:UITableViewCellStyleDefault reuseIdentifier:@"FishCell"];

}

//We will replace fishes with fishJson once we have code that downloads from the REST api

[cell.textLabel setText:[[fishes objectAtIndex:indexPath.row] objectForKey:@"name"] ];

[cell.detailTextLabel setText:[[fishes objectAtIndex:indexPath.row] objectForKey:@"created"]];

return cell;

}
Now, we can test this simple application. Select Product > Run.
Next we need to obtain JSON from the REST api we published using the djangorestframework. We established a NSArray object called fishJson by registering it at the@interfacelevel and synthesizing it with@propertyand@synthesize. This replaces the code for the setters and getters. We then replace the code we had in thenumberOfRowsInSection, where we replace fishes with fishJson that contains the JSON from the REST API. Again replace any existing functions or declarations.
@interface TableViewController ()

@property (strong) NSArray *fishJson;

@end
@implementation TableViewController

@synthesize fishJson;

- (void) downloadData {

//I use NSMutableString so we could append or replace parts of the URI with query parameters in the future

NSMutableString *remoteUrl = [NSMutableString stringWithFormat:@"http://127.0.0.1:8000/api/fishes/?format=%@", @"json"];

NSURLRequest *request = [NSURLRequest requestWithURL:[NSURL URLWithString:remoteUrl] ];

NSError *jsonError = nil;

NSHTTPURLResponse *jsonResponse = nil;
NSData *response;

do {

response = [NSURLConnection sendSynchronousRequest:request returningResponse:&jsonResponse error:&jsonError];

} while ([jsonError domain] == NSURLErrorDomain);
if([jsonResponse statusCode] != 200) {

NSLog(@"%ld", (long)[jsonResponse statusCode]);

} else {

NSLog(@"%@", @"200 OK");

}

NSError* error;

if(response) {

//fishJson was defined earlier near the top as a NSArray object

fishJson = [NSJSONSerialization

JSONObjectWithData:response

options:kNilOptions

error:&error];

}

}
We need to ensure this method runs when the app starts, add the following below viewDidLoad:
[self downloadData];Here we update the numberOfRowsInSection method. This code ensures that the number of rows matches the number of elements contained in the fishJson array.
- (NSInteger)tableView:(UITableView *)tableView numberOfRowsInSection:(NSInteger)section {

#warning Incomplete method implementation.

// Return the number of rows in the section.

return [fishJson count];

}
Update the cellForRowAtIndexPath method so it loads entries from our REST feed:
- (UITableViewCell *)tableView:(UITableView *)tableView cellForRowAtIndexPath:(NSIndexPath *)indexPath {

UITableViewCell *cell = [tableView dequeueReusableCellWithIdentifier:@"FishCell" forIndexPath:indexPath];
// Configure the cell...

if (cell == nil) {

cell = [[UITableViewCell alloc] initWithStyle:UITableViewCellStyleDefault reuseIdentifier:@"FishCell"];

}

[cell.textLabel setText:[[fishJson objectAtIndex:indexPath.row] objectForKey:@"name"] ];

[cell.detailTextLabel setText:[[fishJson objectAtIndex:indexPath.row] objectForKey:@"created"]];

return cell;

}
Now we have a working simple mobile app to display data obtained from an online or local REST API. You can find the code for the iOS app in the same repository above. This tutorial contained a lot of concepts and components which is typical of ‘real world’ apps. If you experienced any issues or have any questions or comments, please let me know in the comments below.
Frequently Asked Questions (FAQs) on Building a Simple REST API for Mobile Applications
What is the Importance of REST API in Mobile Applications?
REST API plays a crucial role in mobile applications. It provides a set of rules and conventions for building and interacting with web services. It allows different software systems to communicate with each other, regardless of the platform or language they are built on. This is particularly important for mobile applications, which often need to interact with server-side applications to retrieve data, update data, or perform other operations. By using a REST API, mobile applications can easily interact with server-side applications in a standardized way, making the development process more efficient and the application more robust.
How Do I Choose the Right Tools for Building a REST API?
Choosing the right tools for building a REST API depends on several factors, including your team’s expertise, the complexity of your application, and your specific requirements. Some popular tools for building REST APIs include Node.js, Express.js, and MongoDB for the backend, and AngularJS or React for the frontend. However, the best tool for you will depend on your specific needs and circumstances. It’s important to research and evaluate different tools before making a decision.
What are the Best Practices for Designing a REST API?
Designing a REST API involves several best practices. First, it’s important to use HTTP methods (GET, POST, PUT, DELETE) appropriately. Second, use resource-naming conventions consistently. Third, always use JSON for payloads. Fourth, handle errors properly and provide useful error messages. Fifth, version your API to avoid breaking changes. Lastly, secure your API using techniques like token-based authentication.
How Can I Secure My REST API?
Securing your REST API is crucial to protect sensitive data and prevent unauthorized access. Some common techniques for securing a REST API include using HTTPS for all communications, implementing token-based authentication, validating and sanitizing all inputs, limiting the rate of requests to prevent denial-of-service attacks, and regularly updating and patching your software to fix any security vulnerabilities.
How Do I Test My REST API?
Testing your REST API is essential to ensure it works correctly and efficiently. You can use tools like Postman or Insomnia for manual testing, or frameworks like Mocha and Chai for automated testing. Your tests should cover all aspects of your API, including all endpoints, all HTTP methods, error handling, and performance.
How Can I Optimize the Performance of My REST API?
Optimizing the performance of your REST API can involve several strategies, including caching responses to reduce server load, using compression to reduce the size of responses, paginating responses to limit the amount of data returned in a single request, and using a Content Delivery Network (CDN) to deliver responses more quickly.
What is the Role of JSON in a REST API?
JSON (JavaScript Object Notation) is a lightweight data-interchange format that is easy to read and write. In a REST API, JSON is commonly used to structure payloads because it is language-independent and can be easily parsed and generated by most programming languages.
How Do I Handle Errors in a REST API?
Proper error handling is crucial in a REST API. This involves returning appropriate HTTP status codes, providing clear and descriptive error messages, and logging errors for debugging purposes. This helps clients understand what went wrong and how to fix it, and helps developers identify and fix issues more quickly.
How Do I Version My REST API?
Versioning your REST API allows you to make changes and improvements without breaking existing clients. This can be done in several ways, such as by including the version number in the URL or in the request headers. It’s important to plan for versioning from the start and to communicate any changes to your clients.
How Do I Document My REST API?
Documenting your REST API is essential to help clients understand how to use it. This can include information about the available endpoints, the HTTP methods they support, the expected request and response formats, and any error codes that can be returned. Tools like Swagger or Postman can help you generate and maintain your API documentation.