

In part 6 of this tutorial series on building DApps with Ethereum, we took the DAO towards completion by adding voting, blacklisting/unblacklisting, and dividend distribution and withdrawal, while throwing in some additional helper functions for good measure. In this tutorial, we’ll build a web interface for interacting with our story, as we otherwise can’t count on any user engagement. So this is the final part of our story before we launch it into the wild.
Since this isn’t a web application tutorial, we’ll keep things extremely simple. The code below is not production-ready, and is meant to serve only as a proof of concept on how to connect JavaScript to the blockchain. But first, let’s add a new migration.
Key Takeaways
- Utilize a simple, static HTML and JavaScript-based front end to interact with Ethereum smart contracts, focusing on basic functionality over design.
- Implement automated token transfers in the deployment process using Truffle migrations to simplify testing and interaction between tokens and the DAO.
- Use Web3.js to connect the front-end application with the Ethereum blockchain, ensuring users have MetaMask installed for wallet management.
- Handle account information dynamically, displaying user status (logged in/out), token balance, and transaction history, leveraging Web3.js for asynchronous blockchain interactions.
- Integrate event listening in the DApp to capture and display real-time contract events, such as token transfers and voting results.
- Offer a user interface for submitting and voting on proposals within the DAO, enhancing community engagement and decentralized decision-making.
- Prepare for deployment by ensuring all functionalities are thoroughly tested in a local environment before launching on the live Ethereum network.
Automating Transfers
Right now as we deploy our token and DAO, they sit on the blockchain but don’t interact. To test what we’ve built, we need to manually transfer token ownership and balance to the DAO, which can be tedious during testing.
Let’s write a new migration which does this for us. Create the file 4_configure_relationship.js and put the following content in there:
var Migrations = artifacts.require("./Migrations.sol");
var StoryDao = artifacts.require("./StoryDao.sol");
var TNSToken = artifacts.require("./TNSToken.sol");

var storyInstance, tokenInstance;

module.exports = function (deployer, network, accounts) {

    deployer.then(function () {
            return TNSToken.deployed();
        }).then(function (tIns) {
            tokenInstance = tIns;
            return StoryDao.deployed();
        }).then(function (sIns) {
            storyInstance = sIns;
            return balance = tokenInstance.totalSupply();
        }).then(function (bal) {
            return tokenInstance.transfer(storyInstance.address, bal);
        })
        .then(function (something) {
            return tokenInstance.transferOwnership(storyInstance.address);
        });
}
Here’s what this code does. First, you’ll notice it’s promise-based. It’s full of then calls. This is because we depend on a function returning some data before we call the next one. All contract calls are promise-based, meaning they don’t return data immediately because Truffle needs to ask the node for information, so a promise to return data at a future time is made. We force the code to wait for this data by using then and providing all then calls with callback functions which get called with this result when it’s finally given.
So, in order:
- first, ask the node for the address of the deployed token and return it
- then, accepting this data, save it into a global variable and ask for the address of the deployed DAO and return it
- then, accepting this data, save it into a global variable and ask for the balance the owner of the token contract will have in their account, which is technically the total supply, and return this data
- then, once you get this balance, use it to call the
transferfunction of this token and send tokens to the DAO’s address and return the result - then, ignore the returned result — we just wanted to know when it’s done — and finally transfer ownership of the token to the DAO’s address, returning the data but not discarding it.
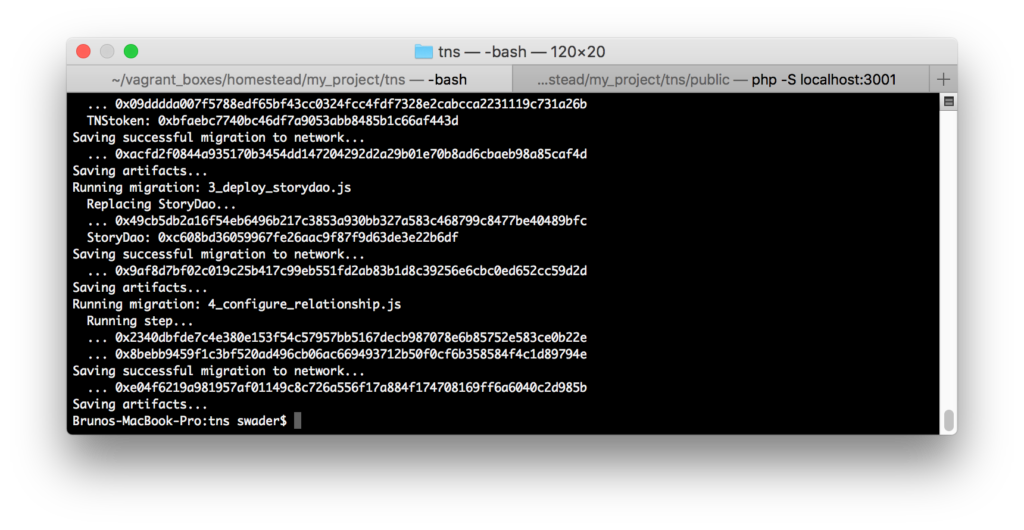
Running truffle migrate --reset should now produce an output like this:
The Front End
The front end is a regular, static HTML page with some JavaScript thrown in for communicating with the blockchain and some CSS to make things less ugly.
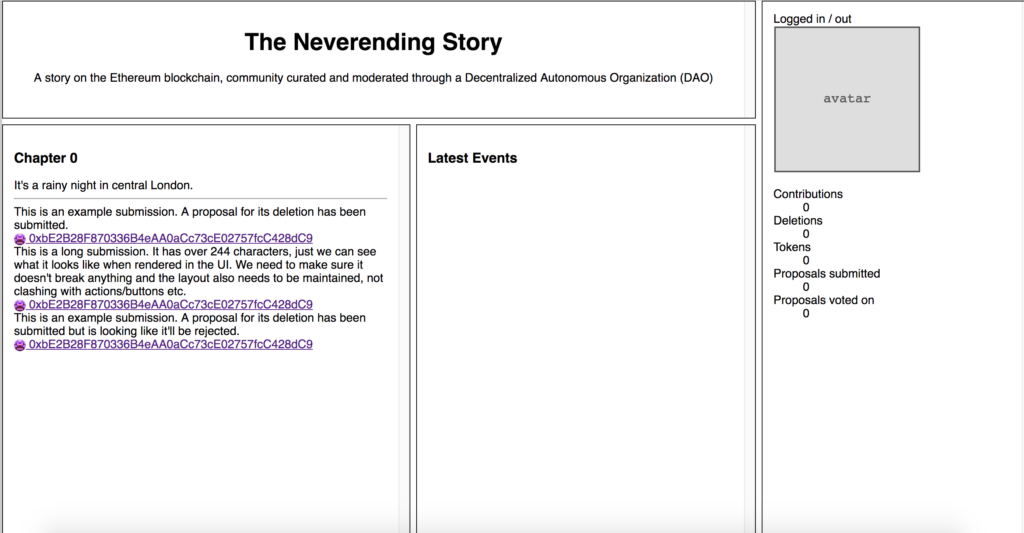
Let’s create a file index.html in the subfolder public and give it the following content:
<!DOCTYPE HTML>

<html lang="en">
<head>
    <title>The Neverending Story</title>
    <meta charset="utf-8"/>
    <meta name="viewport" content="width=device-width, initial-scale=1"/>
    <meta name="description" content="The Neverending Story is an community curated and moderated Ethereum dapp-story">
    <link rel="stylesheet" href="assets/css/main.css"/>
</head>
<body>

    <div class="grid-container">
        <div class="header container">
            <h1>The Neverending Story</h1>
            <p>A story on the Ethereum blockchain, community curated and moderated through a Decentralized Autonomous Organization (DAO)</p>
        </div>
        <div class="content container">
            <div class="intro">
                <h3>Chapter 0</h3>
                <p class="intro">It's a rainy night in central London.</p>
            </div>
            <hr>
            <div class="content-submissions">
                <div class="submission">
                    <div class="submission-body">This is an example submission. A proposal for its deletion has been submitted.</div>
                    <div class="submission-submitter">0xbE2B28F870336B4eAA0aCc73cE02757fcC428dC9</div>
                    <div class="submission-actions">
                        <div class="deletionproposed" data-votes="3024" data-deadline="1531607200"></div>
                    </div>
                </div>
                <div class="submission">
                        <div class="submission-body">This is a long submission. It has over 244 characters, just we can see what it looks like when rendered in the UI. We need to make sure it doesn't break anything and the layout also needs to be maintained, not clashing with actions/buttons etc.</div>
                        <div class="submission-submitter">0xbE2B28F870336B4eAA0aCc73cE02757fcC428dC9</div>
                        <div class="submission-actions">
                            <div class="delete"></div>
                        </div>
                </div>
                <div class="submission">
                        <div class="submission-body">This is an example submission. A proposal for its deletion has been submitted but is looking like it'll be rejected.</div>
                        <div class="submission-submitter">0xbE2B28F870336B4eAA0aCc73cE02757fcC428dC9</div>
                        <div class="submission-actions">
                            <div class="deletionproposed" data-votes="-790024" data-deadline="1531607200"></div>
                        </div>
                </div>
            </div>
        </div>
        <div class="events container">
            <h3>Latest Events</h3>
            <ul class="eventlist">

            </ul>
        </div>
        <div class="information container">
            <p>Logged in / out</p>
            <div class="avatar">
                <img src="http://placeholder.pics/svg/200/DEDEDE/555555/avatar" alt="avatar">
            </div>
            <dl>
                <dt>Contributions</dt>
                <dd>0</dd>
                <dt>Deletions</dt>
                <dd>0</dd>
                <dt>Tokens</dt>
                <dd>0</dd>
                <dt>Proposals submitted</dt>
                <dd>0</dd>
                <dt>Proposals voted on</dt>
                <dd>0</dd>
            </dl>
        </div>
    </div>

<script src="assets/js/web3.min.js"></script>
<script src="assets/js/app.js"></script>
<script src="assets/js/main.js"></script>

</body>
</html>
Note: this is a really really basic skeleton, just to demo integration. Please don’t rely on this being the final product!
It’s possible that you’re missing the dist folder in the web3 folder. The software is still beta, so minor slip-ups are still possible there. To get around this and install web3 with the dist folder, run npm install ethereum/web3.js --save.
For CSS, let’s put something rudimentary into public/assets/css/main.css:
@supports (grid-area: auto) {
    .grid-container{
      display: grid;
      grid-template-columns: 6fr 5fr 4fr;
      grid-template-rows: 10rem ;
      grid-column-gap: 0.5rem;
      grid-row-gap: 0.5rem;
      justify-items: stretch;
      align-items: stretch;
      grid-template-areas:
      "header header information"
      "content events information";
      height: 100vh;
    }
    .events {
      grid-area: events;
    }
    .content {
      grid-area: content;
    }
    .information {
      grid-area: information;
    }
    .header {
      grid-area: header;
      text-align: center;
    }

    .container {
        border: 1px solid black;
        padding: 15px;
        overflow-y: scroll;
    }

    p {
        margin: 0;
    }
  }

body {
    padding: 0;
    margin: 0;
    font-family: sans-serif;
}
Then as JS we’ll start with this in public/assets/js/app.js:
var Web3 = require('web3');
var web3 = new Web3(web3.currentProvider);
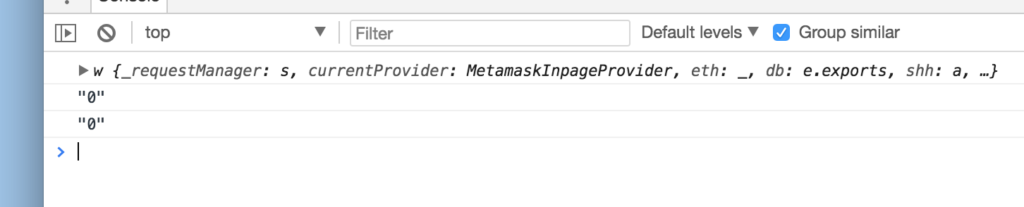
console.log(web3);
What’s going on here?
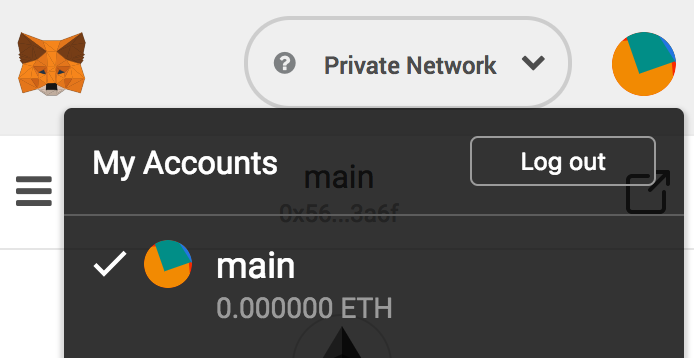
Since we agreed that we’ll assume all our users will have MetaMask installed, and MetaMask injects its own instance of Web3 into the DOM of any visited web page, we basically have access to the “wallet provider” from MetaMask right in our website. Indeed, if we log in to MetaMask while the page is open, we’ll see this in the console:
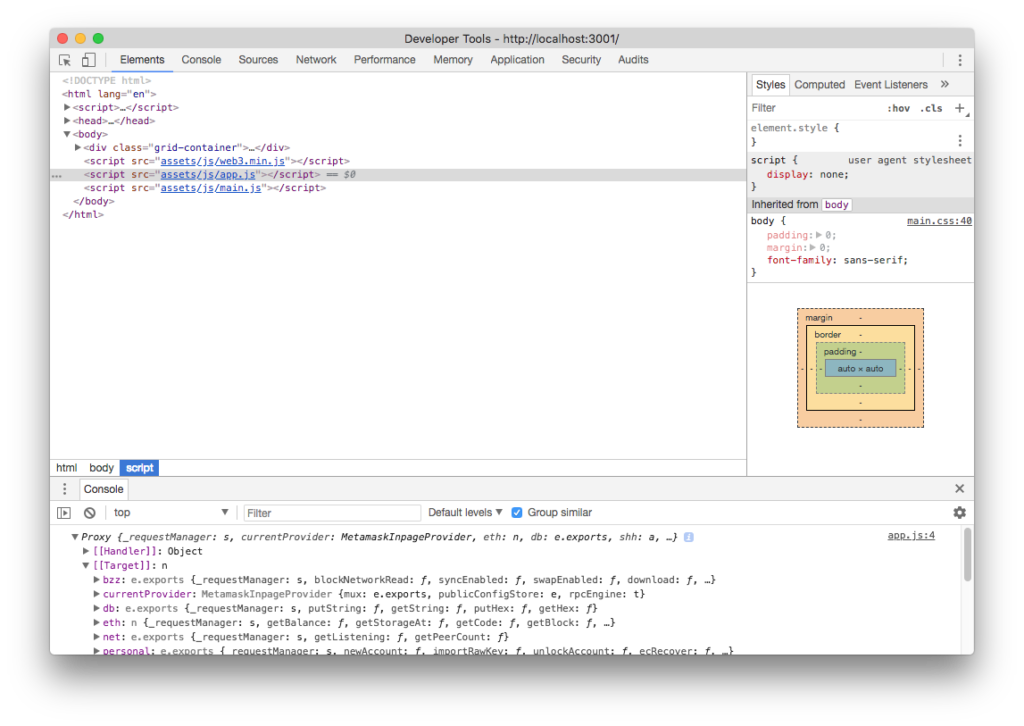
Notice how the MetamaskInpageProvider is active. In fact, if we type web3.eth.accounts into the console, all the accounts we have access to through MetaMask will be printed out:
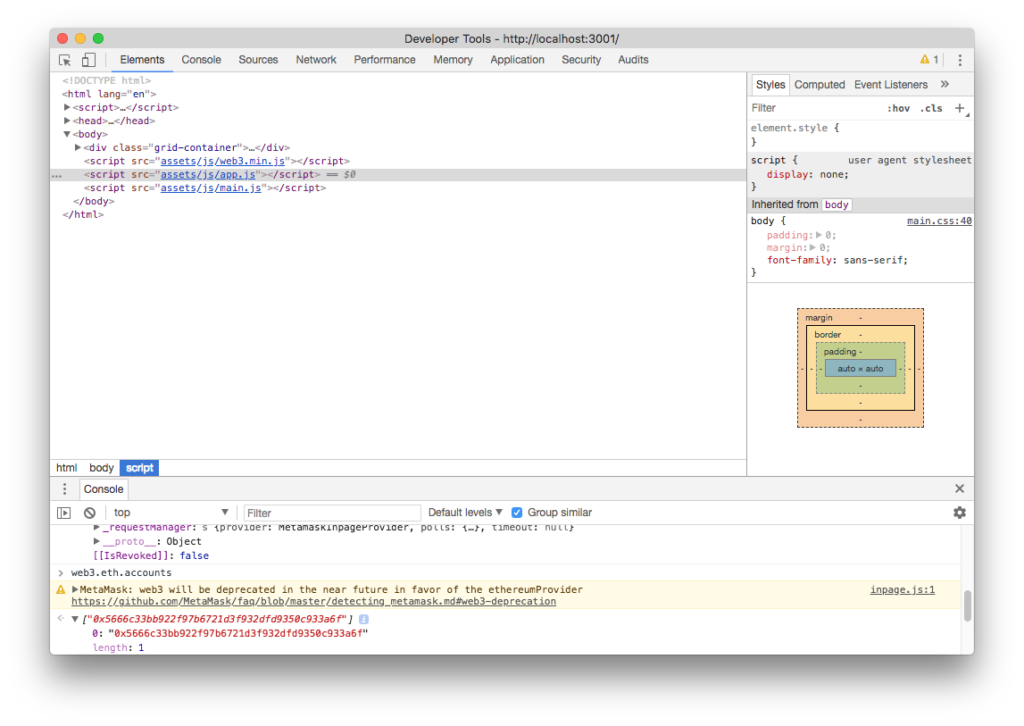
This particular account is, however, one that’s added to my own personal Metamask by default and as such will have a balance of 0 eth. It’s not part of our running Ganache or PoA chain:
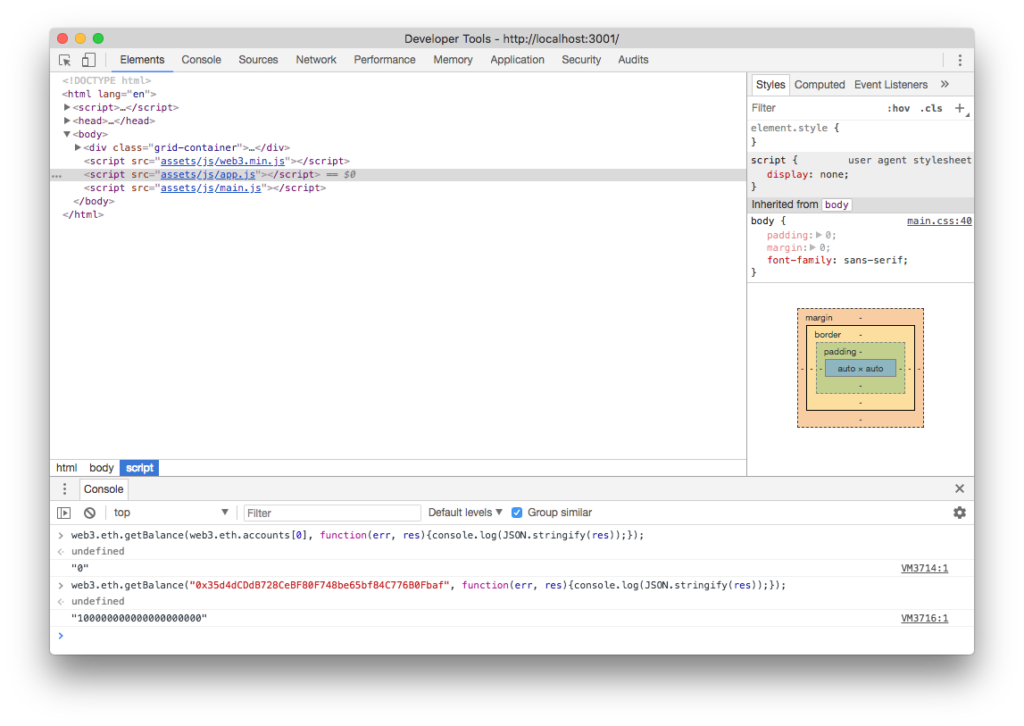
Notice how asking for the balance of our active (MetaMasked) account yields 0, while asking for balance of one of our private blockchain accounts yields 100 ether (in my case it’s Ganache, so all accounts are initialized with 100 ether).
About the syntax
You’ll notice that the syntax for these calls looks a little odd:
web3.eth.getBalance("0x35d4dCDdB728CeBF80F748be65bf84C776B0Fbaf", function(err, res){console.log(JSON.stringify(res));});
In order to read blockchain data, most MetaMask users will not have a node running locally but will instead request it from Infura or another remote node. Because of this, we can practically count on lag. For this reason, synchronous methods are generally not supported. Instead, everything is done through promises or with callbacks — just like with the deployment step at the beginning of this post. Does this mean you need to be intimately familiar with promises to develop JS for Ethereum? No. It means the following. When doing JS calls in the DOM …
- always provide a callback function as the last argument to a function you’re calling
- assume its return values will be twofold: first
error, thenresult.
So, basically, just think of it in terms of a delayed response. When the node responds back with data, the function you defined as the callback function will be called by JavaScript. Yes, this does mean you can’t expect your code to execute line by line as it’s written!
For more information about promises, callbacks and all that async jazz, see this post.
Account Information
If we open the website skeleton as presented above, we get something like this:
Let’s populate the right-most column about account information with real data.
Session
When the user is not signed into their MetaMask extension, the account list will be empty. When MetaMask isn’t even installed, the provider will be empty (undefined). When they are signed into MetaMask, the provider will be available and offer account info and interaction with the connected Ethereum node (live or Ganache or something else).
Tip: for testing, you can log out of MetaMask by clicking on your avatar icon in the top right and then selecting Log Out. If the UI doesn’t look like it does in the screenshot below, you might need to activate the Beta UI by opening the menu and clicking on “Try Beta”.
First, let’s replace all the content of the right status column with a message for the user if they’re logged out:
<div class="information container">
    <div class="logged out">
        <p>You seem to be logged out of MetaMask or MetaMask isn't installed. Please log into MetaMask - to learn more,
            see
            <a href="https://bitfalls.com/2018/02/16/metamask-send-receive-ether/">this tutorial</a>.</p>
    </div>
    <div class="logged in" style="display: none">
        <p>You are logged in!</p>
    </div>
</div>
The JS to handle this looks like this (in public/assets/js/main.js):
var loggedIn;

(function () {

    loggedIn = setLoggedIn(web3.currentProvider !== undefined && web3.eth.accounts.length > 0);

})();

function setLoggedIn(isLoggedIn) {
    let loggedInEl = document.querySelector('div.logged.in');
    let loggedOutEl = document.querySelector('div.logged.out');

    if (isLoggedIn) {
        loggedInEl.style.display = "block";
        loggedOutEl.style.display = "none";
    } else {
        loggedInEl.style.display = "none";
        loggedOutEl.style.display = "block";
    }

    return isLoggedIn;
}
The first part — (function () { — wraps the bit of logic to be executed once the website loads. So anything inside that will get executed immediately when the page is ready. A single function setLoggedIn is called and a condition is passed to it. The condition is that:
- The currentProvider of the
web3object is set (i.e. there’s a web3 client present in the website). - There’s a non-zero number of accounts available, i.e. an account is available for use via this web3 provider. In other words, we’re logged in to at least one account.
If these conditions together evaluate to true, the setLoggedIn function makes the “Logged out” message invisible, and the “Logged In” message visible.
All this has the added advantage of being able to use any other web3 provider as well. If a MetaMask alternative shows up eventually, it’ll be instantly compatible with this code because we’re not explicitly expecting MetaMask anywhere.
Account avatar
Because each private key to an Ethereum wallet is unique, it can be used to generate a unique image. This is where colorful avatars like the ones you see in MetaMask’s upper right corner or when using MyEtherWallet come from, though Mist, MyEtherWallet and MetaMask all use different approaches. Let’s generate one for our logged-in user and display it.
The icons in Mist are generated with the Blockies library — but a customized one, because the original has a broken random number generator and can produce identical images for different keys. So to install this one, download this file into one in your assets/js folder. Then, in index.html we include it before main.js:
    <script src="assets/js/app.js"></script>
    <script src="assets/js/blockies.min.js"></script>
    <script src="assets/js/main.js"></script>

</body>
We should also upgrade the logged.in container:
<div class="logged in" style="display: none">
    <p>You are logged in!</p>
    <div class="avatar">

    </div>
</div>
In main.js, we kickstart the function.
 if (isLoggedIn) {
      loggedInEl.style.display = "block";
      loggedOutEl.style.display = "none";

      var icon = blockies.create({ // All options are optional
          seed: web3.eth.accounts[0], // seed used to generate icon data, default: random
          size: 20, // width/height of the icon in blocks, default: 8
          scale: 8, // width/height of each block in pixels, default: 4
      });

      document.querySelector("div.avatar").appendChild(icon);
So we upgrade the logged-in section of the JS code to generate the icon and paste it into the avatar section. We should align that a little with CSS before rendering:
div.avatar {
    width: 100%;
    text-align: center;
    margin: 10px 0;
}
Now if we refresh the page when logged in to MetaMask, we should see our generated avatar icon.
![]()
Account balances
Now let’s output some of the account balance information.
We have a bunch of read-only functions at our disposal that we developed exclusively for this purpose. So let’s query the blockchain and ask it for some info. To do that, we need to call a smart contract function via the following steps.
1. ABI
Get the ABI of the contracts whose functions we’re calling. The ABI contains function signatures, so our JS code knows how to call them. Learn more about ABI here.
You can get the ABI of the TNS token and the StoryDAO by opening the build/TNSToken.json and build/StoryDao.json files in your project folder after compilation and selecting only the abi part — so the part between the square brackets [ and ]:
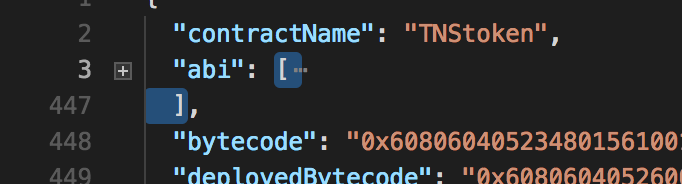
We’ll put this ABI at the top of our JavaScript code into main.js like so:
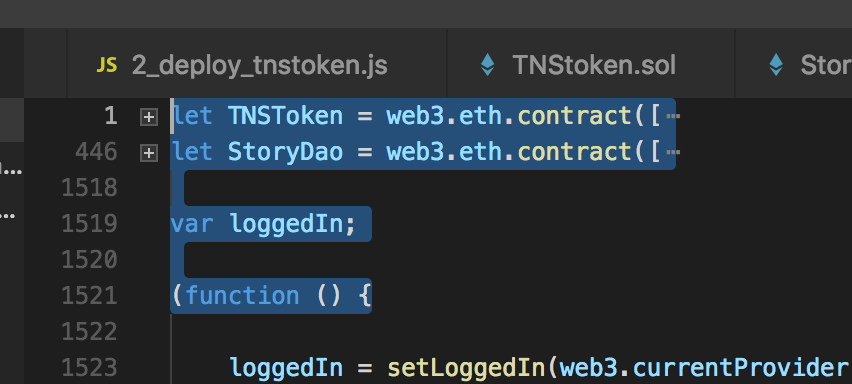
Note that the above screenshot shows the abbreviated insertion, collapsed by my code editor (Microsoft Visual Code). If you look at line numbers, you’ll notice that the ABI of the token is 400 lines of code, and the ABI of the DAO is another 1000, so pasting that into this article would make no sense.
2. Instantiate token
if (loggedIn) {

    var token = TNSToken.at('0x3134bcded93e810e1025ee814e87eff252cff422');
    var story = StoryDao.at('0x729400828808bc907f68d9ffdeb317c23d2034d5');
    token.balanceOf(web3.eth.accounts[0], function(error, result) {console.log(JSON.stringify(result))});
    story.getSubmissionCount(function(error, result) {console.log(JSON.stringify(result))});
//...
We call upon each contract with the address given to us by Truffle and create an instance for each — token and story respectively. Then, we simply call the functions (asynchronously as before). The console gives us two zeroes because the account in MetaMask has 0 tokens, and because there are 0 submissions in the story for now.
3. Read and output data
Finally, we can populate the user’s profile data with the info we have available.
Let’s update our JavaScript:
var loggedIn;

(function () {

    loggedIn = setLoggedIn(web3.currentProvider !== undefined && web3.eth.accounts.length > 0);

    if (loggedIn) {

        var token = TNSToken.at('0x3134bcded93e810e1025ee814e87eff252cff422');
        var story = StoryDao.at('0x729400828808bc907f68d9ffdeb317c23d2034d5');

        token.balanceOf(web3.eth.accounts[0], function(error, result) {console.log(JSON.stringify(result))});
        story.getSubmissionCount(function(error, result) {console.log(JSON.stringify(result))});

        readUserStats().then(User => renderUserInfo(User));
    }

})();

async function readUserStats(address) {
    if (address === undefined) {
        address = web3.eth.accounts[0];
    }
    var User = {
        numberOfSubmissions: await getSubmissionsCountForUser(address),
        numberOfDeletions: await getDeletionsCountForUser(address),
        isWhitelisted: await isWhitelisted(address),
        isBlacklisted: await isBlacklisted(address),
        numberOfProposals: await getProposalCountForUser(address),
        numberOfVotes: await getVotesCountForUser(address)
    }
    return User;
}

function renderUserInfo(User) {
    console.log(User);

    document.querySelector('#user_submissions').innerHTML = User.numberOfSubmissions;
    document.querySelector('#user_deletions').innerHTML = User.numberOfDeletions;
    document.querySelector('#user_proposals').innerHTML = User.numberOfProposals;
    document.querySelector('#user_votes').innerHTML = User.numberOfVotes;
    document.querySelector('dd.user_blacklisted').style.display = User.isBlacklisted ? 'inline-block' : 'none';
    document.querySelector('dt.user_blacklisted').style.display = User.isBlacklisted ? 'inline-block' : 'none';
    document.querySelector('dt.user_whitelisted').style.display = User.isWhitelisted ? 'inline-block' : 'none';
    document.querySelector('dd.user_whitelisted').style.display = User.isWhitelisted ? 'inline-block' : 'none';
}

async function getSubmissionsCountForUser(address) {
    if (address === undefined) {
        address = web3.eth.accounts[0];
    }
    return new Promise(function (resolve, reject) {
        resolve(0);
    });
}
async function getDeletionsCountForUser(address) {
    if (address === undefined) {
        address = web3.eth.accounts[0];
    }
    return new Promise(function (resolve, reject) {
        resolve(0);
    });
}
async function getProposalCountForUser(address) {
    if (address === undefined) {
        address = web3.eth.accounts[0];
    }
    return new Promise(function (resolve, reject) {
        resolve(0);
    });
}
async function getVotesCountForUser(address) {
    if (address === undefined) {
        address = web3.eth.accounts[0];
    }
    return new Promise(function (resolve, reject) {
        resolve(0);
    });
}
async function isWhitelisted(address) {
    if (address === undefined) {
        address = web3.eth.accounts[0];
    }
    return new Promise(function (resolve, reject) {
        resolve(false);
    });
}
async function isBlacklisted(address) {
    if (address === undefined) {
        address = web3.eth.accounts[0];
    }
    return new Promise(function (resolve, reject) {
        resolve(false);
    });
}
And let’s change the profile info section:
<div class="logged in" style="display: none">
    <p>You are logged in!</p>
    <div class="avatar">

    </div>
    <dl>
        <dt>Submissions</dt>
        <dd id="user_submissions"></dd>
        <dt>Proposals</dt>
        <dd id="user_proposals"></dd>
        <dt>Votes</dt>
        <dd id="user_votes"></dd>
        <dt>Deletions</dt>
        <dd id="user_deletions"></dd>
        <dt class="user_whitelisted">Whitelisted</dt>
        <dd class="user_whitelisted">Yes</dd>
        <dt class="user_blacklisted">Blacklisted</dt>
        <dd class="user_blacklisted">Yes</dd>
    </dl>
</div>
You’ll notice we used promises when fetching the data, even though our functions are currently just mock functions: they return flat data immediately. This is because each of those functions will need a different amount of time to fetch the data we asked it to fetch, so we’ll await their completion before populating the User object and then passing it on into the render function which updates the info on the screen.
If you’re unfamiliar with JS promises and would like to learn more, see this post.
For now, all our functions are mocks; we’ll need to do some writes before there’s something to read. But first we’ll need to be ready to notice those writes happening!
Listening to events
In order to be able to follow events emitted by the contract, we need to listen for them — as otherwise we’ve put all those emit statements into the code for nothing. The middle section of the mock UI we built is meant to hold those events.
Here’s how we can listen to events emitted by the blockchain:
// Events

var WhitelistedEvent = story.Whitelisted(function(error, result) {
    if (!error) {
        console.log(result);
    }
});
Here we call the Whitelisted function on the story instance of our StoryDao contract, and pass a callback into it. This callback is automatically called whenever this given event is fired. So when a user gets whitelisted, the code will automatically log to the console the output of that event.
However, this will only get the last event of the last block mined by a network. So if there are several Whitelisted events fired from block 1 to 10, it will only show us those in block 10, if any. A better way is to use this approach:
story.Whitelisted({}, { fromBlock: 0, toBlock: 'latest' }).get((error, eventResult) => {
  if (error) {
    console.log('Error in myEvent event handler: ' + error);
  } else {
    // eventResult contains list of events!
    console.log('Event: ' + JSON.stringify(eventResult[0].args));
  }
});
Note: put the above into a separate section at the bottom of your JS file, one dedicated to events.
Here, we use the get function which lets us define the block range from which to fetch events. We use 0 to latest, meaning we can fetch all events of this type, ever. But this has the added problem of clashing with the watching method above. The watching method outputs the last block’s event, and the get method outputs all of them. We need a way to make the JS ignore double events. Don’t write those you already fetched from history. We’ll do that further down, but for now, let’s deal with whitelisting.
Account whitelisting
Finally, let’s get to some write operations.
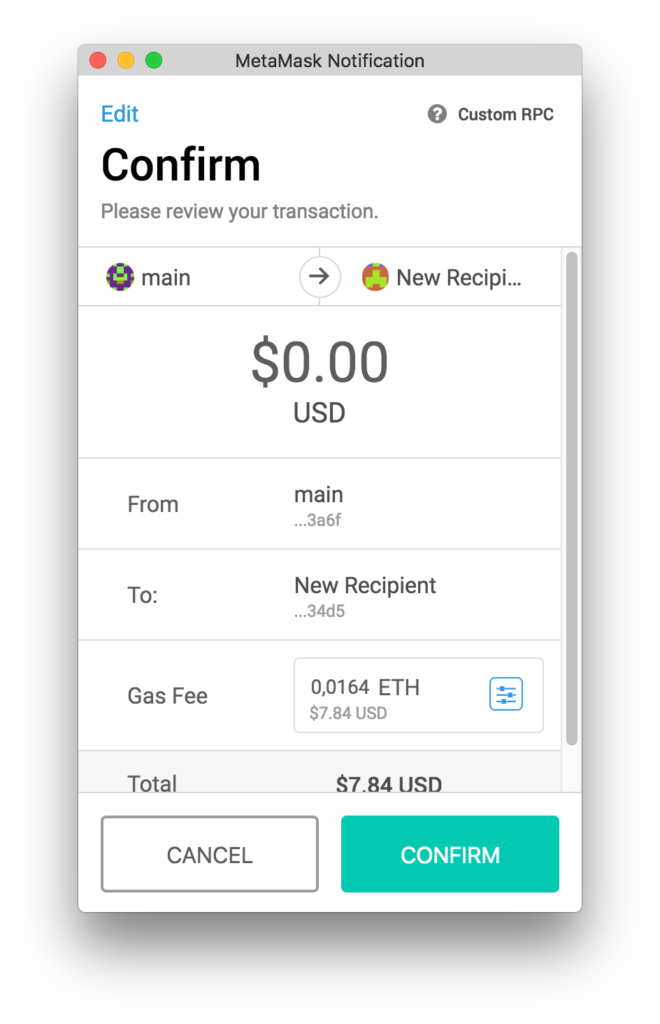
The first and simplest one is getting whitelisted. Remember, to get whitelisted, an account needs to send at least 0.01 ether to the DAO’s address. You’ll get this address on deployment. If your Ganache/PoA chain restarted in between parts of this course, that’s okay, simply re-run the migrations with truffle migrate --reset and you’ll get the new addresses for both the token and the DAO. In my case, the address of the DAO is 0x729400828808bc907f68d9ffdeb317c23d2034d5 and my token is at 0x3134bcded93e810e1025ee814e87eff252cff422.
With everything above set up, let’s try sending an amount of ether to the DAO address. Let’s try it with 0.05 ether just for fun, so we can see if the DAO gives us the extra calculated tokens, too, for overpaying.
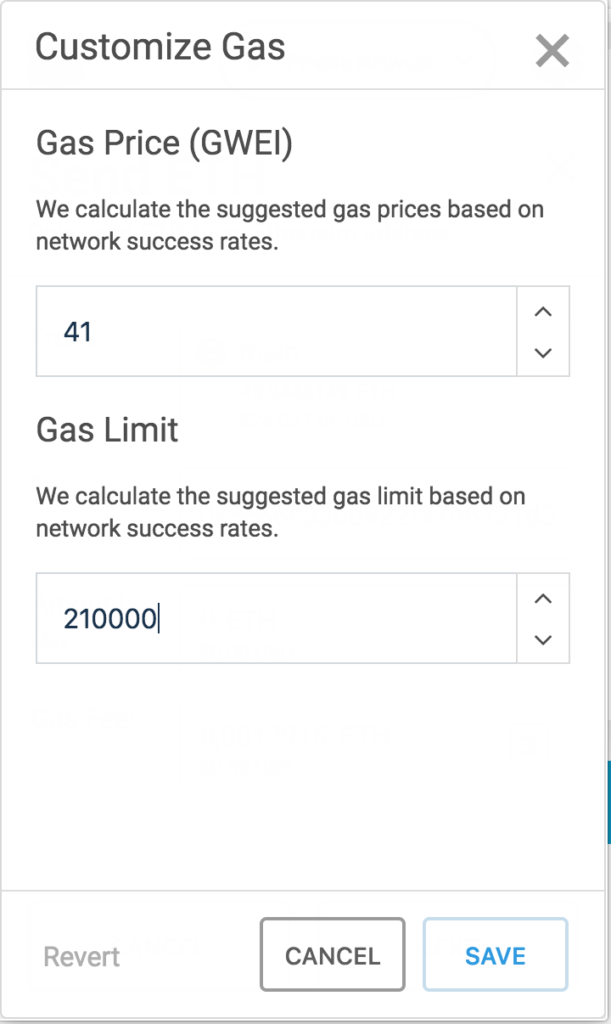
Note: don’t forget to customize the gas amount — just slap another zero on top of the 21000 limit — using the icon marked red. Why is this necessary? Because the function that gets triggered by a simple ether send (the fallback function) executes additional logic which goes beyond 21000, which is enough for simple sends. So we need to up the limit. Don’t worry: anything over this limit is instantly refunded. For a primer on how gas works, see here.
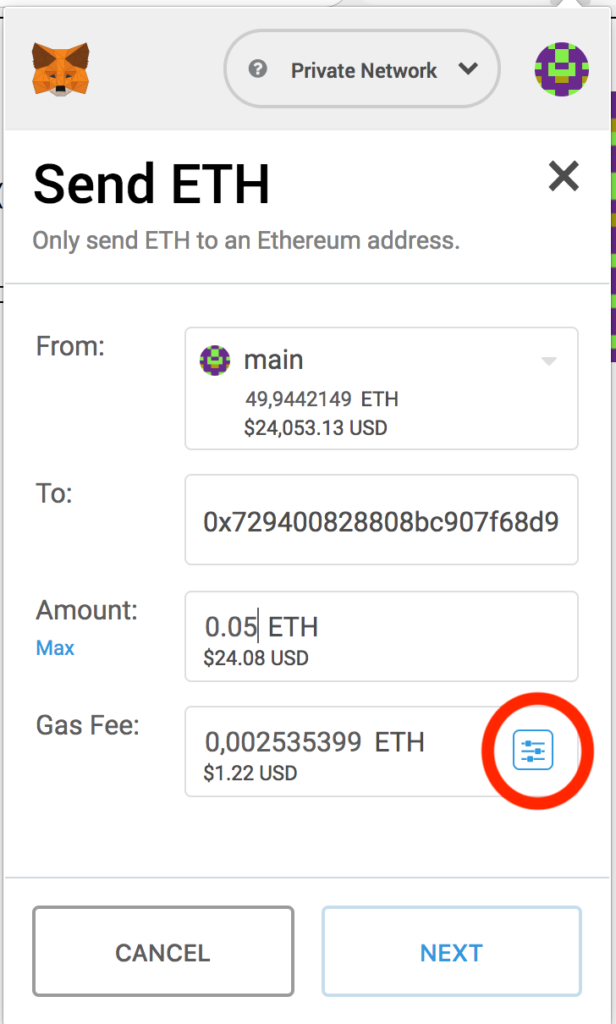
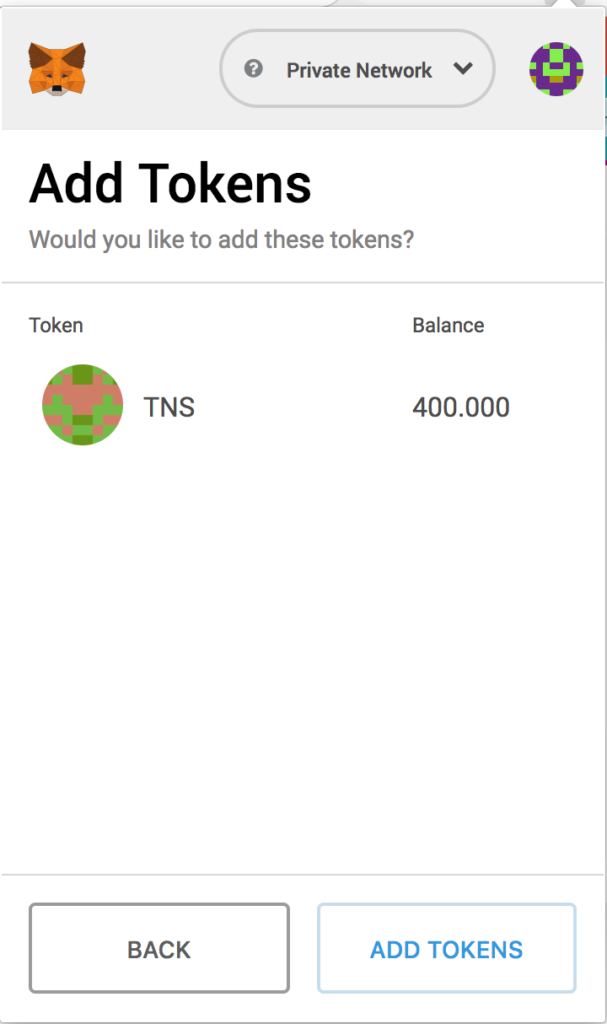
After the transaction confirms (you’ll see this in MetaMask as “confirmed”), we can check the token amount in our MetaMask account. We’ll need to add our custom token to MetaMask first so it can track them. As per the animation below, the process is as follows: select the MetaMask menu, scroll down to Add Tokens, select Custom Token, paste in the address of the token given to you by Truffle on migration, click Next, see if the balance is fine, and then select Add Tokens.
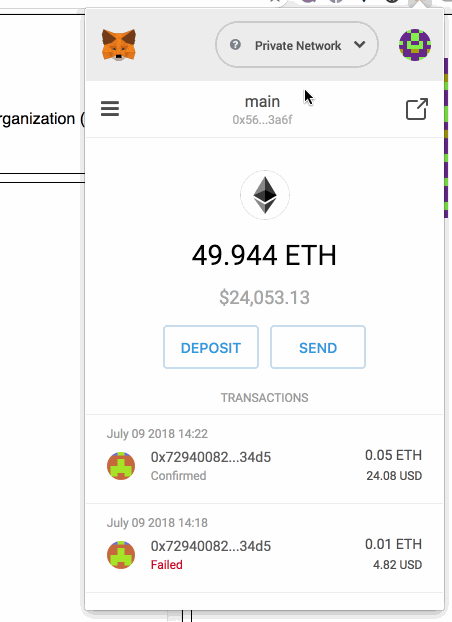
For 0.05 eth we should have 400k tokens, and we do.
What about the event, though? Were we notified of this whitelisting? Let’s look in the console.
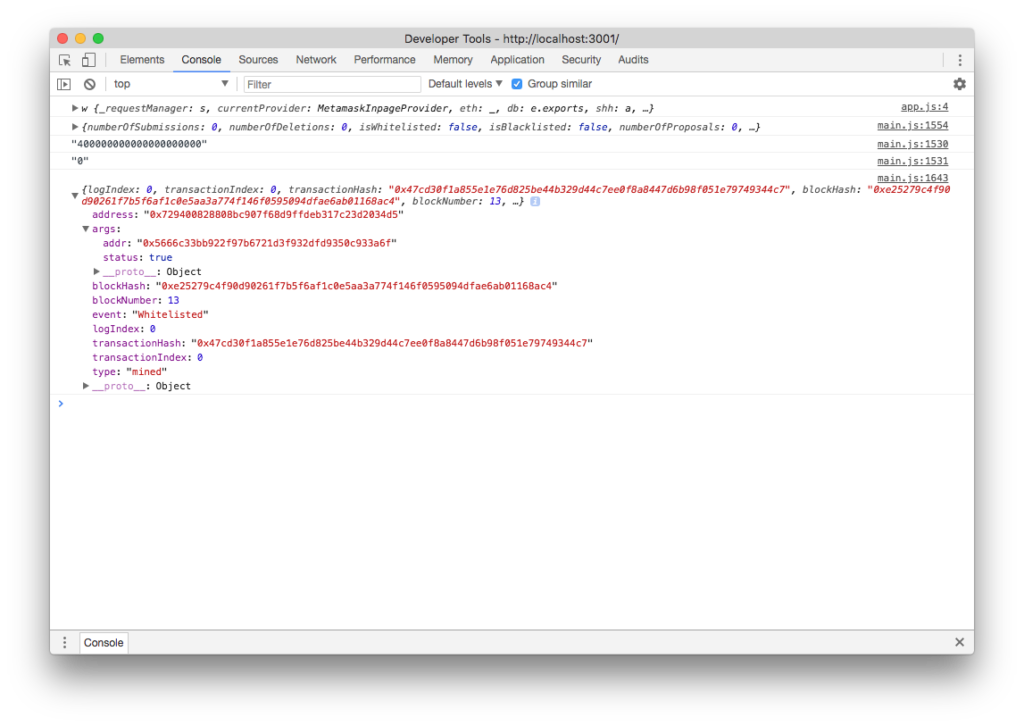
Indeed, the full dataset is there — the address which emitted the event, the block number and hash in which this was mined, and so on. Among all this is the args object, which tells us the event data: addr is the address being whitelisted, and status is whether it was added to the whitelist or removed from it. Success!
If we refresh the page now, the event is again in the console. But how? We didn’t whitelist anyone new. Why did the event fire? The thing with events in EVM is that they are not one-off things like in JavaScript. Sure, they contain arbitrary data and serve as output only, but their output is forever registered in the blockchain because the transaction that caused them is also forever registered in the blockchain. So events will remain after having been emitted, which saves us from having to store them somewhere and recall them on page refresh!
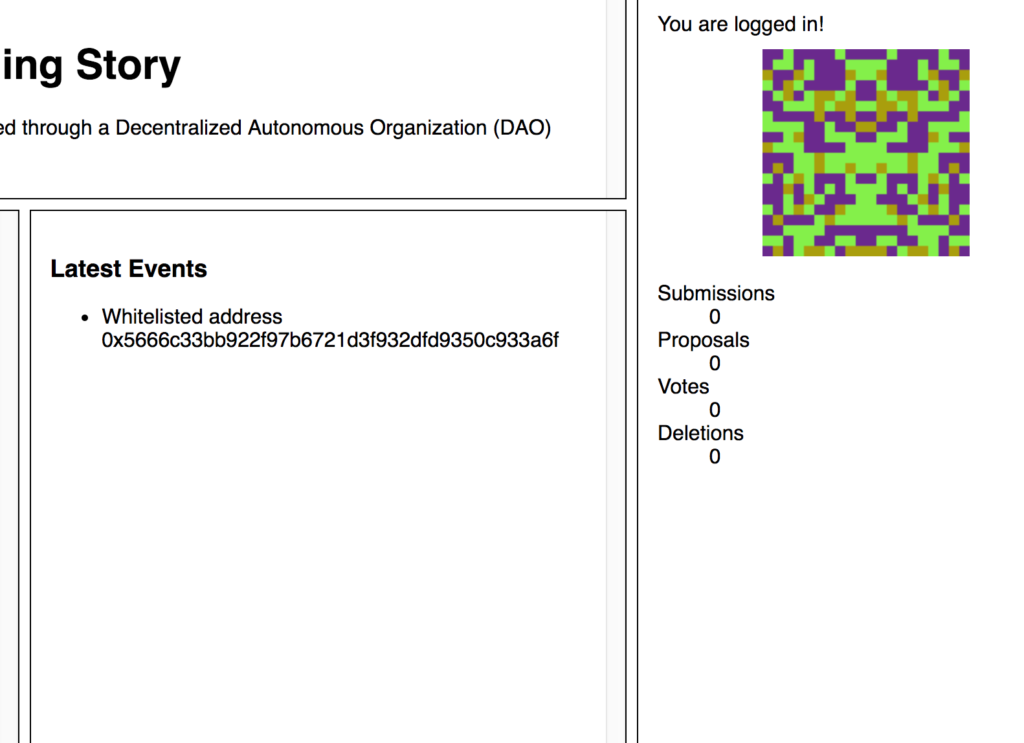
Now let’s add this to the events screen in the UI! Edit the Events section of the JavaScript file like so:
// Events

var highestBlock = 0;
var WhitelistedEvent = story.Whitelisted({}, { fromBlock: 0, toBlock: "latest" });

WhitelistedEvent.get((error, eventResult) => {
  if (error) {
    console.log('Error in Whitelisted event handler: ' + error);
  } else {
    console.log(eventResult);
    let len = eventResult.length;
    for (let i = 0; i < len; i++) {
      console.log(eventResult[i]);
      highestBlock = highestBlock < eventResult[i].blockNumber ? eventResult[i].blockNumber : highestBlock;
      printEvent("Whitelisted", eventResult[i]);
    }
  }
});

WhitelistedEvent.watch(function(error, result) {
  if (!error && result.blockNumber > highestBlock) {
    printEvent("Whitelisted", result);
  }
});

function printEvent(type, object) {
  switch (type) {
    case "Whitelisted":
      let el;
      if (object.args.status === true) {
          el = "<li>Whitelisted address "+ object.args.addr +"</li>";
      } else {
          el = "<li>Removed address "+ object.args.addr +" from whitelist!</li>";
      }
      document.querySelector("ul.eventlist").innerHTML += el;
    break;
    default:
    break;
  }
}
Wow, events got complicated fast, huh? Not to worry, we’ll clarify.
The highestBlock variable will remember the latest block fetched from history. We create an instance of our event and attach two listeners to it. One is get, which gets all events from history and remembers the latest block. The other is watch, which watches for events “live” and triggers when a new one appears in the most recent block. The watcher only triggers if the block that just came in is bigger than the block we have remembered as highest, making sure that only the new events get appended to the list of events.
We also added a printEvent function to make things easier; we can re-use it for other event types too!
If we test this now, indeed, we get it nicely printed out.
Try doing this yourself now for all the other events our story can emit! See if you can figure out how to handle them all at once rather than having to write this logic for each of them. (Hint: define their names in an array, then loop through those names and dynamically register the events!)
Manual checking
You can also manually check the whitelist and all other public parameters of the StoryDAO by opening it in MyEtherWallet and calling its whitelist function.
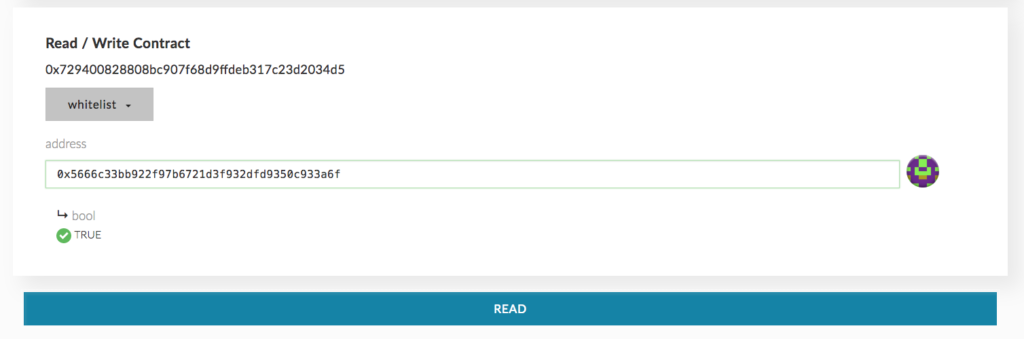
You’ll notice that if we check the account from which we just sent the whitelisting amount we’ll get a true back, indicating that this account really exists in the whitelist mapping.
Use this same function menu to experiment with other functions before adding them to the web UI.
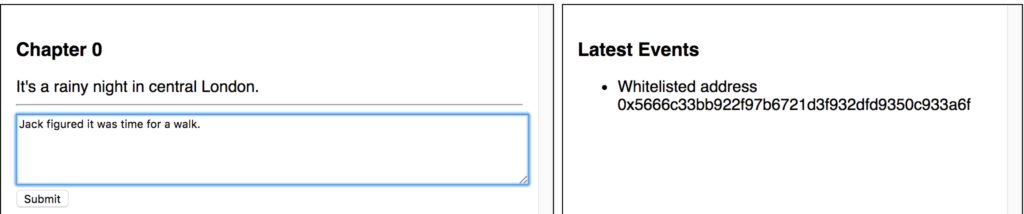
Submitting an entry
At long last, let’s do a proper write-function call from our UI. This time, we’ll submit an entry into our story. First we need to clear the sample entries we put there at the beginning. Edit the HTML to this:
<div class="content container">
    <div class="intro">
        <h3>Chapter 0</h3>
        <p class="intro">It's a rainy night in central London.</p>
    </div>
    <hr>
    <div class="submission_input">
        <textarea name="submission-body" id="submission-body-input" rows="5"></textarea>
        <button id="submission-body-btn">Submit</button>
    </div>
    ...
And some basic CSS:
.submission_input textarea {
  width: 100%;
}
We added a very simple textarea through which users can submit new entries.
Let’s do the JS part now.
First, let’s get ready to accept this event by adding a new one and modifying our printEvent function. We can also refactor the whole event section a bit to make it more reusable.
// Events

var highestBlock = 0;
var WhitelistedEvent = story.Whitelisted({}, { fromBlock: 0, toBlock: "latest" });
var SubmissionCreatedEvent = story.SubmissionCreated({}, { fromBlock: 0, toBlock: "latest" });

var events = [WhitelistedEvent, SubmissionCreatedEvent];
for (let i = 0; i < events.length; i++) {
  events[i].get(historyCallback);
  events[i].watch(watchCallback);
}

function watchCallback(error, result) {
  if (!error && result.blockNumber > highestBlock) {
    printEvent(result.event, result);
  }
}

function historyCallback(error, eventResult) {
  if (error) {
    console.log('Error in event handler: ' + error);
  } else {
    console.log(eventResult);
    let len = eventResult.length;
    for (let i = 0; i < len; i++) {
      console.log(eventResult[i]);
      highestBlock = highestBlock < eventResult[i].blockNumber ? eventResult[i].blockNumber : highestBlock;
      printEvent(eventResult[i].event, eventResult[i]);
    }
  }
}

function printEvent(type, object) {
  let el;
  switch (type) {
    case "Whitelisted":
      if (object.args.status === true) {
          el = "<li>Whitelisted address "+ object.args.addr +"</li>";
      } else {
          el = "<li>Removed address "+ object.args.addr +" from whitelist!</li>";
      }
      document.querySelector("ul.eventlist").innerHTML += el;
    break;
    case "SubmissionCreated":
      el = "<li>User " + object.args.submitter + " created a"+ ((object.args.image) ? "n image" : " text") +" entry: #" + object.args.index + " of content " + object.args.content+"</li>";
      document.querySelector("ul.eventlist").innerHTML += el;
    break;
    default:
    break;
  }
}
Now all we need to do to add a brand new event is instantiate it, and then define a case for it.
Next, let’s make it possible to make a submission.
document.getElementById("submission-body-btn").addEventListener("click", function(e) {
    if (!loggedIn) {
        return false;
    }

    var text = document.getElementById("submission-body-input").value;
    text = web3.toHex(text);

    story.createSubmission(text, false, {value: 0, gas: 400000}, function(error, result) {
        refreshSubmissions();
    });
});

function refreshSubmissions() {
    story.getAllSubmissionHashes(function(error, result){
        console.log(result);
    });
}
Here we add an event listener to our submission form which, once submitted, first rejects everything if the user isn’t logged in, then grabs the content and converts it to hex format (which is what we need to store values as bytes).
Lastly, it creates a transaction by calling the createSubmission function and providing two params: the text of the entry, and the false flag (meaning, not an image). The third argument is the transaction settings: value means how much ether to send, and gas means how much of a gas limit you want to default to. This can be changed in the client (MetaMask) manually, but it’s a good starting point to make sure we don’t run into a limit. The final argument is the callback function which we’re already used to by now, and this callback will call a refresh function which loads all the submissions of the story. Currently, this refresh function only loads story hashes and puts them into the console so we can check that everything works.
Note: ether amount is 0 because the first entry is free. Further entries will need ether added to them. We’ll leave that dynamic calculation up to you for homework. Tip: there’s a calculateSubmissionFee function in our DAO for this very purpose.
At this point, we need to change something at the top of our JS where the function auto-executes on page load:
if (loggedIn) {

    token.balanceOf(web3.eth.accounts[0], function(error, result) {console.log(JSON.stringify(result))});
    story.getSubmissionCount(function(error, result) {console.log(JSON.stringify(result))});

    web3.eth.defaultAccount = web3.eth.accounts[0]; // CHANGE

    readUserStats().then(User => renderUserInfo(User));
    refreshSubmissions(); // CHANGE
} else {
    document.getElementById("submission-body-btn").disabled = "disabled";
}
The changes are marked with // CHANGE: the first one lets us set the default account from which to execute transactions. This will probably be made default in a future version of Web3. The second one refreshes the submissions on page load, so we get a fully loaded story when the site opens.
If you try to submit an entry now, MetaMask should open as soon as you click Submit and ask you to confirm submission.
You should also see the event printed out in the events section.
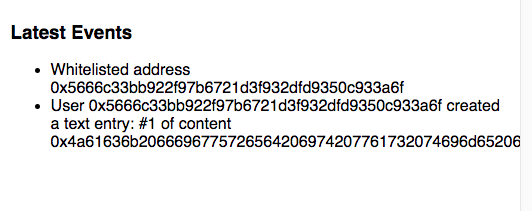
The console should echo out the hash of this new entry.

Note: MetaMask currently has a problem with private network and nonces. It’s described here and will be fixed soon, but in case you get the nonce error in your JavaScript console when submitting entries, the stopgap solution for now is to re-install MetaMask (disabling and enabling will not work). REMEMBER TO BACK UP YOUR SEED PHRASE FIRST: you’ll need it to re-import your MetaMask accounts!
Finally, let’s fetch these entries and display them. Let’s start with a bit of CSS:
.content-submissions .submission-submitter {
  font-size: small;
}
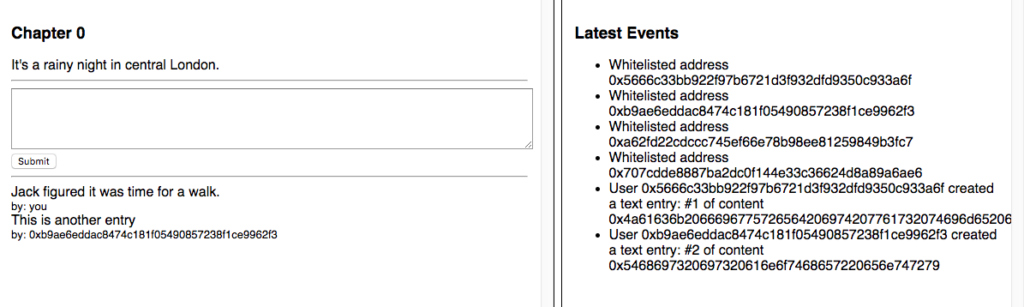
Now let’s update the refreshSubmissions function:
function refreshSubmissions() {
  story.getAllSubmissionHashes(function (error, result) {
    var entries = [];
    for (var i = 0; i < result.length; i++) {
      story.getSubmission(result[i], (err, res) => {

        if (res[2] === web3.eth.accounts[0]) {
          res[2] = 'you';
        }
        let el = "";
        el += '<div class="submission">';
        el += '<div class="submission-body">' + web3.toAscii(res[0]) + '</div>';
        el += '<div class="submission-submitter">by: ' + res[2] + '</div>';
        el += '</div>';
        el += '</div>';
        document.querySelector('.content-submissions').innerHTML += el;
      });
    }
  });
}
We roll through all the submissions, get their hashes, fetch each one, and output it on the screen. If the submitter is the same as the logged-in user, “you” is printed instead of the address.

Let’s add another entry to test.
Conclusion
In this part, we developed the beginnings of a basic front end for our DApp.
Since developing the full front-end application could just as well be a course of its own, we’ll leave further development up to you as homework. Just call the functions as demonstrated, tie them into a regular JavaScript flow (either via a framework like VueJS or plain old jQuery or raw JS like we did above) and bind it all together. It’s literally like talking to a standard server API. If you do get stuck, check out the project repo for the code!
Other upgrades you can do:
- detect when the web3 provider changes or when the number of available accounts changes, indicating log-in or log-out events and auto-reload the page
- prevent the rendering of the submission form unless the user is logged in
- prevent the rendering of the vote and delete buttons unless the user has at least 1 token, etc.
- let people submit and render Markdown!
- order events by time (block number), not by type!
- make events prettier and more readable: instead of showing hex content, translate it to ASCII and truncate to 30 or so characters
- use a proper JS framework like VueJS to get some reusability out of your project and to have better structured code.
In the next and final part, we’ll focus on deploying our project to the live internet. Stay tuned!
Frequently Asked Questions (FAQs) about Building Ethereum DApps with Web3 UI and DAO Contract
What are the prerequisites for building Ethereum DApps with Web3 UI and DAO Contract?
To build Ethereum DApps with Web3 UI and DAO Contract, you need to have a basic understanding of blockchain technology, Ethereum, and smart contracts. You should also be familiar with JavaScript, as it is the primary language used in the development of DApps. Additionally, knowledge of Solidity, the programming language for writing smart contracts on Ethereum, is essential. Lastly, you should have a basic understanding of web development, as DApps are essentially decentralized web applications.
How can I set up my development environment for building Ethereum DApps?
Setting up your development environment for building Ethereum DApps involves installing several tools. First, you need Node.js and npm, which are essential for managing dependencies. You also need to install Truffle, a development framework for Ethereum. Additionally, you need Ganache, a personal blockchain for Ethereum development. Lastly, you need MetaMask, a browser extension that allows you to run Ethereum DApps in your browser.
What is the role of Web3 in building Ethereum DApps?
Web3 is a collection of libraries that allow you to interact with a local or remote Ethereum node using HTTP, IPC, or WebSocket. It plays a crucial role in building Ethereum DApps as it allows your DApp to communicate with the Ethereum blockchain. With Web3, you can send transactions, interact with smart contracts, and do much more.
How can I create a DAO contract for my Ethereum DApp?
Creating a DAO contract for your Ethereum DApp involves writing a smart contract in Solidity. The contract should define the rules of the DAO, including how members can vote and how funds can be spent. Once the contract is written, it can be deployed to the Ethereum blockchain using Truffle.
How can I interact with my DAO contract using Web3?
You can interact with your DAO contract using Web3 by creating an instance of the contract. This involves providing the ABI (Application Binary Interface) and the address of the contract. Once the instance is created, you can call the functions of the contract using the methods provided by Web3.
How can I test my Ethereum DApp?
You can test your Ethereum DApp using Truffle’s built-in testing framework. This allows you to write tests in JavaScript or Solidity. You can also use Ganache to create a private Ethereum blockchain for testing purposes.
How can I deploy my Ethereum DApp?
Deploying your Ethereum DApp involves compiling your smart contracts, migrating them to the Ethereum blockchain, and hosting your DApp’s frontend. You can use Truffle for compiling and migrating your contracts. For hosting, you can use any web server or even host your DApp on IPFS, a decentralized file system.
What are the security considerations when building Ethereum DApps?
Security is a crucial aspect of building Ethereum DApps. You should follow best practices for writing secure smart contracts, such as avoiding reentrancy attacks and ensuring that your contracts are not susceptible to overflow and underflow attacks. You should also thoroughly test your contracts before deploying them to the mainnet.
How can I update my DAO contract once it’s deployed?
Updating a deployed DAO contract can be tricky, as smart contracts on the Ethereum blockchain are immutable. However, you can design your contract in a way that allows for upgrades. This typically involves creating a new contract and transferring the state of the old contract to the new one.
How can I ensure that my Ethereum DApp is user-friendly?
Ensuring that your Ethereum DApp is user-friendly involves focusing on the user interface and user experience. The interface should be intuitive and easy to use. You should also provide clear instructions and feedback to the user. Additionally, you should consider the cost of transactions, as high gas fees can deter users.