
Building a WooCommerce payment extension is a straightforward process for the most part. The hardest problem that you’ll probably encounter is learning how to interact with the merchant’s API to submit a payment and parse the response back. In this article, we are going to build the real thing: a working WooCommerce payment extension. Then, we’ll even connect it to a real payment processor, which we are going to submit payments to and parse the response.

Key Takeaways
- Utilize the Direct method for building a WooCommerce payment extension to allow customers to stay on your site during checkout, enhancing user experience and security.
- Obtain a developer account from Authorize.Net to access sandbox features for safe testing and debugging of your payment gateway.
- Organize your plugin into separate files for better structure and maintainability, ensuring each component handles specific tasks efficiently.
- Implement robust error handling within the payment process to manage failures or issues with transaction processing smoothly.
- Ensure SSL is enforced on checkout pages to secure customer data and comply with PCI standards, enhancing trust and security.
- Customize the plugin settings to include necessary fields like API login and transaction key, and provide options for test mode to facilitate development and testing.
- Process payments effectively by handling card details securely and interfacing correctly with the payment gateway API for transaction completion.
The Different Flavors of WooCommerce Payment Gateways
There are four different types of WooCommerce payment gateways which we can build to process payments on your store. Let’s begin by taking a look at the one we are going to be using in this article; the Direct method.
-
Direct — this payment method allows the payment fields to be shown directly on the checkout page, and the payment happens as soon as the ‘Place Order’ button is pressed. This type of gateway requires you to install an SSL certificate on your site and might also require you to be PCI compliant. Being PCI compliant is something your Merchant evaluates for you. A good example of this type of gateway is the Authorize.net AIM, which we will use later on, when we build our WooCommerce payment extension.
-
Form Based — in this method, the user must click a button on a form and then is redirected to the actual payment process website. Payment is then captured there; think PayPal Standard.
-
iFrame Based — through this method, the entire gateway payment system is loaded for you inside an iFrame on your store, kind of how PayPal Advanced works.
-
Offline – last but not least, the offline method is where no online payments are made at all. Cheque or Bank Transfers are good examples of this type of payment.
Why Use the Direct Method
The direct method allows for a greater level of customization since the payment fields are handled by you and, most importantly, the customer never leaves your website. The customer will greatly enjoy this experience over the other three options.
Methods Used in This Article
Chances are there is more than one way of doing this and the results might be identical. Any suggestions on how you accomplish this task or further improvements are always welcome and received well. Just be polite and informative in your response.
The following code has been tested in the latest versions available for WordPress (4.0) and WooCommerce (2.2.2) and using the dummy data provided for WooCommerce when you install the plugin.
Obtaining an Authorize.Net Developer Account
If you don’t already have a developer/test account from Authorize.net, you’ll need one to fully complete and test this plugin. To obtain an Authorize.net developer/test or sandbox account (as they describe it), just go to their Developer Center and fill out the form.
The developer sandbox is a fully functioning Authorize.Net payment gateway supporting the current API methods. The sandbox functions like our production environment. However, there are two key differences:
-
No actual card processing is performed. The sandbox only simulates connections to the card networks, but no actual card payments are processed.
-
Developers can trigger specific error conditions and transaction responses to aid in testing.
Planning Our WooCommerce Payment Extension Plugin
In order to make this easier to read and follow, we are going to separate our plugin into two different files. One of the files will register our Payment Gateway and custom action link. The other will be a simple Class, which will contain the methods that are going to be responsible for creating the administration fields, handling the payment processing and field validation, and displaying an error message if you are not forcing SSL on the checkout page. Take a look below at our file structure:
woocommerce-authorizenet-aim-gateway (folder)

-- woocommerce-authorizenet-aim-gateway.php

-- woocommerce-authorizenet-aim.php
Building Our Plugin
Now that we have a clear understanding of how our plugin will be set-up and which files do what, we can begin by writing the bare-bones of our entire plugin; the basic code which we will expand on until the plugin is completed.
<?php

/*

Plugin Name: Authorize.net AIM - WooCommerce Gateway

Plugin URI: https://www.sitepoint.com/

Description: Extends WooCommerce by Adding the Authorize.net AIM Gateway.

Version: 1

Author: Yojance Rabelo, SitePoint

Author URI: https://www.sitepoint.com/

*/
// Include our Gateway Class and Register Payment Gateway with WooCommerce

add_action( 'plugins_loaded', 'spyr_authorizenet_aim_init', 0 );

function spyr_authorizenet_aim_init() {}
// Add custom action links

add_filter( 'plugin_action_links_' . plugin_basename( __FILE__ ), 'spyr_authorizenet_aim_action_links' );

function spyr_authorizenet_aim_action_links( $links ) {}
We can now see our plugin on the Plugins page but it doesn’t do anything yet. We are not ready to activate it just yet.

Let’s begin with the first file: include the PHP Class, register this new Payment Gateway with WooCommerce, and add your action links so that the customer can go to the settings page as soon as they activate the plugin.
<?php

/*

Plugin Name: Authorize.net AIM - WooCommerce Gateway

Plugin URI: https://www.sitepoint.com/

Description: Extends WooCommerce by Adding the Authorize.net AIM Gateway.

Version: 1.0

Author: Yojance Rabelo, SitePoint

Author URI: https://www.sitepoint.com/

*/
// Include our Gateway Class and register Payment Gateway with WooCommerce

add_action( 'plugins_loaded', 'spyr_authorizenet_aim_init', 0 );

function spyr_authorizenet_aim_init() {

	// If the parent WC_Payment_Gateway class doesn't exist

	// it means WooCommerce is not installed on the site

	// so do nothing

	if ( ! class_exists( 'WC_Payment_Gateway' ) ) return;
	// If we made it this far, then include our Gateway Class

	include_once( 'woocommerce-authorizenet-aim.php' );
	// Now that we have successfully included our class,

	// Lets add it too WooCommerce

	add_filter( 'woocommerce_payment_gateways', 'spyr_add_authorizenet_aim_gateway' );

	function spyr_add_authorizenet_aim_gateway( $methods ) {

		$methods[] = 'SPYR_AuthorizeNet_AIM';

		return $methods;

	}

}
// Add custom action links

add_filter( 'plugin_action_links_' . plugin_basename( __FILE__ ), 'spyr_authorizenet_aim_action_links' );

function spyr_authorizenet_aim_action_links( $links ) {

	$plugin_links = array(

		'<a href="' . admin_url( 'admin.php?page=wc-settings&tab=checkout' ) . '">' . __( 'Settings', 'spyr-authorizenet-aim' ) . '</a>',

	);
	// Merge our new link with the default ones

	return array_merge( $plugin_links, $links );

}
Note that the action links, in this case the ‘Settings’ link, will only show when the plugin has been activated. This will lead the customer to the WooCommerce checkout administration page. Let’s continue on so that we are one step closer to activating the plugin, and viewing at least some default fields.
Setting Up Our Class Constructor
Now that we are going to begin working on our actual Payment Class, we have to start by setting some default values for this Payment Gateway. Some of the settings we’ll define:
-
id — The global ID for this Payment method.
-
method_title — The Title shown on the top of the Payment Gateways Page next to all the other Payment Gateways.
-
method_description — The description for this Payment Gateway, shown on the actual Payment options page on the backend.
-
title — The title to be used for the vertical tabs that can be ordered from top to bottom.
-
icon — If you want to show an image next to the gateway’s name on the front-end. URL to an image.
-
has_fields — Bool. Can be set to ‘true’ if you want payment fields to show on the checkout if doing a direct integration, which we are doing in this case.
-
supports — Supports the default credit card form. More on this later on. At this stage, you just need to know that it is super cool.
Expressing this on our constructor is next, along with some other useful functions that we need in order to make everything work in harmony. Comments will help you understand the purpose, and why it’s there.
// Setup our Gateway's id, description and other values

function __construct() {
	// The global ID for this Payment method

	$this->id = "spyr_authorizenet_aim";
	// The Title shown on the top of the Payment Gateways Page next to all the other Payment Gateways

	$this->method_title = __( "Authorize.net AIM", 'spyr-authorizenet-aim' );
	// The description for this Payment Gateway, shown on the actual Payment options page on the backend

	$this->method_description = __( "Authorize.net AIM Payment Gateway Plug-in for WooCommerce", 'spyr-authorizenet-aim' );
	// The title to be used for the vertical tabs that can be ordered top to bottom

	$this->title = __( "Authorize.net AIM", 'spyr-authorizenet-aim' );
	// If you want to show an image next to the gateway's name on the frontend, enter a URL to an image.

	$this->icon = null;
	// Bool. Can be set to true if you want payment fields to show on the checkout

	// if doing a direct integration, which we are doing in this case

	$this->has_fields = true;
	// Supports the default credit card form

	$this->supports = array( 'default_credit_card_form' );
	// This basically defines your settings which are then loaded with init_settings()

	$this->init_form_fields();
	// After init_settings() is called, you can get the settings and load them into variables, e.g:

	// $this->title = $this->get_option( 'title' );

	$this->init_settings();
	// Turn these settings into variables we can use

	foreach ( $this->settings as $setting_key => $value ) {

		$this->$setting_key = $value;

	}
	// Lets check for SSL

	add_action( 'admin_notices', array( $this,	'do_ssl_check' ) );
	// Save settings

	if ( is_admin() ) {

		// Versions over 2.0

		// Save our administration options. Since we are not going to be doing anything special

		// we have not defined 'process_admin_options' in this class so the method in the parent

		// class will be used instead

		add_action( 'woocommerce_update_options_payment_gateways_' . $this->id, array( $this, 'process_admin_options' ) );

	}

} // End __construct()
Activate Your Plugin
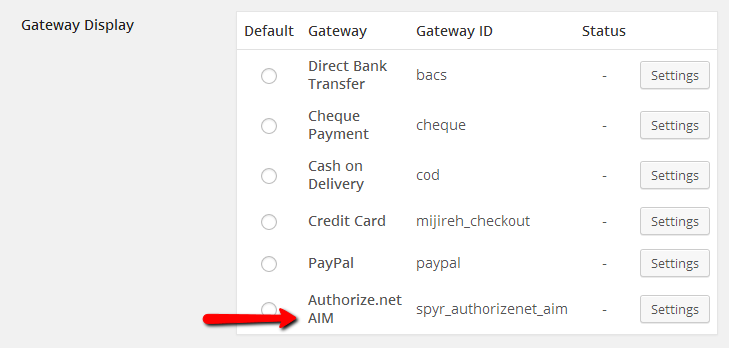
Go ahead and activate your plugin. Make sure that there are no errors thrown and click on the new ‘Settings’ link. This will take you to the Checkout administration options. You should now see your newly registered payment extension there.

Scroll to the bottom of the page and you’ll be able to see it there, too.
Building the Administration Page
In order to build the administration page, we need to know what fields are required by WooCommerce itself, and what fields are required by the payment processor’s API. In our case, since we are using the Authorize.net AIM, we just need the Authorize.net API login and Transaction Key.
Since we are using our testing account to build the plugin, it’s also a good idea to include an option to set the Gateway in test mode. Regardless of what you are doing, providing a way to easily turn the Gateway into test mode is very useful, and you should consider making it a requirement when you build your gateway. Most gateways will provide you with two different links to which you can send the transactions: one for testing purposes, and the other for a production environment.
After some brainstorming, this is what I came up with for the fields that we are going to include in our administration page:
-
enabled — Enable/Disable this payment gateway.
-
title — Payment title that the customer will see during the checkout process.
-
description — Payment description that the customer will see during the checkout process.
-
api_login — API Login provided by Authorize.net when you signed up for an account.
-
trans_key — Transaction Key provided by Authorize.net when you signed up for an account.
-
environment — Place the payment gateway in test mode or production.
Let’s turn these into code that WooCommerce understands, and will parse into options which will be rendered on the back-end. This is where init_form_fields() comes into play.
// Build the administration fields for this specific Gateway

public function init_form_fields() {

	$this->form_fields = array(

		'enabled' => array(

			'title'		=> __( 'Enable / Disable', 'spyr-authorizenet-aim' ),

			'label'		=> __( 'Enable this payment gateway', 'spyr-authorizenet-aim' ),

			'type'		=> 'checkbox',

			'default'	=> 'no',

		),

		'title' => array(

			'title'		=> __( 'Title', 'spyr-authorizenet-aim' ),

			'type'		=> 'text',

			'desc_tip'	=> __( 'Payment title the customer will see during the checkout process.', 'spyr-authorizenet-aim' ),

			'default'	=> __( 'Credit card', 'spyr-authorizenet-aim' ),

		),

		'description' => array(

			'title'		=> __( 'Description', 'spyr-authorizenet-aim' ),

			'type'		=> 'textarea',

			'desc_tip'	=> __( 'Payment description the customer will see during the checkout process.', 'spyr-authorizenet-aim' ),

			'default'	=> __( 'Pay securely using your credit card.', 'spyr-authorizenet-aim' ),

			'css'		=> 'max-width:350px;'

		),

		'api_login' => array(

			'title'		=> __( 'Authorize.net API Login', 'spyr-authorizenet-aim' ),

			'type'		=> 'text',

			'desc_tip'	=> __( 'This is the API Login provided by Authorize.net when you signed up for an account.', 'spyr-authorizenet-aim' ),

		),

		'trans_key' => array(

			'title'		=> __( 'Authorize.net Transaction Key', 'spyr-authorizenet-aim' ),

			'type'		=> 'password',

			'desc_tip'	=> __( 'This is the Transaction Key provided by Authorize.net when you signed up for an account.', 'spyr-authorizenet-aim' ),

		),

		'environment' => array(

			'title'		=> __( 'Authorize.net Test Mode', 'spyr-authorizenet-aim' ),

			'label'		=> __( 'Enable Test Mode', 'spyr-authorizenet-aim' ),

			'type'		=> 'checkbox',

			'description' => __( 'Place the payment gateway in test mode.', 'spyr-authorizenet-aim' ),

			'default'	=> 'no',

		)

	);

}
If you visit the Authorize.net AIM administration page now, your fields will display using the native WooCommerce template system for display administration options.
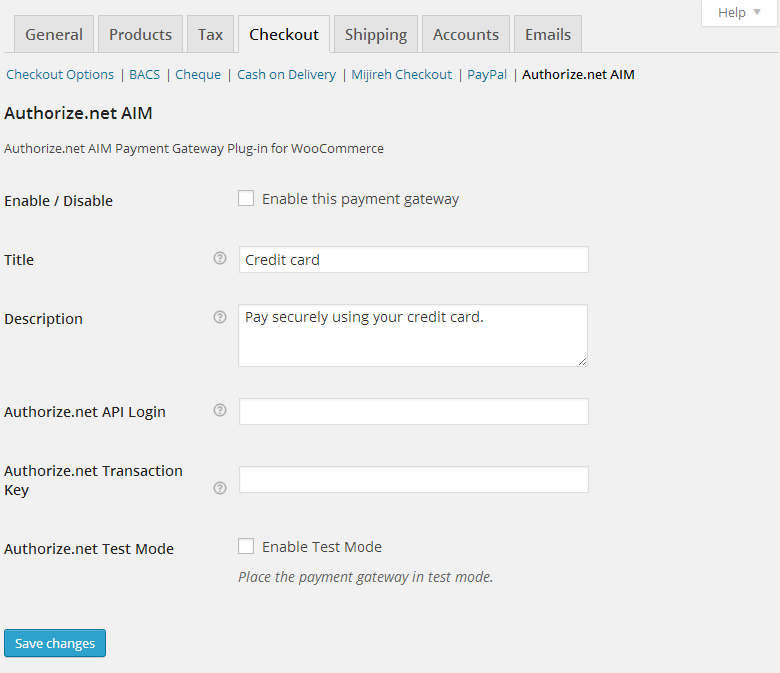
Fill Out The Administration Options
Go ahead and fill out the administration option with your credentials. Don’t forget to set the gateway to Test mode so that we can work safely and test all of our code as we go. Press that ‘Save Changes’ button before proceeding.
Processing Payments
The payment processing is done via process_payment($order_id ). It is important to point out that it gets the current order passed to it so we can get the values we need. The credit card fields can be obtained from $_POST.
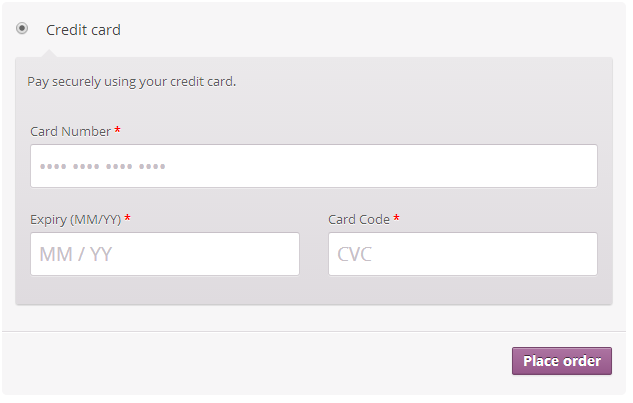
Many gateway plugins, including ours, use a similar interface for card payment fields in the checkout form so WooCommerce added a form for us to use when needed. This default form has automatic formatting for credit card numbers, expiration dates and it even displays automatically the type of card being used as soon as the customer enters the first few digits of their credit card number. To be able to use this form, make sure your site is running with at least version 2.1 of WooCommerce.
By default, the form will create the following form fields which can be obtained from $_POST:
-
GATEWAYID-card-number
-
GATEWAYID-card-cvc
-
GATEWAYID-card-expiry
Here is an example of how the default form looks without any custom CSS.
Now that we know this, we can proceed to the next step and build the process_payment() function to handle the transaction.
// Submit payment and handle response

public function process_payment( $order_id ) {

	global $woocommerce;
	// Get this Order's information so that we know

	// who to charge and how much

	$customer_order = new WC_Order( $order_id );
	// Are we testing right now or is it a real transaction

	$environment = ( $this->environment == "yes" ) ? 'TRUE' : 'FALSE';
	// Decide which URL to post to

	$environment_url = ( "FALSE" == $environment )

					   ? 'https://secure.authorize.net/gateway/transact.dll'

					   : 'https://test.authorize.net/gateway/transact.dll';
	// This is where the fun stuff begins

	$payload = array(

		// Authorize.net Credentials and API Info

		"x_tran_key"           	=> $this->trans_key,

		"x_login"              	=> $this->api_login,

		"x_version"            	=> "3.1",
		// Order total

		"x_amount"             	=> $customer_order->order_total,
		// Credit Card Information

		"x_card_num"           	=> str_replace( array(' ', '-' ), '', $_POST['spyr_authorizenet_aim-card-number'] ),

		"x_card_code"          	=> ( isset( $_POST['spyr_authorizenet_aim-card-cvc'] ) ) ? $_POST['spyr_authorizenet_aim-card-cvc'] : '',

		"x_exp_date"           	=> str_replace( array( '/', ' '), '', $_POST['spyr_authorizenet_aim-card-expiry'] ),
		"x_type"               	=> 'AUTH_CAPTURE',

		"x_invoice_num"        	=> str_replace( "#", "", $customer_order->get_order_number() ),

		"x_test_request"       	=> $environment,

		"x_delim_char"         	=> '|',

		"x_encap_char"         	=> '',

		"x_delim_data"         	=> "TRUE",

		"x_relay_response"     	=> "FALSE",

		"x_method"             	=> "CC",
		// Billing Information

		"x_first_name"         	=> $customer_order->billing_first_name,

		"x_last_name"          	=> $customer_order->billing_last_name,

		"x_address"            	=> $customer_order->billing_address_1,

		"x_city"              	=> $customer_order->billing_city,

		"x_state"              	=> $customer_order->billing_state,

		"x_zip"                	=> $customer_order->billing_postcode,

		"x_country"            	=> $customer_order->billing_country,

		"x_phone"              	=> $customer_order->billing_phone,

		"x_email"              	=> $customer_order->billing_email,
		// Shipping Information

		"x_ship_to_first_name" 	=> $customer_order->shipping_first_name,

		"x_ship_to_last_name"  	=> $customer_order->shipping_last_name,

		"x_ship_to_company"    	=> $customer_order->shipping_company,

		"x_ship_to_address"    	=> $customer_order->shipping_address_1,

		"x_ship_to_city"       	=> $customer_order->shipping_city,

		"x_ship_to_country"    	=> $customer_order->shipping_country,

		"x_ship_to_state"      	=> $customer_order->shipping_state,

		"x_ship_to_zip"        	=> $customer_order->shipping_postcode,
		// Some Customer Information

		"x_cust_id"            	=> $customer_order->user_id,

		"x_customer_ip"        	=> $_SERVER['REMOTE_ADDR'],
	);
	// Send this payload to Authorize.net for processing

	$response = wp_remote_post( $environment_url, array(

		'method'    => 'POST',

		'body'      => http_build_query( $payload ),

		'timeout'   => 90,

		'sslverify' => false,

	) );
	if ( is_wp_error( $response ) )

		throw new Exception( __( 'We are currently experiencing problems trying to connect to this payment gateway. Sorry for the inconvenience.', 'spyr-authorizenet-aim' ) );
	if ( empty( $response['body'] ) )

		throw new Exception( __( 'Authorize.net\'s Response was empty.', 'spyr-authorizenet-aim' ) );
	// Retrieve the body's resopnse if no errors found

	$response_body = wp_remote_retrieve_body( $response );
	// Parse the response into something we can read

	foreach ( preg_split( "/\r?\n/", $response_body ) as $line ) {

		$resp = explode( "|", $line );

	}
	// Get the values we need

	$r['response_code']             = $resp[0];

	$r['response_sub_code']         = $resp[1];

	$r['response_reason_code']      = $resp[2];

	$r['response_reason_text']      = $resp[3];
	// Test the code to know if the transaction went through or not.

	// 1 or 4 means the transaction was a success

	if ( ( $r['response_code'] == 1 ) || ( $r['response_code'] == 4 ) ) {

		// Payment has been successful

		$customer_order->add_order_note( __( 'Authorize.net payment completed.', 'spyr-authorizenet-aim' ) );
		// Mark order as Paid

		$customer_order->payment_complete();
		// Empty the cart (Very important step)

		$woocommerce->cart->empty_cart();
		// Redirect to thank you page

		return array(

			'result'   => 'success',

			'redirect' => $this->get_return_url( $customer_order ),

		);

	} else {

		// Transaction was not succesful

		// Add notice to the cart

		wc_add_notice( $r['response_reason_text'], 'error' );

		// Add note to the order for your reference

		$customer_order->add_order_note( 'Error: '. $r['response_reason_text'] );

	}
}
Let’s break down the code even more so that it’s easier to understand.
Lines 5-15
We assign $customer_order a new WC_Order holding all the information from the order for which we are about to process payment. Then we decide whether or not we are in test mode, and finally chose the right URL for the transaction.
Lines 18-66
These are arbitrary fields that we can send Authorize.net so that they can record this information. We build it into an array so that we can build a proper query using http_build_query() later on.
Lines 69-74
Since we are using WordPress, we can utilize all the HTTP API to interact with other sites and, in this case, POST our payload for processing on Authorize.net. Follow this link for more on the HTTP API and wp_remote_post().
Lines 76-80
Two important checks happen here. First we make sure WordPress didn’t encounter any errors while POSTing our payload and secondly; we make sure that we got a response back. At any point, we throw an exception error letting the customer know if there is something wrong with the transaction. Take a look below at an example of one of these errors:

Lines 83-94
If we’ve made it this far without any errors, then we can retrieve the response’s body and parse it into something we can read. The first four values in the response are the only ones we need. We add these four values to an array for easier testing and also to make it much simpler to read.
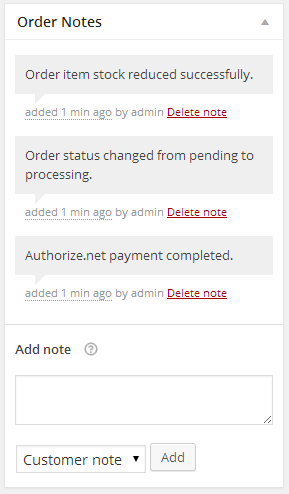
Lines 98-112
Test the response_code value. Codes 1 or 4 mean that the transaction has been approved. In the event that the transaction is approved, we add a friendly order note for your reference, mark the order as paid, empty the cart’s contents, and finally redirect the customer to the ‘Thank You’ page. If you are curious about seeing how the order notes look after doing these four steps, take a look below:
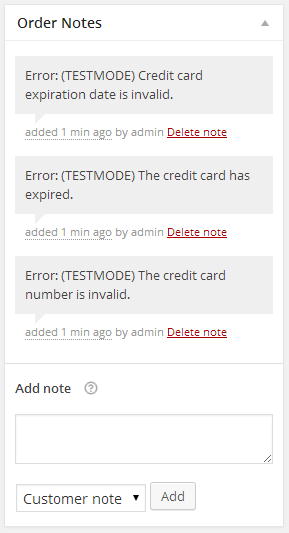
Lines 114-118
In case that the transaction is not successful, we display an error notice to the customer and update the order with the error received from Authorize.net. Here is an example of the order notes on the back-end after the customer has tried a couple of times to complete the transaction without success.
That’s it for the payment processing.
Validate Submitted Fields
We are not doing any kind of field validation since we are relying on the default credit card form. Try to enter letters or symbols in any field and you’ll see it’s just not possible. In some cases, I can see how this would be extremely useful, for example; for validating expiration dates which would have to be in a specific format other than the standard we are mostly accustomed to seeing.
For the sake of simplicity in this article, we are just going to return ‘true’ and bypass the field validation.
// Validate fields

public function validate_fields() {

	return true;

}
Do Checkout Pages Use SSL?
Part of being able to provide a seamless checkout experience to the customer and allowing them to checkout on your own site requires the use of an SSL certificate. WooCommerce allows you to quickly enforce the use of SSL only on checkout pages by checking the ‘Force secure checkout’ under WooCommerce -> Settings -> Checkout.
We are just going to check whether or not this has been checked. If it has not been checked, then we are going to display an error on the back-end, warning you that an SSL is required.
// Check if we are forcing SSL on checkout pages

// Custom function not required by the Gateway

public function do_ssl_check() {

	if( $this->enabled == "yes" ) {

		if( get_option( 'woocommerce_force_ssl_checkout' ) == "no" ) {

			echo "<div class=\"error\"><p>". sprintf( __( "<strong>%s</strong> is enabled and WooCommerce is not forcing the SSL certificate on your checkout page. Please ensure that you have a valid SSL certificate and that you are <a href=\"%s\">forcing the checkout pages to be secured.</a>" ), $this->method_title, admin_url( 'admin.php?page=wc-settings&tab=checkout' ) ) ."</p></div>";

		}

	}

}
Assuming that we are not forcing a secure checkout, this message is displayed in the back-end.

If you have made it this far, give yourself a pat on the back: you’ve just built a WooCommerce Payment Gateway by following this guide.
What’s Next?
Challenge yourself. Try to create another payment gateway by following this article and applying the same techniques to your plugin. If I have to make a recommendation, I would recommend trying to build your own extension for Simplify Commerce. This is now bundled into WooCommerce so don’t be afraid to take a peek at that code.
Simplify Commerce has a great API, SDKs for your to use, and is very well documented. Also, signing up for a test account takes just minutes and you can be on your way to writing your next plugin in a heart beat.
Conclusion
As you can see, writing the WooCommerce payment extension was not as hard as you thought it would be. With a little practice, you can write a new one in a matter of hours, just remember to do a lot of testing before you release it to the public, or use it on any production environment. Develop with WP_DEBUG set to true so you can get extra feedback when needed.
The Plugin Code
Below you’ll find the sample code used in this article it the complete form. Please comment below if you have any questions or comments.
WooCommerce Authorize.net AIM
<?php

/* Authorize.net AIM Payment Gateway Class */

class SPYR_AuthorizeNet_AIM extends WC_Payment_Gateway {
	// Setup our Gateway's id, description and other values

	function __construct() {
		// The global ID for this Payment method

		$this->id = "spyr_authorizenet_aim";
		// The Title shown on the top of the Payment Gateways Page next to all the other Payment Gateways

		$this->method_title = __( "Authorize.net AIM", 'spyr-authorizenet-aim' );
		// The description for this Payment Gateway, shown on the actual Payment options page on the backend

		$this->method_description = __( "Authorize.net AIM Payment Gateway Plug-in for WooCommerce", 'spyr-authorizenet-aim' );
		// The title to be used for the vertical tabs that can be ordered top to bottom

		$this->title = __( "Authorize.net AIM", 'spyr-authorizenet-aim' );
		// If you want to show an image next to the gateway's name on the frontend, enter a URL to an image.

		$this->icon = null;
		// Bool. Can be set to true if you want payment fields to show on the checkout

		// if doing a direct integration, which we are doing in this case

		$this->has_fields = true;
		// Supports the default credit card form

		$this->supports = array( 'default_credit_card_form' );
		// This basically defines your settings which are then loaded with init_settings()

		$this->init_form_fields();
		// After init_settings() is called, you can get the settings and load them into variables, e.g:

		// $this->title = $this->get_option( 'title' );

		$this->init_settings();
		// Turn these settings into variables we can use

		foreach ( $this->settings as $setting_key => $value ) {

			$this->$setting_key = $value;

		}
		// Lets check for SSL

		add_action( 'admin_notices', array( $this,	'do_ssl_check' ) );
		// Save settings

		if ( is_admin() ) {

			// Versions over 2.0

			// Save our administration options. Since we are not going to be doing anything special

			// we have not defined 'process_admin_options' in this class so the method in the parent

			// class will be used instead

			add_action( 'woocommerce_update_options_payment_gateways_' . $this->id, array( $this, 'process_admin_options' ) );

		}

	} // End __construct()
	// Build the administration fields for this specific Gateway

	public function init_form_fields() {

		$this->form_fields = array(

			'enabled' => array(

				'title'		=> __( 'Enable / Disable', 'spyr-authorizenet-aim' ),

				'label'		=> __( 'Enable this payment gateway', 'spyr-authorizenet-aim' ),

				'type'		=> 'checkbox',

				'default'	=> 'no',

			),

			'title' => array(

				'title'		=> __( 'Title', 'spyr-authorizenet-aim' ),

				'type'		=> 'text',

				'desc_tip'	=> __( 'Payment title the customer will see during the checkout process.', 'spyr-authorizenet-aim' ),

				'default'	=> __( 'Credit card', 'spyr-authorizenet-aim' ),

			),

			'description' => array(

				'title'		=> __( 'Description', 'spyr-authorizenet-aim' ),

				'type'		=> 'textarea',

				'desc_tip'	=> __( 'Payment description the customer will see during the checkout process.', 'spyr-authorizenet-aim' ),

				'default'	=> __( 'Pay securely using your credit card.', 'spyr-authorizenet-aim' ),

				'css'		=> 'max-width:350px;'

			),

			'api_login' => array(

				'title'		=> __( 'Authorize.net API Login', 'spyr-authorizenet-aim' ),

				'type'		=> 'text',

				'desc_tip'	=> __( 'This is the API Login provided by Authorize.net when you signed up for an account.', 'spyr-authorizenet-aim' ),

			),

			'trans_key' => array(

				'title'		=> __( 'Authorize.net Transaction Key', 'spyr-authorizenet-aim' ),

				'type'		=> 'password',

				'desc_tip'	=> __( 'This is the Transaction Key provided by Authorize.net when you signed up for an account.', 'spyr-authorizenet-aim' ),

			),

			'environment' => array(

				'title'		=> __( 'Authorize.net Test Mode', 'spyr-authorizenet-aim' ),

				'label'		=> __( 'Enable Test Mode', 'spyr-authorizenet-aim' ),

				'type'		=> 'checkbox',

				'description' => __( 'Place the payment gateway in test mode.', 'spyr-authorizenet-aim' ),

				'default'	=> 'no',

			)

		);

	}
	// Submit payment and handle response

	public function process_payment( $order_id ) {

		global $woocommerce;
		// Get this Order's information so that we know

		// who to charge and how much

		$customer_order = new WC_Order( $order_id );
		// Are we testing right now or is it a real transaction

		$environment = ( $this->environment == "yes" ) ? 'TRUE' : 'FALSE';
		// Decide which URL to post to

		$environment_url = ( "FALSE" == $environment )

						   ? 'https://secure.authorize.net/gateway/transact.dll'

						   : 'https://test.authorize.net/gateway/transact.dll';
		// This is where the fun stuff begins

		$payload = array(

			// Authorize.net Credentials and API Info

			"x_tran_key"           	=> $this->trans_key,

			"x_login"              	=> $this->api_login,

			"x_version"            	=> "3.1",
			// Order total

			"x_amount"             	=> $customer_order->order_total,
			// Credit Card Information

			"x_card_num"           	=> str_replace( array(' ', '-' ), '', $_POST['spyr_authorizenet_aim-card-number'] ),

			"x_card_code"          	=> ( isset( $_POST['spyr_authorizenet_aim-card-cvc'] ) ) ? $_POST['spyr_authorizenet_aim-card-cvc'] : '',

			"x_exp_date"           	=> str_replace( array( '/', ' '), '', $_POST['spyr_authorizenet_aim-card-expiry'] ),
			"x_type"               	=> 'AUTH_CAPTURE',

			"x_invoice_num"        	=> str_replace( "#", "", $customer_order->get_order_number() ),

			"x_test_request"       	=> $environment,

			"x_delim_char"         	=> '|',

			"x_encap_char"         	=> '',

			"x_delim_data"         	=> "TRUE",

			"x_relay_response"     	=> "FALSE",

			"x_method"             	=> "CC",
			// Billing Information

			"x_first_name"         	=> $customer_order->billing_first_name,

			"x_last_name"          	=> $customer_order->billing_last_name,

			"x_address"            	=> $customer_order->billing_address_1,

			"x_city"              	=> $customer_order->billing_city,

			"x_state"              	=> $customer_order->billing_state,

			"x_zip"                	=> $customer_order->billing_postcode,

			"x_country"            	=> $customer_order->billing_country,

			"x_phone"              	=> $customer_order->billing_phone,

			"x_email"              	=> $customer_order->billing_email,
			// Shipping Information

			"x_ship_to_first_name" 	=> $customer_order->shipping_first_name,

			"x_ship_to_last_name"  	=> $customer_order->shipping_last_name,

			"x_ship_to_company"    	=> $customer_order->shipping_company,

			"x_ship_to_address"    	=> $customer_order->shipping_address_1,

			"x_ship_to_city"       	=> $customer_order->shipping_city,

			"x_ship_to_country"    	=> $customer_order->shipping_country,

			"x_ship_to_state"      	=> $customer_order->shipping_state,

			"x_ship_to_zip"        	=> $customer_order->shipping_postcode,
			// Some Customer Information

			"x_cust_id"            	=> $customer_order->user_id,

			"x_customer_ip"        	=> $_SERVER['REMOTE_ADDR'],
		);
		// Send this payload to Authorize.net for processing

		$response = wp_remote_post( $environment_url, array(

			'method'    => 'POST',

			'body'      => http_build_query( $payload ),

			'timeout'   => 90,

			'sslverify' => false,

		) );
		if ( is_wp_error( $response ) )

			throw new Exception( __( 'We are currently experiencing problems trying to connect to this payment gateway. Sorry for the inconvenience.', 'spyr-authorizenet-aim' ) );
		if ( empty( $response['body'] ) )

			throw new Exception( __( 'Authorize.net\'s Response was empty.', 'spyr-authorizenet-aim' ) );
		// Retrieve the body's resopnse if no errors found

		$response_body = wp_remote_retrieve_body( $response );
		// Parse the response into something we can read

		foreach ( preg_split( "/\r?\n/", $response_body ) as $line ) {

			$resp = explode( "|", $line );

		}
		// Get the values we need

		$r['response_code']             = $resp[0];

		$r['response_sub_code']         = $resp[1];

		$r['response_reason_code']      = $resp[2];

		$r['response_reason_text']      = $resp[3];
		// Test the code to know if the transaction went through or not.

		// 1 or 4 means the transaction was a success

		if ( ( $r['response_code'] == 1 ) || ( $r['response_code'] == 4 ) ) {

			// Payment has been successful

			$customer_order->add_order_note( __( 'Authorize.net payment completed.', 'spyr-authorizenet-aim' ) );
			// Mark order as Paid

			$customer_order->payment_complete();
			// Empty the cart (Very important step)

			$woocommerce->cart->empty_cart();
			// Redirect to thank you page

			return array(

				'result'   => 'success',

				'redirect' => $this->get_return_url( $customer_order ),

			);

		} else {

			// Transaction was not succesful

			// Add notice to the cart

			wc_add_notice( $r['response_reason_text'], 'error' );

			// Add note to the order for your reference

			$customer_order->add_order_note( 'Error: '. $r['response_reason_text'] );

		}
	}
	// Validate fields

	public function validate_fields() {

		return true;

	}
	// Check if we are forcing SSL on checkout pages

	// Custom function not required by the Gateway

	public function do_ssl_check() {

		if( $this->enabled == "yes" ) {

			if( get_option( 'woocommerce_force_ssl_checkout' ) == "no" ) {

				echo "<div class=\"error\"><p>". sprintf( __( "<strong>%s</strong> is enabled and WooCommerce is not forcing the SSL certificate on your checkout page. Please ensure that you have a valid SSL certificate and that you are <a href=\"%s\">forcing the checkout pages to be secured.</a>" ), $this->method_title, admin_url( 'admin.php?page=wc-settings&tab=checkout' ) ) ."</p></div>";

			}

		}

	}
} // End of SPYR_AuthorizeNet_AIM
WooCommerce Authorize.net AIM Gateway
<?php

/*

Plugin Name: Authorize.net AIM - WooCommerce Gateway

Plugin URI: https://www.sitepoint.com/

Description: Extends WooCommerce by Adding the Authorize.net AIM Gateway.

Version: 1.0

Author: Yojance Rabelo, SitePoint

Author URI: https://www.sitepoint.com/

*/
// Include our Gateway Class and register Payment Gateway with WooCommerce

add_action( 'plugins_loaded', 'spyr_authorizenet_aim_init', 0 );

function spyr_authorizenet_aim_init() {

	// If the parent WC_Payment_Gateway class doesn't exist

	// it means WooCommerce is not installed on the site

	// so do nothing

	if ( ! class_exists( 'WC_Payment_Gateway' ) ) return;
	// If we made it this far, then include our Gateway Class

	include_once( 'woocommerce-authorizenet-aim.php' );
	// Now that we have successfully included our class,

	// Lets add it too WooCommerce

	add_filter( 'woocommerce_payment_gateways', 'spyr_add_authorizenet_aim_gateway' );

	function spyr_add_authorizenet_aim_gateway( $methods ) {

		$methods[] = 'SPYR_AuthorizeNet_AIM';

		return $methods;

	}

}
// Add custom action links

add_filter( 'plugin_action_links_' . plugin_basename( __FILE__ ), 'spyr_authorizenet_aim_action_links' );

function spyr_authorizenet_aim_action_links( $links ) {

	$plugin_links = array(

		'<a href="' . admin_url( 'admin.php?page=wc-settings&tab=checkout' ) . '">' . __( 'Settings', 'spyr-authorizenet-aim' ) . '</a>',

	);
	// Merge our new link with the default ones

	return array_merge( $plugin_links, $links );

}
Frequently Asked Questions (FAQs) on Building a WooCommerce Payment Extension
What is a WooCommerce Payment Extension?
A WooCommerce Payment Extension is a plugin that integrates with your WooCommerce store to facilitate the processing of online payments. It allows your customers to pay for their purchases using various payment methods such as credit cards, debit cards, digital wallets, bank transfers, and more. These extensions are designed to provide a seamless checkout experience, ensuring customer satisfaction and increased sales conversions.
How do I choose the right WooCommerce Payment Extension for my online store?
Choosing the right WooCommerce Payment Extension depends on several factors. Firstly, consider the payment methods your target customers prefer. Some customers may prefer paying with credit cards, while others may prefer digital wallets or bank transfers. Secondly, consider the transaction fees charged by the payment gateway. Some gateways may charge a flat fee per transaction, while others may charge a percentage of the transaction amount. Lastly, consider the security features of the payment gateway. It should comply with PCI DSS standards and offer fraud protection measures.
How do I install a WooCommerce Payment Extension?
Installing a WooCommerce Payment Extension is a straightforward process. From your WordPress dashboard, navigate to ‘Plugins’ and click on ‘Add New’. In the search bar, type the name of the payment extension you want to install. Click on ‘Install Now’ and then ‘Activate’. You can then configure the extension settings from the WooCommerce settings page.
Can I use multiple WooCommerce Payment Extensions on my online store?
Yes, you can use multiple WooCommerce Payment Extensions on your online store. This allows your customers to choose their preferred payment method, enhancing their shopping experience. However, it’s important to ensure that all your payment extensions are compatible with each other to avoid any technical issues.
How do I troubleshoot issues with my WooCommerce Payment Extension?
If you’re experiencing issues with your WooCommerce Payment Extension, start by checking the extension settings. Ensure that all the details are correctly entered and that the extension is properly configured. If the problem persists, try deactivating and reactivating the extension. If the issue still remains, contact the extension developer or WooCommerce support for assistance.
How do I update my WooCommerce Payment Extension?
Updating your WooCommerce Payment Extension is crucial to ensure its smooth functioning and security. You can update the extension from your WordPress dashboard. Navigate to ‘Plugins’, find the extension you want to update, and click on ‘Update Now’. Always backup your website before updating any plugins to prevent data loss.
How secure are WooCommerce Payment Extensions?
WooCommerce Payment Extensions are designed with security in mind. They comply with PCI DSS standards and use secure encryption methods to protect sensitive customer data. However, the level of security may vary between different extensions. Always choose a reputable extension with strong security features.
Can I customize my WooCommerce Payment Extension?
Yes, many WooCommerce Payment Extensions offer customization options. You can customize the checkout process, payment methods, and more to match your brand and provide a unique shopping experience for your customers. However, extensive customization may require coding knowledge or the help of a developer.
Do WooCommerce Payment Extensions support international payments?
Yes, many WooCommerce Payment Extensions support international payments. They allow your customers to pay in their local currency and accept payments from various countries. However, it’s important to check the specific features of the extension as not all extensions may support all currencies or countries.
What happens if my WooCommerce Payment Extension stops working?
If your WooCommerce Payment Extension stops working, it can disrupt your online sales. Start by troubleshooting the issue as mentioned in Question 5. If you can’t resolve the issue, contact the extension developer or WooCommerce support immediately. It’s also a good idea to have a backup payment extension in place to prevent sales loss.