

Have you ever wondered what it’s like to build web applications without the need to write a single line of code? Enter Bubble, a no-code, visual programming language that lets you build web applications using a drag-and-drop editor.
In this article, I’ll be introducing you to Bubble. You’ll learn what it is, what features it offers, and what sort of web applications you can build with it. Then we’ll compare its no-code programming approach to traditional web application development and examine the pros and cons of using Bubble. Lastly, we’ll build an app using Bubble so you can get a feel for how to build stuff with it.
Key Takeaways
- Bubble is a versatile no-code platform that enables both coders and non-coders to create web applications using a drag-and-drop interface, without writing code.
- Key features of Bubble include a UI builder, hosting platform, plugin integration, and support for real-time collaboration with up to 40 team members.
- Users can build a variety of web applications on Bubble, such as CRUD apps, real-time apps, API-connected apps, responsive apps, and progressive web apps, but cannot create native mobile apps or complex games.
- Compared to traditional web development, Bubble offers faster development with lower initial costs, though it requires learning its specific tools and may incur higher running costs depending on the application’s needs.
- Bubble handles hosting and scaling but limits users from hosting applications on their servers; it also ensures data exportability and plans to release source code under open-source licenses if it ever goes out of business.
- The platform’s development environment supports building, testing, and version control, enabling users to revert to any version of their application and scale as needed.
- Bubble is particularly suited for building MVPs and simpler applications quickly, though more complex applications might still benefit from traditional development approaches for greater customization and control.
What is Bubble?
Bubble is both a no-code visual programming tool and a platform. You build the application using a drag-and-drop interface in the browser, and then Bubble acts as the platform that serves your application. This means that everything you need to build a web application is in your web browser. Bubble takes care of all the setup and provisioning required to run a web application.
Bubble is geared towards both coders and non-coders alike. But it mostly appeals to non-coders who want to build no-code web applications without knowing the traditional tools of trade.
Bubble Features
Bubble is packed with lots of features. We can’t cover all of them here, but we’ll try to cover the most important ones.
-
UI Builder. With Bubble’s UI builder, you can drag and drop visual elements such as text, images, icons, maps, videos and other common UI elements into its canvas. Web apps created with Bubble incorporate responsive design and can be easily localized to any language.
-
Hosting platform. After you build the app using the drag-and-drop UI builder, Bubble takes care of deploying and hosting the app for you. It also has a version control system that allows you to revert your application to any point in time. Bubble also allows you to easily scale the app as the need arises. You’l know when it’s time to upgrade, because Bubble has graphs on the server metrics such as page views and server capacity usage. The only downside to Bubble being a platform is that you can’t host the app you built with Bubble on your own server.
-
Plugins. With plugins, you can integrate functionality from various tools around the Web into your web application. For example, if you want your users to log in with their Facebook account, you can do so with the Facebook plugin.
-
Realtime collaboration. Bubble is team-friendly. It allows up to 40 collaborators.
We’ll only be covering the UI builder in this article.
What You Can Build with Bubble
Due to its flexibility, you can build any type of web application with Bubble.
-
CRUD apps. These are apps that let users create, read, update, and delete data. Most apps today are really just CRUD apps with different features added to it. So with the ability to build CRUD apps, you can already build all kinds of functionality. Think Amazon or YouTube. At their core, they’re really just CRUD apps.
-
Realtime apps. These are apps that let users communicate or collaborate in real time, either via chat, audio, video call, or a shared interface. Examples of these apps include Messenger, Discord, and Slack.
-
API-connected app. The idea that “no man is an island” applies to apps as well. With Bubble, you can build apps that make use of third-party APIs all around the Internet. Think Stripe for handling payments, or Algolia for handling search. The possibilities are endless with API access. Through an API, you can provide any type of functionality that’s not already provided by Bubble. It also goes the other way around: the apps you create using Bubble can also expose an API that can be used by others.
-
Responsive apps. These are apps that look good no matter what device you’re viewing them on. With Bubble, you get this for free, as the apps you build with it are already responsive.
-
Progressive web apps. These are web apps that can be added to your home screen for easy access. They won’t have access to native functionality that’s available to native Android or iOS apps, but they can be accessed from the home screen and they can work offline. So it’s the closest thing you can get to a native app.
If you want to see live examples of apps that you can build with Bubble, check out Bubble’s showcase page. You can also check out it’s how to build page to see a tutorial on how to build apps like Instagram, Dropbox, or TripAdvisor. Do note that these aren’t super detailed tutorials; they’re just general ones to give you an idea of the general steps for building those kinds of apps. You’ll still need some level of proficiency in using Bubble to be able to build those apps.
What Can’t be Built with Bubble
-
Native apps. At the time of writing this article, Bubble doesn’t support building native apps that run on Android or iOS. Bubble says in its documentation that there’s a plan to add this feature to the core functionality, but it’s not on Bubble’s timeline yet. So we don’t really know when it will become available. For now, the only feasible option is to either create a progressive web app or wrap the web app in a web view using tools like React Native, Flutter, or Cordova.
-
Games. If you’re planning to build games and other apps with complex graphics requirements with Bubble, you’re out of luck. Bubble is specifically made for creating web apps. You can probably get away with creating simple puzzle games, but that’s it.
Bubble’s No-code Programming vs Traditional Web Application Development
In this section, we’ll look at how Bubble compares to the traditional way of developing web applications, based on these metrics:
- control over code and data
- development speed
- development cost
- running costs
Control over code and data
Bubble has a data export feature that allows you to export user-created data via CSV files. The only downside is that everything runs on Bubble’s platform, so you can’t really export your app and run it somewhere else. Bubble has guaranteed to release the source code of your app under an open-source license in case it goes out of business.
With traditional web development, you have control over everything, since the source code is written from scratch and it’s hosted on a server of your choice.
Development speed
Bubble comes with all the tools you need to build a web application via a drag-and-drop interface. This makes the development process faster than traditional web development. That said, it also comes with a learning curve that’s dependent on the thing you want to build. If it’s a simple one-page app that only does one or two things, it’s probably going to take a few hours to learn. But if it’s a fairly complex app, expect to invest one to three months before you can become productive enough to build the app quickly.
With traditional web development, it can take at least three months to learn the technologies and tools. But it can easily take six months to a year depending on various factors. Once that’s done, however, you can expect to be productive with building most apps.
Overall, the development speed will mostly depend on your level of experience. If you’re a complete novice, Bubble will be faster. If you already have some development experience, it’s usually faster to just build your app via the traditional route. Yes, your development experience will probably help with a lot of the concepts in building apps with Bubble. But the learning curve for building fairly complex apps will still be great.
Development cost
With Bubble, you can pretty much build the app yourself, even if you have no prior experience. Bubble provides lots of free resources for learning how to build different kinds of apps. Of course, you can hire other people to do it for you. But the main premise of Bubble (and other no-code platforms in general) is for lowering the development costs by doing the development yourself.
With traditional web development, you’ll most likely have to hire a web developer to build the app for you, due to the steep learning curve involved.
Overall, the associated development costs when developing your app with Bubble is significantly lowered compared to traditional development.
Running costs
Bubble starts with a free plan. This allows you to learn the platform and build an app with it. Bubble’s personal plan will be used mostly for staging and testing purposes. Once you’re ready to launch your app, you’ll have to switch to either professional or production plans. You can checkout out Bubble’s pricing page for more info on what you get with each plan.
Bubble has a concept called “units”, which are basically reserved server capacity for scaling up. Additional units are needed once your app acquires a certain amount of active users. Aside from that, another limiting factor is the file storage. Each plan has a total file storage allotment assigned to it. So you’ll most likely meet the ceiling sooner if your app stores a lot of user-uploaded media. There are plugins available for handling file storage, but those are going to cost additional per month.
On the other hand, running your app via the traditional way will cost as little as $5 per month for the server. The only downside is that you have to set up everything from scratch — things like the web server, database, and queue server. Realistically speaking, you won’t just be paying $5 per month, since you also have to bring in file storage, error reporting, and deployment services. Those can easily increase your total running costs.
Overall, the costs associated with running your app will be highly dependent on the services you need to pull in and the server capacity you need.
Building an App with Bubble
For you to get a feel of what it’s like to build apps with Bubble, we’ll be creating a simple CRUD app with it. Before proceeding, you first need to create a Bubble account.
Once you have an account, create a new app.
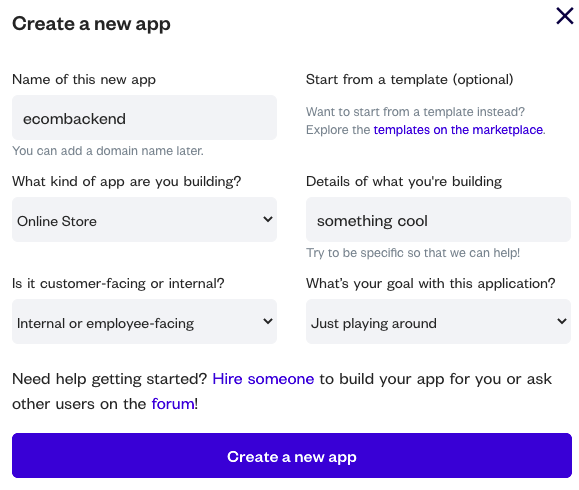
Once the app is created, the new application assistant will prompt you to get started. Click the Start with a blank page button and close the assistant. I don’t know about you, but I always prefer to start from scratch.

Now that we have an app, let’s quickly go over what we’re going to build.
- Authentication feature. This will allow the user to log in to the system.
- Product CRUD. CRUD is an acronym that describes an app capable of handling the most important database functions for interactivity, and stands for “create, read, update, and delete” — basically allowing the user to maintain product data in a database.
We’ve chosen these two features to show just how effectively Bubble can handle app logic, and ensure this guide teaches you all the concepts you might need to bring your own ideas to life in Bubble.
UI basics
Before we proceed to actually building the app, it’s important to get yourself familiar with the UI first.
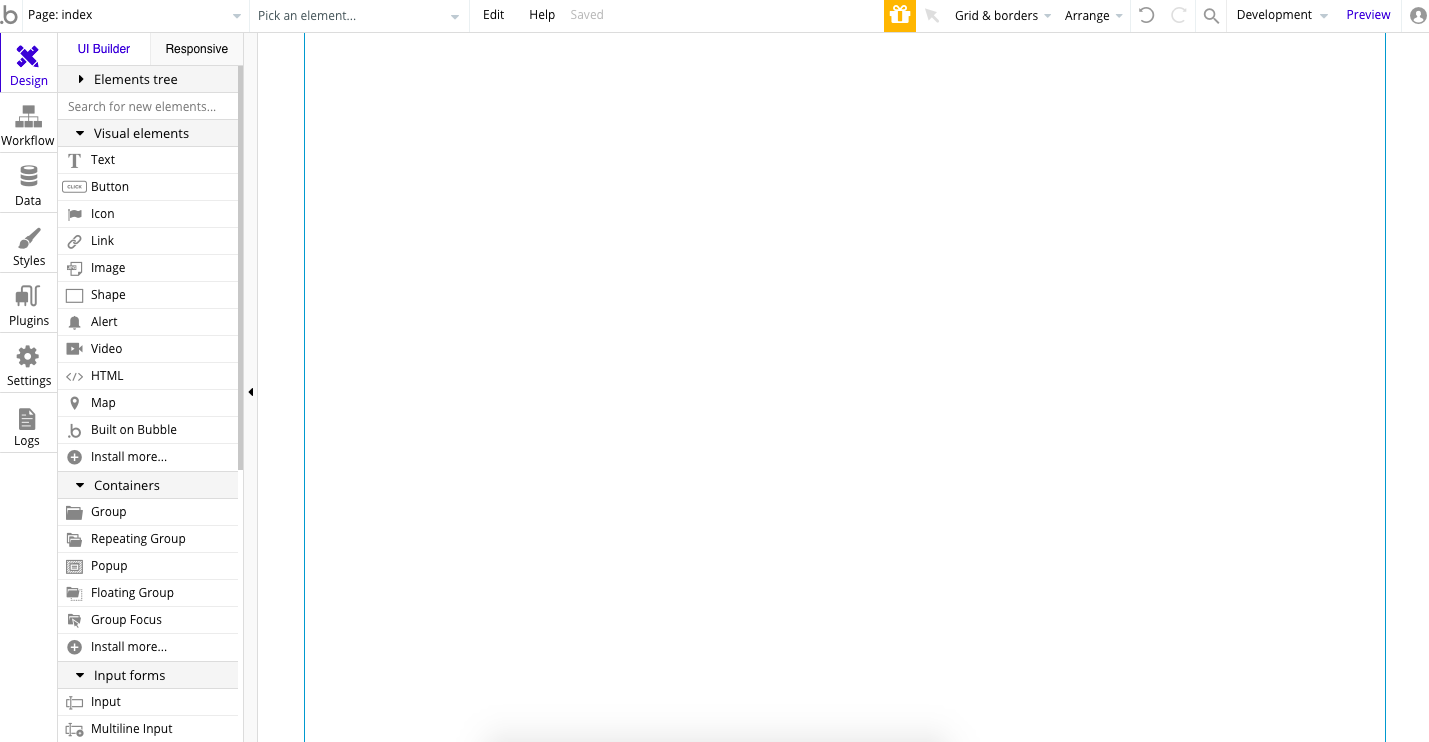
The Design tab is where you’ll usually start. As Bubble is a visual programming language, it always starts with the UI. The Design tab contains a list of visual elements that you can drag or click and draw (click the element to select it, release, then draw the element) to the canvas.
Next is the Workflow tab. This is where you’ll find all the workflows for a specific page. In Bubble, you use workflows to specify what the app does when a certain event happens. For example, when the Log in button is clicked, we want to log the user in to the app, clear out the form, then redirect the user to the admin page if the credentials are correct.
The workflows are displayed only per page and not the whole app, so you have to click on the dropdown on the upper left to select which page you want to add a workflow to.

The Data tab is where you’ll see the app’s database, the tables within it, and the data within each table. It also comes with a data manager that allows you to perform CRUD operations on each row.
If you want to edit the columns for each table, you can do so in the Data types tab.
Lastly, we have the Styles tab. This is where you can customize the app’s overall theme.
There are three other tabs we haven’t gone through: plugins, settings, and logs. We won’t really go over those since we won’t be using them in the app we’re building here.
Authentication
Now that we’ve gone through Bubble’s UI, let’s start implementing the authentication feature.
The default app that we’ve cleared earlier using the new application assistant actually has user authentication baked into it already. But since we’ve cleared it, we’ll have to build it from scratch again. This way, you’ll know how easy it is to build the app’s authentication feature using Bubble.
The index page is already created for us by default, so all we have to do is draw all the elements that we need.
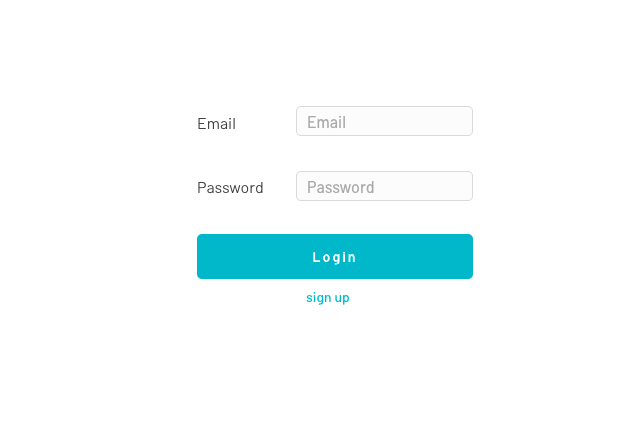
The login page
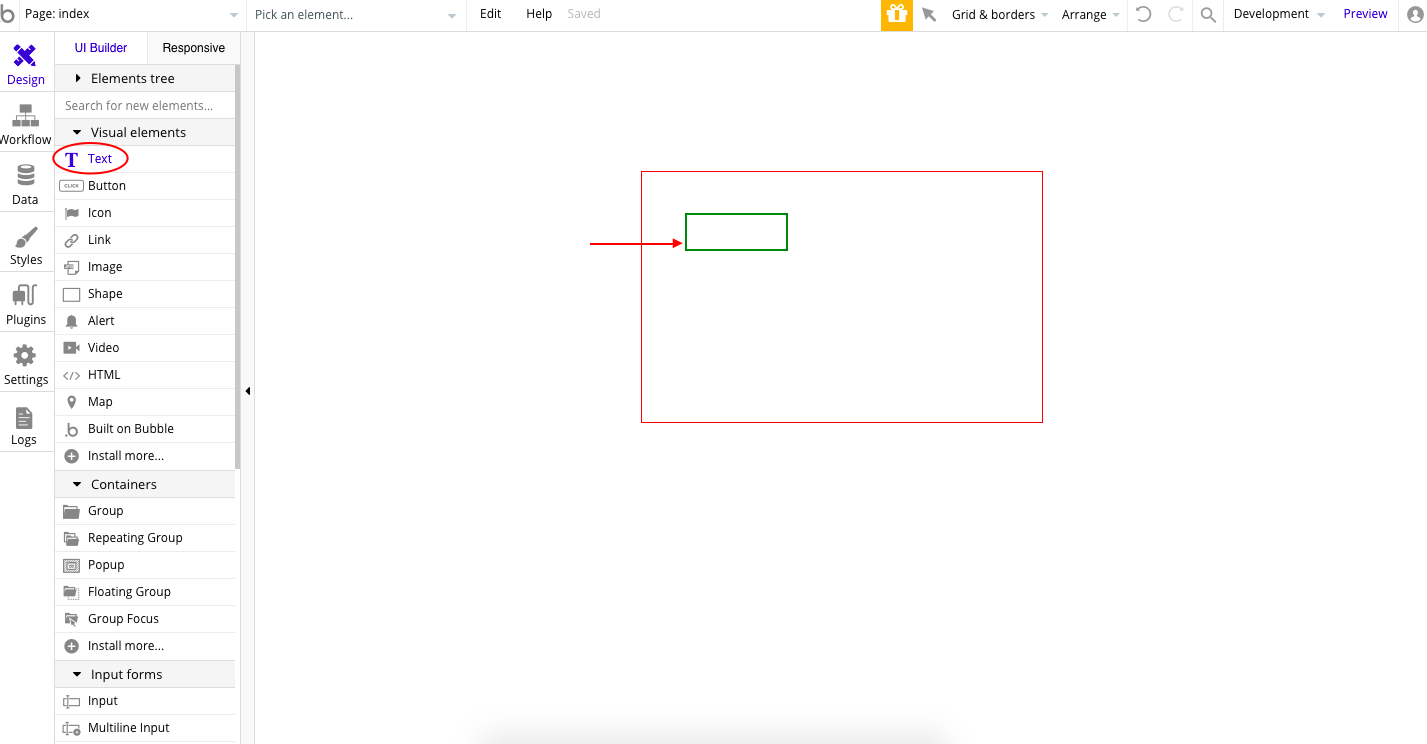
First, under the Containers section in the Design tab, click on Group, then draw a square in the canvas. This will serve as the login container.
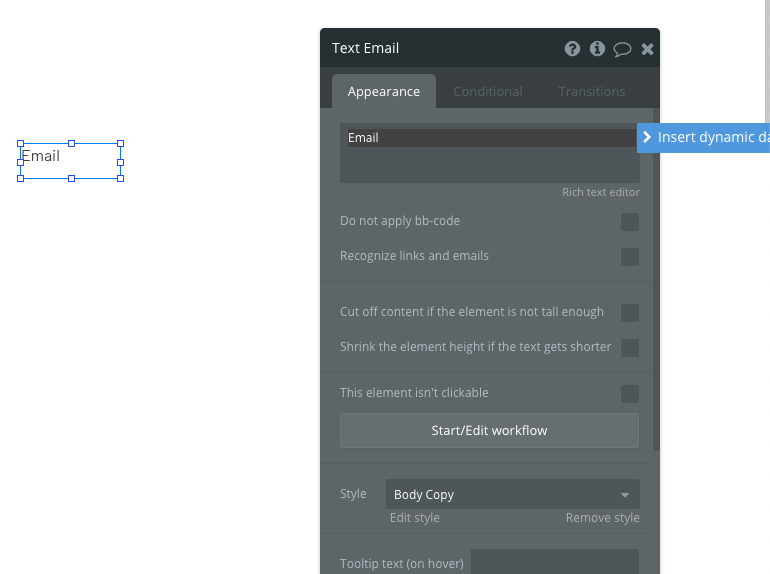
Next, click on the Text element, release, then draw it inside the container you just created. You’ll see a red border surrounding the container when you do.
Once the element is drawn, a floating box will appear. This allows you to customize the element accordingly. In this case, all we need to do is change the label.
Next, do the same for the password. Instead of doing the exact steps, you can simply copy and paste the email label you’ve just drawn.
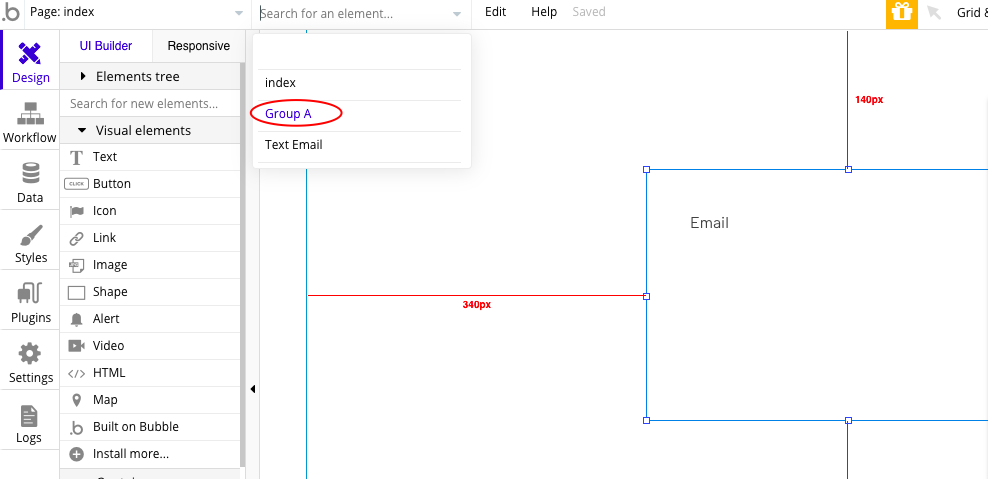
If you somehow lost the current element (all too common with container elements since they’re invisible to the end users), you can click on the dropdown just beside the page selection dropdown and click the element you want to select.
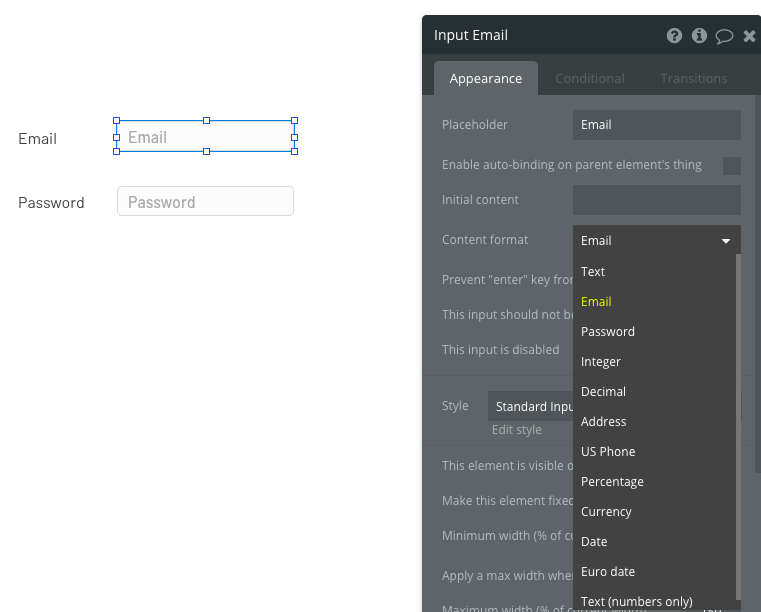
Once the labels are drawn, you can proceed to draw the corresponding input elements. Just scroll down to the Input forms section and click input. Then draw the element like usual. Also change the placeholder, since that’s essentially what we’ll be using to identify the element later on. After that, the Content format should also be changed to the corresponding data type that we’re expecting. With that in place, Bubble will handle the data type validation for you.
By now, you should know the drill. Draw a button element inside the container, then change its label.

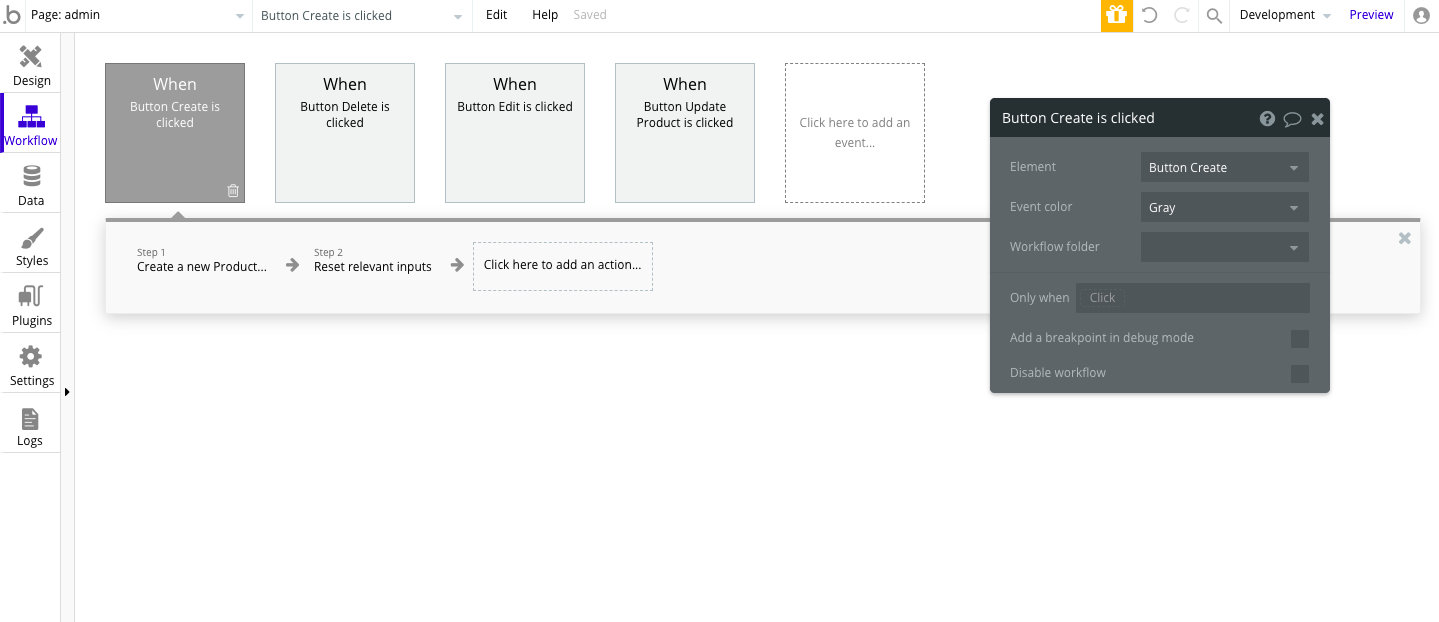
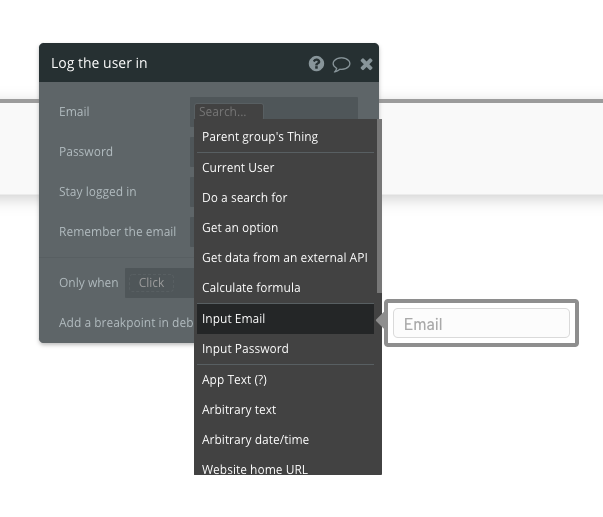
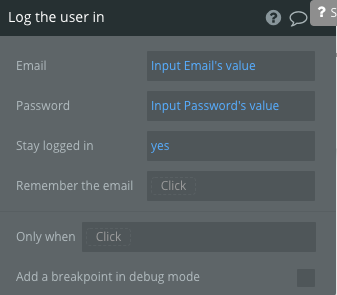
We’re done drawing all the elements for the login page. The next step is adding the login functionality. Click on the Start/Edit workflow button on the login button’s customization box. This will redirect you to the Workflow tab for when the login button is clicked. Click the box below the action, hover over Account, then click Log the user in.

This will pop out a customization box. Bubble already assumes that users will all log in using an email and password combination. So all you have to do is pick the corresponding input element and pick its value.
Do the same for the password. Once done, your screen should look like this.
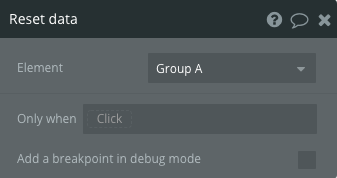
Next, we want to clean up after ourselves by clearing the form. Click the box where it says Click here to add an action, hover over Element Actions, then click Reset data.

Since we’ve taken the time to group all the elements related to the login form earlier, it now rewards us by allowing us to select the container to reset instead of resetting each individual element.
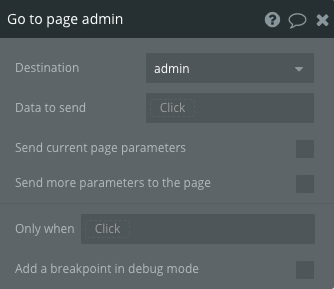
Next, add another action to redirect to the admin page.
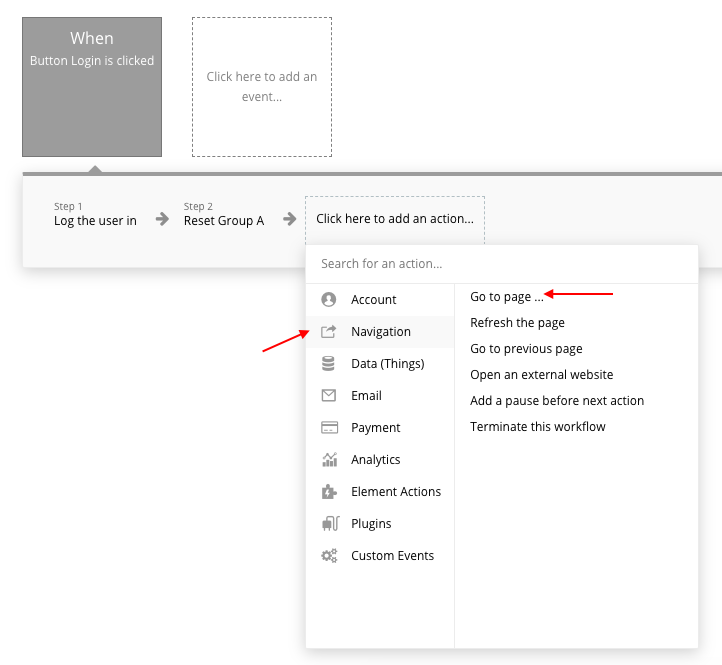
In the destination dropdown, select Create a new page…. Then set the name of the page to admin. Bubble will then create this page for you. Once created, it will show in the destination dropdown so you can now select it.
That’s it for the login workflow. Next, we need to create the signup page so users can register.
Signup page
To create a new page, click on the dropdown which says page: index. Then click Add a new page….
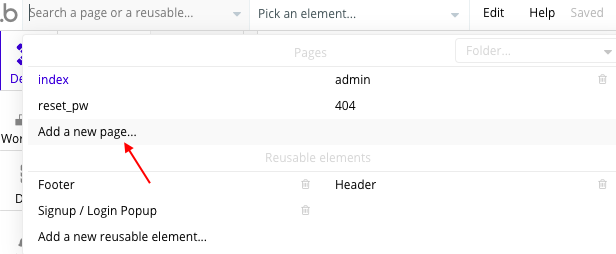
This should show the same modal window you saw earlier when you created the admin page. Input “signup” and click create.
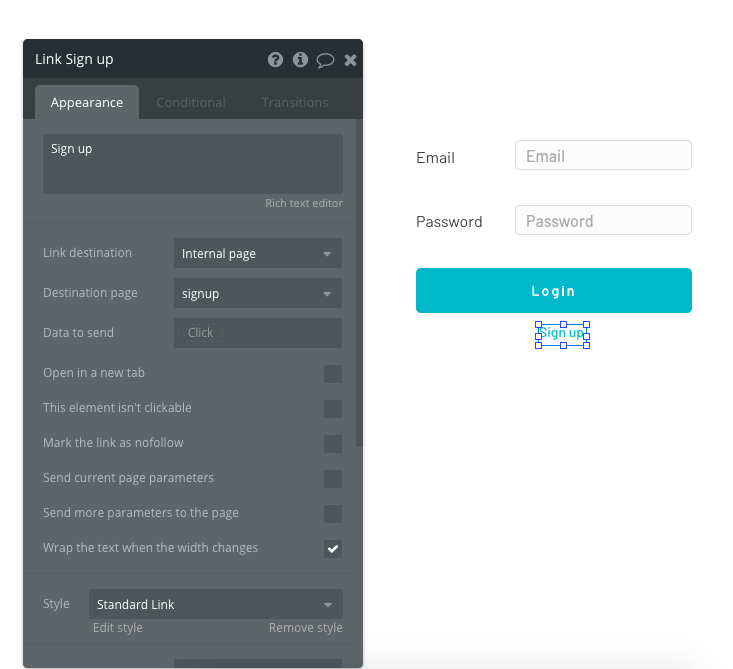
In that newly created page, drag the same elements we’ve used in the login page earlier. Only change the label of the signup button to Sign Up. As a shortcut, you can even copy and paste from the login page to the signup page. Simply copy the group container and it will bring all the elements inside it along with it. From there, all you have to do is change the button’s label.

Next, click on the Sign Up button and edit its workflow just like we did with the login button earlier. Select Account, then Sign the user up.
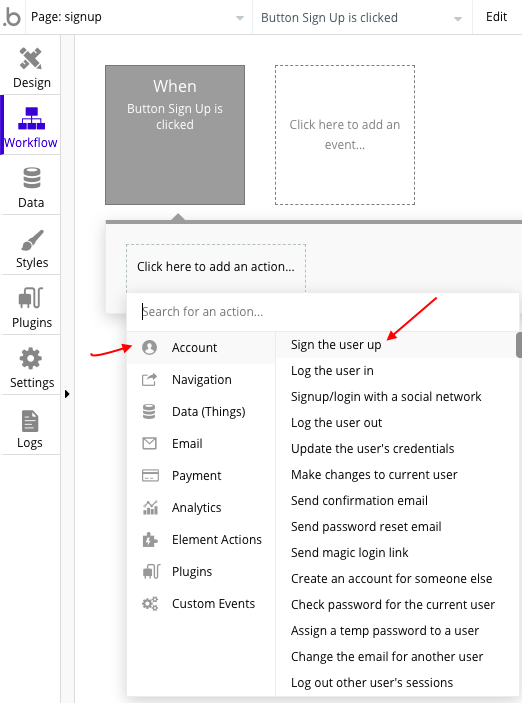
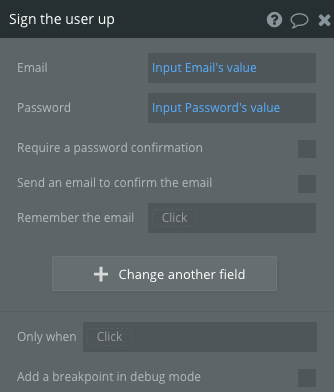
Set the value to be used for the user’s email and password.
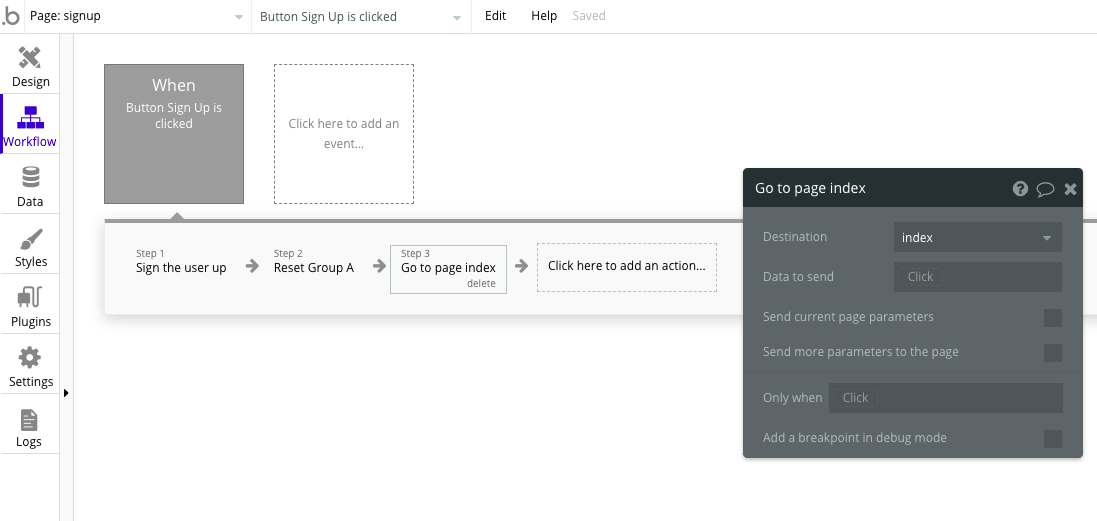
You should know the drill by now. We should clean up after ourselves, then redirect to the login page so the user can actually log in. We can actually sign the user up and then log them in automatically from here, but let’s try to keep things simple for now.
Next, in the signup page, add a link to the login page. Do the same for the login page so users can easily sign up.
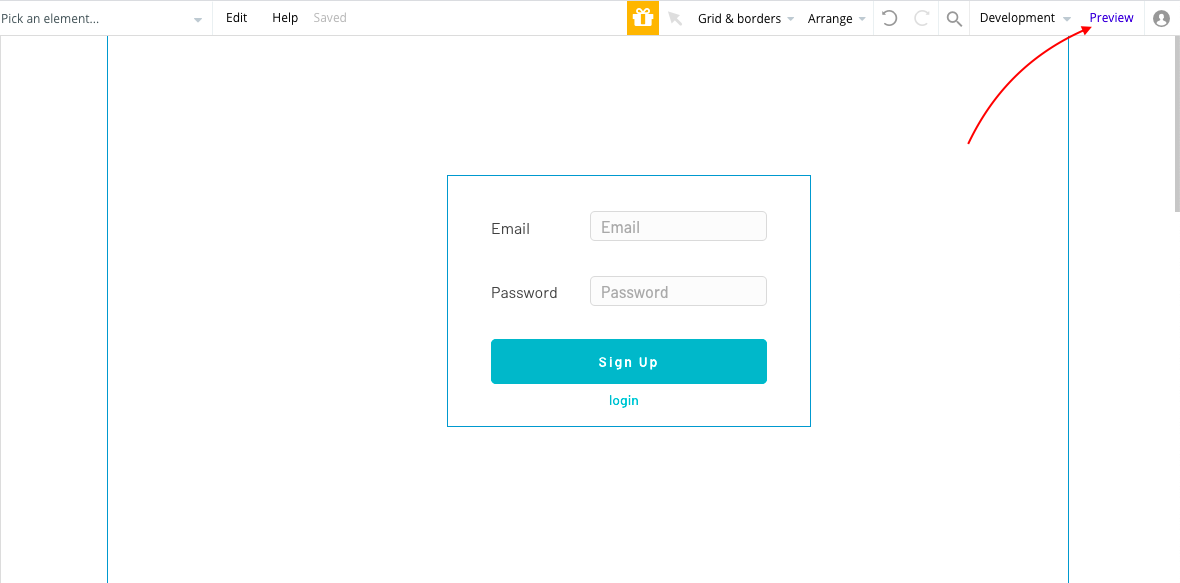
At this point, you can now test the signup process. Click on the Preview link on the upper right corner of the screen. Make sure you don’t have pop-up blocker extensions enabled, as that will interfere with opening the new tab in which the preview will be displayed.
Admin page
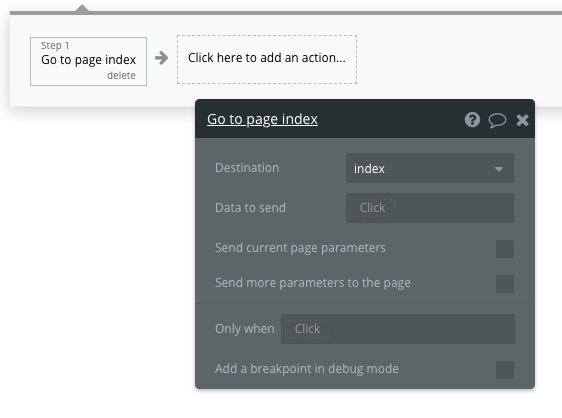
Let’s now proceed with the admin page. Select admin from the page selector dropdown on the upper left part of the screen. Once there, click on the Workflow tab. We don’t want anyone accessing this page if they’re not logged in, so we have to check if the user is logged out.
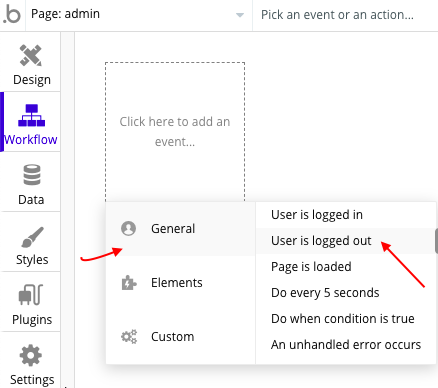
If the user is logged out, we navigate them to the index page so they can log in.
We’re now ready to implement the functionality for the admin side.
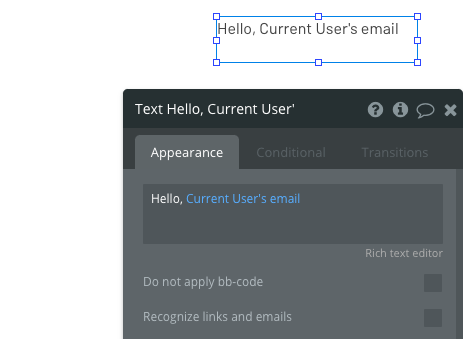
First, drag a text element on the upper right corner of the screen. This will display a greeting to the user. To do this, simply type the word “Hello”, then click on insert dynamic data. From there, select Current User’s, then email.
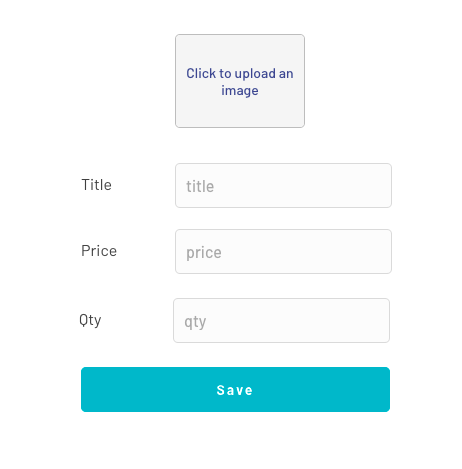
Next, we create the product form, which comprises the following:
- picture uploader
- title (text)
- price (text, numbers only)
- qty (integer)
- Save button
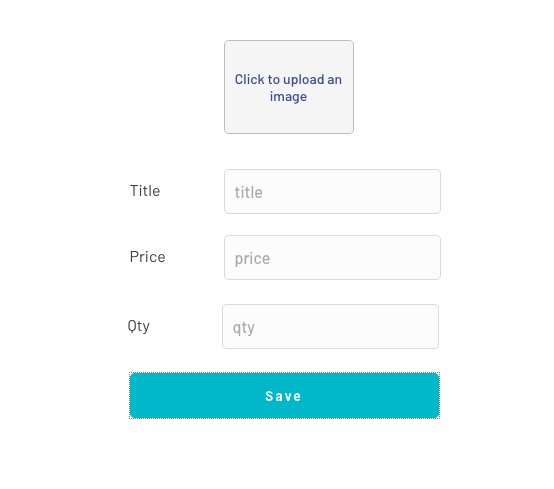
You should know the drill by now. Be sure to drag a group container to the canvas before anything else. Then, once you’ve drawn the elements, the container should turn red to indicate that it’s being dragged inside it.
By the end, you should have something that looks like the picture below.
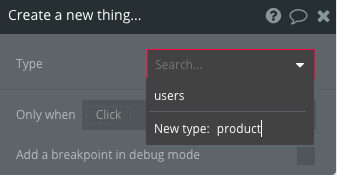
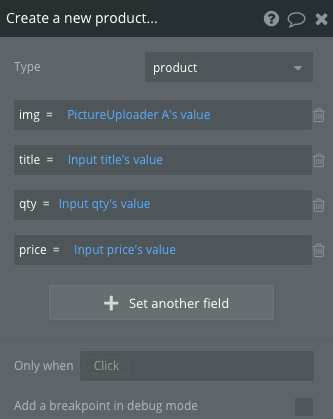
Next, add a workflow to the Save button. Select Data (Things), then Create a new thing….

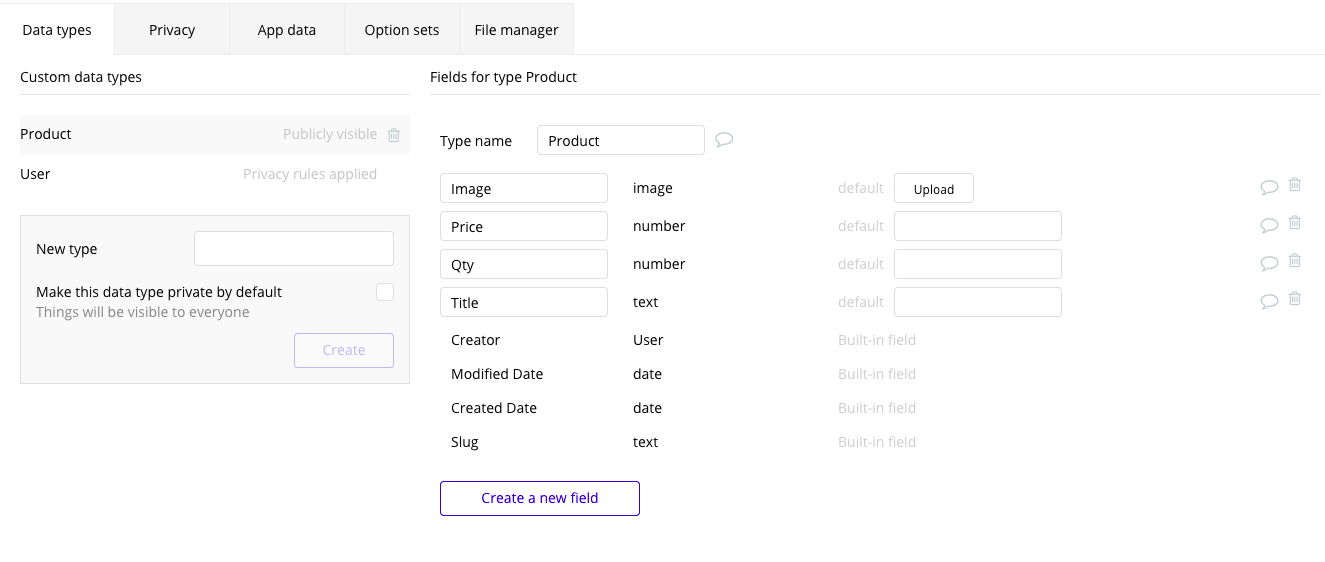
From the type dropdown, select Create a new type… and set it to “product”.
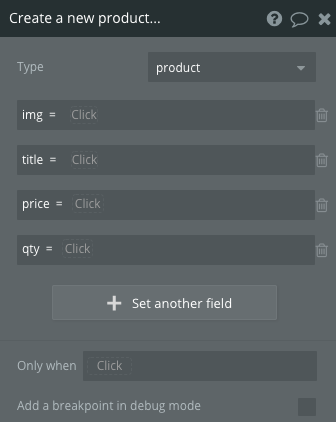
Click on the Set another field button to add each field one by one. These fields should correspond with the fields you dragged to the product form earlier.
I’ll set the first field as an example, and I’ll let you do the rest. The first field is the image uploader. The Field name is the column name in the database, while the Field type is its data type.

Do the rest of the fields by clicking the Set another field button:
- title (text)
- price (number)
- qty (number)
By the end, you should see something like what’s shown below.
The next step is to set its value to the corresponding fields in the form.
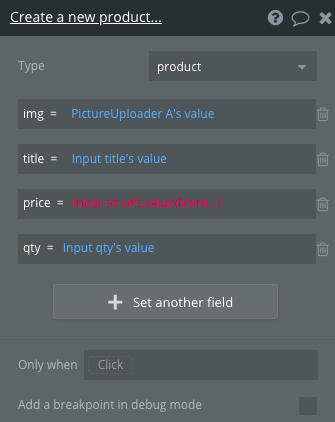
But now we’re in a bind, since the price seems to have an error. In Bubble, issues are displayed on the upper right corner of the screen (just to the right of the gift icon). Click on that to see what the issue is all about.
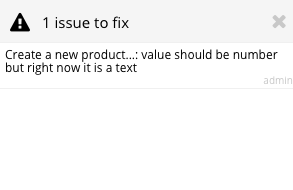
The image above shows a data mismatch error. It’s expecting the value to be a number but instead we’ve entered some text.
To solve that, we need to set the data type of the price to text instead. Go to the Data tab and select the Product table (this was created when we added a new type). It’s not really possible to update data types in Bubble, so we have to delete the existing one and create a new one with the correct data type instead.
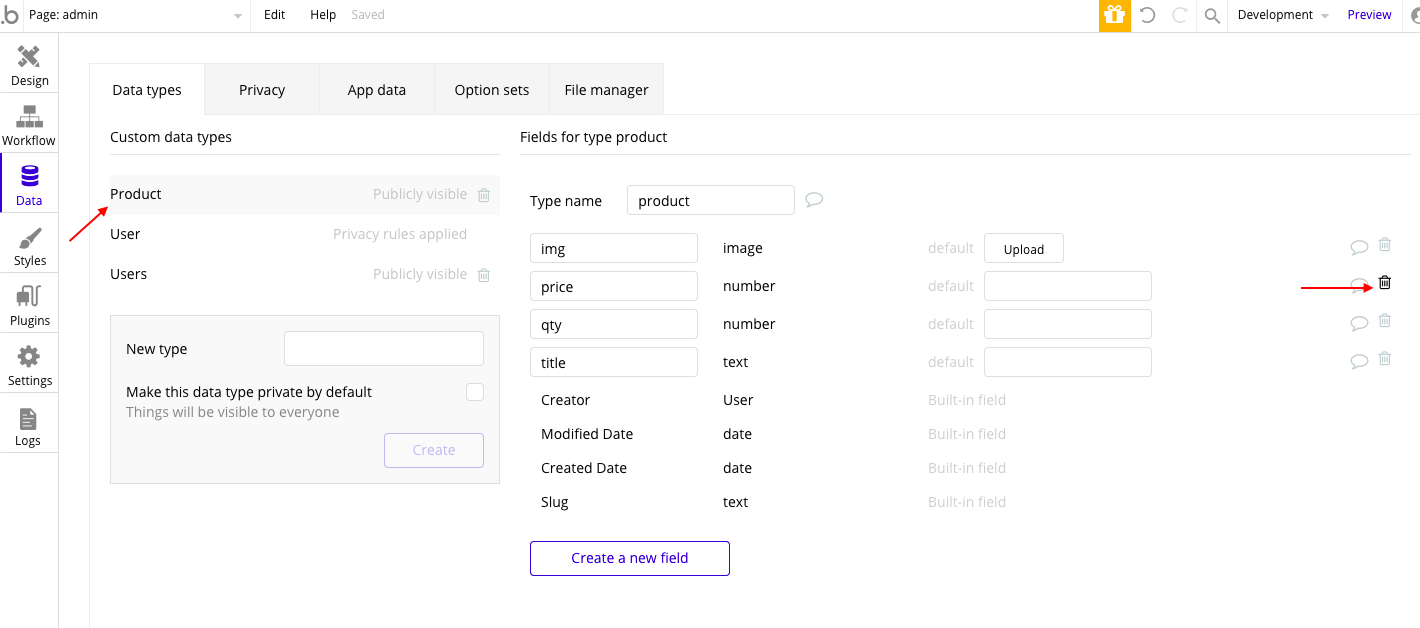
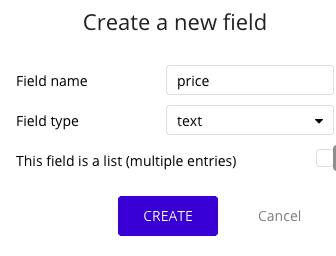
Once deleted, create a new price field.
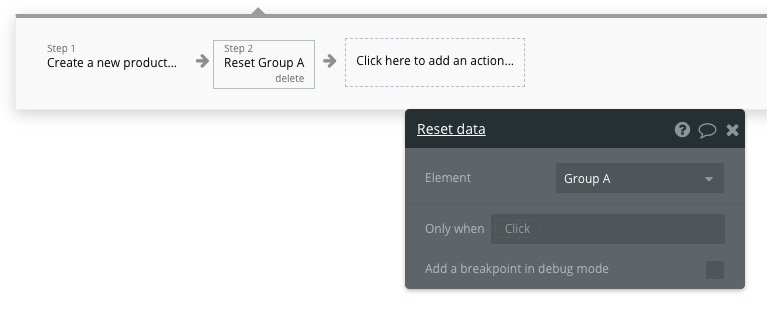
Next, go back to the workflow and delete the existing price field as well. Then create a new one and assign the correct field. That should now fix the issue.
Next, reset the product form.
At this point, you can test whether your product form is saving the data to the database. You should see something like what’s shown below.
Note: Bubble is smart enough to log you in with an existing user in the database if you preview an admin page. So be sure to sign up with an account first so Bubble has some data to work with.
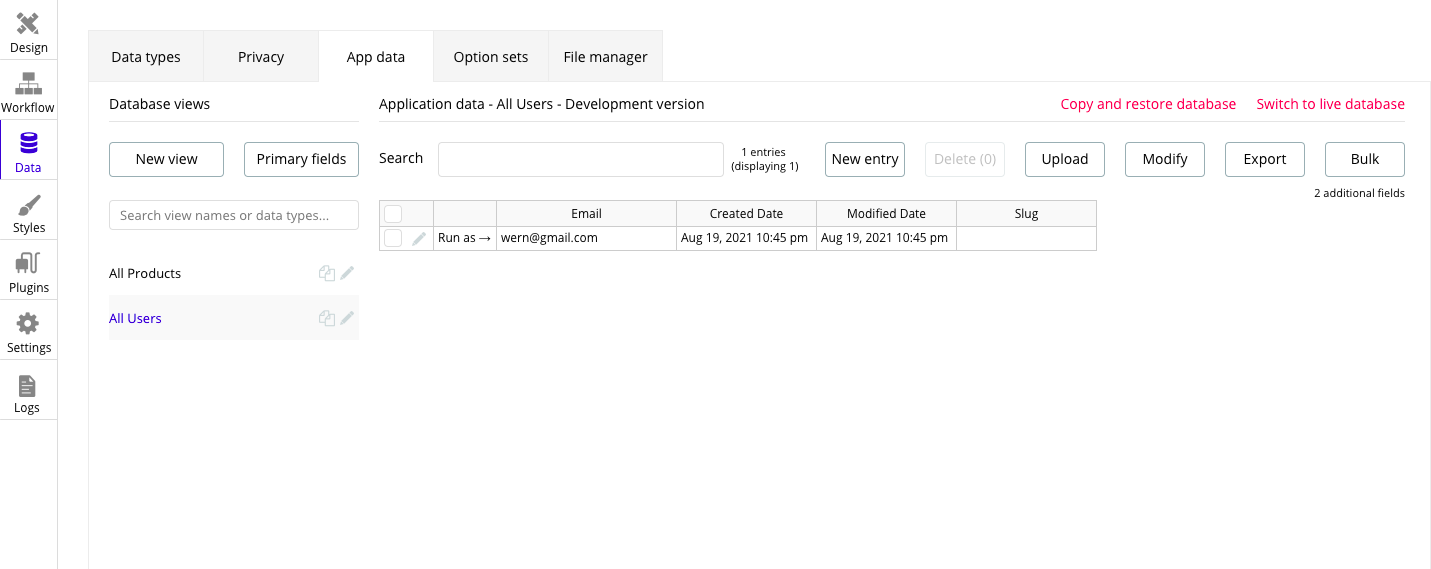
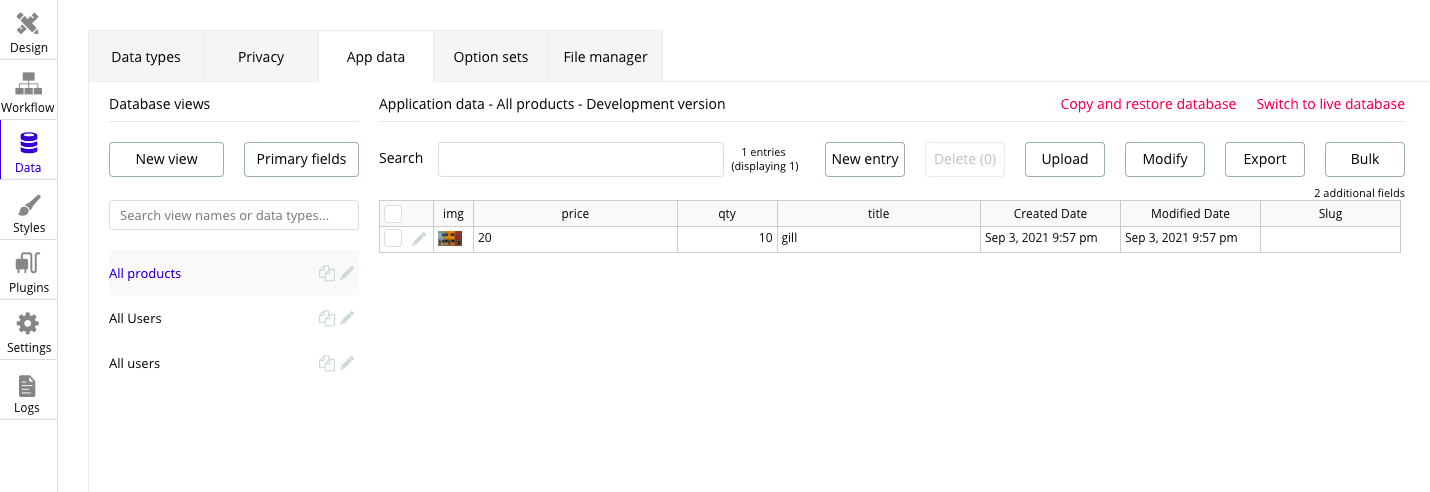
Once you’ve filled out all the fields and saved everything, go back to the Bubble editor. Under the Data tab, click App Data then click All Products. This should show the product you just saved.
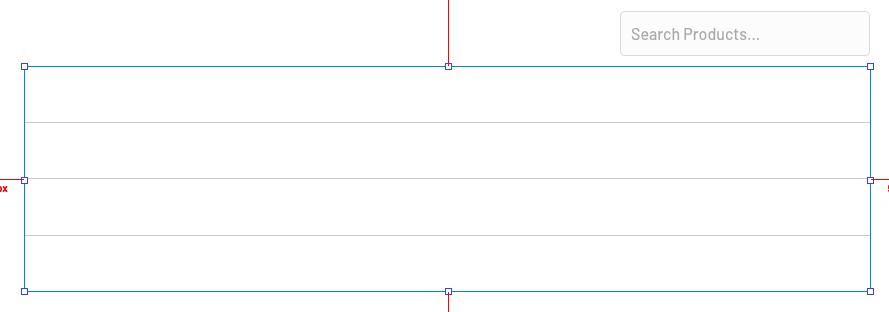
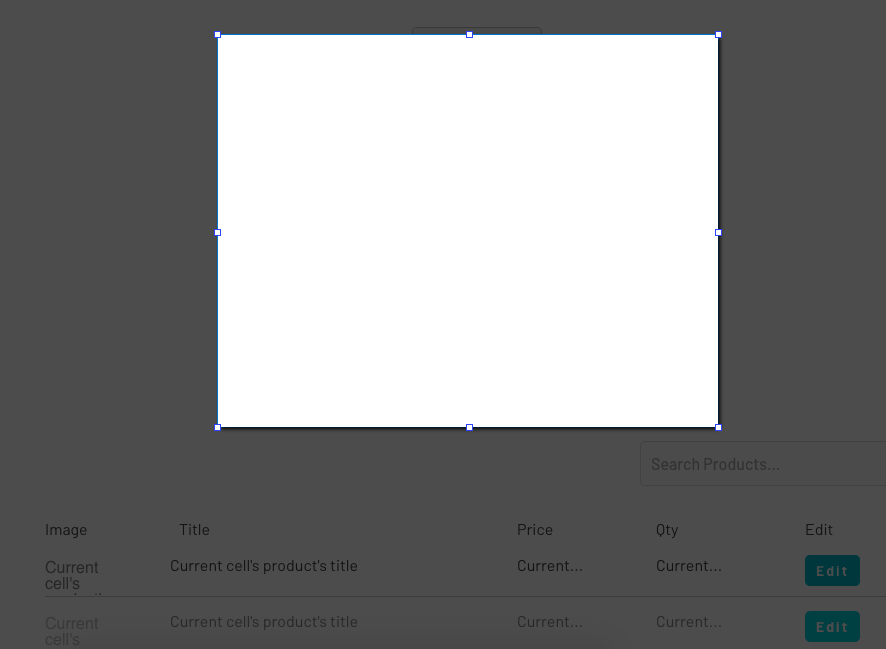
Cool! Now we’re getting somewhere! The next step is to display all the products that are stored in the database. To do that, we need to use a RepeatingGroup container. Drag it into the canvas. While you’re there, also drag a text field. Once you’re done, it should look something like the image below. This is just below the product form.
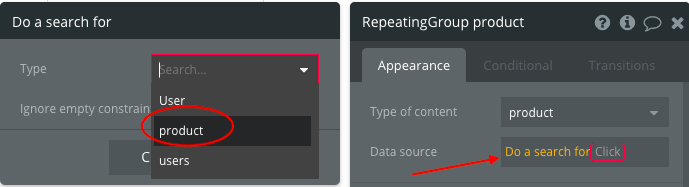
Next, click on the repeating group and set its type of content to product. The data source should be set to Do a search for… → product.
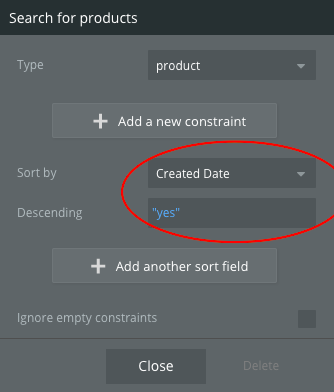
You can also have the data sorted by the creation date.
Nothing will be displayed if you preview now. That’s because it doesn’t know yet which fields you want to display.
Drag the table headings first so we have a guide where each field will be displayed. These are just text elements.
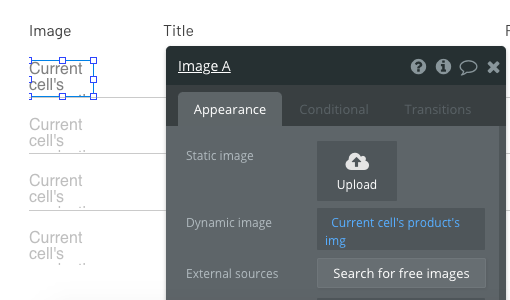
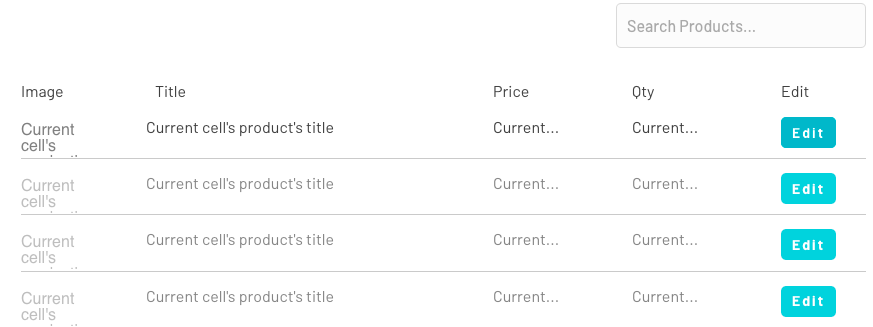
Next, drag an image element inside the repeating group. You’ll know that it’s being dragged inside if you see the red border. In the image customization box, click on the text field beside the Dynamic image label. Then select current cell’s → product’s → img. This should now display the product image on this particular column.
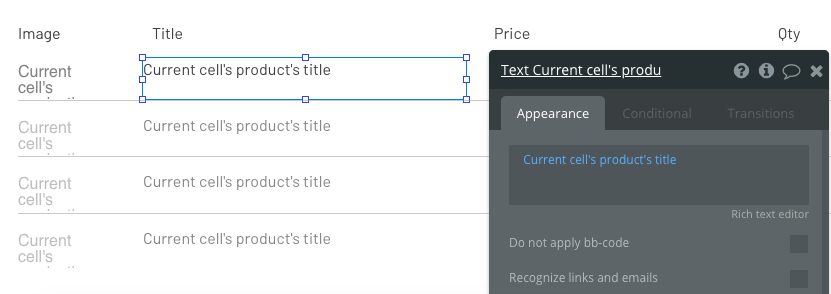
The same idea applies for the title, price, and qty — only this time you need to use the text element. I’ll show you how the title is done, then you do the rest.
Basically, you just drag or draw a text element inside the repeating group, drag its container so it has space for products with particularly long titles. Then for the contents, click on the insert dynamic data → current cell’s → product’s → title.
Do the same thing for the price and qty. I’ll wait.
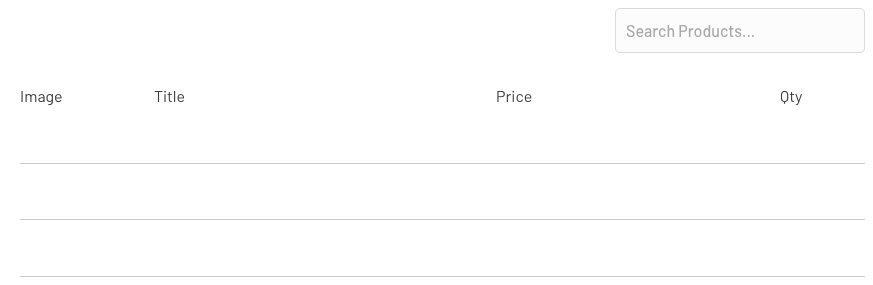
Once you’re done, you should have something that looks like this.
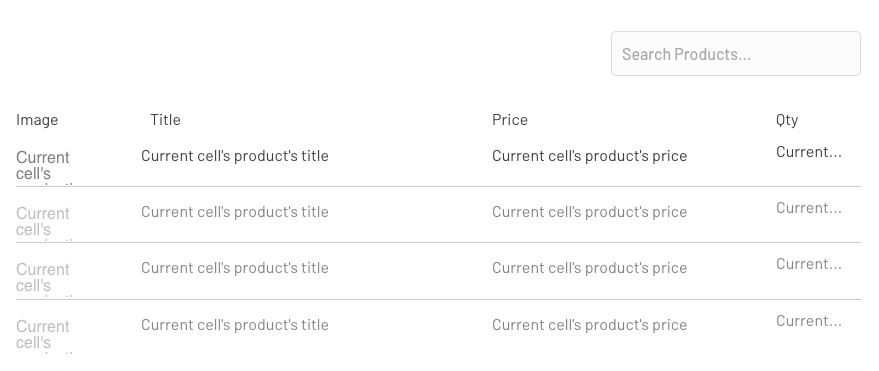
At this point, you can now preview and add a few products to see the list in action.
Search functionality
You might have tried typing in the search field earlier, but that won’t work since the repeating group isn’t made to respond to the search field events yet.
To do that, you need to add a conditional to the repeating group. A conditional allows you to add a filter to the search results when specific criteria are met. In this case, we only need two conditions:
- When the search field is empty, we don’t want to apply any filters to the repeating group’s data source.
- When the search field is not empty, we apply a filter to the data source.
On the repeating group’s customization box, click on the Conditional tab. Then click on the Define another condition button.
To add a condition, click on the when field and set it to Input search product’s → value → is empty. Then click select a property to change when true dropdown. From the options, select Data source.
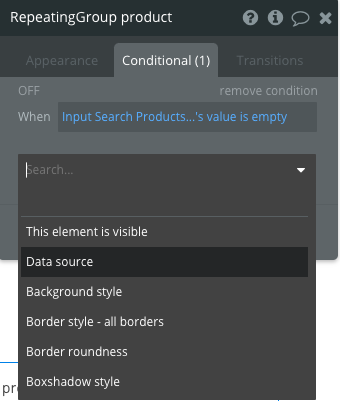
Click the data source field and select Do a search for.

Set the type to product and sort it by Created Date in descending order.

Close it, and that should deal with the first condition.
Next, click define another condition. This time, we want to set the condition to the opposite of what we did earlier: Input search productÆs → value → is empty. The property to change is still the data source with product as the type and Created Date as the sorting. But this time around, click on the Add a new constraint button. In the new field that shows up, select title → contains → Input search product’s → value. This effectively creates a filter for the title field.
At this point, you can now preview the app and see that the search field is now working as expected.
Update functionality
Now we’re ready to implement the update functionality. Do some adjustments to the positioning of the elements inside the repeating group to make room for the Edit button:
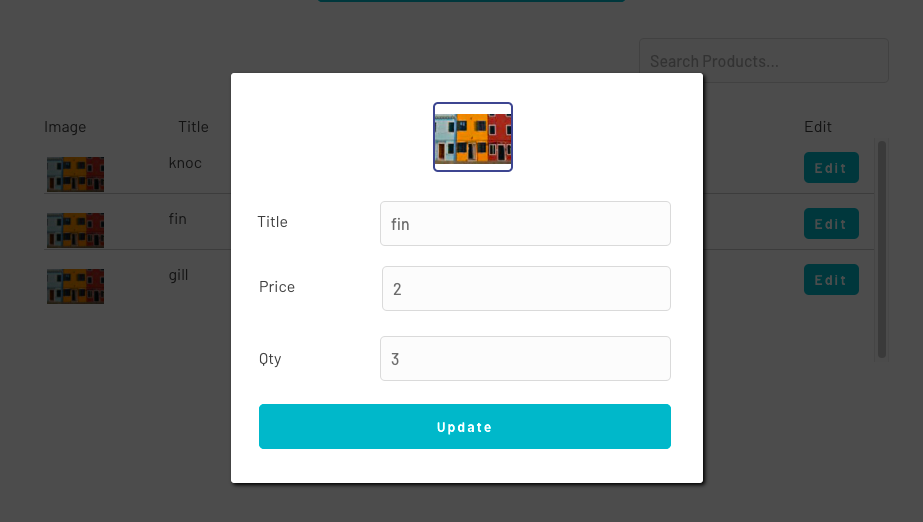
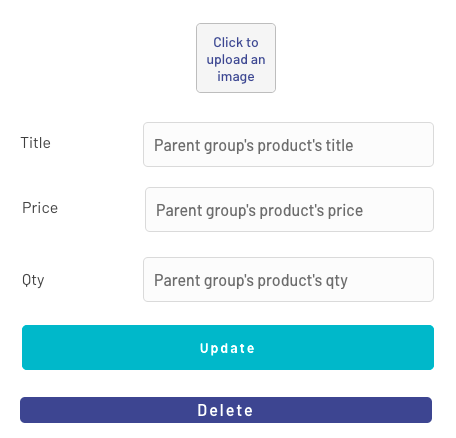
To show the current product being edited, we’ll use a popup element. Drag one so it’s in the same position where the create product form currently is.
Inside the popup, add the same fields as the product form so it looks like this.
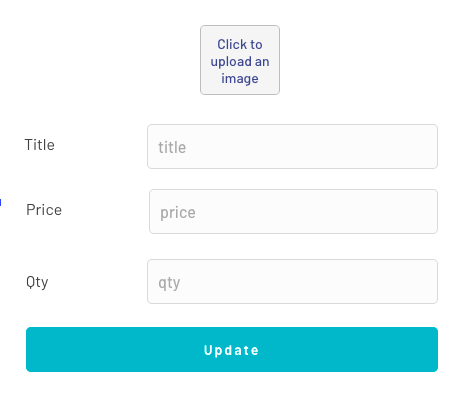
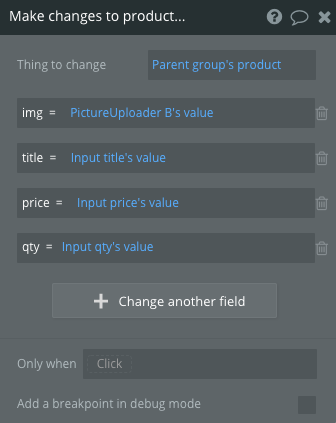
Next, you need to specify what initial value you want to display. For the image uploader, you specify that as the value for the dynamic image field. For the text fields, it’s the initial content. Just click on the insert dynamic data, select Parent group’s product’s → img. That should display the product image of the clicked Edit button by default. Do the same thing for the title, price, and qty — this time by supplying the value for initial content.
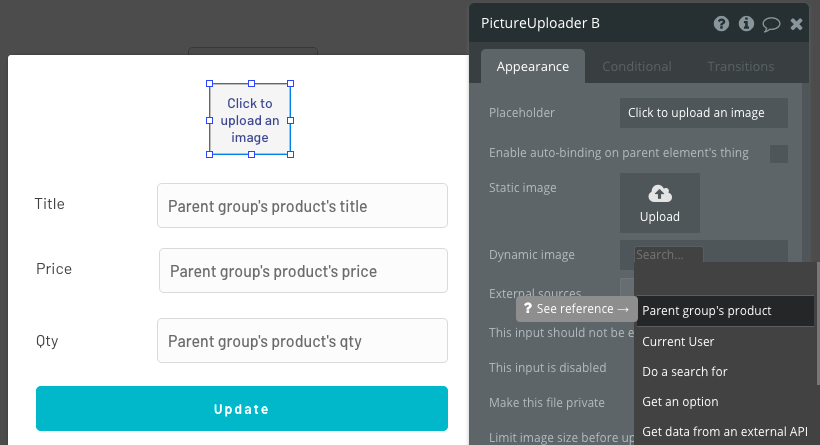
You may be asking how Bubble knows the parent group’s product. The answer is because we’ve set the popup’s type of content to product. Remember that a popup is classified as a container, and containers are responsible for grouping everything inside them. This is what gave us the parent group option. That still doesn’t answer how Bubble is able to load the exact product that the user clicked though. You’ll know the answer if you continue following along.
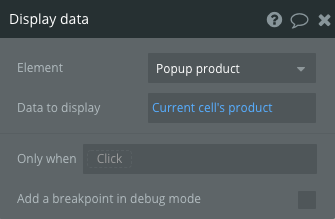
Now we need to add a way to open the popup. But at the same time, we also need to load the data of the product whose Edit button was clicked. To do that, we add a workflow to the Edit button. Click the container to add a new action, then select Element Actions → Display data.
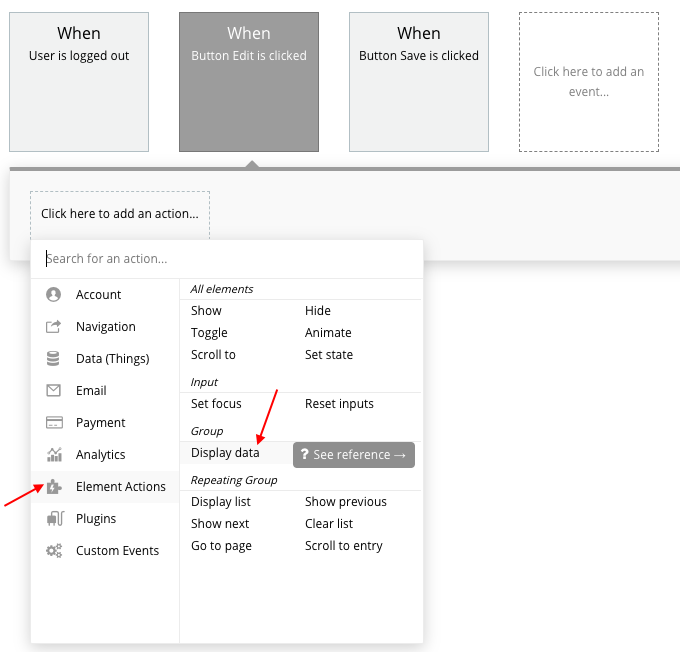
Set the Element as Popup product while the Data to display is the Current cell’s product. This is the missing piece from earlier. This is how Bubble knows which exact product to load on the popup. Pretty anti-climactic, despite all the suspense. But that’s all there is to it.
Next, to show the popup, add another action, select Elements, then Show. Then pick the popup as the value for the Element field.
At this point, you should now be able to test out that the popup is loading the product data when you click on the Edit button.
Next, we need to add the actual update functionality. To do that — you guessed it! — add a workflow to the Update button. Add an action and select Data (Things) → Make changes to thing….
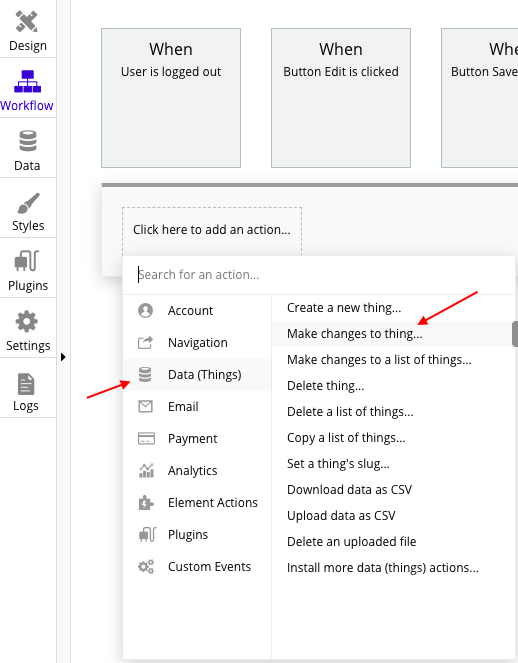
Set the Thing to change to Parent group’s product. If you remember, this is the same thing we used for showing the current product’s data. Click on Change another field to add a field to modify. It can be a bit confusing which fields you should pick, but you can use Parent Group’s as a keyword. Any fields that have that keyword at the beginning are the ones that were dragged to the popup. The other ones are those from the product creation form. By the end of it, yours should look something like this.
After that, we need to add two more actions: reset the form, and close the popup. I’ll leave you with the following screenshot so you can figure it out on your own.

At this point, you can run the preview again and you should be able to update a product. Once a product is updated, the popup should automatically close and the updated data should be reflected in the repeating group.
Delete functionality
Now on to the final functionality before we go about beautifying things a little bit.
The easiest way to go about the delete functionality is to just make use of the popup. That way, we already have access to the selected product. Go ahead and drag a Delete button below the update button.
You should know the drill by now. This time select Data (Things) → Delete thing…
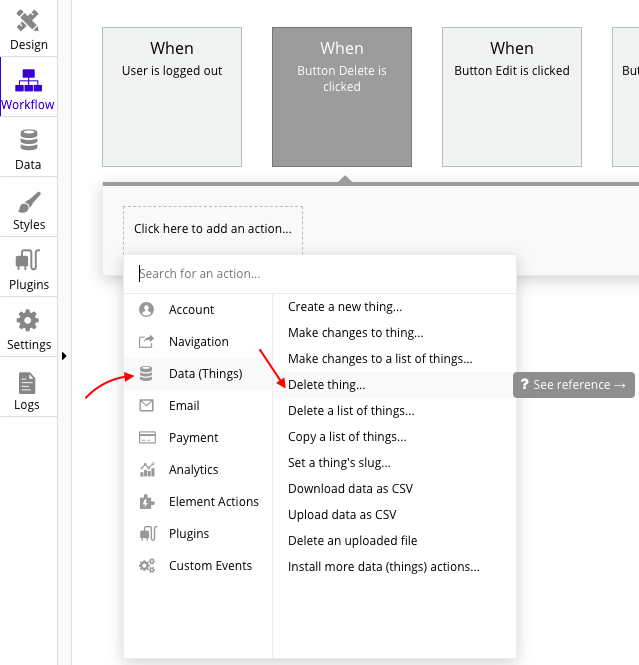
In the To delete field, select Parent group’s product once again. That’s it! Just add another action for closing the popup and you’re good to go.
At this point, you can test out the preview. When you delete a product, it should close the popup and the corresponding product in the repeating group should disappear as well.
Styling the app
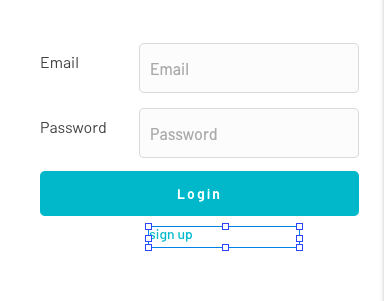
Let’s make the styling a bit nicer — because up until now, we haven’t really considered how the different elements will be aligned. Here’s a quick example to show you what I mean.
As you can see, it’s not really aligned correctly, even though it looks decent when on the design page.
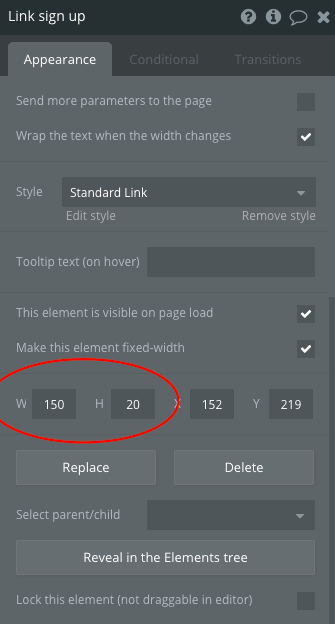
The first thing you can do to fix this alignment issue is to make sure the container surrounding the element should have the same dimensions as the actual content. Below you can see that the signup link’s container doesn’t really match the dimensions of the content inside it.
To fix that, all you have to do is use the handles to adjust it accordingly. You can also adjust the width and height of the element in the customization box. This is very useful to make sure text fields and buttons have the same width and height. Go ahead make those adjustments in all the forms.
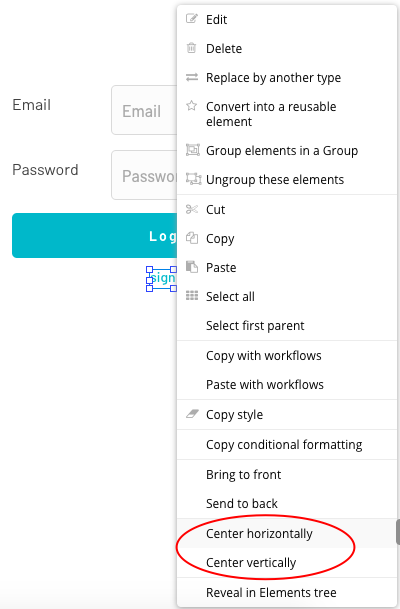
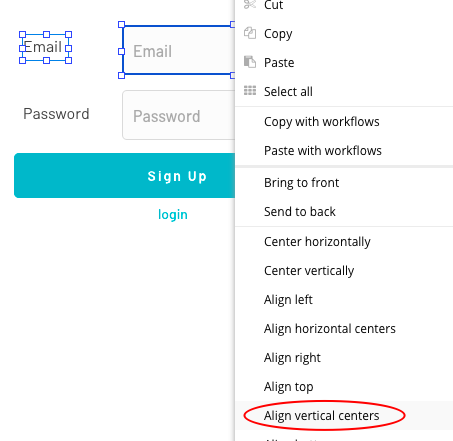
Another thing you could do to fix the alignment is by right-clicking the element and selecting the centering options. You can either center things vertically or horizontally. This will center the element inside its immediate container.
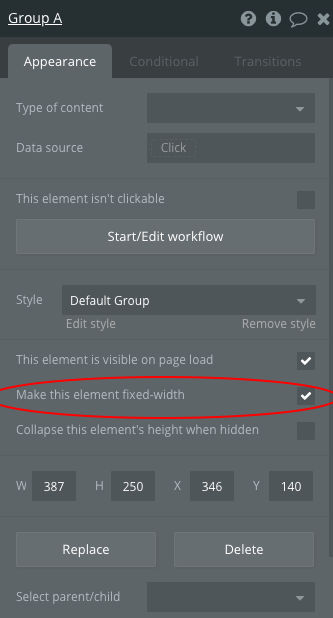
If that still hasn’t fixed the alignment, make sure that the immediate container is of fixed width.
You can also select multiple elements and align them vertically.
Here’s another example using the repeating group.
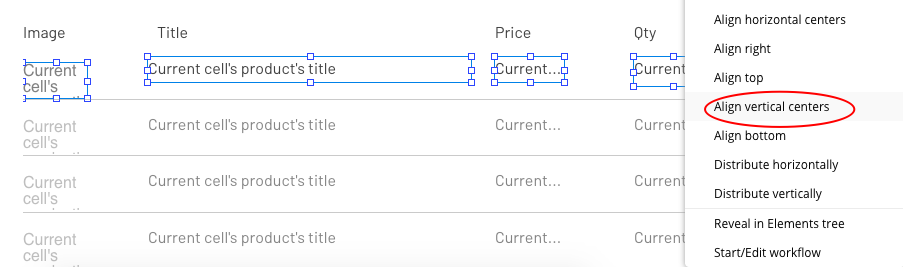
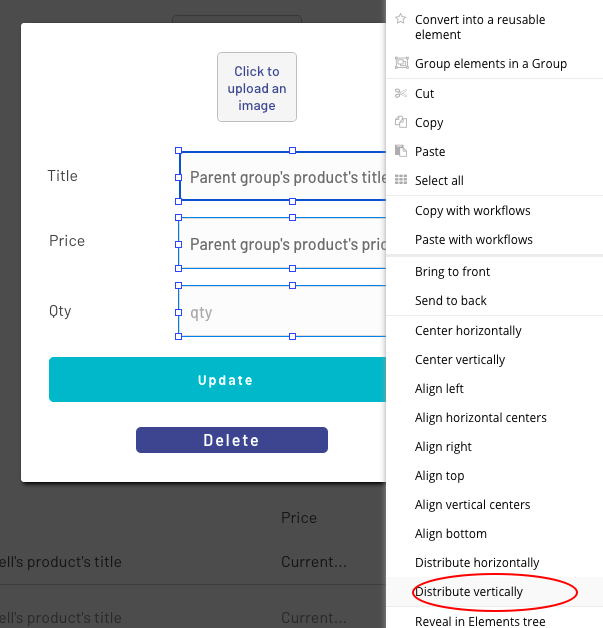
You can also distribute elements vertically. This makes sure the selected elements have the same amount of spacing between them. Note that if you do this with the inputs, you have to align the vertical centers once again, since distributing the elements vertically will cause it to reset.
Aligning the elements and making sure everything has the same width and height goes a long way towards making the design look decent enough.
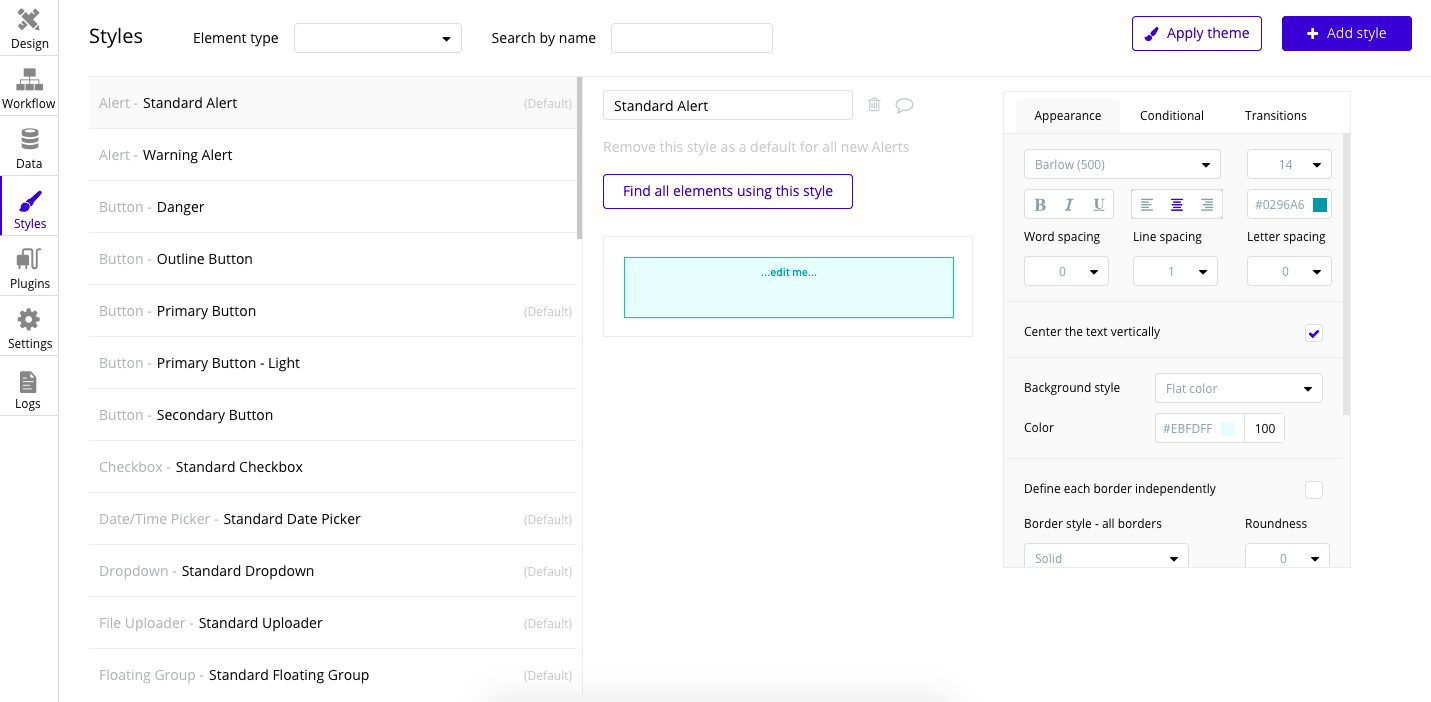
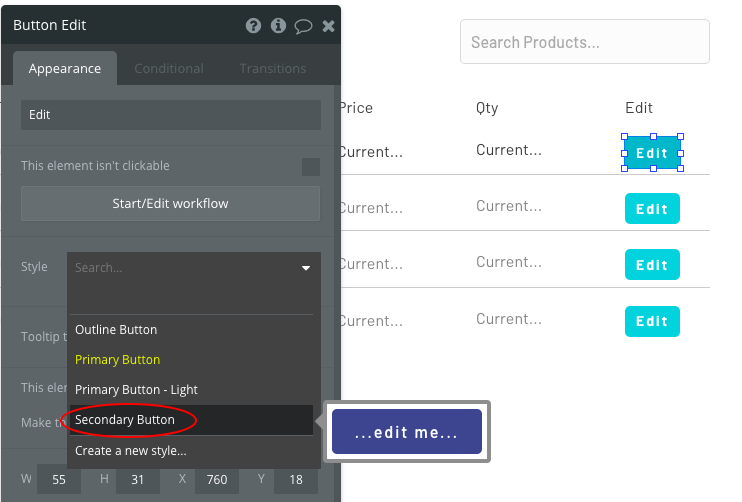
One last thing we could do is change the button styles so they don’t look all the same. Start by assigning the Secondary Button style to the edit button.
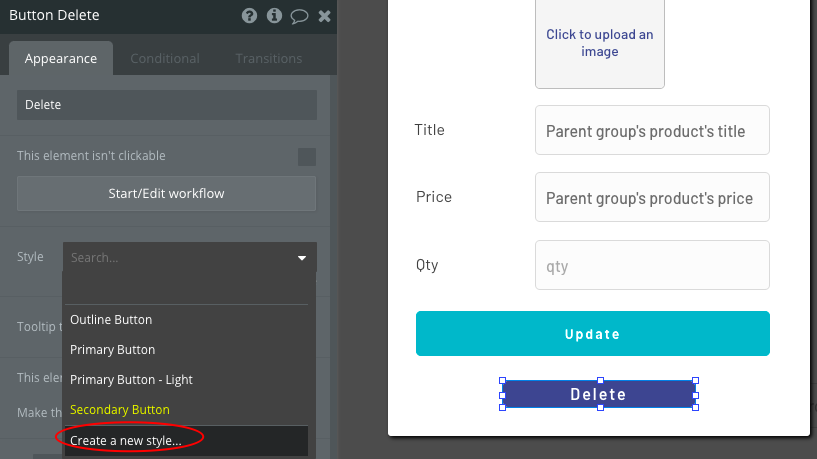
For the delete button, we can create a new style.
Name the style Danger.
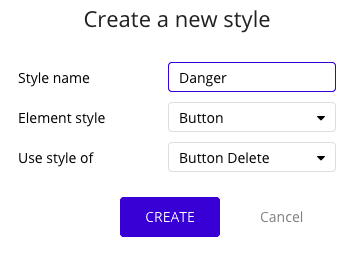
Once created, click on edit style and customize it however you want.

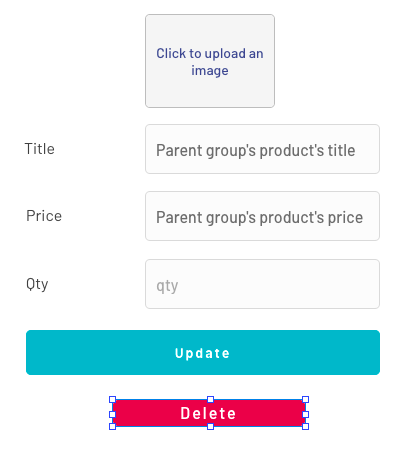
Once you’re done editing the style, go back to the Design tab and you’ll see that the Delete button now has the new style applied to it.
Conclusion
That’s it! In this article, you’ve learned all about Bubble, a no-code platform that enables non-developers and developers to develop apps without the need for coding, setting up your own servers, and everything else that comes with traditional development.
Bubble is more optimized for building web apps and not design-heavy websites. You can certainly build more complex apps with it, because it comes with a plugin system — although you will have to dedicate more time to learning the ropes, and you’ll also have to pay more to get access to certain features via the plugin system.
Overall, Bubble is a nice tool for building MVPs, from fairly simple apps to apps with a bit more complexity. For more complex apps like social networks, you’re better off developing them via traditional means.
Frequently Asked Questions (FAQs) about Bubble No-Code App Development
What is Bubble and how does it work?
Bubble is a visual programming platform that allows you to build web applications without any coding knowledge. It works by providing a drag-and-drop interface where you can design your app’s user interface and define its functionality using pre-built elements and workflows. These workflows are essentially a series of events and actions that define how your app behaves. For example, you can create a workflow that triggers when a user clicks a button, causing a pop-up to appear or data to be saved to your database.
Can I build a mobile app with Bubble?
Yes, you can build mobile apps with Bubble. While Bubble is primarily designed for web app development, it also provides tools for creating responsive designs that work well on mobile devices. However, to convert your Bubble app into a native mobile app, you’ll need to use a third-party service like PhoneGap or Cordova.
How secure is Bubble?
Bubble takes security seriously. All Bubble apps are hosted on Amazon Web Services, which is known for its robust security measures. Bubble also provides built-in tools for managing user authentication and data privacy. However, as with any platform, the security of your app also depends on how well you design and implement your workflows and data structures.
Can I use Bubble for free?
Bubble offers a free plan that allows you to build and host your app without any cost. However, the free plan comes with certain limitations, such as a Bubble branding on your app and limited server capacity. If you need more resources or want to remove the Bubble branding, you can upgrade to one of their paid plans.
How does Bubble compare to traditional coding?
Bubble provides a more accessible way to build web apps compared to traditional coding. Instead of writing lines of code, you design your app visually and define its behavior using workflows. This makes Bubble a great option for non-technical people who want to build their own apps. However, Bubble also has its limitations and may not be suitable for more complex apps that require custom functionality not available in Bubble’s pre-built elements and workflows.
Can I integrate Bubble with other services?
Yes, Bubble supports integration with a wide range of third-party services through its API Connector. This allows you to connect your Bubble app with other platforms like Google Maps, Stripe, and Zapier, enabling you to add more functionality to your app.
Can I collaborate with others on a Bubble project?
Yes, Bubble supports team collaboration. You can invite others to your Bubble project and assign them different roles, such as developer or editor. This makes it easy to work together on a project, whether you’re a small team or a large organization.
Can I sell my Bubble app?
Yes, you can sell your Bubble app. Once you’ve built your app on Bubble, you own it completely. You can choose to sell it, monetize it through ads or in-app purchases, or use it to provide a service to your customers.
How long does it take to learn Bubble?
The learning curve for Bubble is relatively gentle compared to traditional coding. Most beginners can start building simple apps within a few hours of starting with Bubble. However, mastering Bubble’s more advanced features and best practices can take several weeks or months of practice.
Can I import and export data in Bubble?
Yes, Bubble provides tools for importing and exporting data. You can import data from a CSV file into your Bubble database, and you can export your Bubble data to a CSV file. This makes it easy to migrate data to and from your Bubble app.