Build Your Own Wicked WordPress Themes, the latest release from SitePoint, contains everything you need to know to build stunning themes for the world’s most popular online publishing platform. To give you a taste of what’s inside, we’ve made Chapters 1, 4, and 5 available as a free sample PDF. This article is the second half of chapter 4. In the first half, Raena gave us the arguments for using a theme framework, and surveyed a few of the best frameworks available. Now, we’ll have a look at how to start customizing the Thematic framework. If you want even more, you can buy the whole book directly from SitePoint, as a printed book or digitally (containing PDF, MOBI, and EPUB formats).
To start with, we will assume that you have already grabbed a copy of WordPress to use for theme development and testing. We’ll also assume that you’ve populated your development blog with some dummy content.
It’s important to road test your theme with a good variety of content. Of course, if you have your own WordPress blog, you could export your blog’s content as a WordPress export file (from > ), and import it into your dev blog (by navigating to > , and then clicking on the link). Another option is to create that test content by hand, ensuring that you’ve included lots of different content: large and small images, ordered and unordered lists, blockquotes, paginated posts, and the like.
But the fastest way of all is to grab some dummy content and import it. A good way to do so is with WordPress’s very own theme unit testing file, which you can grab from the Codex—it’ll fill your blog with posts of all shapes and sizes, pages, tags, categories, and even some attachments. You could also try the WP Dummy Content plugin, which can add and remove zillions of posts with a few easy button presses.
Grab a copy of Thematic from its download page, or use the theme browser in your WordPress installation, and install it in your WordPress wp-content/themes directory. Feel free to go ahead and activate it as your theme right now—it’s a great opportunity to see how a default Thematic theme looks and works.
View the source of your blog’s home page, and you’ll see what makes Thematic’s markup great: it’s stuffed with useful class names, ids, microformats, and more. Here’s the body element of my test blog:
<body class="wordpress y2010 m05 d01 h14 home blog not-singular loggedin mac firefox ff3">
And here’s one for the div element that surrounds the first post on the page:
<div id="post-86" class="hentry p1 post publish author-raena category-uncategorized untagged comments-open pings-open y2008 m04 d01 h11 alt slug-test-post">
Hey, we did warn you that it was stuffed! I bet you’re wondering what all these classes are for, and I’m glad you asked. What makes Thematic’s HTML output so useful for themers is that there’s usually a class for any purpose you can think of, and that means you can achieve a lot of cool effects without the need to modify the templates in any way. Imagine you wanted to decorate your post headers with a little heart every time you used the tag “love.” Well, that’s easy, because Thematic creates a class for every tag and puts it on the post’s div.
For our sample post above we had an untagged class because the post had no tags attached to it, but for posts that have tags you’ll see classes that look like tag-tagname. So we’re looking to target posts with class tag-love:
.post .tag-love .entry-title { background: url(heart.gif) center left no-repeat}
Do you need the first post on your home page to have bigger text? Easy! Thematic gives every post a post number class, and there’s a home class on the body tag when you’re viewing the home page. So we want to do this:
body.home .p1 { font-size: 1.5em }
Should the header be taller on a specific page? Thematic shows you a class for every post or page’s ID, so it’s a cinch:
body.pageid-14 #header { height: 500px; }
Suffering from a terrible case of the IE6 blues? Put away those dodgy hacks; Thematic’s browser, version, and platform classes have you covered:
body.ie6 #branding { /* do IE 6 specific stuff here */}
Take some time to look through Thematic’s markup and learn about some of the useful classes it provides. Chances are that Thematic’s dynamic ids and classes will allow you make some very specific style changes without the need to hack away at the markup.
At this point, it’s also worth looking inside the thematic directory to see what makes it tick. Let’s check it out: we see a number of PHP template files, some directories, a readme file, and, of course, the CSS for this theme. Most of the filenames should be fairly self-explanatory: the header.php file looks after header logic, post.php relates to how posts are displayed, and so forth. Inside the library folder, you’ll find a collection of handy helpers—more CSS, JavaScript, and PHP files—that Thematic uses to work some of its magic. We’ll find these useful later on, but if you’re the curious type, feel free to poke around and see some of the code that drives this theme.
And hey, what’s that at the bottom there? Thematic has even provided its own sample child theme to start us off on the right foot, conveniently called thematicsamplechildtheme. Inside it, there’s a style.css file, a functions.php file, and a handy readme, inviting us to kick-start our child theme with these files. I think we’ll do just that!
Copy the thematicsamplechildtheme directory back up to the wp-content/themes directory, and give it a new name. I plan to call my new child theme “Wicked,” so I’ve named this folder appropriately: wicked.
Next, we’ll need to make some changes to the theme information, which is all stored within the theme’s style.css file. Open it up in your favorite text editor, and take a look at what’s there:
Example 1. chapter_04/v1/wicked/style.css (excerpt)
/* Theme Name: A Thematic Child ThemeTheme URI: Description: Use this theme to start your Thematic Child Theme development.Author: Ian StewartAuthor URI: http://themeshaper.com/Template: thematicVersion: 1.0Tags: Thematic.Thematic is © Ian Stewart http://themeshaper.com/.*/⋮
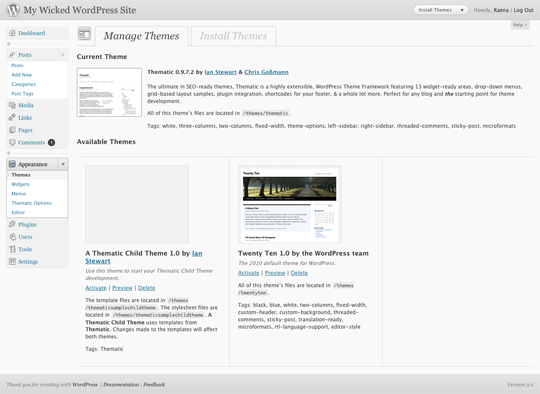
What’s happening here? Well, that big comment block at the very beginning of the file performs a very important job: it defines the theme’s title, author, URI, description, tags, and version number. This information appears alongside each theme in your WordPress installation’s > panel, shown in Figure 1, “The Manage Themes panel in WordPress 3, showing Twenty Ten and Thematic”.
There are two items which are absent from the Manage Themes panel, however. The line beginning with Template: tells WordPress that Thematic is our parent theme, so it should use the templates from Thematic by default. The other line with the copyright statement is also excluded from the WordPress admin section; this is a place to put comments, instructions, or even a good knock-knock joke—anything you like.
Let’s personalize this theme’s info now. It’s okay if you’ve yet to decide on a name or a description; we can go back and change this whenever we like, but for now, defining a name at the very least is a good start:
Example 2. chapter_04/v2/wicked/style.css (excerpt)
/* Theme Name: Wicked ThemeTheme URI: http://example.com/themes/wickedDescription: A Thematic child theme that's just for kicks.Author: Raena Jackson ArmitageAuthor URI: http://example.com/themesTemplate: thematicVersion: 0.1Tags: Thematic, three-columns, blue, grey, gray.This theme is © 2010 Raena Jackson Armitage..*/⋮
Line breaks matter to WordPress and these items belong on one line each. If your description is so long that it requires a new paragraph, you might want to think about editing it.
Now that we’ve named our theme, let’s address the Manage Themes panel once more. If you’ve performed each of these steps correctly, you’ll see your theme sitting alongside any other installed themes, with your name, description, and additional information as shown in Figure 2, “Hey, that’s my theme!”.

All seems in order here. Let’s activate our theme and start styling it up!
For now, we’ll start by adjusting the CSS to suit our design a little better. Thematic helpfully provides a bunch of nifty reset styles, prepackaged layouts, typography, and other CSS helpers; if you look further down in the styles.css file, you’ll see that they’ve been imported into our sample child theme. Here’s what the rest of the theme’s style.css looks like:
Example 3. chapter_04/v2/wicked/style.css (excerpt)
⋮/* Reset browser defaults */@import url('../thematic/library/styles/reset.css');/* Apply basic typography styles */@import url('../thematic/library/styles/typography.css');/* Apply a basic layout */@import url('../thematic/library/layouts/2c-r-fixed.css');/* Apply basic image styles */@import url('../thematic/library/styles/images.css');/* Apply default theme styles and colors *//* It's better to actually copy over default.css into this file(or link to a copy in your child theme) if you're going to doanything outrageous */@import url('../thematic/library/styles/default.css');/* Prepare theme for plugins */@import url('../thematic/library/styles/plugins.css');
The ins and outs of how to work with CSS are beyond the scope of this book—we figure that if you’re interested in WordPress theming, you already have some understanding of how to use CSS. For an introduction to the wild and woolly world of the style sheet, it’s hard to go past Build Your Own Web Site the Right Way using HTML and CSS, 2nd edition (Melbourne: SitePoint, 2008) and the handy online reference text, SitePoint CSS Reference.
While the basic design Thematic provides is … well, nice, it certainly falls short in the glamor stakes. Let’s make some changes to the typography, colors, and layout.
The first change is easy: at the moment this theme places a sidebar on the right, but I’d prefer it on the left. Thematic’s library/layouts folder provides a bunch of layouts we could apply to our theme: two-column left (2c-l-fixed.css) or right (2c-r-fixed.css), three-column with a sidebar on either side of the main content (3c-fixed.css), or three-column with both sidebars right (3c-r-fixed.css and 3c-r-fixed-primary.css, which differ in the order of the sidebars).
Changing the default is as easy as picking out the one we want, and changing the reference to it in our style.css file. In this case, I want 2c-r-fixed.css to move my sidebar onto the left:
Example 4. chapter_04/v3/wicked/style.css (excerpt)
/* Apply a basic layout */@import url('../thematic/library/layouts/2c-l-fixed.css');
Of course, if none of these imported styles suit your ideas, you’re free to remove the @import statements and build your own layout, typography, or default reset style sheets. Remember, you’re in control!
Next, let’s think about color. Did you notice the helpful little comment about default.css in the code example above? It’s reminding us to copy the default.css file to our own theme if we plan to do anything outrageous.
What we’re about to do is hardly outrageous, but the advice to copy the file over is solid: let’s do that now, and change our @import statement to reflect its new location. Copy the default.css file from the thematic directory into your child theme’s directory, then change the @import accordingly. Feel free to change its name; you may want to leave yourself a comment to remind yourself that it’s a copy of the original. For the purposes of my Wicked theme, I’ve renamed the file newstyles.css:
Example 5. chapter_04/v3/wicked/style.css (excerpt)
/* Apply default theme styles and colors -- This is a copy of the Thematic default.css */@import url('newstyles.css');
Thematic is released under the General Public License; if you copy its CSS for use in your child theme your CSS will also be bound by the terms of this license. While this may pose no problem for you (plenty of successful commercial themes are GPL-licensed), if you plan on distributing your theme and would prefer a more restrictive license for your clients, you’ll need to write your own style sheet from scratch.
The file is a big one—too long to reproduce in this book—but here’s an excerpt from it. Take your time and look over it carefully; you’ll see that selectors are grouped according to purpose, and there’s a style for just about any element you think you might use. We’ll start by splashing a bit of paint on the theme’s header; we’re looking for a section helpfully marked =Header. Here’s what we find there:
#header { z-index:2;}#branding { padding:88px 0 44px 0;}#blog-title { font-family:Arial,sans-serif; font-size:34px; font-weight:bold; line-height:40px;}#blog-title a { color:#000; text-decoration:none;}#blog-title a:active,#blog-title a:hover { color: #FF4B33;}#blog-description { color:#666; font-size:13px; font-style:italic;}
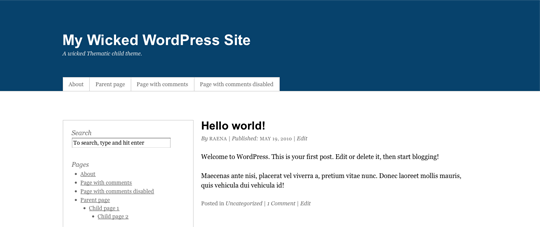
Changing the colors is simple: I’ve chosen a dark blue for the background, and that means the text and link colors also need to change:
Example 6. chapter_04/v3/wicked/newstyles.css (excerpt)
#header { z-index:2; background: #07426c;}⋮#blog-title a { color:#fff; text-decoration:none;}#blog-title a:active,#blog-title a:hover { color: #f47920;}#blog-description { color:#eee; font-size:13px; font-style:italic;}
How’s that looking? Let’s find out: the result is shown in Figure 3, “Looking sharp”.
As I add and adjust more styles, my theme begins to take shape. We’ll omit all the gory details from this book, but if you’re curious to see what I came up with, feel free to dive into the code archive [1]and examine my CSS.
Seems reasonably straightforward, right? It’s simply a matter of examining the theme’s markup, and finding a way to bring your design to life with your sharp CSS skills. With some keen CSS, and a few hours’ poking, prodding, and refreshing, you should have a sharp-looking template. You can see what I achieved in Figure 4, “Wicked!” using only CSS changes. You can poke through the styles I used in the v4 folder in the code archive for this chapter.[2]

Many themers will find that simply modifying the CSS is all it takes to create a nifty, original child theme. But what if you want to spread your wings a little further? In the next chapter, we’ll explore how to add more functionality to a theme.
For more on how to build stunning themes using the Thematic framework, download the free sample PDF of Build Your Own Wicked WordPress Themes. The sample contains Chapter 4 in its entirety, from which this article was drawn, as well as Chapter 5, which goes into more depth about harnessing the power of the Thematic framework. You can buy the whole book directly from SitePoint, either in the print form or as a digital pack (containing PDF, MOBI, and EPUB formats).
[1] Grab the archive from https://www.sitepoint.com/premium/library
[2] The header image is licensed under Creative Commons by Flickr user Seo2.
 Raena Jackson Armitage
Raena Jackson Armitage is an Australian web developer with a background in content management, public speaking, and training. When she is not thinking about the Web, she loves knitting, gaming, all-day breakfasts, and cycling.