


Key Takeaways
- Facebook’s Account Kit Tool can be used to authenticate Android users using their phone number or email, providing a simpler and faster login or signup process without the need for a password.
- To use Account Kit, the Android project must be added to Facebook’s Developers console to obtain an APP ID. This ID, along with the Account Kit Client Token, is then added to the strings.xml file, while the AndroidManifest.xml file is updated with the required permissions, activities, and meta data.
- The Account Kit activity returns an Account Kit Account with an AccessToken, which can be used to get the user’s email or phone number, or both. The getCurrentAccount() method can be used to check whether a user is already logged in using Account Kit, while the logout method clears any saved access token.
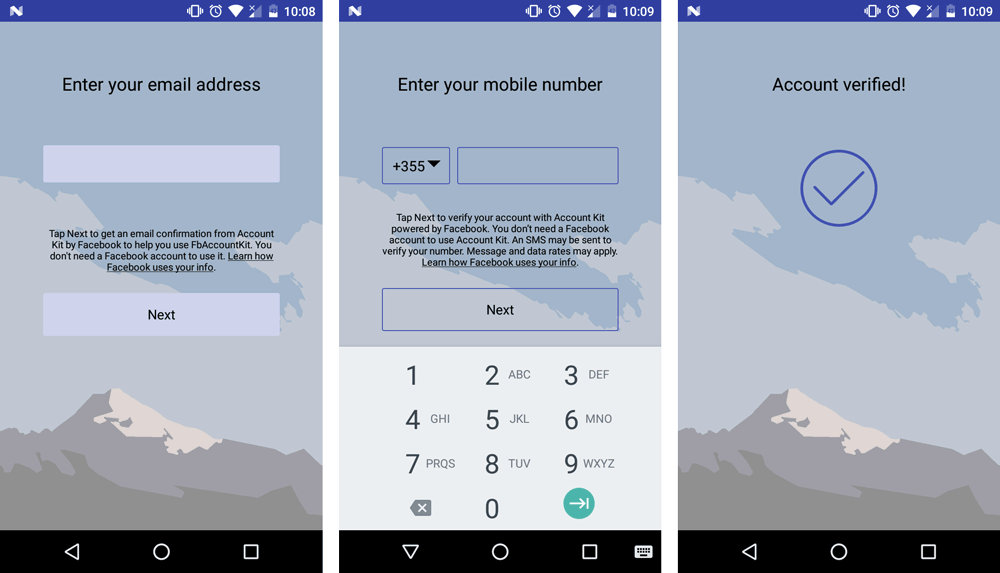
In this tutorial I will show how to use Facebook’s Account Kit Tool to allow users to log in or sign up using their phone number or email. You can find the completed project on Github.
After creating your project, please make sure that you add your Application to the Facebook’s Developers console and obtain your APP ID.
Once your Android Studio project has been set up, go to your Project/build.gradle and add mavenCentral() inside the repositories{ }
Also open your app/build.gradle file and add the Account Kit dependency:
compile 'com.facebook.android:account-kit-sdk:4.20.0'
Android Manifest file and Strings
Inside the strings.xml file, add the following IDs:
    <string name="facebook_app_id">YOUR_FACEBOOK_APP_ID</string>
    <string name="ACCOUNT_KIT_CLIENT_TOKEN">YOUR_ACCOUNT_KIT_CLIENT_TOKEN</string>
    <string name="ak_login_protocol_scheme">akYOUR_FACEBOOK_APP_ID</string>
Next, we need to declare the required permissions, activities and meta datas inside the AndroidManifest.xml:
Since this application needs the Internet to perform the Phone or Email login, make sure you add the INTERNET permission on top of the Manifest file.
<uses-permission android:name="android.permission.INTERNET"/>
To properly configure our application and connect with the Facebook dashboard, we need to add the following meta data:
<meta-data android:name="com.facebook.accountkit.ApplicationName"
            android:value="@string/app_name" />
<meta-data android:name="com.facebook.sdk.ApplicationId"
    android:value="@string/facebook_app_id" />
<meta-data android:name="com.facebook.accountkit.ClientToken"
    android:value="@string/ACCOUNT_KIT_CLIENT_TOKEN" />
<meta-data android:name="com.facebook.accountkit.FacebookAppEventsEnabled"
    android:value="false"/>
Inside the <application> tags, we need to declare the Email Redirect Activity.
<activity
    android:name="com.facebook.accountkit.ui.AccountKitEmailRedirectActivity">
            <intent-filter>
                <action android:name="android.intent.action.VIEW" />
                <category android:name="android.intent.category.DEFAULT" />
                <category android:name="android.intent.category.BROWSABLE" />
                <data android:scheme="@string/ak_login_protocol_scheme" />
            </intent-filter>
 </activity>
This activity, detects when you click on an Account Kit kind of link or URL placed inside the Email body and launches the Application. That occurs when the user has confirmed the received email about Email logging in using Account Kit.
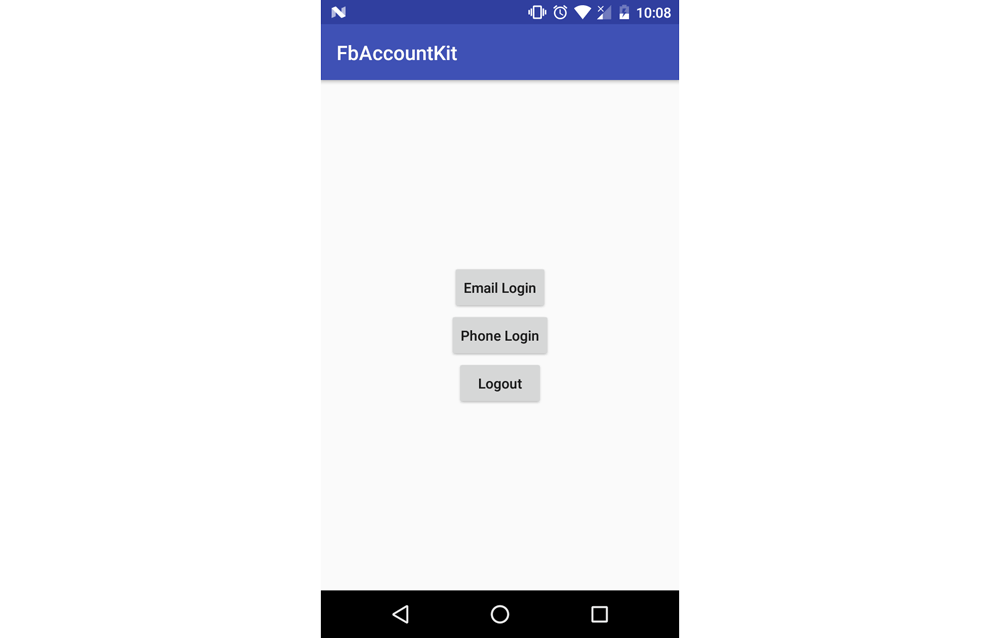
In this tutorial we are going to use a very simple layout. It contains only three buttons, and you can find its code below:
<?xml version="1.0" encoding="utf-8"?>
<LinearLayout
    xmlns:android="http://schemas.android.com/apk/res/android"
    xmlns:tools="http://schemas.android.com/tools"
    android:layout_width="match_parent"
    android:layout_height="match_parent"
    android:orientation="vertical"
    android:gravity="center"
    tools:context="com.example.theodhor.fbaccountkit.MainActivity">

    <Button
        android:layout_width="wrap_content"
        android:layout_height="wrap_content"
        android:onClick="emailLogin"
        android:text="Email Login"
        android:textAllCaps="false"/>

    <Button
        android:layout_width="wrap_content"
        android:layout_height="wrap_content"
        android:text="Phone Login"
        android:textAllCaps="false"
        android:onClick="phoneLogin"/>

    <Button
        android:layout_width="wrap_content"
        android:layout_height="wrap_content"
        android:text="Logout"
        android:textAllCaps="false"
        android:onClick="logout"/>

</LinearLayout>
Each one of the first two buttons will open a new view, Phone number login type or Email, depending on the case. The third button clears the stored sessions.
Login with email or phone
To begin with, we will declare two global variables as below:
public static int APP_REQUEST_CODE = 99;
public static final String TAG = "MainActivity";
Each one of the buttons declared inside the xml has a function as a parameter of the onClick attribute.
So we need a public void emailLogin(View view) method inside our activity.
public void emailLogin(@Nullable View view) {
    final Intent intent = new Intent(this, AccountKitActivity.class);
    AccountKitConfiguration.AccountKitConfigurationBuilder configurationBuilder = new AccountKitConfiguration.AccountKitConfigurationBuilder(
            LoginType.EMAIL,AccountKitActivity.ResponseType.TOKEN); // or .ResponseType.CODE
    UIManager uiManager = new SkinManager(
            LoginType.EMAIL,
            SkinManager.Skin.CLASSIC,
            (Build.VERSION.SDK_INT >= Build.VERSION_CODES.M ? getResources().getColor(R.color.colorPrimary,null):getResources().getColor(R.color.colorPrimary)),
            R.drawable.background,
            SkinManager.Tint.BLACK,
            0.55
    );
    configurationBuilder.setUIManager(uiManager);
    intent.putExtra(AccountKitActivity.ACCOUNT_KIT_ACTIVITY_CONFIGURATION,configurationBuilder.build());
    startActivityForResult(intent, APP_REQUEST_CODE);
}
This method will open the Email Login view. The @Nullable annotation allows us to call the same method even with a null parameter.
Its UI will be determined by the UIManager object. Using this object, you can customize its skin type, primary color, background image, tint color and tint intensity.
To start the Phone Login type activity, just set the LoginType.EMAIL to LoginType.PHONE
After the Account Kit activity has finished, it will return an AccountKit Account with a AccessToken at the same time. To get this account and access token, we need to Override the onActivityResult method. Its code is below:
@Override
    protected void onActivityResult(final int requestCode,final int resultCode,final Intent data) {
        super.onActivityResult(requestCode, resultCode, data);
        if (requestCode == APP_REQUEST_CODE && resultCode == RESULT_OK) {
            getCurrentAccount();
        }
    }
The getCurrentAccount(); method:
private void getCurrentAccount(){
        AccessToken accessToken = AccountKit.getCurrentAccessToken();
        if (accessToken != null) {
            //Handle Returning User
            AccountKit.getCurrentAccount(new AccountKitCallback<Account>() {
                @Override
                public void onSuccess(final Account account) {
                    // Get Account Kit ID
                    String accountKitId = account.getId();
                    Log.e("Account Kit Id", accountKitId);

                    if(account.getPhoneNumber()!=null) {
                        Log.e("CountryCode", "" + account.getPhoneNumber().getCountryCode());
                        Log.e("PhoneNumber", "" + account.getPhoneNumber().getPhoneNumber());

                        // Get phone number
                        PhoneNumber phoneNumber = account.getPhoneNumber();
                        String phoneNumberString = phoneNumber.toString();
                        Log.e("NumberString", phoneNumberString);
                    }

                    if(account.getEmail()!=null)
                        Log.e("Email",account.getEmail());
                }

                @Override
                public void onError(final AccountKitError error) {
                    // Handle Error
                    Log.e(TAG,error.toString());
                }
            });
        } else {
            //Handle new or logged out user
            Log.e(TAG,"Logged Out");
        }
    }
If the result from AccountKit Activity is okay, then we will have an AccessToken and an AccountKit Account. Depending on the login type we can get the user’s email or phone, or even both. No matter which login type is being used, the result is obtained in the same way.
To check if the user is already logged in using AccountKit, you can place getCurrentAccount() inside the onCreate() method too and it will check if there exists a AccountKit AccessToken.
The third button, will log out the current user and clear any saved access token. Its code is as below:
public void logout(@Nullable View view){
        AccountKit.logOut();
        AccessToken accessToken = AccountKit.getCurrentAccessToken();
        if(accessToken!=null)
            Log.e(TAG,"Still Logged in...");
        else
            Toast.makeText(this,"Logged Out",Toast.LENGTH_SHORT).show();
    }
These are the most important methods to keep in mind while using the Facebook Acccount Kit as an alternative login method.
Conclusion
Facebook Account Kit is a really handy tool for a simpler, faster and passwordless application login or signup. It is one of the most reliable services of its kind. Hope you enjoyed the article.
If you have any questions or comments, please let me know in the comments field below.
Frequently Asked Questions (FAQs) on Authenticating Android Users Using Phone or Email
How can I authenticate Android users using their phone numbers?
Authenticating Android users using their phone numbers involves using Firebase Authentication. Firebase Authentication provides backend services that help authenticate users by verifying their phone numbers. The process involves sending a verification code to the user’s phone number. The user then enters this code in your app, and Firebase verifies it. If the code is correct, the user is authenticated. This method is secure and user-friendly, as it does not require the user to remember any passwords.
Can I authenticate Android users using their email addresses?
Yes, you can authenticate Android users using their email addresses. This is done using Firebase Authentication, which provides backend services for authenticating users. The process involves the user entering their email address and password. Firebase then verifies these credentials. If they are correct, the user is authenticated. This method is secure and allows users to authenticate using credentials they are already familiar with.
Is it possible to authenticate users without them having to enter a password?
Yes, it is possible to authenticate users without them having to enter a password. This can be done using Firebase Authentication’s Email Link sign-in method. With this method, users receive an email with a link. When they click on this link, they are automatically signed in to your app. This method is secure and user-friendly, as it does not require users to remember any passwords.
How secure is Firebase Authentication?
Firebase Authentication is very secure. It uses industry-standard security technologies and practices to protect user data. These include secure transmission of data over SSL, hashing of passwords, and token-based authentication. Furthermore, Firebase Authentication is built on Google’s secure infrastructure, which provides additional layers of security.
Can I use Firebase Authentication to authenticate users on other platforms, not just Android?
Yes, Firebase Authentication supports multiple platforms, including iOS, web, and Unity. This means you can use it to authenticate users on these platforms using the same methods as on Android, such as phone number verification, email and password sign-in, and email link sign-in.
What happens if a user forgets their password?
If a user forgets their password, Firebase Authentication provides a password reset feature. This involves the user entering their email address, and Firebase sending them an email with a link to reset their password. The user can then enter a new password, which Firebase verifies and updates in its system.
Can I customize the user experience with Firebase Authentication?
Yes, Firebase Authentication is highly customizable. You can customize the user interface, the authentication methods available to users, and the user flow. This allows you to create a user experience that fits your app’s brand and meets your users’ needs.
How can I monitor user authentication in my app?
Firebase Authentication provides a dashboard where you can monitor user authentication in your app. This includes information such as the number of users, the authentication methods they used, and the date and time of their last sign-in. This data can help you understand your users better and make informed decisions about your app.
Can I integrate Firebase Authentication with other Firebase services?
Yes, Firebase Authentication integrates seamlessly with other Firebase services, such as Firestore, Firebase Storage, and Firebase Cloud Messaging. This allows you to build comprehensive app features that include user authentication, data storage, and push notifications.
Is Firebase Authentication free to use?
Firebase Authentication is free to use for basic usage. However, for advanced features and larger usage volumes, there are paid plans available. These plans provide additional benefits such as priority support, SLA guarantees, and increased usage limits.